Recently, Lao Zuo played with SSL certificates, including the Namecheap paid SSL certificate purchased for less than $1 a year on Black Friday, and the Let's Encrypt free SSL certificate recommended by many businesses and netizens. For ordinary website users or blog users, it doesn't really matter what encryption level certificate to install. The most important thing is The URL header is a small green lock, which makes it feel high-end and grand.
In view of the third-party support of Let's Encrypt and the enthusiasm of many netizens, Lao Zuo used it the day before yesterday SSL For Free Tool The certificate package can be generated by one click. The method of installing to the VPS server has been shared before( ad locum )In order to experience the methods of different environments, Lao Zuo also separately set up an environment in the virtual host environment of the cPanel panel used by many of our friends and installed the free SSL certificate generated the day before yesterday to the website.
Step 1. Prepare to install the SSL certificate to the cPanel
We need to add the website to the cPanel before we are ready to install the website to access the HTTPS URL encryption certificate, so that HTTP can be accessed. This is not a basic thing to teach here. Secondly, we need to obtain the certificate package through the above SSL For Free method, which contains three files, ca_bundle.crt, certificate.crt, and private.key, which we need to prepare for later use.
This is not to play with the Let's Encrypt free certificate. Lao Zuo also specially registered the letsencrypt.cc domain name, which will be implemented in the end https://www.letsencrypt.cc Such website access forms need to jump to HTTPS addresses in all forms. Now that the preparations are ready, let's start together.
Step 2: Log in to the cPanel to set the certificate file to be added
1. Log in to SSL/TLS Manager
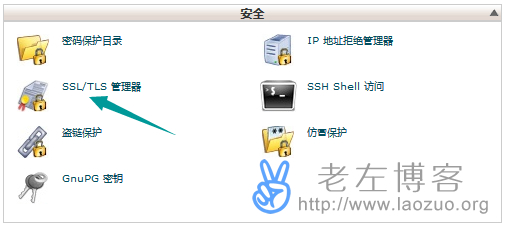
Log in to the CP panel, as shown in the figure above, and find the SSL/TLS manager.
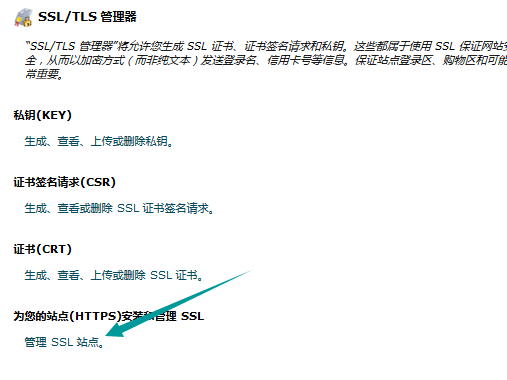
There are many options above. Click the Manage SSL Site option directly here.
2. Add Certificate File
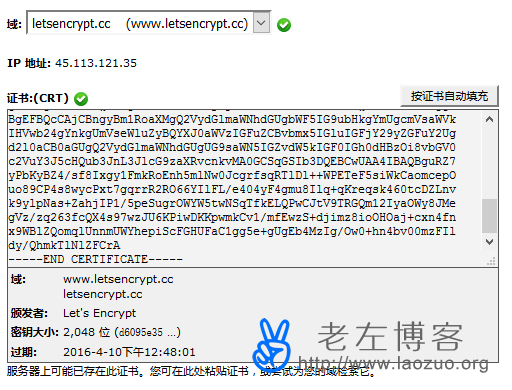
Here we need to select the site that has been in the CP panel, that is, the domain name that we have prepared and downloaded to the certificate, and then copy the script of the certificate.crt file in it, and then we will see the corresponding domain name options.
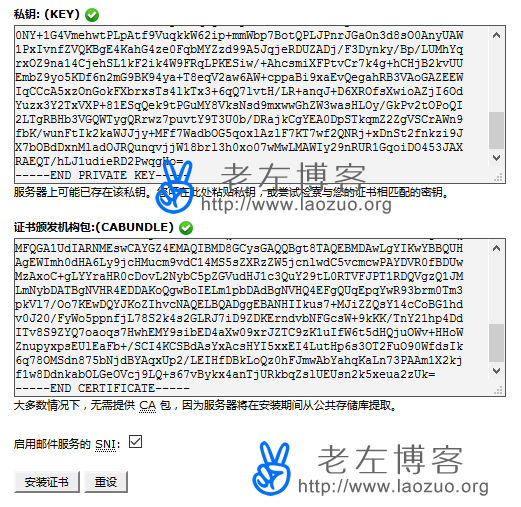
Then copy the private.key and ca_bundle.crt files into the corresponding text box. Click Install Certificate to see the following figure.

When you see this interface, it means that we have finished deploying SSL certificates in the cpanel panel. After clicking OK, we can actually use the HTTPS address to visit our website.
Step 3: Force HTTPS to skip to the site
One is to unify the user access portal, and the other is to standardize the website. Therefore, it is necessary to unify the current format of both HTTP access and HTTPS access to the website. Lao Zuo needs to redirect all HTTP access addresses to HTTPS addresses.
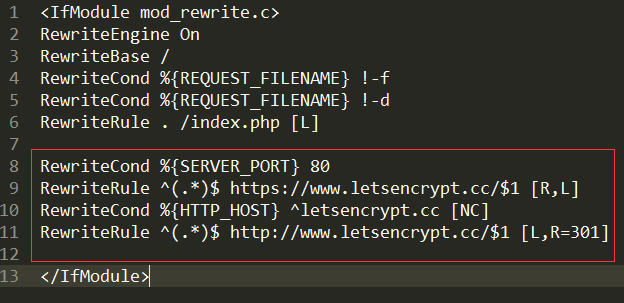
Because Laozuo's site uses the ZBLOG PHP program, add the four lines shown in the above figure directly to the. htaccess file in the root directory. Whether it is HTTP or without WWW, it will jump to the HTTPS WWW form.
RewriteCond %{SERVER_PORT} 80
RewriteRule ^(.*)$ https://www.letsencrypt.cc/ $1 [R,L] RewriteCond %{HTTP_HOST} ^letsencrypt.cc [NC] RewriteRule ^(.*)$ http://www.letsencrypt.cc/ $1 [L,R=301]
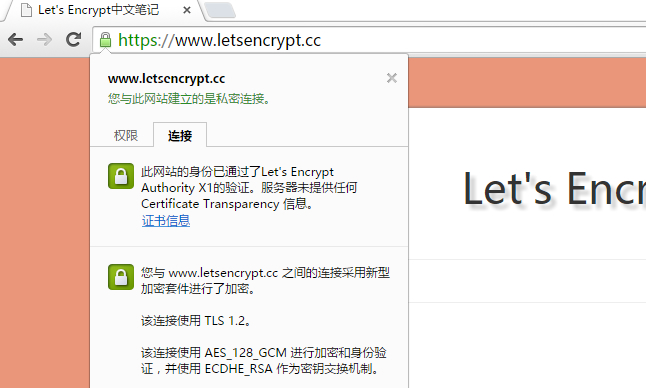
Let's open the website with a browser to see if there is a small green lock.
Fourth, use SSL tools to check effectiveness and summary
Online inspection tools: https://www.ssllabs.com/
No matter which certificate we use to configure SSL, we can use the online tool above to check whether it is successful.
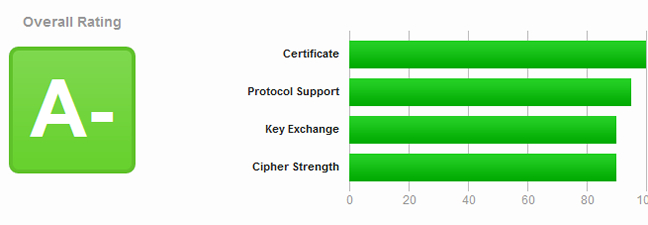
After the detection, it was pretty good. So far, Lao Zuo used the free Let's Encrypt SSL certificate to generate and install it to the site. The process is relatively simple. If we also use the CP panel virtual host to build sites that need to install SSL certificates, we can refer to the above methods.