For various reasons, many of our users may need to build their own DNS servers in various ways. Lao Zuo is lucky to have access to the free and open source PowerDNS system, which can help us build free DNS servers on Windows and Linux. The public's introduction to PowerDNS is like this. Lao Zuo copied the original saying "PowerDNS is a cross platform open source DNS service component, and PowerDNS has both Windows and Linux/Unix versions. PowerDNS can use the mdb file of Access to record DNS information under Windows, and then use MySQL to record DNS information under Linux/Unix. "
The introduction and installation methods were originally seen in foreign blogs, but the information may be out of date, or the old Zuo is not skilled enough to ponder for two days before the complete construction was successful. Then he reinstalled VPS and completed the writing of this article. At least I can guarantee that this PowerDNS building process is carried out under my own successful rehearsal. This article is based on Centos 6 32-bit. The record is as follows.
First, install the MYSQL service components
Because PowerDNS needs to use the MYSQL database to store data, the MYSQL database environment needs to be built.
Yum - y install mysql mysql server # Install MYSQL
Chkconfig -- levels 235 mysqld on # Set startup
/etc/init.d/mysqld start
Modify root user's mysql password
mysqladmin -u root passwordmyrootpassword
Second, install PowerDNS
yum install wget
wget https://soft.laozuo.org/powerdns/epel-release-6-8.noarch.rpm
rpm -Uvh ./epel-release-6-8.noarch.rpm
yum install pdns pdns-backend-mysql
Connect MYSQL and create a database
mysql -u root -p
After connecting, enter the password we set above to log in to MYSQL, and then start creating databases and users
create database powerdns; #Create Database
#Create the database user power_user, and set www.laozuo.org as the password. When we set it, we change it to our own password
grant all onpowerdns.* to'power_user'@'localhost' identified by'www.laozuo.org';
flush privileges;
#Create Data Table
use powerdns;
create table domains (
id int auto_increment,
name varchar(255) not null,
master varchar(128) default null,
last_check int default null,
type varchar(6) not null,
notified_serial int default null,
account varchar(40) default null,
primary key (id));
create unique index name_index on domains(name);
create table records (
id int auto_increment,
domain_id int default null,
name varchar(255) default null,
type varchar(6) default null,
content varchar(255) default null,
ttl int default null,
prio int default null,
change_date int default null,
primary key(id));
create index rec_name_index on records(name);
create index nametype_index on records(name,type);
create index domain_id on records(domain_id);
create table supermasters (
ip varchar(25) not null,
nameserver varchar(255) not null,
account varchar(40) default null);
#Exit the current MYSQL management
quit;
Third, edit the vi/etc/pdns/pdns.conf configuration file
launch=gmysql
gmysql-host=127.0.0.1
gmysql-user=power_user
gmysql-password=www.laozuo.org
gmysql-dbname=powerdns
At the end of adding the above to pdns.conf, pay attention to modifying the database user name and password as set above.

Set PowerDNS to start automatically after power on
chkconfig --levels 235 pdns on
/etc/init.d/pdns start
So far, we have installed POWERDNS. We need to install the WEB management interface later.
Fourth, install PowerAdmin management platform
A - Install the PHP environment
yum -y install httpd php php-devel php-gd php-imap php-ldap php-mysql php-odbc php-pear php-xml php-xmlrpc php-mbstring php-mcrypt php-mhash gettext
Set startup and start apache
chkconfig --levels 235 httpd on
/etc/init.d/httpd start
B - 2 support components required for the installation environment
yum install php-pear-DB php-pear-MDB2-Driver-mysql
C - Install PowerAdmin
Both A and B above complete the environment that PowerAdmin needs to support. Here we install the latest poweradmin-2.1.7 package
cd /tmp
wgethttps://soft.laozuo.org/powerdns/poweradmin-2.1.7.tgz
tar zxvfpoweradmin-2.1.7
mv poweradmin-2.1.7 /var/www/html/poweradmin
touch /var/www/html/poweradmin/inc/config.inc.php
chown -R apache:apache /var/www/html/poweradmin/
We lead the temporary folder tmp to download and unzip the latest version poweradmin-2.1.7, and then move it to the VAR/WWW/HTML directory.
After that, we can use our VPS IP address/poweradmin/install/to open the POWERDNS installation wizard.
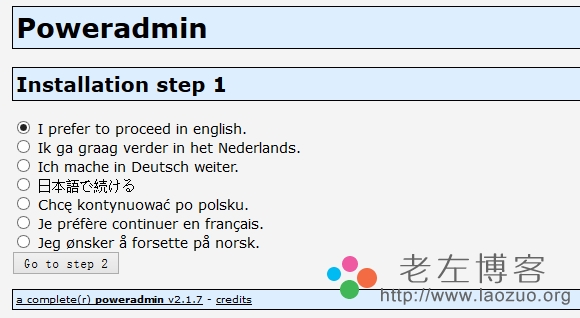
Fifth, install PowerAdmin wizard
Here we look at the figure above and select the first English language. Later, we can select CHINESE when setting account login.
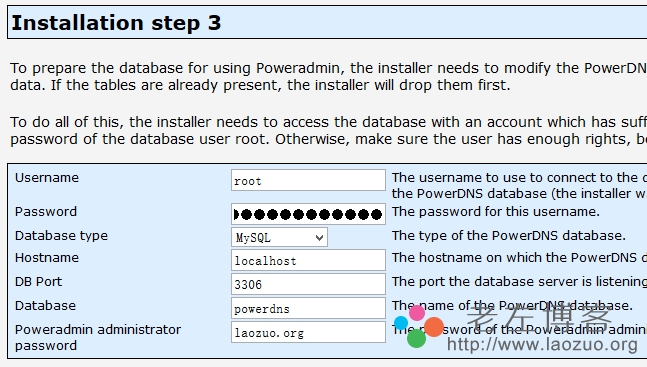
The database information and Poweradmin panel password are entered here.
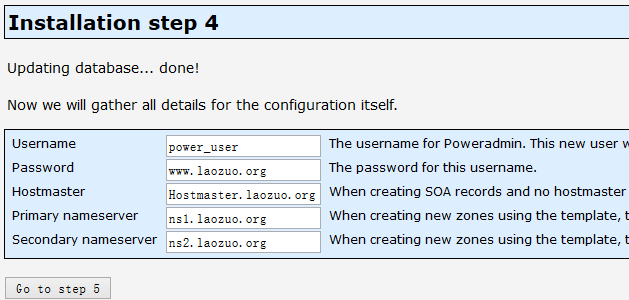
Set database user information and DNS domain name server information.
Then it is determined that until the end, you need to delete the install/directory file, and then log in to the POWERDNS panel at the ip address/poweradmin/.
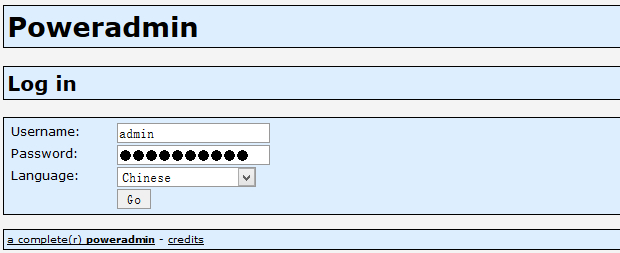
The panel management user name is admin, and the password is the one we set before. You can select the CHINESE Chinese panel.

So far, we have seen that all PowerDNS has been installed and the management interface can be logged in. Because it is a demonstration operation, I use the root information of the database here. If we need a separate user information when we actually set up the database, we can ensure the security of the account. For how to use it, if you have time to write a supplementary application method in the future, your friends who usually use it should be able to figure it out by themselves.