Let's Encrypt merchants can really bring users a lot of benefits after they support the universal domain name SSL certificate. The most important thing is that it is free, and most software vendors still support it well. Compared with the previous single domain name, it is really troublesome. For multiple secondary domain names, it is troublesome to reapply for management separately. Now we can apply for a universal domain name certificate directly without such trouble.
Lao Zuo is in front“ Let's Encrypt Universal Domain Name SSL Certificate Application Cooperate with DNSPOD API to quickly obtain "The article introduces that if the DNSPOD resolution used by the domain name can quickly apply for the universal domain name SSL certificate. Some users mentioned how to quickly apply for other DNS. This left will share it later. It's really troublesome to write a tutorial every time.
In this article, what we need to share is how to install the Let's Encrypt SSL universal domain name certificate to the website after we apply for it. Today, we will test the way to install the certificate on the Nginx Web environment website. It is slightly similar to our common files, but different from individual files.
Attention: According to the official document installation requirements, the generated certificate file cannot be directly referenced. The best way is to use installcert to copy to the required location. Specific reference: https://github.com/Neilpang/acme.sh#3 -install-the-issued-cert-to-apachenginx-etc, And the method of posting in the message office. I'll sort it out later.
First, find our certificate file
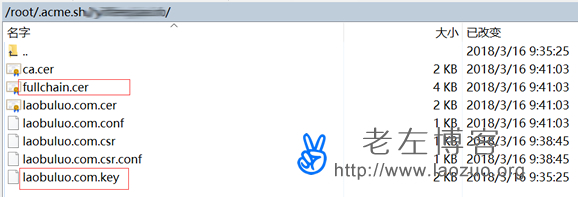
The certificate file is in the "/root/. acme. sh/" for the website domain name directory. It is recommended that we do not copy the certificate and store it separately, because the installation certificate script has the automatic renewal function, so the automatic renewal is not allowed after copying. Here we need to pay attention to two files: fullchain. cer and laobuluo. com. key (this should be your own domain name).
Second, modify and add scripts
/usr/local/nginx/conf/vhost/
This depends on which WEB environment we install. For example, the installed LNMP can see the site in the directory above CONF configuration file, and then add the script.
listen 443 ssl http2;
ssl_certificate /root/.acme.sh/laobuluo.com/fullchain.cer ;
ssl_certificate_key /root/.acme.sh/laobuluo.com/laobuluo.com.key ;
ssl_protocols TLSv1 TLSv1.1 TLSv1.2;
ssl_ciphers EECDH+CHACHA20:EECDH+AES128:RSA+AES128:EECDH+AES256:RSA+AES256:EECDH+3DES:RSA+3DES:! MD5;
ssl_prefer_server_ciphers on;
ssl_session_timeout 10m;
ssl_session_cache builtin:1000 shared:SSL:10m;
ssl_buffer_size 1400;
add_header Strict-Transport-Security max-age=15768000;
ssl_stapling on;
ssl_stapling_verify on;
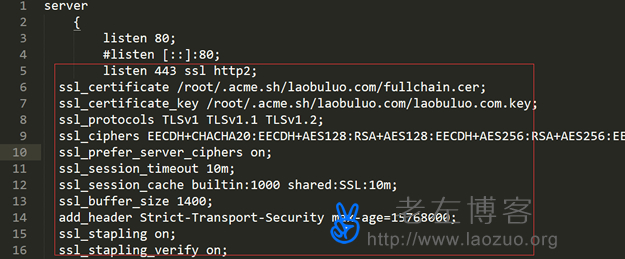
You need to pay attention to modifying the path and file name of the two files of your certificate. Different from our previous work, the ssl_certificate file is fullchain.cer, which used to be prefixed with the domain name.
Third, jump and follow-up questions
Here, Lao Zuo just introduces the installation of certificates. If we need to force a jump, we can add 301 jump. Finally, we can restart NGINX to take effect.