Using multiple channels to send notifications in Laravel

brief introduction
Create Notification
php artisan make:notification InvoicePaid
<? php namespace App\Notifications; use Illuminate\Bus\Queueable; use Illuminate\Notifications\Notification; use Illuminate\Contracts\Queue\ShouldQueue; use Illuminate\Notifications\Messages\MailMessage; class InvoicePaid extends Notification { use Queueable; /** * Create a new notification instance. * * @return void */ public function __construct() { // } /** * Get the notification's delivery channels. * * @param mixed $notifiable * @return array */ public function via($notifiable) { return ['mail']; } /** * Get the mail representation of the notification. * * @param mixed $notifiable * @return \Illuminate\Notifications\Messages\MailMessage */ public function toMail($notifiable) { return (new MailMessage) ->line('The introduction to the notification.') ->action('Notification Action', url('/')) ->line('Thank you for using our application!'); } /** * Get the array representation of the notification. * * @param mixed $notifiable * @return array */ public function toArray($notifiable) { return [ // ]; } } Send notification
Using the Notifiable Train
<? php namespace App; use Illuminate\Notifications\Notifiable; use Illuminate\Foundation\Auth\User as Authenticatable; class User extends Authenticatable { use Notifiable; }
use App\Notifications\InvoicePaid; $user->notify(new InvoicePaid($invoice)); Note: You can use it in any model Illuminate\Notifications\Notifiable Trait, not limited to User Used in the model.
Use Notification Facade
Notification::send($users, new InvoicePaid($invoice)); Specify transmission channel
Note: If you want to use other transmission channels, such as Telegram or Pusher, refer to the drivers provided by the community: Larravel Notification Channel Website 。
/** *Get the delivery channel of the notice * * @param mixed $notifiable * @return array * @translator laravelacademy.org */ public function via($notifiable) { return $notifiable->prefers_sms ? ['nexmo'] : ['mail', 'database']; } Notification Queue
Note: Before using the notification queue, you need to configure the queue and Open a queue task 。
<? php namespace App\Notifications; use Illuminate\Bus\Queueable; use Illuminate\Notifications\Notification; use Illuminate\Contracts\Queue\ShouldQueue; class InvoicePaid extends Notification implements ShouldQueue { use Queueable; // ... }
$user->notify(new InvoicePaid($invoice));
$when = Carbon::now()->addMinutes(10); $user->notify((new InvoicePaid($invoice))->delay($when)); On demand notification
Notification::route('mail', ' taylor@laravel.com ') ->route('nexmo', '5555555555') ->notify(new InvoicePaid($invoice)); Email notification
Format Mail Message
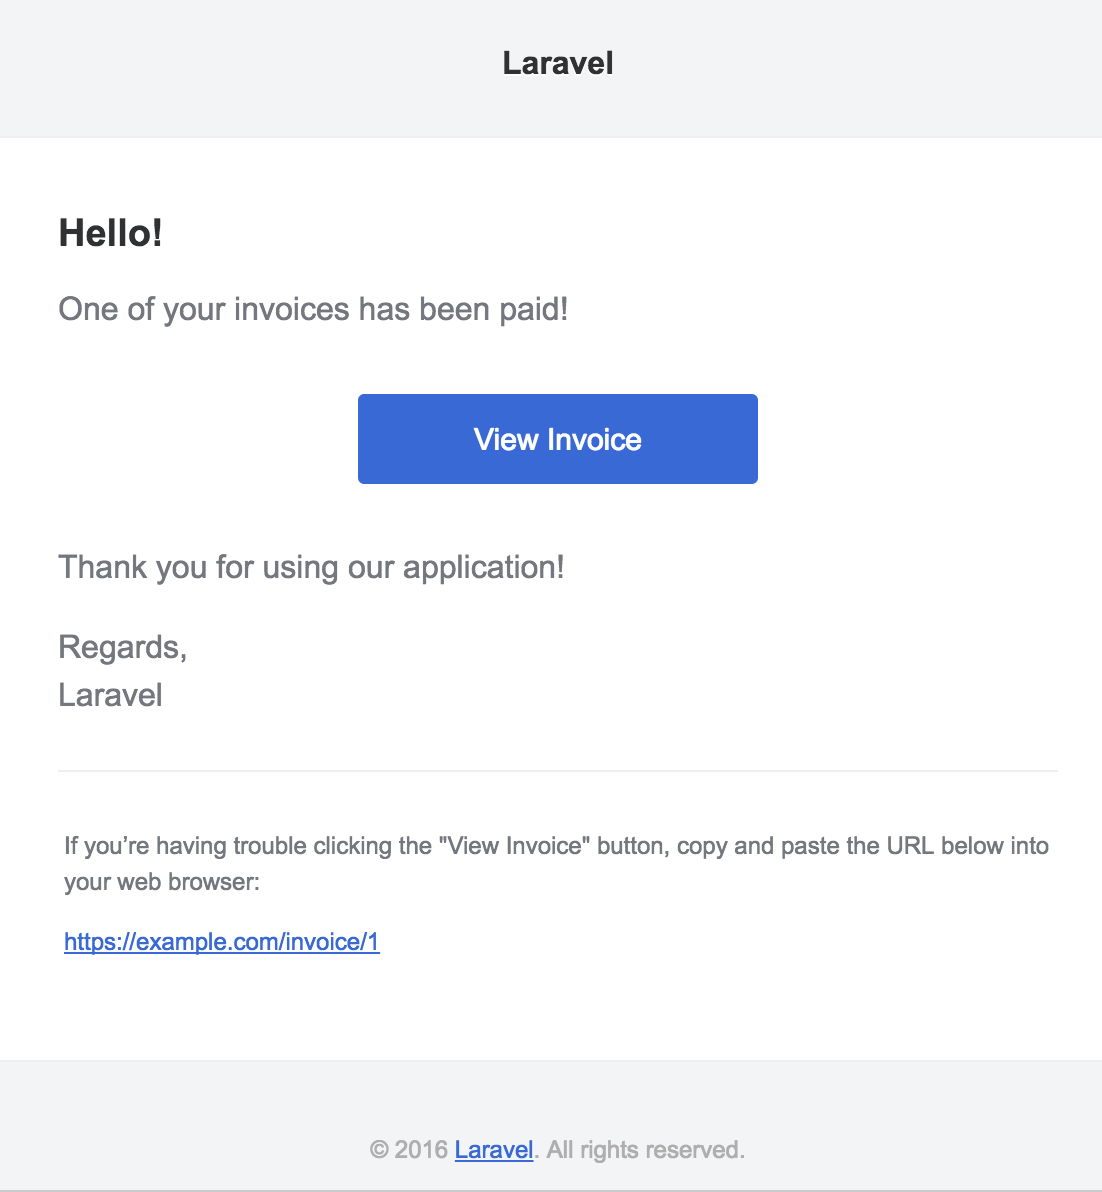
/** *Get the email corresponding to the notification * * @param mixed $notifiable * @return \Illuminate\Notifications\Messages\MailMessage */ public function toMail($notifiable) { $url = url('/invoice/'.$this->invoice->id); return (new MailMessage) ->greeting('Hello!') ->line('One of your invoices has been paid!') ->action('View Invoice', $url) ->line('Thank you for using our application!'); } Note: Note that we have message Method $this->invoice->id , you can pass any data required by the notification generation message to the notification constructor.
Note: When sending email notifications, ensure that the configuration file config/app.php Is set in name The value of, which will be used in the header and footer of the mail notification message.
/** *Get notification email * * @param mixed $notifiable * @return \Illuminate\Notifications\Messages\MailMessage * @translator laravelacademy.org */ public function toMail($notifiable) { return (new MailMessage)->view( 'emails.name', ['invoice' => $this->invoice] ); }
use App\Mail\InvoicePaid as Mailable; /** *Get notification email * * @param mixed $notifiable * @return Mailable */ public function toMail($notifiable) { return new Mailable($this->invoice)->to($this->user->email); }
/** *Get notification email * * @param mixed $notifiable * @return \Illuminate\Notifications\Message */ public function toMail($notifiable) { return (new MailMessage) ->error() ->subject('Notification Subject') ->line('...'); } Custom recipient
<? php namespace App; use Illuminate\Notifications\Notifiable; use Illuminate\Foundation\Auth\User as Authenticatable; class User extends Authenticatable { use Notifiable; /** * Route notifications for the mail channel. * * @return string */ public function routeNotificationForMail() { return $this->email_address; } } Custom Theme
/** * Get the mail representation of the notification. * * @param mixed $notifiable * @return \Illuminate\Notifications\Messages\MailMessage */ public function toMail($notifiable) { return (new MailMessage) ->subject('Notification Subject') ->line('...'); } Custom Template
php artisan vendor:publish --tag=laravel-notifications Markdown email notification
Generate Message
php artisan make:notification InvoicePaid --markdown=mail.invoice.paid
/** * Get the mail representation of the notification. * * @param mixed $notifiable * @return \Illuminate\Notifications\Messages\MailMessage * @translator laravelacademy.org */ public function toMail($notifiable) { $url = url('/invoice/'.$this->invoice->id); return (new MailMessage) ->subject('Invoice Paid') ->markdown('mail.invoice.paid', ['url' => $url]); } Write Message
@component('mail::message') # Invoice Paid Your invoice has been paid! @component('mail::button', ['url' => $url]) View Invoice @endcomponent Thanks,<br> {{ config('app.name') }} @endcomponent
@component('mail::button', ['url' => $url, 'color' => 'green']) View Invoice @endcomponent
@component('mail::panel') This is the panel content. @endcomponent
@component('mail::table') | Laravel | Table | Example | | ------------- |:-------------:| --------:| | Col 2 is | Centered | $10 | | Col 3 is | Right-Aligned | $20 | @endcomponent Custom Components
php artisan vendor:publish --tag=laravel-mail
If you want to build a new theme for Markdown components, just click html/themes Write a new CSS file in the directory and modify it Profile's theme Option.
Database notification
Preparatory knowledge
php artisan notifications:table php artisan migrate Format Database Notification
/** * Get the array representation of the notification. * * @param mixed $notifiable * @return array */ public function toArray($notifiable) { return [ 'invoice_id' => $this->invoice->id, 'amount' => $this->invoice->amount, ]; }
Access notifications
$user = App\User::find(1); foreach ($user->notifications as $notification) { echo $notification->type; }
$user = App\User::find(1); foreach ($user->unreadNotifications as $notification) { echo $notification->type; } Note: To access notifications from the JavaScript client, you need to define a notification controller in the application to return notifications for the specified notified entity (such as the current user), and then send an HTTP request from the JavaScript client to the corresponding URI of the controller.
Mark notification as read
$user = App\User::find(1); foreach ($user->unreadNotifications as $notification) { $notification->markAsRead(); }
$user->unreadNotifications->markAsRead();
$user = App\User::find(1); $user->unreadNotifications()->update(['read_at' => now()]);
$user->notifications()->delete(); Broadcast notification
Preparatory knowledge
Format broadcast notification
use Illuminate\Notifications\Messages\BroadcastMessage; /** * Get the broadcastable representation of the notification. * * @param mixed $notifiable * @return BroadcastMessage */ public function toBroadcast($notifiable) { return new BroadcastMessage([ 'invoice_id' => $this->invoice->id, 'amount' => $this->invoice->amount, ]); }
return new BroadcastMessage($data) ->onConnection('sqs') ->onQueue('broadcasts'); In addition to the specified data, the broadcast notification also contains a type Field for the class name containing the notification.
Monitor notification
Echo.private('App.User.' + userId) .notification((notification) => { console.log(notification.type); });
<? php namespace App; use Illuminate\Notifications\Notifiable; use Illuminate\Broadcasting\PrivateChannel; use Illuminate\Foundation\Auth\User as Authenticatable; class User extends Authenticatable { use Notifiable; /** *The channel for users to receive broadcast notifications * * @return array */ public function receivesBroadcastNotificationsOn() { return 'users.'.$ this->id; } } SMS notification
Preparatory knowledge
'nexmo' => [ 'key' => env('NEXMO_KEY'), 'secret' => env('NEXMO_SECRET'), 'sms_from' => '15556666666', ],
Format SMS notification
/** * Get the Nexmo / SMS representation of the notification. * * @param mixed $notifiable * @return NexmoMessage */ public function toNexmo($notifiable) { return (new NexmoMessage) ->content('Your SMS message content'); }
/** * Get the Nexmo / SMS representation of the notification. * * @param mixed $notifiable * @return NexmoMessage */ public function toNexmo($notifiable) { return (new NexmoMessage) ->content('Your unicode message') ->unicode(); } Custom Source Number
 /**
  * Get the Nexmo / SMS representation of the notification.
  *
  * @param  mixed  $notifiable
  * @return NexmoMessage
  */
 public function toNexmo($notifiable)
 {
     return (new NexmoMessage)
         ->content('Your SMS message content')
         ->from('15554443333');
 }
SMS notification routing
<? php namespace App; use Illuminate\Notifications\Notifiable; use Illuminate\Foundation\Auth\User as Authenticatable; class User extends Authenticatable { use Notifiable; /** * Route notifications for the Nexmo channel. * * @return string */ public function routeNotificationForNexmo() { return $this->phone; } } Slack notification
Preparatory knowledge
composer require guzzlehttp/guzzle
Format Slack Notification
/** * Get the Slack representation of the notification. * * @param mixed $notifiable * @return SlackMessage */ public function toSlack($notifiable) { return (new SlackMessage) ->content('One of your invoices has been paid!'); }

/** * Get the Slack representation of the notification. * * @param mixed $notifiable * @return SlackMessage */ public function toSlack($notifiable) { return (new SlackMessage) ->from('Ghost', ':ghost:') ->to('#other') ->content('This will be sent to #other'); }
/** * Get the Slack representation of the notification. * * @param mixed $notifiable * @return SlackMessage */ public function toSlack($notifiable) { return (new SlackMessage) ->from('Laravel') ->image(' https://laravel.com/favicon.png ') ->content('This will display the Laravel logo next to the message'); } Slack Accessories
/** * Get the Slack representation of the notification. * * @param mixed $notifiable * @return SlackMessage */ public function toSlack($notifiable) { $url = url('/exceptions/'.$this->exception->id); return (new SlackMessage) ->error() ->content('Whoops! Something went wrong.') ->attachment(function ($attachment) use ($url) { $attachment->title('Exception: File Not Found', $url) ->content('File [background.jpg] was not found.'); }); }

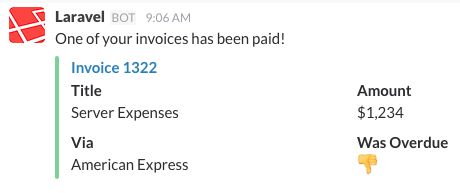
/** * Get the Slack representation of the notification. * * @param mixed $notifiable * @return SlackMessage */ public function toSlack($notifiable) { $url = url('/invoices/'.$this->invoice->id); return (new SlackMessage) ->success() ->content('One of your invoices has been paid!') ->attachment(function ($attachment) use ($url) { $attachment->title('Invoice 1322', $url) ->fields([ 'Title' => 'Server Expenses', 'Amount' => '$1,234', 'Via' => 'American Express', 'Was Overdue' => ':-1:', ]); }); }
/** * Get the Slack representation of the notification. * * @param mixed $notifiable * @return SlackMessage */ public function toSlack($notifiable) { $url = url('/exceptions/'.$this->exception->id); return (new SlackMessage) ->error() ->content('Whoops! Something went wrong.') ->attachment(function ($attachment) use ($url) { $attachment->title('Exception: File Not Found', $url) ->content('File [background.jpg] was *not found*.') ->markdown(['text']); }); } Slack notification routing
<? php namespace App; use Illuminate\Notifications\Notifiable; use Illuminate\Foundation\Auth\User as Authenticatable; class User extends Authenticatable { use Notifiable; /** * Route notifications for the Slack channel. * * @return string */ public function routeNotificationForSlack() { return $this->slack_webhook_url; } } Notify Events
/** * The event listener mappings for the application. * * @var array */ protected $listen = [ 'Illuminate\Notifications\Events\NotificationSent' => [ 'App\Listeners\LogNotification', ], ]; Note: On EventServiceProvider After registering the listener in, use the Artisan command event:generate Quickly generate listener classes.
/** * Handle the event. * * @param NotificationSent $event * @return void */ public function handle(NotificationSent $event) { // $event->channel // $event->notifiable // $event->notification } Custom Channel
<? php namespace App\Channels; use Illuminate\Notifications\Notification; class VoiceChannel { /** *Send the given notification * * @param mixed $notifiable * @param \Illuminate\Notifications\Notification $notification * @return void */ public function send($notifiable, Notification $notification) { $message = $notification->toVoice($notifiable); //Send notification to $notifiable instance } }
<? php namespace App\Notifications; use Illuminate\Bus\Queueable; use App\Channels\VoiceChannel; use App\Channels\Messages\VoiceMessage; use Illuminate\Notifications\Notification; use Illuminate\Contracts\Queue\ShouldQueue; class InvoicePaid extends Notification { use Queueable; /** *Get notification channel * * @param mixed $notifiable * @return array|string */ public function via($notifiable) { return [VoiceChannel::class]; } /** * Get the voice representation of the notification. * * @param mixed $notifiable * @return VoiceMessage */ public function toVoice($notifiable) { // ... } }