HTTP response, redirection and file download
Create Response
String&Array
All routes and controllers will return a response sent to the user's browser after processing the business logic. Laravel provides many different ways to return the response. The most basic response is to return a simple string from the route or controller. The framework will automatically convert this string into a complete HTTP response:
Route::get('/', function () { return 'Hello World'; });
In addition to returning strings from routes or controllers, you can also return arrays. The framework will automatically convert the array into a JSON response:
Route::get('/', function () { return [1, 2, 3]; });
Note: Do you know that Eloquent collection can also be returned from route or controller? This is also automatically converted into JSON responses.
Response object
Usually, we do not simply return strings and arrays from routing actions. In most cases, we will return a complete Illuminate\Http\Response Instance or view (we will discuss views in detail in the next tutorial).
Return a complete Response The instance allows you to customize the HTTP status code and header information of the response. Response Instance inherited from Symfony\Component\HttpFoundation\Response Base class, which provides a series of methods for creating HTTP responses:
Route::get('cookie/response', function () { return response('Hello World', 200) ->header('Content-Type', 'text/plain'); });
Add Response Header
Most of the response methods can be called in the form of method chains, so that the response can be constructed in a streaming manner( Stream interface mode )。 For example, you can use the header Method to add a series of response headers: return response($content) ->header('Content-Type', $type) ->header('X-Header-One', 'Header Value') ->header('X-Header-Two', 'Header Value');
Or you can use withHeaders Method to specify that the header information array is added to the response: return response($content) ->withHeaders([ 'Content-Type' => $type, 'X-Header-One' => 'Header Value', 'X-Header-Two' => 'Header Value', ]);
Add Cookies to Response
Use the cookie Method can easily add cookies to the response. For example, you can use the cookie method to generate cookies and add them to the response instance: return response($content) ->header('Content-Type', $type) ->cookie('name', 'value', $minutes);
cookie The method can also receive more optional parameters that are less frequently used. Generally speaking, these parameters are similar to those provided by PHP natively setcookie The purpose and significance of the method are similar: ->cookie($name, $value, $minutes, $path, $domain, $secure, $httpOnly)
In addition, you can also use the Cookie The facade adds cookies to the response in the form of a "queue". queue Method receives the cookie instance or the parameters necessary for creating cookies as parameters. These cookies will be added to the response before the response is sent to the browser: Route::get('cookie/response', function() { Cookie:: queue (Cookie:: make ('site ','Larravel College', 1)); Cookie:: queue ('author ',' Scholar ', 1); return response('Hello Laravel', 200) ->header('Content-Type', 'text/plain'); });
We access http://blog.dev/cookie/response You can see the two new cookies: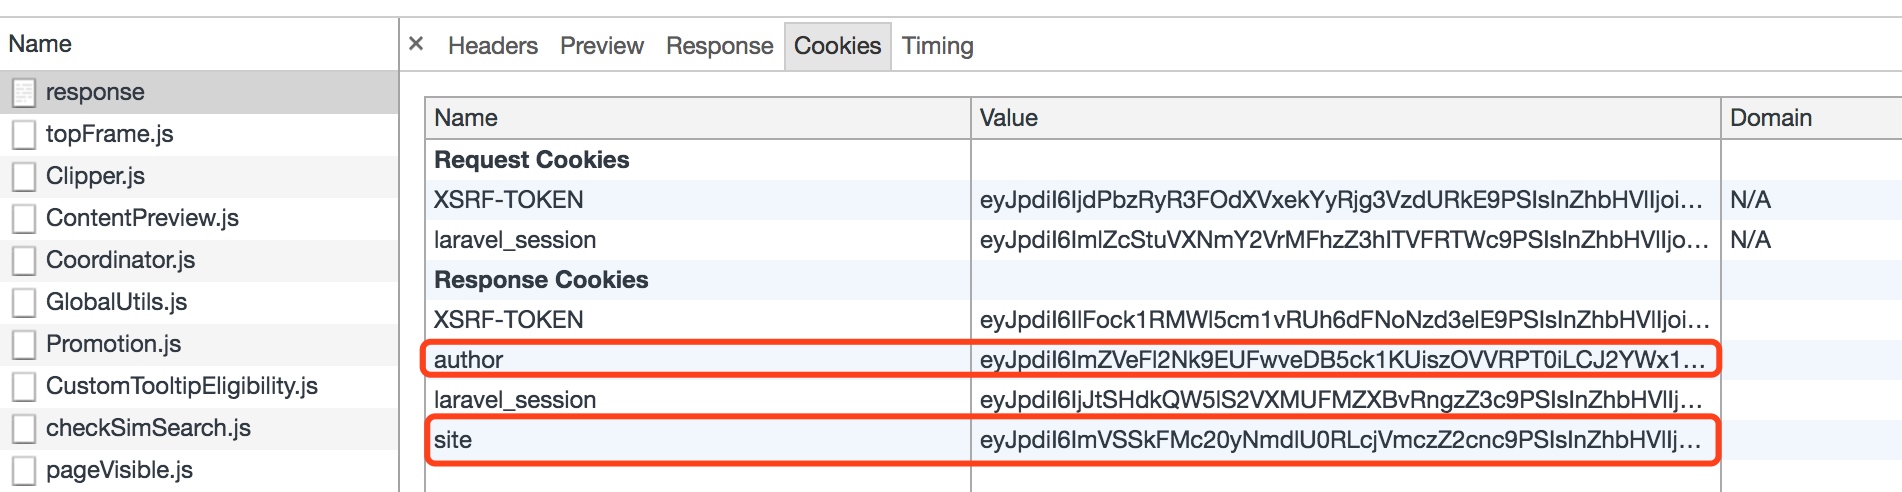
Cookies&Encryption
By default, the cookies generated by the Larravel framework are encrypted and signed to prevent tampering on the client side. If you want to have a specific cookie subset unencrypted when it is generated, you can use the app/Http/Middleware Middleware under directory App\Http\Middleware\EncryptCookies Provided $except Property to exclude these cookies: /** *Cookies names that do not need to be encrypted * * @var array */ protected $except = [ 'cookie_name', ];
redirect
Redirect response is Illuminate\Http\RedirectResponse Class contains the necessary header information to redirect the user to another URL. There are many ways to generate RedirectResponse For example, the simplest way is to use global auxiliary functions redirect : Route::get('dashboard', function () { return redirect('home/dashboard'); });
Sometimes you want to redirect the user to the location of the last request. For example, after the form is submitted and the verification fails, you can use auxiliary functions back Return to the previous URL (because this function uses Session, ensure that the relevant route is located in the web Middleware group or session middleware applied): Route::post('user/profile', function () { //Verify Request return back()->withInput(); });
Redirect to Named Route
If you call the redirect Method, a Illuminate\Routing\Redirector Instance, and then you can use Redirector All methods on the instance. For example, to generate a RedirectResponse To a named route, you can use the route method: return redirect()->route('login');
If there is a parameter in the route, it can be passed to the route method: // For a route with the following URI: profile/{id} return redirect()->route('profile', ['id'=>1]);
Filling parameters with Eloquent model
If you want to redirect to a route with ID parameters (Eloquent model binding), you can pass the model itself, and the ID will be automatically resolved:
return redirect()->route('profile', [$user]);
If you want to customize the default parameter name in this route parameter (default is id ), you need to override the getRouteKey method:
/** * Get the value of the model's route key. * * @return mixed */ public function getRouteKey() { return $this->slug; }
Redirect to Controller Action
You can also generate responses redirected to controller actions by passing the controller and action name to action Method. Remember, you don't need to specify the full namespace of the controller, because Larave's RouteServiceProvider The default controller namespace will be set automatically: return redirect()->action(' HomeController@index ');
and route The method is the same. If the controller route requires parameters, you can pass the parameters as the second parameter to action method: return redirect()->action(' UserController@profile ', ['id'=>1]);
Redirection with one-time session data
Redirection to a new URL and storing data in a one-time session are usually completed at the same time. For convenience, you can create a RedirectResponse The instance then stores the data to the session on the same method chain action It is particularly convenient to store status information later: Route::post('user/profile', function () { //Update User Properties return redirect('dashboard')->with('status', 'Profile updated!'); });
After the user redirects to the new page, you can take out and display these one-time information from the session, and use the Blade syntax to achieve the following (we will discuss the use of the Blade template in detail in the subsequent tutorials): @if (session('status')) {{ session('status') }}
@endif
Note: This one-time embodiment is that after the data is taken from the session, the data will be destroyed and no longer exist.
Other response types
We talked about it Response and RedirectResponse Two response types, we can also use auxiliary functions response It is easy to generate other types of response instances response Will return when Illuminate\Contracts\Routing\ResponseFactory An implementation of a contract that provides some useful methods to generate various responses, such as view response, JSON response, file download, stream response, and so on. View Response
If you need to control the response status and response header and return a view as the response content, you can use view method: return response() ->view('hello', $data, 200) ->header('Content-Type', $type);
Of course, if you don't need to pass custom HTTP status codes and headers, you just need to simply use global auxiliary functions view That is: Route::get('view/response', function() { return view('hello'); });
We need to create this file in this path to access its contents normally:
JSON response
json Method will automatically Content-Type Header set to application/json , and use PHP functions json_encode Method to convert the given array into JSON format data: return response()->json([ 'name' => 'Abigail', 'state' => 'CA' ]);
If you want to create a JSONP response, you can json Call after method withCallback method: return response() ->json(['name' => 'Abigail', 'state' => 'CA']) ->withCallback($request->input('callback'));
Or directly use jsonp method: return response() ->jsonp($request->input('callback'), ['name' => 'Abigail', 'state' => 'CA']);
File download
download Method is used to generate a response that forces a user's browser to download a file of a given path. download The method accepts the file name as the second parameter, which determines the display name of the file downloaded by the user. You can also pass the HTTP header information to the method as the third parameter: return response()->download($pathToFile); return response()->download($pathToFile, $name, $headers); return response()->download($pathToFile)->deleteFileAfterSend(true);
Note: The Symfony HttpFoundation class that manages file download requires the downloaded file to have an ASCII file name, which means that the downloaded file name cannot be Chinese.
For example, we can download the following code Previous Tutorial Uploaded pictures: Route::get('download/response', function() { Return response() ->download (storage_path ('app/photo/test. jpg '),' test image. jpg '); });
File Response
file The method can be used to display files, such as pictures or PDFs, directly in the user's browser without downloading. The method receives the file path as the first parameter and the header array as the second parameter: return response()->file($pathToFile); return response()->file($pathToFile, $headers);
Response Macro
If you want to define a customized response that can be reused in multiple routes and controllers, you can use Response On the facade macro method. For example, in the boot The code in the method is as follows: <? php namespace App\Providers; use Illuminate\Support\Facades\Response; use Illuminate\Support\ServiceProvider; class ResponseMacroServiceProvider extends ServiceProvider { /** * Perform post-registration booting of services. * * @return void */ public function boot() { Response::macro('caps', function ($value) { return Response::make(strtoupper($value)); }); } }
macro The method receives the response name as the first parameter, the closure function as the second parameter, and the closure of the response macro ResponseFactory Implementation class or auxiliary function response The macro name is executed when called in:
Route::get('macro/response', function() { return response()->caps('LaravelAcademy'); });
Access in browser http://blog.dev/macro/response , output input:
LARAVELACADEMY