The Way of Operation and Maintenance of Cat_IT Operation and Maintenance Technology Blog_ Operation and Maintenance Learning Communication Blog_DevOps_Automated Operation and Maintenance
Unix traditional operating systems are different from those in MS-DOS traditional systems, because they are not only multitasking systems, but also multi-user systems.What does this mean?It means that multiple users can use the same computer at the same time.However, a typical computer may only have one keyboard and one monitor, but it can still be used by multiple users.For example, if a computer is connected to a network or the Internet, remote users can log in and operate the computer through ssh (secure shell).In fact, remote users can also run graphical interface applications, and the graphical output results will appear on the remote display.The X window system takes this as part of the basic design concept and supports this function.
The multi-user performance of Linux system is not a recent "innovation", but a feature, which is deeply embedded in the design process of Linux operating system.It is meaningful to think about the birth environment of Unix system.Many years ago, before the advent of personal computers, computers were large, expensive and centralized.A typical university computer system, for example, is composed of a large central computer located in a building and many terminals scattered around the campus. Each terminal is connected to this large central computer.This computer can support many users at the same time.
In order to put the multi-user feature into practice, a method must be invented to prevent users from being affected by each other.After all, one user's behavior cannot cause the computer to crash, nor can they tamper with files belonging to another user.
In this chapter, we will take a look at the essence of this system security and introduce the following commands:
Id – Display user ID number
Chmod – Change file mode
Umask – Set the default file permissions
Su – Run the shell as another user
Sudo – Execute commands as another user
Chown – Change file owner
Chgrp – Change file group ownership
Passwd – Change user password
Owners, group members, and others
When we explore the file system in Chapter 4, when we try to view a file like/etc/shadow, we will encounter a problem.
[me@linuxbox ~]$ file /etc/shadow/etc/shadow: regular file, no read permission[me@linuxbox ~]$ less /etc/shadow/etc/shadow: Permission denied
The reason for this error message is that as an ordinary user, we do not have permission to read this file.
In the Unix security model, a user may own files and directories.When a user owns a file or directory, the user has control over the access to the file or directory.Users, in turn, belong to a user group composed of one or more users, whose members are granted access to files and directories by the owners of files and directories.In addition to granting permissions to a user group, the file owner may give everyone some permissions. In Unix terminology, everyone means the whole world.You can use the id command to find information about your identity:
Let's take a look at the output.After the user creates an account, the system will assign a number, called user ID or uid, to the user. Then, in order to conform to human habits, this ID is mapped to a user name.The system will assign the user an original group ID or gid, which may belong to another group.The above example comes from the Fedora system. For example, the output of Ubuntu may look a little different:
As we can see, the uid and gid numbers of users in the two systems are different.The reason is simple, because Fedora system starts from 500 to number ordinary user accounts, while Ubuntu starts from 1000.We can also see that Ubuntu users belong to more user groups.This has something to do with the way Ubuntu manages system devices and service permissions.
So where does this information come from?Like many things in Linux, it comes from a series of text files.User accounts are defined in the/etc/passwd file, and user groups are defined in the/etc/group file.After the user account and user group are created, these files will be modified with the change of the file/etc/shadow. The file/etc/shadow contains information about the user password.For each user account, the file/etc/passwd defines the user (login) name, uid, gid, the real name of the account, home directory, and login shell.If you check the contents of the file/etc/passwd and the file/etc/group, you will notice that in addition to the ordinary user account, there are super user (uid 0) accounts and various system users.
In the next chapter, when we discuss processes, you will know who these other "users" are. In fact, they are quite busy.
However, many systems like Unix will assign ordinary users to a public user group, such as "users". Today's Linux will create a unique user group with only one member. This user group has the same name as the user.This makes it easier to assign certain types of permissions.
Read, write, and execute
Access rights to files and directories are defined according to read access, write access, and execute access.If we look at the output of the ls command, we can get some clues about how to achieve this:
[me@linuxbox ~]$ > foo.txt[me@linuxbox ~]$ ls -l foo.txt-rw-rw-r-- 1 me me 0 2008-03-06 14:52 foo.txt
The first ten characters of the list are attributes of the file.The first of these ten characters indicates the file type.The following table shows the file types you may often see (and other, uncommon types):
Table 10-1: File Types
attribute
file type
-
A normal file
d
A directory
l
A symbolic link.Note that for symbolic link files, the remaining file attributes are always "rwxrwxrwxrwx" and are all virtual values.The real file attribute refers to the attribute of the file pointed to by the symbolic link.
c
A character device file.This file type refers to the device that processes data according to the byte stream.For example, terminal, or modem
b
A block device file.This file type refers to a device that processes data according to data blocks, such as a hard disk or CD-ROM disk.
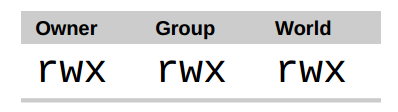
The remaining nine characters, called file mode, represent the read, write, and execute permissions of the file owner, file group owner, and others.
Figure 1: Permission Attributes
When the file mode is set, the r, w, and x mode attributes will have the following effects on files and directories:
Table 10-2: Permission Attributes
attribute
file
catalog
r
Allows you to open and read file contents.
It is allowed to list the contents in the directory, provided that the executable attribute (x) must be set for the directory.
w
Allows you to write the file contents or truncate the file.However, it is not allowed to rename or delete files. Renaming or deleting is determined by the attributes of the directory.
It is allowed to create, delete or rename files under the directory, provided that the executable attribute (x) is set for the directory.
x
It is allowed to execute a file as a program. A program written in a scripting language must be set to be readable before it can be executed.
Allows you to enter a directory, such as cd directory.
The following are some examples of permission attributes:
Table 10-3: Example of Permission Attributes
File Properties
meaning
-rwx------
A common file that is readable, writable, and executable to the file owner.No one else can access it.
-rw-------
A normal file, readable and writable to the file owner.No one else can access it.
-rw-r--r--
A common file can be read and written by the file owner. The file owner's group members can read the file, and everyone else can read the file.
-rwxr-xr-x
A common file that is readable, writable, and executable to the file owner.It can also be read and executed by everyone else.
-rw-rw----
A normal file, readable and writable to the file owner and the group members of the file owner.
lrwxrwxrwx
For a symbolic link, the permissions of the symbolic link are virtual, and the real permissions should be subject to the files pointed to by the symbolic link.
drwxrwx---
A directory that can be accessed by the file owner and members of the file owner's group, and can be used to create, rename, or delete files.
drwxr-x---
A directory that the file owner can access, and can create, rename, or delete files under the directory. The group members of the file owner can access the directory, but they cannot create, rename, or delete files.
Chmod - Change file mode
To change the mode (permission) of a file or directory, you can use the chmod command.Note that only the owner or superuser of the file can change the mode of the file or directory.The chmod command supports two different ways to change the file mode: octal digital representation, or symbolic representation.First, let's talk about octal digit representation.
What exactly is octal?
Octal (base number 8), and her relatives, hexadecimal (base number 16) are both digital systems, which are often used to represent numbers in computers.We humans, because of this fact (or at least most people) are born with ten fingers, use the number system based on 10 to count.Computer, on the other hand, is born with only one finger, so it counts in binary (base 2).Their numerical system has only two values, 0 and 1.So in binary, the count looks like this:
In hexadecimal system, numbers from 0 to 9, plus capital letters from "A" to "F" are used to count, and every 16 goes to one:
0, 1, 2, 3, 4, 5, 6, 7, 8, 9, A, B, C, D, E, F, 10, 11, 12, 13…
Although we can know the meaning of binary (because computers have only one finger), what are the benefits of octal and hexadecimal?The answer is for human convenience.Many times, in a computer, a small part of data is represented in binary form.Take RGB color as an example.In most computer monitors, each pixel is composed of three colors: 8-bit red, 8-bit green, and 8-bit blue.In this way, a lovely medium blue is represented by 24 digits:
010000110110111111001101
I don't think you like reading and writing these numbers every day.Another kind of digital system is more helpful to us.Each hexadecimal digit represents four binary digits.In octal, each digit represents three binary digits.Then the 24 bit binary representing medium blue can be compressed into 6-bit hexadecimal number:
436FCD
Because the two digits in the hexadecimal system correspond to the 8-digit binary number, we can see that "43" represents red, "6F" represents green, and "CD" represents blue.
Now, hexadecimal notation (often called "hex") is more common than octal, but we will soon see that octal is very useful for representing three binary numbers
With octal notation, we use octal numbers to set the desired permission mode.Because each octal digit represents three binary digits, this correspondence is exactly mapped to the scheme used to store the file schema.The following table shows what we mean:
Octal
Binary
File Mode
zero
000
---
one
001
--x
two
010
-w-
three
011
-wx
four
one hundred
r--
five
one hundred and one
r-x
six
one hundred and ten
rw-
seven
one hundred and eleven
rwx
By using three octal digits, we can set the permissions of file owners, user groups, and others:
[me@linuxbox ~]$ > foo.txt[me@linuxbox ~]$ ls -l foo.txt-rw-rw-r-- 1 me me 0 2008-03-06 14:52 foo.txt[me@linuxbox ~]$ chmod 600 foo.txt[me@linuxbox ~]$ ls -l foo.txt-rw------- 1 me me 0 2008-03-06 14:52 foo.txt
By passing the parameter "600", we can set the file owner's permission to read and write, and delete all permissions of user groups and others.Although the octal to binary mapping seems inconvenient, it usually only uses some common mapping relationships: 7 (rwx), 6 (rw -), 5 (r-x), 4 (r -), and 0 (---).
The chmod command supports a symbolic representation to specify the file mode.The symbolic representation is divided into three parts: who will be affected by the change, which operation to execute, and which permissions to set.Specify the object to be affected by the combination of characters "u", "g", "o", and "a", as shown below:
Table 10-4: Symbol Representation of chmod Command
u
Short for "user", which means the owner of a file or directory.
g
User groups.
o
Abbreviation of "others", which means everyone else.
a
The abbreviation of "all" is the combination of "u", "g" and "o".
If no character is specified, "all" is assumed.The operation may be a "+" character, which means adding a permission, a "-" which means deleting a permission, or a "=" which means that only the specified permission is available and all other permissions are deleted.
Permissions are specified by "r", "w", and "x".Here are some examples of symbolic representation:
Table 10-5: Example of chmod notation
u+x
Add executable permissions for the file owner.
u-x
Remove the executable permissions of the file owner.
+x
Add executable permissions for file owners, user groups, and everyone else.Equivalent to a+x.
o-rw
Remove read and write permissions for everyone except the file owner and user group.
go=rw
Give the group owner and any file owner read and write permissions.If the group owner or global has the permission to execute before, they will be removed.
u+x,go=rw
The permission given to the file owner to execute and to the group and others to read and execute.Multiple settings can be separated by commas.
Some people like to use octal notation, while others like symbolic notation very much.The advantage of symbolic representation is that it allows you to set one attribute of the file mode without affecting other attributes.
Take a look at the man page of the chmod command to get more detailed information and various options of the chmod command.Note the "-- recursive" option: it can work on files and directories at the same time, so it is not as useful as we expected, because we rarely want files and directories to have the same permissions.
Set file mode with GUI
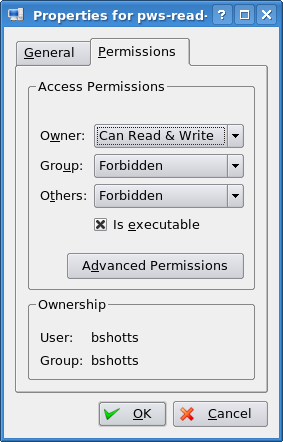
Now that we know how to set permissions for files and directories, we can better understand the permission setting dialog box in the GUI.In Nautilus (GNOME) and Konqueror (KDE), right clicking a file or directory icon will pop up a property dialog box.The following example comes from KDE 3.5:
Figure 2: KDE 3.5 File Properties Dialog Box
From this dialog box, we can see that you can set the access permissions of file owners, user groups, and others.In KDE, right click the "Advanced Permissions" button to open another dialog box, which allows you to set the attributes of each mode separately.This can also be understood through the command line!
Umask - Set default permissions
When creating a file, the umask command controls the default permissions of the file.The umask command uses octal notation to express the removal of a bitmask from a file mode attribute.Look at the following examples:
[me@linuxbox ~]$ rm -f foo.txt[me@linuxbox ~]$ umask0002[me@linuxbox ~]$ > foo.txt[me@linuxbox ~]$ ls -l foo.txt-rw-rw-r-- 1 me me 0 2008-03-06 14:53 foo.txt
First, delete the file foo.txt to make sure we start over.Next, run the umask command without parameters to check the current mask value.The response value is 0002 (0022 is another commonly used value), which is the octal representation of the mask.Next, we create the file foo.txt and retain its permissions.
We can see that both the file owner and user group have read permission and write permission, while others only have read permission.The reason why others do not have write permission is determined by the mask value.Repeat our experiment and set the mask value yourself this time:
[me@linuxbox ~]$ rm foo.txt[me@linuxbox ~]$ umask 0000[me@linuxbox ~]$ > foo.txt[me@linuxbox ~]$ ls -l foo.txt-rw-rw-rw- 1 me me 0 2008-03-06 14:58 foo.txt
When the mask is set to 0000 (essentially turning it off), we see that other people can read and write files.To understand this, we need to look at the octal form of the mask.Expand the mask into binary form and compare it with the file attribute to see what the difference is:
Original file mode
--- rw- rw- rw-
Mask
000 000 000 010
Result
--- rw- rw- r--
At this moment, ignore the first three zeros (we will discuss later). Note that if a number 1 appears in the mask, the attribute in the same position as the 1 in the file mode will be deleted, which refers to the write permission of others.This is what the mask does.In the binary form of the mask, if the position of the number 1 appears, turn off a file mode attribute accordingly.Look at the role of mask 0022:
Original file mode
--- rw- rw- rw-
Mask
000 000 010 010
Result
--- rw- r-- r--
Once again, where the digit 1 appears in the binary, the corresponding attribute is deleted.Try other mask values (some with the number 7), and get used to the working principle of the mask.When you finish your experiment, remember to clean up the scene:
[me@linuxbox ~]$ rm foo.txt; umask 0002
In most cases, you do not need to modify the mask value. The default mask value provided by the system is good.However, at some high security levels, you need to be able to control the mask value.
Some special permissions
Although we usually see an octal permission mask represented by three digits, technically speaking, it is more accurate to use four digits to represent it.Why?In addition to read, write, and execute permissions, there are other permission settings that are rarely used.
One of them is the setuid bit (octal 4000).When applied to an executable file, it sets the effective user ID from the real user (the user who actually runs the program) to the ID of the program owner.This operation usually applies to some programs owned by superusers.When an ordinary user runs a program, the program is owned by the root user (root), and the setuid bit is set. The program runs with the privileges of superuser, so that the program can access the files and directories that ordinary users cannot access.Obviously, because this will cause security problems, the number of programs that can set the setuid bit must be kept within an absolutely small range.
The second is the setgid bit (octal 2000), which is similar to the setuid bit. It changes the effective user group ID from the real user group ID to the file owner's group ID.If the setgid bit of a directory is set, the newly created files in the directory have the ownership of the directory user group, rather than the ownership of the user group to which the file creator belongs.For a shared directory, when members of an ordinary user group need to access all files in the shared directory, regardless of the primary user group of the file owner, it is useful to set the setgid bit.
The third is the sticky bit (octal 1000).This inherits from Unix. In Unix, it may mark an executable file as "non exchangeable".In Linux, the sticky bit of files is ignored. However, if the sticky bit is set for a directory, it can prevent users from deleting or renaming files, unless the user is the owner of the directory, the file owner, or the superuser.This is often used to control access to shared directories, such as/tmp.
Here are some examples of using the chmod command and symbolic notation to set these special permissions.First, grant a program setuid permission.
chmod u+s program
Next, grant setgid permission to a directory:
chmod g+s dir
Finally, grant a directory sticky permission:
chmod +t dir
When browsing the output of the ls command, you can confirm these special permissions.Here are some examples.First, a program is set to the setuid attribute:
-rwsr-xr-x
Directory with setgid attribute:
drwxrwsr-x
Directory with sticky bit set:
drwxrwxrwt
Change identity
At different times, we will find it necessary to have another user's identity.Often, we want to get super user privileges to perform some management tasks, but it is also possible to "change to" another ordinary user, such as testing an account.There are three ways to have multiple identities:
Log out of the system and log back in as another user.
Use the su command.
Use the sudo command.
We will skip the first method because we know how to use it and it lacks the convenience of the other two methods.In our own shell session, the su command allows you to start a new shell session with the ID of another user, or issue a command as the user.The sudo command allows an administrator to set a configuration file called/etc/sudoers, and defines some specific commands. Under the assumed identity, special users can execute these commands.The choice of which command to use is largely determined by the Linux distribution you use.Your distribution may contain both commands, but the system configuration may favor one of them.Let's introduce the su command first.
Su - Run a shell as another user and group ID
The su command is used to start the shell as another user.The command syntax looks like this:
su [-[l]] [user]
If the "- l" option is included, a shell that needs to be logged in will be started for the specified user.This means that the user's shell environment will be loaded, and the working directory will be changed to the user's home directory.This is usually what we need.If no user is specified, it is assumed to be a superuser.Note (miraculously) that the option "- l" can be abbreviated to "-", which is often used. To start the superuser's shell, we can do this:
[me@linuxbox ~]$ su -Password:[root@linuxbox ~]#
After pressing the carriage return character, the shell prompts us to enter the superuser's password.If the password is entered correctly, a new shell prompt appears, which indicates that the shell has superuser privileges (the end character of the prompt is "#" instead of "$"), and the current working directory is the superuser's home directory (usually/root).Once entering a new shell, we can execute the commands used by the super user.When the work is completed, enter "exit" to return to the original shell:
[root@linuxbox ~]# exit[me@linuxbox ~]$
Using the su command in this way, you can also only execute a single command instead of starting a new interactive shell:
su -c 'command'
In this mode, commands are passed to a new shell for execution.It is important to enclose the command in single quotation marks, because we do not want the command to be expanded in our shell, but we need to expand it in a new shell.
The sudo command is similar to the su command in many aspects, but sudo also has some very important functions.The administrator can configure the sudo command to allow an ordinary user to execute commands in a very controllable way with different identities (usually super users).In particular, when only one user can execute one or more special commands, (this more reflects the convenience of sudo commands).Another important difference is that the sudo command does not require the superuser's password.When using the sudo command, the user uses his/her own password to authenticate.For example, the sudo command is configured to allow us to run a fictitious backup program called "backup_script", which requires superuser privileges.With the sudo command, the program will run like this:
After pressing the Enter key, the shell prompts us to enter our password (not that of the superuser).Once the authentication is completed, execute the specific command.An important difference between su and sudo is that sudo does not restart a shell or load another user's shell running environment.This means that commands do not have to be enclosed in single quotes.Note that this behavior can be overridden by specifying various options.For more information, read the sudo man page.
To know what permissions the sudo command can grant, use the "- l" option to list all permissions:
[me@linuxbox ~]$ sudo -lUser me may run the following commands on this host:(ALL) ALL
Ubuntu and sudo
Ordinary users often encounter such problems as how to complete some tasks that require super user permissions.These tasks include installing and updating software, editing system configuration files, and accessing devices.In the Windows world, these tasks are accomplished by granting user administrator permissions.This allows the user to perform these tasks.However, this will also lead to the same ability of the program executed by the user.In most cases, this is what we expect, but it also allows malware, such as computer viruses, to freely dominate the computer.
In the Unix world, because Unix is a multi-user system, there is always a big difference between ordinary users and administrators.Unix adopts the method of granting superuser privileges to ordinary users only when necessary.In this way, the su and sudo commands are commonly used.
A few years ago, most Linux distributions relied on the su command to achieve their goals.The su command does not need the configuration required by the sudo command. The su command has a root account, which is traditional in Unix.But this can cause problems.All users will attempt to manipulate the system with the root user account.In fact, some users use the root user account to operate the system, because doing so really eliminates all those annoying "permission denied" messages.If you do this, the security performance of the Linux system will be reduced to the same level as that of the Windows system.Not a good idea.
When Ubuntu was introduced, its creators adopted different strategies.By default, Ubuntu does not allow users to log in to the root account (because passwords cannot be set for the root account). Instead, the sudo command is used to grant ordinary users superuser privileges.With the sudo command, the initial user can have superuser privileges, or grant similar privileges to subsequent user accounts.
Chown - Change the file owner and user group
The chown command is used to change the owner and user group of a file or directory.Using this command requires superuser privileges.The syntax of the chown command looks like this:
chown [owner][:[group]] file...
Chown can change the file owner and/or file user group according to the first parameter of this command.Here are some examples:
Table 10-6: Example of chown parameter
parameter
result
bob
Change the file owner from the current owner to user bob.
bob:users
Change the file owner to user bob, and the file user group to user group users.
:admins
Change the file user group to group admins, and the file owner remains unchanged.
bob:
The file owner is changed to user bob, and the file user group is changed to the user group to which user bob belongs when logging into the system.
For example, we have two users, Janet, who have superuser access rights, while Tony does not.User jant wants to copy a file from her home directory to user tony's home directory.Because user jant wants tony to be able to edit the file, janet changes the owner of the file to tony:
[janet@linuxbox ~]$ sudo cp myfile.txt ~tonyPassword:[janet@linuxbox ~]$ sudo ls -l ~tony/myfile.txt-rw-r--r-- 1 root root 8031 2008-03-20 14:30 /home/tony/myfile.txt[janet@linuxbox ~]$ sudo chown tony: ~tony/myfile.txt[janet@linuxbox ~]$ sudo ls -l ~tony/myfile.txt-rw-r--r-- 1 tony tony 8031 2008-03-20 14:30 /home/tony/myfile.txt
Here, we see user Janet copying files from her directory to Tony's home directory.Next, janet changes the file owner from root (the reason for using the sudo command) to tony.By using the ":" character at the end of the first parameter, Janet also changes the file user group to Tony, which happens to be the user group Tony when logging into the system.
Notice why (shell) didn't prompt Janet to enter her password after using sudo command for the first time?This is because in most configurations, the sudo command will trust you for a few minutes until the timing is over.
Chgrp - Change user group ownership
In older Unix systems, the chown command can only change file ownership, not user group ownership.To achieve this, use a separate command, chgrp.Except for more restrictions, the chgrp command is similar to the chown command.
Practice using permissions
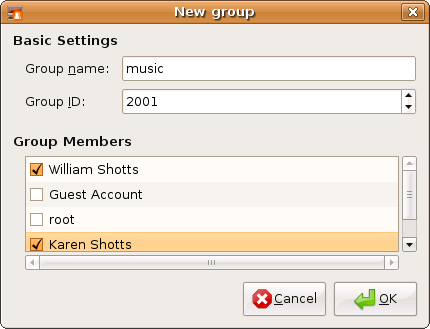
So far, we have known how permissions work. Now is the time to show off.We will show a solution to a common problem, which is how to set a shared directory.Suppose we have two users, "bill" and "karen".They all have music CD collections and are willing to set a shared directory in which they store their music files in Ogg Vorbis or MP3 format.With the sudo command, the user bill has superuser access rights.
The first thing we need to do is to create a user group with Bill and Karen as members.Using the graphical user management tool, bill created a user group called music, and added users bill and karen to the user group music:
Figure 3: Creating a new user group with GNOME
Next, bill creates a directory to store music files:
Because bill is operating files outside his home directory, he needs superuser permission.After the directory is created, it has the following ownership and permissions:
As we can see, this directory is owned by the root user and has permission 755.To share this directory and allow (user Karen) to write, bill needs to change the ownership and permissions of the directory user group:
So what does this mean?It means that now we have a directory,/usr/local/share/Music, which is owned by the root user and allows the user group music to read and write.The user group music has two members, bill and karen, so that bill and karen can create files in the directory/usr/local/share/Music.Other users can list the contents of the directory, but cannot create files in it.
But we still have problems.With the permissions we currently have, the files created in the Music directory only have the normal permissions of the users bill and karen:
[bill@linuxbox ~]$ > /usr/local/share/Music/test_file[bill@linuxbox ~]$ ls -l /usr/local/share/Music-rw-r--r-- 1 bill bill 0 2008-03-24 20:03 test_file
In fact, there are two problems.First, the default mask value in the system is 0022, which will prevent members of the user group from editing files belonging to members of the same group.If the shared directory only contains files, this is not a problem, but because this directory will store music, concerts are usually organized and classified according to the hierarchy of artists and albums.Therefore, user group members need to create files and directories in the directories created by other members of the same group.We will change the mask value used by user bill and karen to 0002.
The second problem is that the user group of the files and directories created by the members of the user group will be set as the main group of the user, not the user group music.This problem can be solved by setting the setgid bit of this directory:
[bill@linuxbox ~]$ sudo chmod g+s /usr/local/share/Music[bill@linuxbox ~]$ ls -ld /usr/local/share/Musicdrwxrwsr-x 2 root music 4096 2008-03-24 20:03 /usr/local/share/Music
Now test to see if the new permissions solve this problem.Bill sets his mask value to 0002, deletes the previous test file, and creates a new test file and directory:
[bill@linuxbox ~]$ umask 0002[bill@linuxbox ~]$ rm /usr/local/share/Music/test_file[bill@linuxbox ~]$ > /usr/local/share/Music/test_file[bill@linuxbox ~]$ mkdir /usr/local/share/Music/test_dir[bill@linuxbox ~]$ ls -l /usr/local/share/Musicdrwxrwsr-x 2 bill music 4096 2008-03-24 20:24 test_dir-rw-rw-r-- 1 bill music 0 2008-03-24 20:22 test_file[bill@linuxbox ~]$
Now, the created files and directories have the correct permissions, allowing all members of the user group music to create files and directories in the directory Music.
The remaining question is about the umask command.The mask value set by the umask command can only take effect in the current shell session. If the current shell session ends, it must be reset.In the third part of this book, we will look at how to make the mask value permanent.
Change user password
At the end of this chapter, we will discuss the password of your own account (and the password of others, if you have super user rights).Use the passwd command to set or change the user password.The command syntax is as follows:
passwd [user]
Just enter the passwd command to change your password.The shell will prompt you to enter your old password and your new password:
The passwd command will try to force you to use a "strong" password.This means that it will refuse to accept passwords that are too short, similar to previous passwords, words in the dictionary as passwords, or passwords that are too easy to guess:
[me@linuxbox ~]$ passwd(current) UNIX password:New UNIX password:BAD PASSWORD: is too similar to the old oneNew UNIX password:BAD PASSWORD: it is WAY too shortNew UNIX password:BAD PASSWORD: it is based on a dictionary word
If you have superuser privileges, you can specify a user name as a parameter of the passwd command, so that you can set the password of another user.There are other passwd command options that are valid for super users, allowing account locking, password invalidation, and so on.For details, refer to the man page of the passwd command.