API authentication using Laravel Passport

brief introduction
Laravel has made user authentication very simple through traditional login forms, but how to achieve API authentication? API usually uses token for authentication and does not maintain session state between requests. Laravel Passport, the official extension package of Laravel, makes API authentication easy. The Passport is based on the League OAuth2 server , can provide a complete OAuth2 server implementation for Laravel applications in a few minutes. OAuth2 Overview
Before we begin, let's briefly understand OAuth2.
What is the OAuth protocol
OAuth is short for Open Authorization. OAuth protocol provides a secure, open and simple standard for user resource authorization. The difference from the previous authorization method is that the authorization of OAuth will not make the third party touch the user's account information (such as user name and password), that is, the third party can apply for authorization of the user resource without using the user's user name and password, so OAuth is secure.
OAuth itself does not have a standard implementation. The back-end developers implement it according to the actual requirements and standard provisions. The steps are generally as follows:
- The client requests authorization from the user
- The user agrees to grant authorization
- Request a token from the authentication server according to the authorization obtained in the previous step
- The authentication server authenticates the authorization and issues the token after confirmation
- The client requests resources from the resource server using the token
- The resource server uses the token to confirm the correctness of the token to the authentication server, and provides resources after confirmation
What problems does OAuth2 solve
Any identity authentication is essentially based on the distrust of the requester. At the same time, the requester trusts the requestee. For example, when users request services, they will trust the server. Therefore, identity authentication is to solve the problem of identity trustworthiness.
In OAuth, there are three parties: users (here refers to users belonging to the service party), service parties, and third-party applications (clients).
The service provider does not trust users, so users are required to provide passwords or other trusted credentials;
The service provider does not trust the third party, so it needs the third party to provide its own credentials (usually some security signatures);
Some users trust a third party, so they are willing to give some of their services to a third party for use, but are unwilling to give their passwords to a third party;
In the process of OAuth, after the user logs in to the third-party system, he will first jump to the service party to obtain the one-time user authorization credentials, and then jump back to give it to the third party. The third-party server will give the authorization credentials and the identity credentials given to him by the service party to the service party. In this way, The service provider can determine that the third party has been authorized by the user for this service (based on the user's authorization credentials), and can determine that the identity of the third party can be trusted (based on the identity credentials). Therefore, the final result is that the third party successfully obtained the requested service from the service provider.
From the above process, we can see that OAuth completely solves the trust problem among users, service providers, and third parties during a service.
OAuth basic process
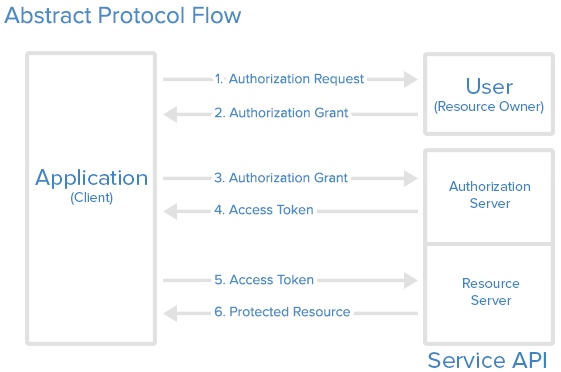
Members involved:
- Resource Owner
- Client (third-party access platform: requester)
- Resource Server
- Authorization Server
Note: Passport can only be used freely if you are very familiar with OAuth2. The above overview of OAuth2 is transferred from Understanding OAuth2.0 certification For more discussion on OAuth2 mode, please refer to Ruan Yifeng's blog: Understanding OAuth 2.0 )。
2. Installation
First install the Passport through Composer Package Manager:
composer require laravel/passport
Note: If you are prompted during installation that you need a higher version of Laravel: laravel/passport v5.0.0 requires illuminate/http ~5.6 , can be installed by specifying the version composer require laravel/passport ~4.0 。
The Passport service provider has registered its own database migration directory for the framework, so it needs to migrate the database after registering the service provider (the service provider will be automatically registered after Larave 5.5). Passport migration will generate a data table for the application to store the client and access token:
php artisan migrate
Note: If you do not want to use the default migration of Passport, you need to AppServiceProvider Of register Method Passport::ignoreMigrations method. You can use php artisan vendor:publish --tag=passport-migrations Export the default migration.
Next, you need to run passport:install Command. This command will create the encryption key required to generate the security access token. In addition, this command will also create "personal access" and "password grant" clients to generate the access token:
php artisan passport:install
The generated record is stored in the data table oauth_clients :

After running this command, add Laravel\Passport\HasApiTokens Trait to App\User Model. This trait will provide some auxiliary functions for the model class to check the token and scope of the authenticated user:
<? php namespace App; use Laravel\Passport\HasApiTokens; use Illuminate\Notifications\Notifiable; use Illuminate\Foundation\Auth\User as Authenticatable; class User extends Authenticatable { use HasApiTokens, Notifiable; }
Next, you need to AuthServiceProvider Of boot Method Passport::routes Method, which will register necessary routes for issuing access tokens, revoking access tokens, clients, and private access tokens:
<? php namespace App\Providers; use Laravel\Passport\Passport; use Illuminate\Support\Facades\Gate; use Illuminate\Foundation\Support\Providers\AuthServiceProvider as ServiceProvider; class AuthServiceProvider extends ServiceProvider { /** * The policy mappings for the application. * * @var array */ protected $policies = [ 'App\Model' => 'App\Policies\ModelPolicy', ]; /** * Register any authentication / authorization services. * * @return void */ public function boot() { $this->registerPolicies(); Passport::routes(); } }
Finally, in the configuration file config/auth.php Medium, need to set api Certified by guard driver Options are passport 。 This will tell the app to use the Passport when authenticating the input API request TokenGuard :
'guards' => [ 'web' => [ 'driver' => 'session', 'provider' => 'users', ], 'api' => [ 'driver' => 'passport', 'provider' => 'users', ], ],
Front end quick start
Note: If you want to use the Passport Vue component, the front-end JavaScript must use Vue Framework. These components also use the Bootstrap CSS framework. However, even if you do not use these tools, these components can also provide valuable references for you to implement your own front-end components.
Passport comes with JSON API for users to create client and private access token. However, considering that it is time-consuming to write front-end code to interact with these APIs, Passport also has a preset Vue The component is used as an example (or as a reference for its own implementation).
To publish Passport Vue components, you can use the vendor:publish Command:
php artisan vendor:publish --tag=passport-components
The published components are located in resources/assets/js/components Directory. After components are published, they need to be registered to resources/assets/js/app.js File:
Vue.component( 'passport-clients', require('./ components/passport/Clients.vue') ); Vue.component( 'passport-authorized-clients', require('./ components/passport/AuthorizedClients.vue') ); Vue.component( 'passport-personal-access-tokens', require('./ components/passport/PersonalAccessTokens.vue') );
After registering components, make sure to run npm run dev To recompile the front-end resources. After recompiling the front-end resources, these components can be placed in a template of the application to create client and private access tokens:
<passport-clients></passport-clients> <passport-authorized-clients></passport-authorized-clients> <passport-personal-access-tokens></passport-personal-access-tokens>
Deploy Passport
When deploying the Passport to the production server for the first time, you may need to run passport:keys Command. This command generates the encrypted keys required by the Passport to generate access tokens. The generated keys will not be stored in source code control: php artisan passport:keys
to configure
Token lifecycle
By default, the access token issued by Passport is valid for a long time. If you want to configure a token with a shorter life cycle, you can use tokensExpireIn and refreshTokensExpireIn Methods, which need to be AuthServiceProvider Of boot Method:
/** *Register any authentication/authorization service * * @return void */ public function boot() { $this->registerPolicies(); Passport::routes(); Passport::tokensExpireIn(now()->addDays(15)); Passport::refreshTokensExpireIn(now()->addDays(30)); }
Issue Access Token
Using OAuth2 through the authorization code is a familiar way for most developers. When using the authorization code, the client application will redirect the user to your server, and the server can pass or refuse to issue the request for access token to the client. Management client
Agreement: We refer to the OAuth2 authentication process. Here we agree that the Laravel application is the service party and the developer develops the application as a third-party client.
First, when developers build applications that interact with the Larvel application API, they need to register their applications with Larvel applications by creating a "client". Usually, this includes providing the name of the application and the URL to which the user's authorization request is redirected after passing. (Think about how you use microblog, WeChat, and QQ third-party login APIs to understand the process here.)
passport:client command
The easiest way to create a client is to use Artisan commands passport:client This command can be used to create your own client to facilitate testing OAuth2 functions. When you run client In the command, Passport will prompt you to enter more information about the client, and generate a client ID and secret for you:
php artisan passport:client
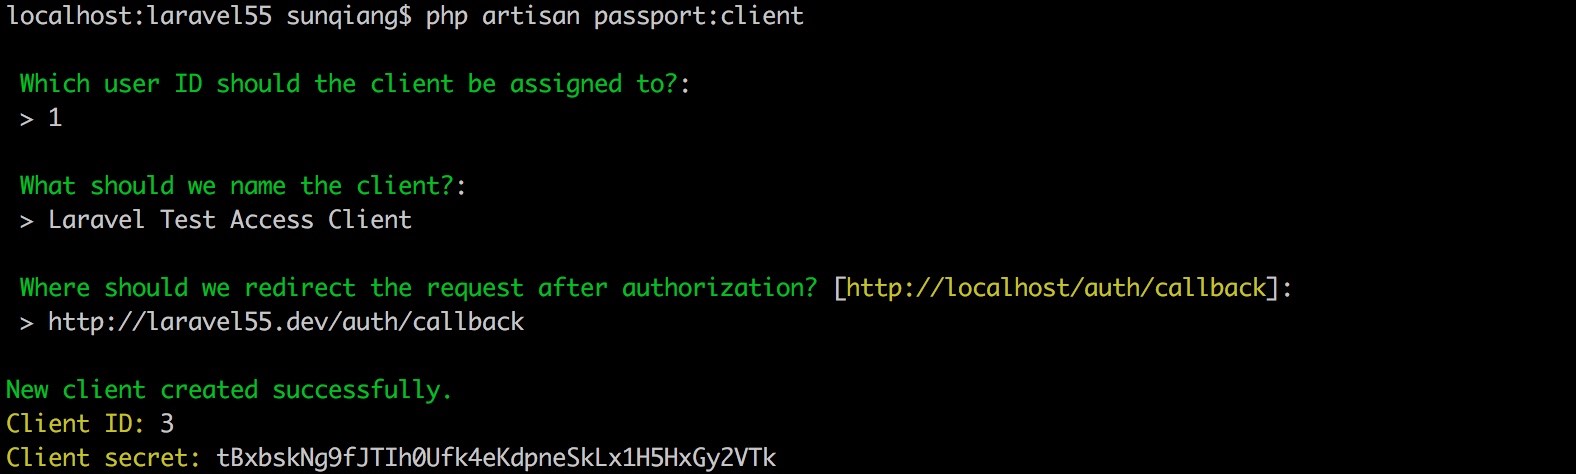
The newly generated record is stored in oauth_clients :

JSON API
Because third-party application developers cannot directly use the client To this end, Passport provides a JSON API for creating clients, which saves you the trouble of manually writing controllers for creating, updating, and deleting clients.
However, you need to pair the Passport's JSON API with your own front end to provide a background for third-party developers to manage their own clients. Now, let's take a look at all the APIs used to manage clients. For convenience, we will use Axios To demonstrate sending an HTTP request to an API:
Note: If you don't want to implement the whole client management front-end by yourself, you can use Front end quick start tutorial Build a front-end with full functions in a few minutes.
GET /oauth/clients
This route returns all clients for authenticated users, which is useful for displaying the list of user clients. Users can easily edit or delete clients:
axios.get('/oauth/clients') .then(response => { console.log(response.data); });
POST /oauth/clients
This route is used to create a new client. Two data are required to be passed in: the client's name and redirect URL, redirect The URL is the location to which the user is redirected after the authorization request is passed or rejected.
After the client is created, a client ID and secret will be attached. These two values will be used when requesting an access token. When a client creates a route, it returns a new client instance:
const data = { name: 'Client Name', redirect: ' http://example.com/callback ' }; axios.post('/oauth/clients', data) .then(response => { console.log(response.data); }) .catch (response => { // List errors on response... });
PUT /oauth/clients/{client-id}
This route is used to update the client. Two parameters are required: client's name and redirect URL。 redirect The URL is the location to which the user is redirected after the authorization request is passed or rejected. The route will return the updated client instance:
const data = { name: 'New Client Name', redirect: ' http://example.com/callback ' }; axios.put('/oauth/clients/' + clientId, data) .then(response => { console.log(response.data); }) .catch (response => { // List errors on response... });
DELETE /oauth/clients/{client-id}
This route is used to delete clients:
axios.delete('/oauth/clients/' + clientId) .then(response => { // });
Request Token
Authorization Redirection
After the client is created, the developer can use the corresponding client ID and secret to request the authorization code and access token from the application. First, the client application needs to generate a redirect request to the server application /oauth/authorize route:
Route::get('/redirect', function () { $query = http_build_query([ 'client_id' => 'client-id', 'redirect_uri' => ' http://example.com/callback ', 'response_type' => 'code', 'scope' => '', ]); return redirect(' http://your-app.com/oauth/authorize? '.$ query); });
Note: /oauth/authorize The route has passed Passport::routes Method is defined. You do not need to define this route manually.
We use the test client whose client ID is equal to 3 created above to test, and rewrite the above test code as follows (the route is defined in routes/api.php Middle):
Route::get('/redirect', function (){ $query = http_build_query([ 'client_id' => '3', 'redirect_uri' => ' http://laravel55.dev/auth/callback ', 'response_type' => 'code', 'scope' => '', ]); return redirect(' http://laravel55.dev/oauth/authorize? ' . $ query); });
At the same time routes/web.php register auth/callback route:
Route::get('/auth/callback', function (\Illuminate\Http\Request $request){ if ($request->get('code')) { return 'Login Success'; } else { return 'Access Denied'; } });
Then access the http://laravel55.dev/api/redirect , if the user is not already in laravel55 When you log in in the application, you will first be redirected to the form login page. After successful login, you will jump to the third-party authorized login page http://laravel55.dev/oauth/authorize?client_id=3&redirect_uri=http%3A%2F%2Flaravel55.dev%2Fauth%2Fcallback&response_type=code&scope= :
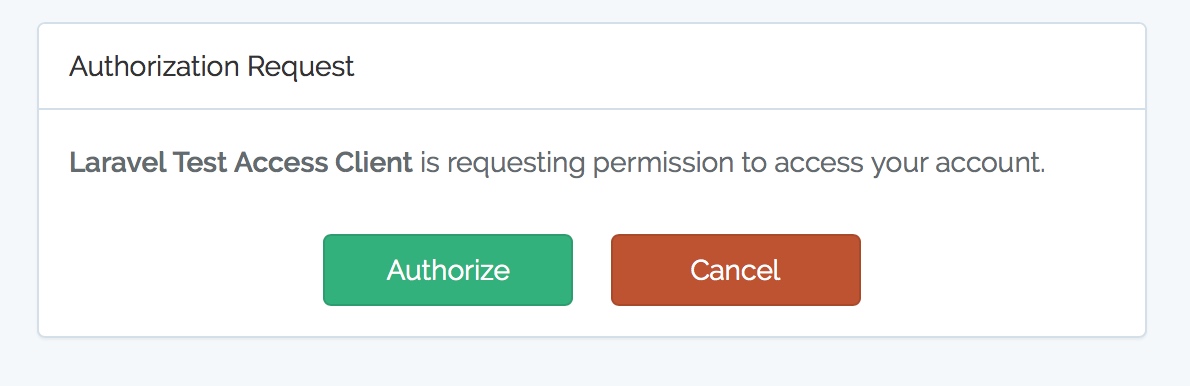
By request
When receiving an authorization request, Passport will automatically display a view template to users to allow them to pass or refuse the authorization request (as shown in the figure above). If users pass the request, they will be redirected back to the third-party application designated redirect_uri (In this case http://laravel55.dev/auth/callback ), this redirect_uri It must be consistent with the redirect The URL is consistent.
If you want to customize the authorization interface, you can use the Artisan command vendor:publish Publish the view template of the Passport. The published view is located in resources/views/vendor/passport :
php artisan vendor:publish --tag=passport-views
Convert authorization code into access token
If the user passes the authorization request, it will be redirected back to the third-party application. The third-party application will then send a POST Request to the server application to request an access token. This request should contain the authorization code specified by the user when he/she requests authorization. In this example, we will use the Guzzle HTTP library to generate POST Request:
Route::get('/auth/callback', function (Request $request) { $http = new GuzzleHttp\Client; $response = $http->post(' http://laravel55.dev/oauth/token ', [ 'form_params' => [ 'grant_type' => 'authorization_code', 'client_id' => '3', // your client id 'client_secret' => 'tBxbskNg9fJTIh0Ufk4eKdpneSkLx1H5HxGy2VTk', // your client secret 'redirect_uri' => ' http://laravel55.dev/auth/callback ', 'code' => $request->code, ], ]); return json_decode((string) $response->getBody(), true); });
/oauth/token The route will return a message containing access_token 、 refresh_token and expires_in Property. expires_in The attribute contains the expiration time of the access token (s):
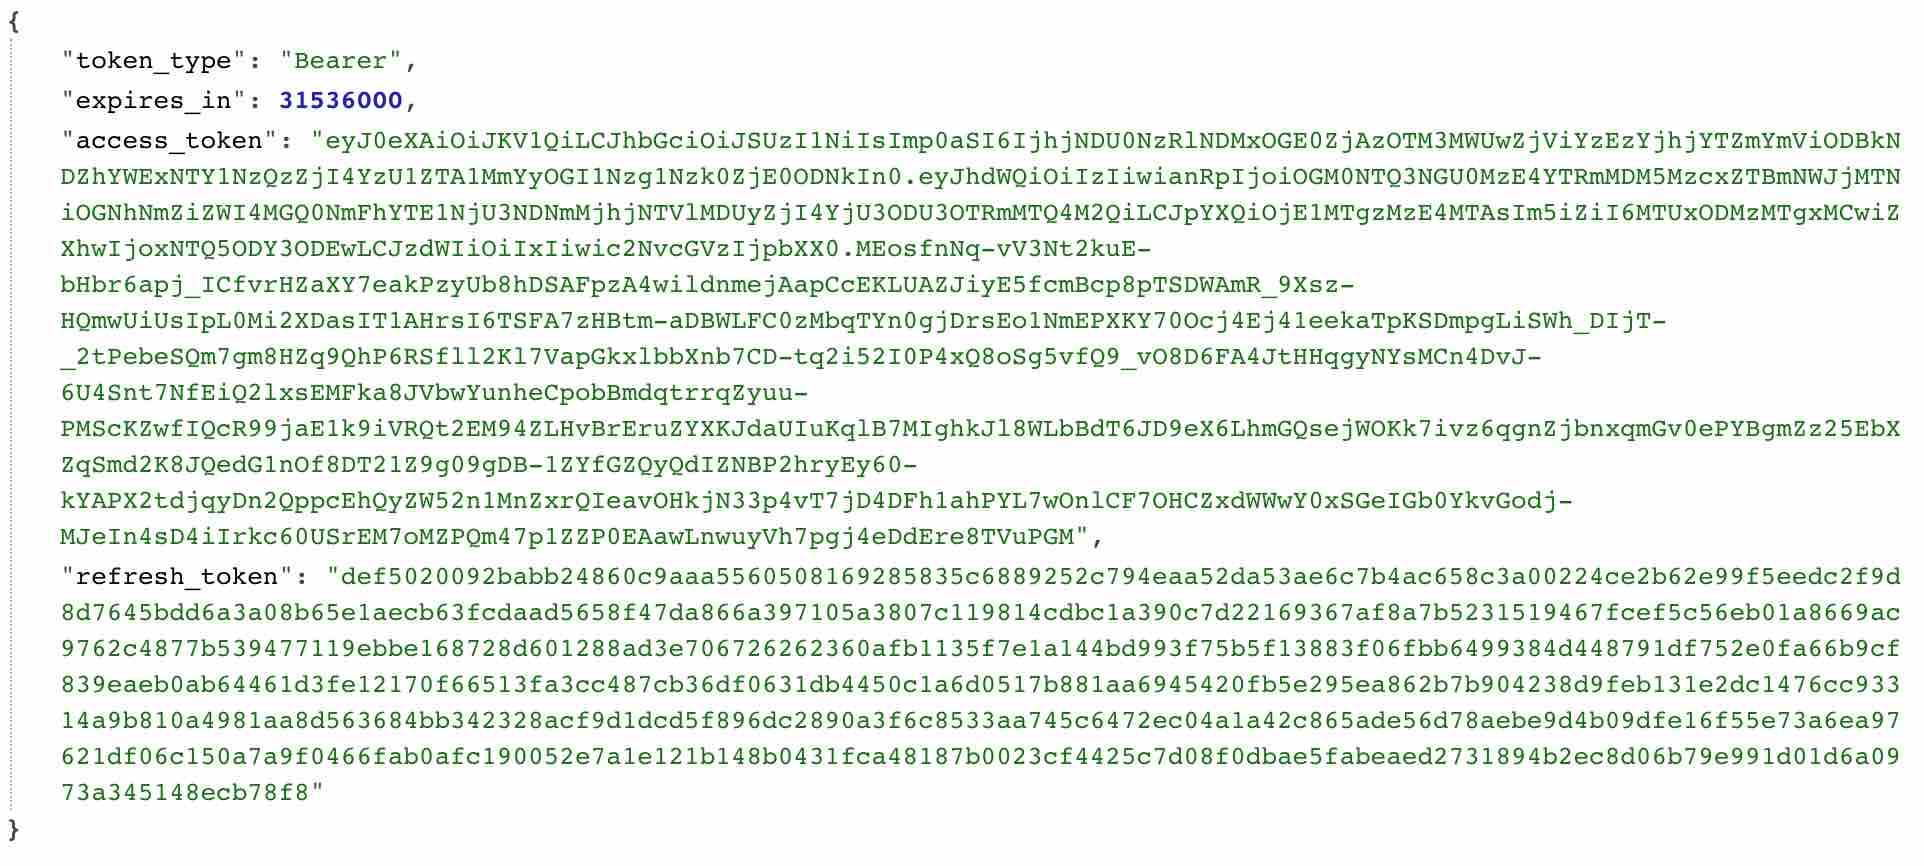
Note: and /oauth/authorize Same route, /oauth/token The route has passed Passport::routes The method has been defined. You do not need to define the route manually.
Get valid access_token You can use it to obtain other required resource information from the server. So far, the process of API authentication through authorization code has been completed. In actual development, 99% of API authentication is achieved in this way. refresh token
If the application issues a short-term valid access token, the user needs to provide refresh_token Refresh the access token. In this example, we use the Guzzle HTTP library to refresh the token: $http = new GuzzleHttp\Client; $response = $http->post(' http://laravel55.dev/oauth/token ', [ 'form_params' => [ 'grant_type' => 'refresh_token', 'refresh_token' => 'the-refresh-token', 'client_id' => 'client-id', 'client_secret' => 'client-secret', 'scope' => '', ], ]); return json_decode((string) $response->getBody(), true);
/oauth/token The route will return a message containing access_token 、 refresh_token and expires_in JSON response of the attribute. Similarly, expires_in Property contains the access token expiration time (s).
Password authorization token
OAuth2 password authorization allows your other first party clients, such as mobile applications, to use email address/user name+password to obtain access tokens. This allows you to securely issue access tokens to the first party client without requiring your users to go through the entire OAuth2 authorization code redirection process. Create a password issuing client
Before an application can issue a token through password authorization, it needs to create a password authorization client. You can use the --password Of options passport:client Command. If you have already run passport:install Command, you do not need to run this command again: php artisan passport:client --password
Here we use the passport:install The record created by the command is used as the test record. Request Token
After creating the password authorization client, you can send POST Request to /oauth/token Route (with user email address and password) to obtain access token. This route has passed Passport::routes The method has been registered and does not need to be defined manually. If the request is successful, it can be obtained from the JSON response returned by the server access_token and refresh_token : Route::get('/auth/password', function (\Illuminate\Http\Request $request){ $http = new \GuzzleHttp\Client(); $response = $http->post(' http://laravel55.dev/oauth/token ', [ 'form_params' => [ 'grant_type' => 'password', 'client_id' => '2', 'client_secret' => 'XtkyWdevgTnqbVtWTd8l7ASx76VtBBuZHzlAbCvm', 'username' => ' yaojinbu@163.com ', 'password' => 'test123', 'scope' => '', ], ]); return json_decode((string)$response->getBody(), true); });
Direct access when requesting http://laravel55.dev/auth/password OK. The returned data is as follows:
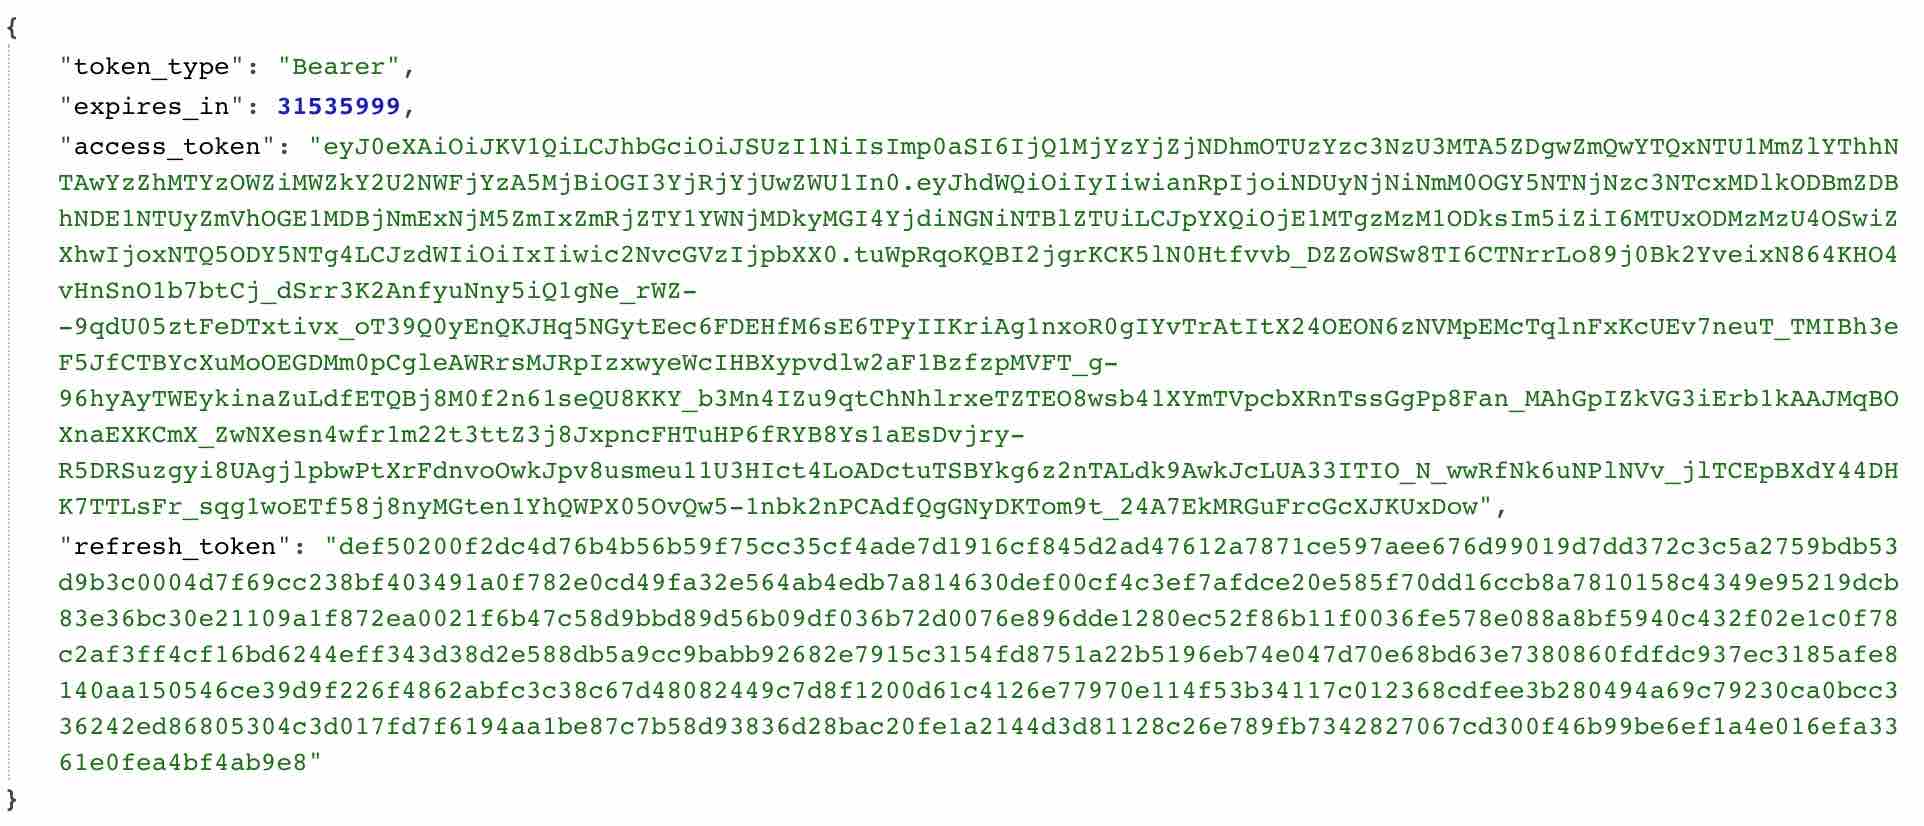
It is consistent with the format of the data returned through the authorization code.
Note: Remember that the access token is valid for a long time by default, but you can also use it if necessary Configure the longest life cycle of the access token 。
Request all domains
When using password authorization, you may want to use token authorization for all domains supported by the application. This can be done by requesting * Domain. If your request is * Domain, then the can Method always returns true , this field will only be assigned to users password Authorized token: $response = $http->post(' http://your-app.com/oauth/token ', [ 'form_params' => [ 'grant_type' => 'password', 'client_id' => 'client-id', 'client_secret' => 'client-secret', 'username' => ' taylor@laravel.com ', 'password' => 'my-password', 'scope' => '*', ], ]);
Implicit authorization token
Implicit authorization is similar to authorization code authorization. However, the token will be returned to the client without obtaining the authorization code. This authorization is usually applied to JavaScript or mobile applications where client credentials cannot be stored securely. To enable this authorization, set the AuthServiceProvider Called in enableImplicitGrant Method: /** * Register any authentication / authorization services. * * @return void */ public function boot() { $this->registerPolicies(); Passport::routes(); Passport::enableImplicitGrant(); }
After authorization is enabled, developers can use their client ID to request access tokens from applications. Third party applications need to send redirect requests to applications like this /oauth/authorize route:
Route::get('/redirect', function () { $query = http_build_query([ 'client_id' => 'client-id', 'redirect_uri' => ' http://example.com/callback ', 'response_type' => 'token', 'scope' => '', ]); return redirect(' http://your-app.com/oauth/authorize? '.$ query); });
Note: /oauth/authorize The route is already in Passport::routes Method. You don't need to define this route manually.
Client credential authorization token
Client credential authorization is applicable to machine to machine authentication. For example, you can use this authorization in scheduling tasks to perform maintenance tasks through APIs. To use this method, you first need to app/Http/Kernel.php Add new middleware to $routeMiddleware :
use Laravel\Passport\Http\Middleware\CheckClientCredentials; protected $routeMiddleware = [ 'client' => CheckClientCredentials::class, ];
Then apply the middleware to routing:
Route::get('/user', function(Request $request) { ... })->middleware('client');
To obtain a token, send a request to oauth/token :
$guzzle = new GuzzleHttp\Client; $response = $guzzle->post(' http://your-app.com/oauth/token ', [ 'form_params' => [ 'grant_type' => 'client_credentials', 'client_id' => 'client-id', 'client_secret' => 'client-secret', 'scope' => 'your-scope', ], ]); return json_decode((string) $response->getBody(), true);
Private Access Token
Sometimes, your users may want to issue access tokens to themselves instead of following the typical authorization code redirection process. Allowing users to issue tokens to themselves through the application UI is useful when users experience your API or as a simpler way to issue access tokens. Note: Private access tokens are always valid, and their life cycle is in use tokensExpireIn or refreshTokensExpireIn Method.
Create a private access client
Before your application can issue a private access token, you need to create a private access client. You can take --personal Of options passport:client Command, if you have already run passport:install Command, you do not have to run this command again:
php artisan passport:client --personal
Manage Private Access Tokens
After creating a private access client, you can use User On model instance createToken Method to issue a token for the given user. createToken Method takes the token name as the first parameter, and an optional field Array as the second parameter:
$user = App\User::find(1); // Creating a token without scopes... $token = $user->createToken('Token Name')->accessToken; // Creating a token with scopes... $token = $user->createToken('My Token', ['place-orders'])->accessToken;
JSON API
Passport also provides a JSON API for managing private access tokens. You can pair it with your front end to provide users with a background for managing private access tokens. Next, let's take a look at all the APIs used to manage private access tokens. For convenience, we use Axios To demonstrate sending HTTP requests to the API.
Note: If you don't want to implement your own private access token front-end, you can use Front end quick start tutorial Build a fully functional front end in minutes.
GET /oauth/scopes
This route will return all domains defined by the application. You can use this route to list all domains that users can assign to private access tokens:
axios.get('/oauth/scopes') .then(response => { console.log(response.data); });
GET /oauth/personal-access-tokens
This route will return all the private access tokens created by the authenticated user, which is useful when listing all the user's tokens for editing or deleting:
axios.get('/oauth/personal-access-tokens') .then(response => { console.log(response.data); });
POST /oauth/personal-access-tokens
This route will create a new private access token. This route requires passing in two parameters: name And those that need to be assigned to this token scopes :
const data = { name: 'Token Name', scopes: [] }; axios.post('/oauth/personal-access-tokens', data) .then(response => { console.log(response.data.accessToken); }) .catch (response => { // List errors on response... });
DELETE /oauth/personal-access-tokens/{token-id}
This route can be used to delete private access tokens:
axios.delete('/oauth/personal-access-tokens/' + tokenId);
Route protection
Through middleware
Passport provides an authentication guard to verify the access token of input request. When you use passport Drive configuration is good api After guard, you only need to specify on all routes auth:api Middleware: Route::get('/user', function () { // })->middleware('auth:api');
Pass access token
When calling a route protected by a Passport, consumers applying the API need to Authorization The header specifies their access tokens as Bearer Token. For example: $response = $client->request('GET', '/api/user', [ 'headers' => [ 'Accept' => 'application/json', 'Authorization' => 'Bearer '.$ accessToken, ], ]);
Token Scope
Define Scope
Scope allows API clients to request specific permission sets when requesting account authorization. For example, if you are building an e-commerce application, not all API consumers need the ability to place orders. Instead, you can let these consumers only request permission to access the order logistics status. In other words, the scope allows your application users to limit the operations that third-party applications can perform themselves. You can AuthServiceProvider Of boot Method Passport::tokensCan Method defines the scope of the API. tokensCan The method receives the scope name array and scope description. The scope description can be anything you want to display to the user through the authorization page:
use Laravel\Passport\Passport; Passport::tokensCan([ 'place-orders' => 'Place orders', 'check-status' => 'Check order status', ]);
Assign scope to token
Request authorization code
When requesting an access token using an authorization code, consumers should specify their desired scope as scope Query string parameter, scope Parameters are a list of scopes separated by spaces:
Route::get('/redirect', function () { $query = http_build_query([ 'client_id' => 'client-id', 'redirect_uri' => ' http://example.com/callback ', 'response_type' => 'code', 'scope' => 'place-orders check-status', ]); return redirect(' http://your-app.com/oauth/authorize? '.$ query); });
Issue private access token
If you use User Model-based createToken Method to issue a private access token, you can pass the expected scope array as the second parameter of the method:
$token = $user->createToken('My Token', ['place-orders'])->accessToken;
Check Scope
Passport provides two middleware that can be used to verify whether the input request has passed the token authentication of the issued scope. Before using, add the following middleware to app/Http/Kernel.php Filed $routeMiddleware Properties: 'scopes' => \Laravel\Passport\Http\Middleware\CheckScopes::class, 'scope' => \Laravel\Passport\Http\Middleware\CheckForAnyScope::class,
Check all scopes
scopes The middleware will assign an access token to verify the input request. The access token has all routes listed in the scope:
Route::get('/orders', function () { // Access token has both "check-status" and "place-orders" scopes... })->middleware('scopes:check-status,place-orders');
Check any scope
scope The middleware will assign an access token used to verify the input request with at least one route listed in the scope:
Route::get('/orders', function () { // Access token has either "check-status" or "place-orders" scope... })->middleware('scope:check-status,place-orders');
Check scope on token instance
After an access token authenticated request enters the application, you can still use the authenticated User On instance tokenCan Method to check whether the token has the given scope:
use Illuminate\Http\Request; Route::get('/orders', function (Request $request) { if ($request->user()->tokenCan('place-orders')) { // } });
Use JavaScript consumption API
When building an API, it is very useful to be able to consume your own API from your JavaScript application. This API development method allows your own application to consume the same API you share with others. This API can be consumed by your Web application, your mobile application, third-party applications, and any SDK you may publish on multiple package managers. Generally, if you want to consume your own API from your JavaScript application, you need to manually send an access token to the application and pass it in every request of the application. However, Passport provides a middleware to handle this operation. All you need to do is add the middleware CreateFreshApiToken reach web Middleware group:
'web' => [ // Other middleware... \Laravel\Passport\Http\Middleware\CreateFreshApiToken::class, ],
The Passport middleware will attach laravel_token From the cookie to the output response, this cookie contains the encrypted JWT. Passport will use this JWT to authenticate the API request from the JavaScript application. Now, you can send the request to the application's API without displaying the pass through access token:
axios.get('/user') .then(response => { console.log(response.data); });
When using this authentication method, Axios will automatically send X-CSRF-TOKEN Header. In addition, Axios introduced by Laravel's default JavaScript scaffold will also send X-Requested-With Head. But you need to make sure that HTML meta tag CSRF token introduced in:
window.axios.defaults.headers.common = { 'X-Requested-With': 'XMLHttpRequest', };
Note: If you use other JavaScript frameworks, you need to ensure that each request is configured to send these two request headers.
event
Passport will trigger events when issuing access tokens and refreshing tokens. You can use these events to process or revoke other access tokens in the database. You can use the EventServiceProvider Add listeners to these events in: /** * The event listener mappings for the application. * * @var array */ protected $listen = [ 'Laravel\Passport\Events\AccessTokenCreated' => [ 'App\Listeners\RevokeOldTokens', ], 'Laravel\Passport\Events\RefreshTokenCreated' => [ 'App\Listeners\PruneOldTokens', ], ];
test
Passport's actingAs Method can be used to specify the current authenticated user and its scope, which is passed to actingAs The first parameter of the method is the user instance, and the second parameter is the scope array authorized to the user token: public function testServerCreation() { Passport::actingAs( factory(User::class)->create(), ['create-servers'] ); $response = $this->post('/api/create-server'); $response->assertStatus(200); }