Quick start: basic configuration and use, read-write separation&database transaction
brief introduction
Laravel makes it very easy to connect different databases and add, delete, modify and query databases, whether using native SQL, query builder or Eloquent ORM. At present, Larave supports four types of database systems:- MySQL
- Postgres
- SQLite
- SQL Server
to configure
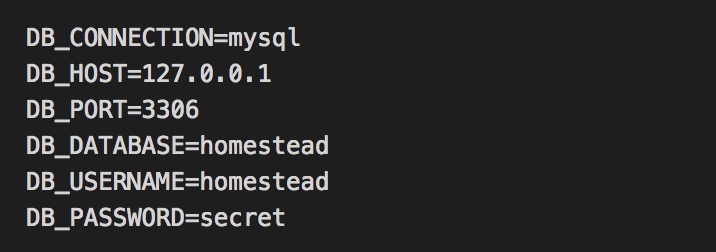
The applied database configuration is located in config/database.php (However, sensitive information such as database user and password is located in .env Files, if you don't know .env Who is the Holy One? You may need to make up lessons here: https://laravelacademy.org/post/7620.html#toc -4 )。 In this file, you can define all database connections and specify which connection is the default connection. This file provides examples of all configurations that support database systems.
By default, Laravel uses MySQL as the database engine, and the sample configuration has been set for the Laravel Homestead environment (meaning that if you use Homestead as the development environment, you can achieve zero configuration). Of course, you can also modify the configuration for the local database as required (in the .env Modify database configuration in):
SQLite Configuration
Use in the project root directory touch database/database.sqlite After the command creates a new SQLite database, you can use the database absolute path configuration environment variable to point to the newly created database:
DB_CONNECTION=sqlite DB_DATABASE=/absolute/path/to/database.sqlite
Note: As its name indicates, SQLite is a lightweight, ACID compliant relational database, which is contained in a relatively small C library. Unlike many other database management systems, SQLite is not a client/server database engine, but is integrated into user programs. As an embedded database, it is a common choice for applications (such as web browsers) to store data locally/on the client side. For more information about SQLite, please see its official website: http://www.sqlite.org/index.html
Read write separation
Sometimes you want to use one database connection for query, and another database connection for insert, update, and delete. It is very simple to achieve this read-write separation in Laravel. No matter you use native SQL, query builder, or Eloquent ORM, as long as the configuration is correct, the appropriate connection will always be used.
To know how to configure a read/write connection, refer to the following example:
'mysql' => [ 'read' => [ 'host' => '192.168.1.1', ], 'write' => [ 'host' => '196.168.1.2' ], 'driver' => 'mysql', 'database' => 'database', 'username' => 'root', 'password' => '', 'charset' => 'utf8', 'collation' => 'utf8_unicode_ci', 'prefix' => '', ],
Note that we have added two keys in the configuration array: read and write The corresponding values of these two keys have an array containing a single key "host", and the mapped IP values are read connections and write connections respectively. Other database configuration items for read/write connections share the same mysql The main array configuration of.
If we want to overwrite the configuration in the main array, just put the corresponding configuration item in read and write Array. In this example, 192.168.1.1 Will be used as a read connection, and 192.168.1.2 Will be used as a Write connection. The credentials (user name/password), prefix, character set and other configurations of the two database connections will be shared mysql Similarly, if the settings in the array are different read or write It can be configured separately in the array.
For most applications, there are more reads and less writes. In this case, how to configure multiple read connections and one write connection? You can do this:
'mysql' => [ 'driver' => 'mysql', 'read' => [ 'host' => ['193.168.1.1', '194.168.1.1'] ], 'write' => [ 'host' => '196.168.1.2' ], // ]
When Larave reads data, it will select a random IP from the provided IP addresses to connect. Students interested in the implementation principle can view Illuminate\Database\Connectors\ConnectionFactory The underlying source code.
Note: At present, read/write separation only supports a single write connection.
sticky option
sticky Option is an optional configuration value that allows immediate reading of records written to the database during the current request life cycle. If sticky If the option is enabled and a "write" operation occurs in the current life cycle, all subsequent "read" operations will use this "write" connection (provided that it is within the same request life cycle), which can ensure that the data written in the same request life cycle can be read immediately, so as to avoid data inconsistency caused by master slave delay, Whether or not to enable this feature depends on you.
College note: Of course, this is just a very preliminary solution to the delay of master slave data synchronization in a distributed database system. Small and medium-sized websites with low traffic can do this, but websites with high traffic and high concurrency can't do this. The separation of master slave read and write is originally intended to solve the single point performance problem, which actually leads back the problem, As a result, all reads and writes are concentrated on the write database. In the scenario of high concurrency and frequent writes, the consequences may be unimaginable. But in other words, for small and medium-sized sites with less concurrency and less frequent write operations, sticky This is an elementary solution.
Use a different database connection
When using multiple database connections, you can use the DB On the facade connection Method to access different connections. Pass to connection Methodological name Corresponding configuration file config/database.php A connection set in:
$users = DB::connection('read')->select(...);
You can even specify the database and connection name using the :: separate:
$users = DB::connection('mysql::read')->select(...);
You can also use the getPdo Method to access the underlying native PDO instance:
$pdo = DB::connection('read')->getPdo();
Run native SQL query
After configuring the database connection, you can use DB Facade to run the query. DB The door face provides corresponding methods for each operation: select , update , insert , delete and statement 。 Run Select Query
Run a basic query using DB Facade select method:
<? php namespace App\Http\Controllers; use Illuminate\Support\Facades\DB; use App\Http\Controllers\Controller; class UserController extends Controller { /** *Display the user list of the application * * @return Response */ public function index() { $users = DB::select('select * from users where active = ?', [1]); return view('user.index', ['users' => $users]); } }
Pass to select The first parameter of the method is a native SQL statement, and the second parameter needs to be bound to the parameter binding of the query. Usually, these are where The value in the clause constraint. Parameter binding can avoid SQL injection attacks (the verification of input parameters is controlled by the implementer, and the user cannot pass arbitrary query parameters).
select Method returns a result set in the form of an array. Each result in the array is a PHP stdClass Object:

You can access the result value as follows:
foreach ($users as $user) { echo $user->name; }
Use Named Binding
In addition to using ? In addition to the placeholder representing parameter binding, you can also use named binding to execute queries:
$results = DB::select('select * from users where id = :id', ['id' => 1]);
Run Insert Statement
use DB Facade insert Method to execute the insert statement. and select Similarly, this method takes the native SQL statement as the first parameter and parameter binding as the second parameter:
DB::insert('insert into users (id, name) values (?, ?)', [1, 'Academician']);
Run Update Statement
update Method is used to update existing records in the database. This method returns the number of rows affected by the update statement:
$affected=DB:: update ('update users set votes=100 where name=? ', ['Xuejun']);
Run Delete Statement
delete Method is used to delete records that already exist in the database, and update Similarly, the statement returns the number of deleted rows:
$deleted = DB::delete('delete from users');
College note: use delete and update You need to be very careful when making statements, because the consequences caused by careless setting of conditions may be irreversible, such as those without conditions delete All records in the data table will be deleted by the statement! These are bloody lessons ahead.
Run a generic statement
Some database statements do not return any value, such as adding a table, modifying a table, deleting a table, etc. For this type of operation, you can use DB Facade statement method:
DB::statement('drop table users');
Listen to query events
If you want to obtain the execution of each SQL statement in the application, you can use listen Method, which is very useful for querying logs and debugging. You can register a query listener in the service provider: <? php namespace App\Providers; use Illuminate\Support\Facades\DB; use Illuminate\Support\ServiceProvider; class AppServiceProvider extends ServiceProvider { /** * Bootstrap any application services. * * @return void */ public function boot() { DB::listen(function ($query) { // $query->sql // $query->bindings // $query->time }); } /** * Register the service provider. * * @return void */ public function register() { // } }
Database transactions
To run a series of operations in a database transaction, you can use the DB Facade transaction Method, using transaction Method requires no manual rollback or commit: if an exception is thrown in the transaction closure, the transaction will be rolled back automatically; If the closure is successfully executed, the transaction will be automatically committed: DB::transaction(function () { DB::table('users')->update(['votes' => 1]); DB::table('posts')->delete(); });
Dealing with Deadlocks
Database deadlock refers to two or more database operations that are interdependent. One side needs to wait for the other side to exit to obtain resources. However, if neither side exits in advance, it will cause a deadlock. A side effect of database transactions is deadlock. to this end transaction Method receives an optional parameter as the second parameter, which is used to define the maximum retry times of a transaction when a deadlock occurs. If the number of attempts exceeds the specified value, an exception will be thrown:
DB::transaction(function () { DB::table('users')->update(['votes' => 1]); DB::table('posts')->delete(); }, 5);
Using transactions manually
If you want to manually start a transaction to have better control over rollback and commit, you can use DB Facade beginTransaction method:
DB::beginTransaction();
You can rollBack Method Rollback transaction:
DB::rollBack();
Finally, you can go through commit Method commit transaction:
DB::commit();
Note: Use DB The facade transaction method can also be used to control the transaction of the query builder and Eloquent ORM. We will see these two pieces in a minute.