HTTP request filter: middleware
brief introduction
Middleware provides a convenient mechanism for filtering HTTP requests entering applications. For example, Larave has a built-in middleware to verify whether the user has been authenticated (such as logging in). If the user has not been authenticated, the middleware will redirect the user to the login page. If the user has been authenticated, the middleware will allow the request to proceed to the next step. Of course, in addition to authentication, middleware can also be used to handle many other tasks. For example, CORS middleware can be used to add appropriate headers (cross domain) for responses leaving the site; The log middleware can record all requests entering the site, so that we can build a system log system.
Larave framework comes with some middleware, including authentication, CSRF protection middleware, etc. All middleware is located in app/Http/Middleware Directory.
This tutorial will focus on the definition, registration and use of middleware.
Define middleware
To create a new middleware, you can use the Artisan command make:middleware : php artisan make:middleware CheckToken
This command will be app/Http/Middleware Create a new middleware class under the directory CheckToken In this middleware, we only allow token Equal to the specified value laravelacademy.org Or we will jump to the website of Laravel College: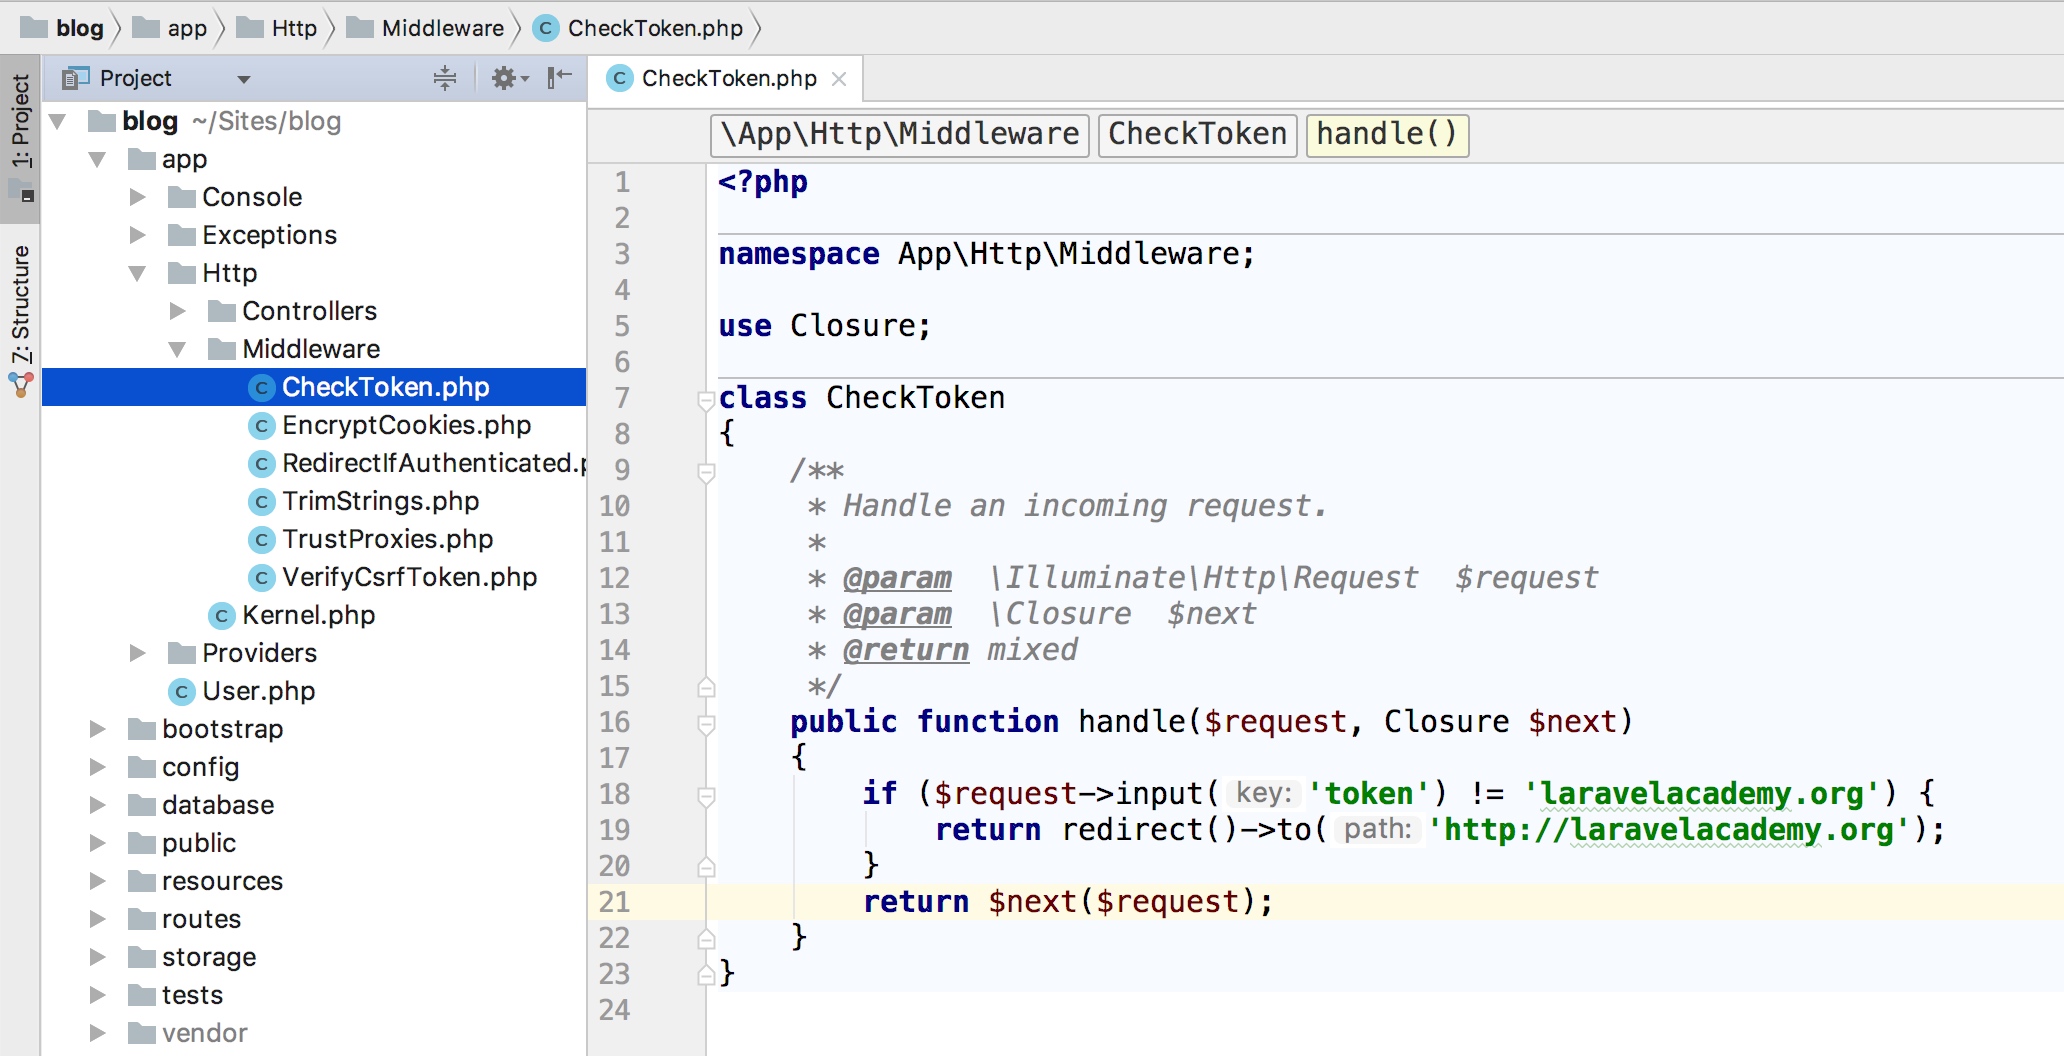
As you can see, if token != 'laravelacademy.org' The middleware will return an HTTP redirect to Laravel College; Otherwise, the request will be passed on. The request can be passed down by calling the callback function $next And pass in the current $request 。
Note: At this time, only the logic of the middleware has been defined. To make the middleware effective, it needs to be registered to the specified route. We will soon teach you how to do this in the following part of registering middleware.
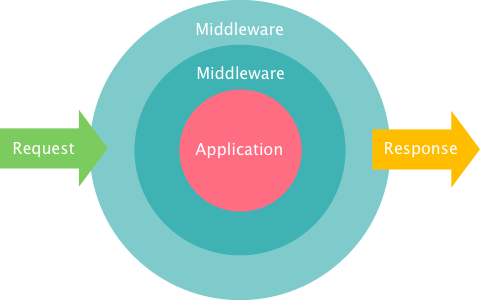
The best way to understand middleware is to regard it as a "layer" that HTTP requests must pass through before reaching the target action. Each layer will check the request and can reject it completely. Middleware before/after request
Whether a middleware executes before or after a request depends on the middleware itself. For example, the following middleware will perform some tasks before request processing: <? php namespace App\Http\Middleware; use Closure; class BeforeMiddleware { public function handle($request, Closure $next) { //Execute action return $next($request); } }
The following middleware will perform its tasks after request processing:
<? php namespace App\Http\Middleware; use Closure; class AfterMiddleware { public function handle($request, Closure $next) { $response = $next($request); //Execute action return $response; } }
Register middleware
Middleware can be divided into three categories: global middleware, middleware group, and designated routing middleware: Global middleware
If the middleware you want to define is executed at every HTTP request, you only need to add the corresponding middleware class to the app/Http/Kernel.php Array Properties for $middleware Middle: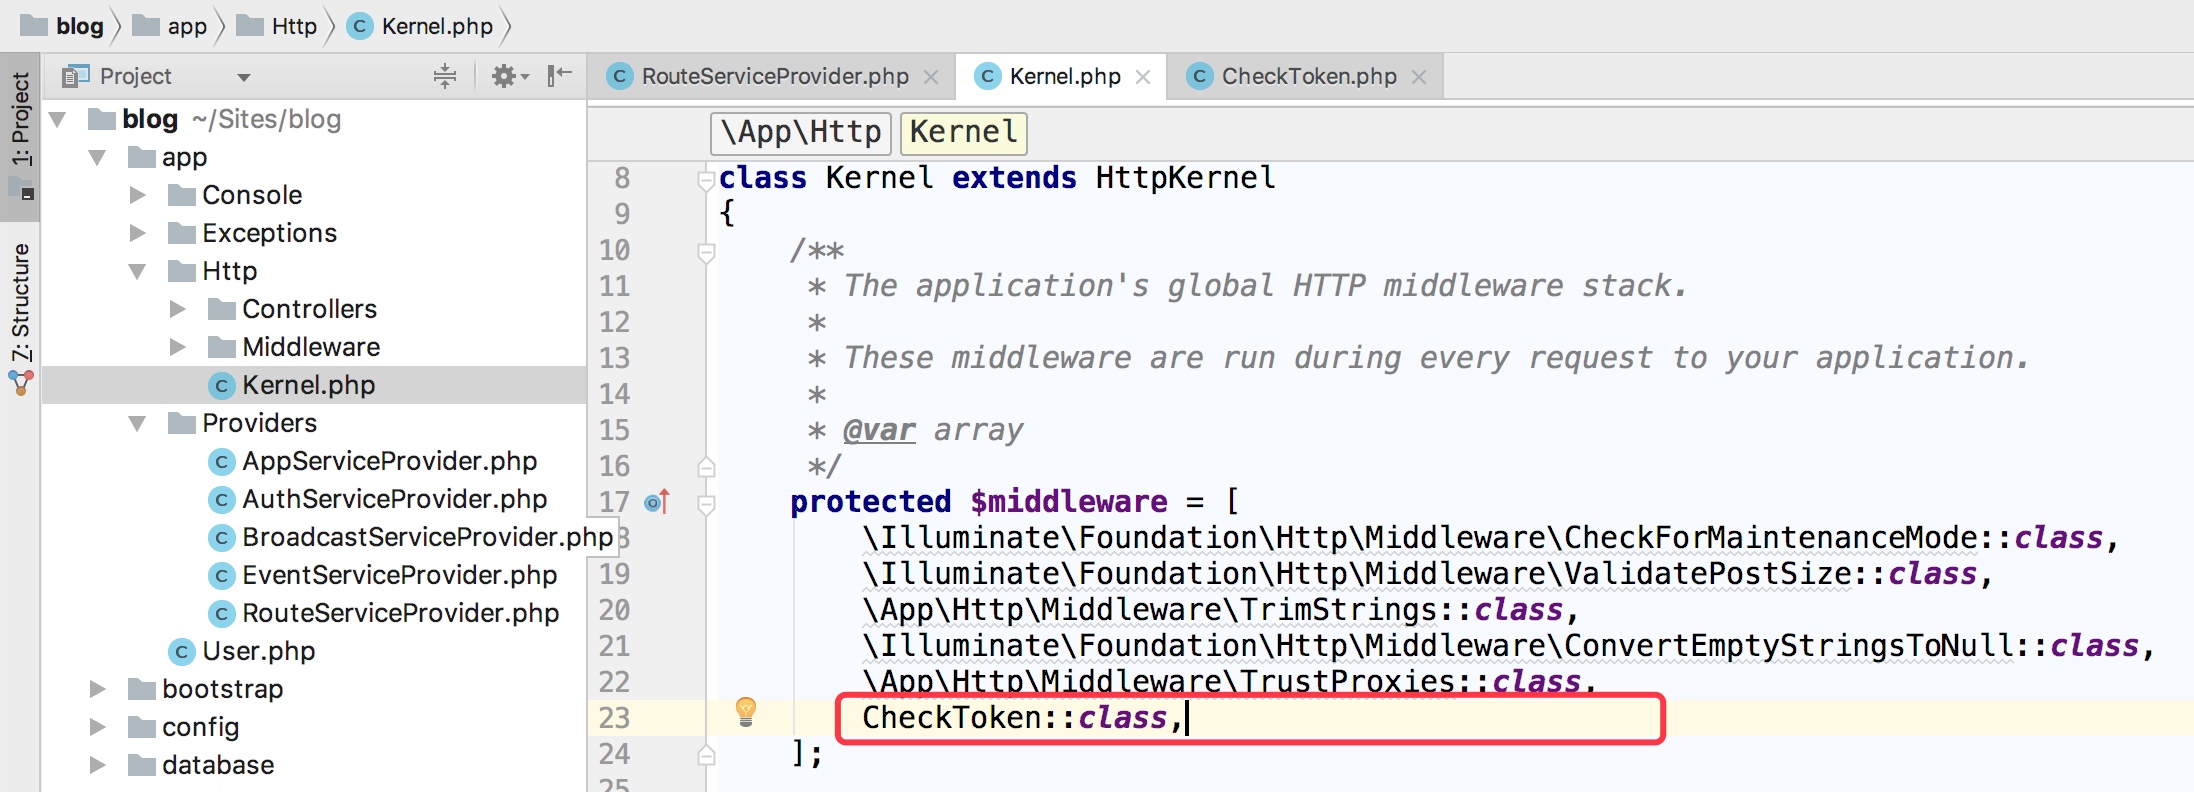
However, unless we really need it, we generally do not put business level middleware into global middleware.
Allocate middleware to the specified route
If you want to allocate middleware to a specified route, you should first select app/Http/Kernel.php One is allocated to the middleware in the file key , by default, the $routeMiddleware The attribute contains the middleware provided by Laravel. To add your own middleware, just append it to the following and assign one key , for example: //In the App Http Kernel class /** *List of applied routing middleware * *These middleware can be assigned to a routing group or a single route * * @var array */ protected $routeMiddleware = [ 'auth' => \Illuminate\Auth\Middleware\Authenticate::class, 'auth.basic' => \Illuminate\Auth\Middleware\AuthenticateWithBasicAuth::class, 'bindings' => \Illuminate\Routing\Middleware\SubstituteBindings::class, 'can' => \Illuminate\Auth\Middleware\Authorize::class, 'guest' => \App\Http\Middleware\RedirectIfAuthenticated::class, 'throttle' => \Illuminate\Routing\Middleware\ThrottleRequests::class, 'token' => CheckToken::class ];
After the middleware is defined in the HTTP Kernel, it can be used middleware Method to assign it to a route:
Route::get('/', function () { // })->middleware('token');
In this way, when we access http://blog.dev Will jump to https://xueyuanjun.com , only when accessing http://blog.dev?token=laravelacademy.org The following effects can be seen:

You can use arrays to allocate multiple middleware to routes:
Route::get('/', function () { // })->middleware('token', 'auth');
Complete class names can also be passed when middleware is allocated (this method is not recommended):
use App\Http\Middleware\CheckToken; Route::get('admin/profile', function () { // })->middleware(CheckToken::class);
Middleware group
Sometimes you may want to assign related middleware to the same group by specifying a key name, so that it can be more easily allocated to routes. This can be done by using the $middlewareGroups Property implementation. Larravel brought it out of the box web and api Two middleware groups, respectively, contain common middleware that can be applied to Web and API routing:
/** *Applied middleware group * * @var array */ protected $middlewareGroups = [ 'web' => [ \App\Http\Middleware\EncryptCookies::class, \Illuminate\Cookie\Middleware\AddQueuedCookiesToResponse::class, \Illuminate\Session\Middleware\StartSession::class, // \Illuminate\Session\Middleware\AuthenticateSession::class, \Illuminate\View\Middleware\ShareErrorsFromSession::class, \App\Http\Middleware\VerifyCsrfToken::class, \Illuminate\Routing\Middleware\SubstituteBindings::class, ], 'api' => [ 'throttle:60,1', 'bindings', ], ];
Middleware groups are assigned to routing and controller actions using the same syntax as assigning a single middleware. Again, the purpose of the middleware group is to facilitate the implementation of multiple middleware assigned to routes at one time:
Route::get('/', function () { // })->middleware('web'); Route::group(['middleware' => ['web']], function () { // });
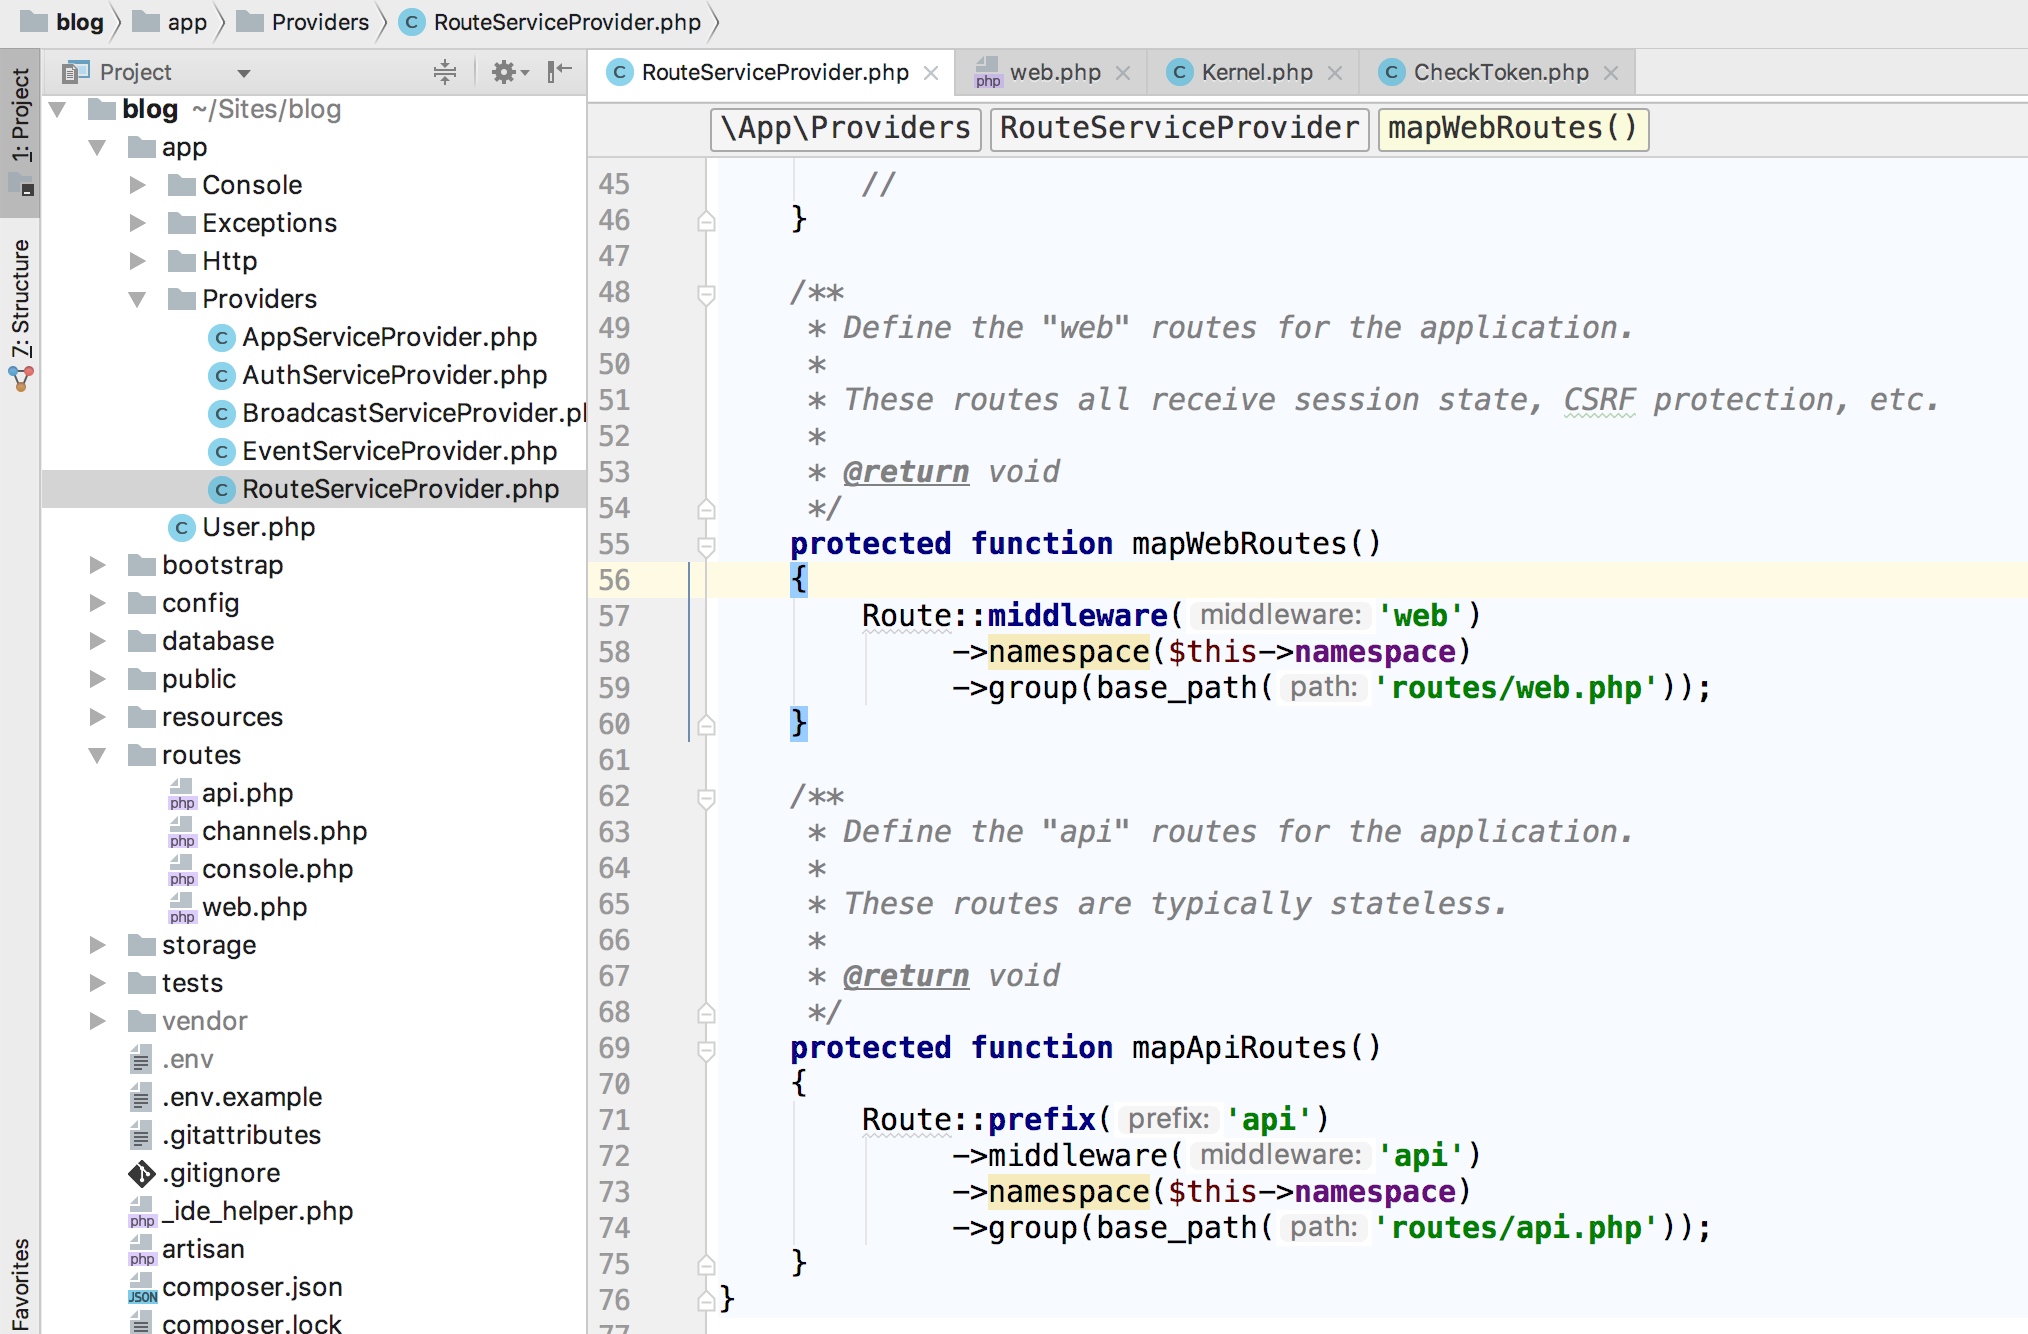
By default, RouteServiceProvider Automatically set the middleware group web apply to routes/web.php File, set the middleware group api apply to routes/api.php :
Of course, we can set our own middleware group to achieve more flexible middleware allocation strategies:
/** *The applied middleware group * * @var array */ protected $middlewareGroups = [ 'web' => [ \App\Http\Middleware\EncryptCookies::class, \Illuminate\Cookie\Middleware\AddQueuedCookiesToResponse::class, \Illuminate\Session\Middleware\StartSession::class, // \Illuminate\Session\Middleware\AuthenticateSession::class, \Illuminate\View\Middleware\ShareErrorsFromSession::class, \App\Http\Middleware\VerifyCsrfToken::class, \Illuminate\Routing\Middleware\SubstituteBindings::class, ], 'api' => [ 'throttle:60,1', 'bindings', ], 'blog' => [ 'token', ] ];
We modify routes/web.php The following middleware allocation methods:
Route::group(['middleware'=>['blog']],function(){ Route::get('/', function () { return view('welcome', ['website' => 'Laravel']); }); Route:: view ('/view', 'welcome', ['website '=>' Larravel College ']); });
So we visit http://blog.dev and http://blog.dev/view You should always take it with you token=laravelacademy.org Parameter, otherwise it will jump to the Larravel Academy website.
Middleware parameters
The middleware can also receive additional user-defined parameters. For example, if the application needs to verify whether the authenticated user has the specified role before executing a given action, you can create a CheckRole To receive the role name as an additional parameter. Additional middleware parameters will be $next The parameters are passed into the middleware:
<? php namespace App\Http\Middleware; use Closure; class CheckRole { /** *Process input request * * @param \Illuminate\Http\Request $request * @param \Closure $next * @param string $role * @return mixed * translator https://xueyuanjun.com */ public function handle($request, Closure $next, $role) { if (! $ request->user()->hasRole($role)) { // Redirect... } return $next($request); } }
Middleware parameters can be passed when defining routes : Separate the middleware name and parameter name to specify. Multiple middleware parameters can be separated by commas:
Route::put('post/{id}', function ($id) { // })->middleware('role:editor');
According to the above demonstration example, this function is also relatively simple to implement, so it will not be demonstrated separately.
Terminal middleware
Terminal middleware can be understood as a back-end processing middleware. Sometimes the middleware may need to do some work after the HTTP response is sent to the browser, for example, the built-in session The middleware will write the session data to the memory after the response is sent to the browser. To achieve this function, you need to define a termination middleware and add terminate Method to this middleware: <? php namespace Illuminate\Session\Middleware; use Closure; class StartSession { public function handle($request, Closure $next) { return $next($request); } public function terminate($request, $response) { //Store session data } }
terminate Method will receive the request and response as parameters. After defining a terminal middleware, you need to add it to the app/Http/Kernel.php The global middleware list of the file.
When calling the terminate Method, Larravel will take a new instance of the middleware from the service container. If you want to call handle and terminate When using the same middleware instance, you need to use the singleton Method to register the middleware to the container in a single instance. We will talk about the service container later, but we won't go further for the time being.