Gravity forms is a famous WordPress form plug-in, which is used to add form content on the website page, such as the inquiry form of foreign trade website, contact us form, etc.Commonly used with Chinese foreign trade websitesContact Form 7 plug-inSimilarly, they are used to generate website forms.Gravity forms are paid plug-ins, while contact form 7 can be used for free.
On the left side of the WordPress background, click Form>New Form to add the title and description of the form.
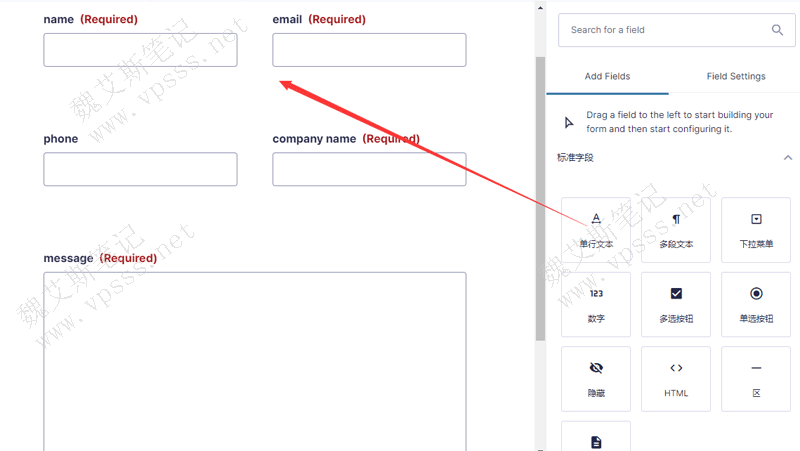
On the form editing page, there are standard fields, advanced controls, article fields, and price fields to add on the right.
General inquiry forms can add single line text, digital text and multi segment text of standard fields.You can also add web address, file upload, verification code, multiple selection menu, and product and quantity tabs in the price field in the advanced control.
The addition process is to drag various form elements from the right to the left and sort the layout, which is very simple and easy.
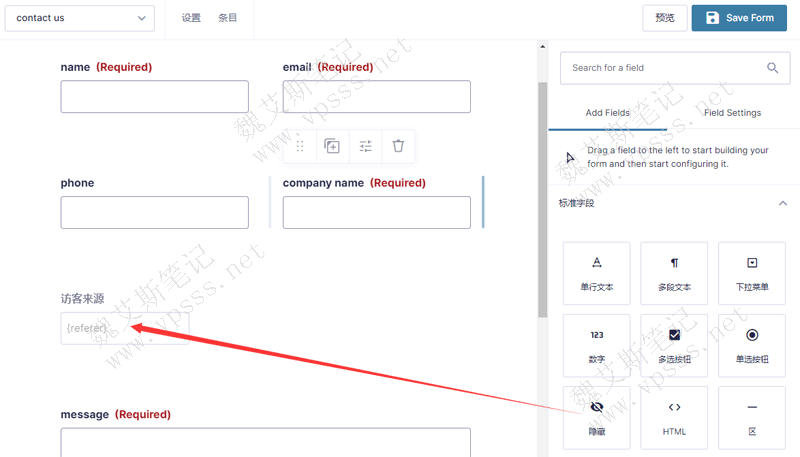
Add a [Hidden Field] (in the standard field) to obtain the URL of the page where visitors send inquiries.
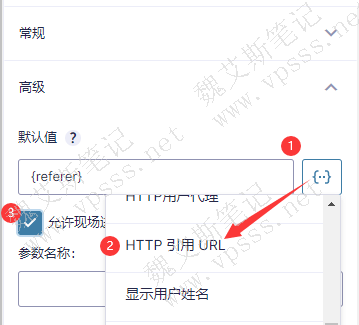
Click the hidden field, and enter "visitor source" in the field label of General on the right. For the default value of Advanced Options, click {..} on the right, select "HTTP Reference URL" from the drop-down menu, and check "Allow Off the shelf Dynamic Filling".
Remember to click save form in the upper right corner after adding.
3. Gravity forms plug-in setting parameters
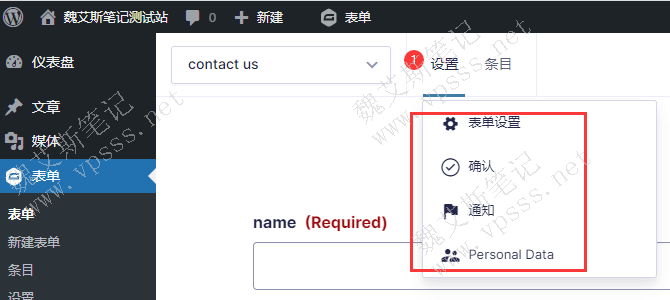
After adding the form, remember to set various parameters in turn in the settings.
Form settings: the form title must be filled in, the form description, form layout, whether the form button is represented by text or image, and how to add honeypot anti garbage to the form.
Confirm: After the visitor sends the form, there is a prompt: Thank you for your participation!We have received your submitted data, we will review it as soon as possible, please be patient. Similar prompt statements.
Notice: The form of notice that you receive an inquiry.Send to email (required) Fill in the email address you want to use to receive inquiries.Other contents need no modification.
Item: Inquiry record you received.The inquiry records are built in the Gravity forms, and no additional plug-ins are required.Inquiries received will be saved and sent to your set email address at the same time.
As shown in the figure below, the received test email contains visitor name, visitor email, company name, visitor source, inquiry information, etc.
Among them, the source of visitors is more valuable.If you often receive inquiries from certain URLs, it means that the products on these pages can attract more visitors' attention, which is of great reference significance for foreign trade products, website content, etc.
4. Gutenberg Insert Gravity Forms Form
If you use Gutenberg editor, as shown in the following figure.
Add a Gravity forms block to the page and article page, and select the created form on the right.
5. Elementor Insert Gravity Forms Form
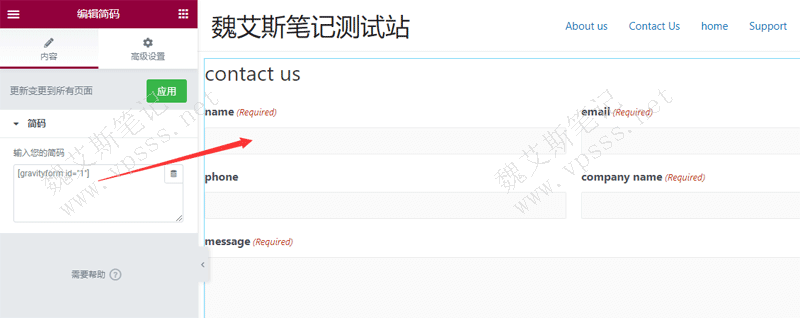
If you use the Elementor page editor, you can add the Gravity forms form with short code.
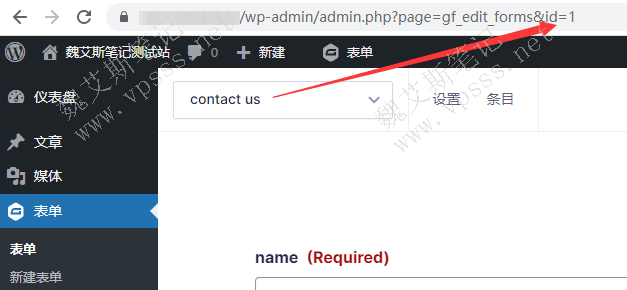
First, obtain the ID number of the current form from the editing status of the Gravity forms form, as shown in the following figure. The browser URL of the contact us form shows that the ID number is 1.
You need to useElementorPlug in, drag [General]>simple code elements from the article page/page to the right section.
Add the following code
[gravityform id=”1″]
The simplified number is the form ID value obtained above.
As shown in the following figure, after adding the simplified code, you can see the actual form effect on the right.
Click Apply and Save to take effect.
6. Summary
Gravity forms can add various forms when generating forms, while contact form 7 is relatively simple.
Gravity forms can send inquiry emails to your email address withoutSMTP plug-inAuxiliary.The contact form 7 requires additional smtp plug-ins to send emails.
Gravity forms have the function of saving inquiry plug-in, which can be seen in [Item].The contact form 7 needs the help ofFlamingo plug-inOnly then can the inquiry be recorded.
Another feature of Gravity forms is that it can display the source url of visitors and the page from which they come from your website. This function is uniqueSelect Gravity formsOne of the reasons.
The former is a paid plug-in, while the latter can be used for free and most of its functions can meet the needs of the inquiry form. There are many domestic choices of the latter. As long as you can interact with visitors and get the email and other contact information, you can communicate by email later.
Article name: Detailed Introduction to WordPress Form Plug in Gravity Forms Article link:https://www.vpsss.net/28098.html Copyright notice: The resources of this website are only for personal learning and exchange, and are not allowed to be reproduced and used for commercial purposes, otherwise, legal issues will be borne by yourself. The copyright of the pictures belongs to their respective creators, and the picture watermark is for the purpose of preventing unscrupulous people from stealing the fruits of labor.