
Managing CFS Best Practices with Terraform
overview
Demand Scenario
-
You can use code to manage and maintain your CFS resources. Allows you to save the state of CFS, enabling you to track changes to the configuration of CFS and share those configurations with others. -
You reduce costs by creating development and deployment environments on demand. Also, you can evaluate before the CFS configuration changes. -
It can greatly reduce the cost of enterprises in the process of infrastructure construction, improve the skills of cloud infrastructure developers in IAC (infrastructure is code), and simplify the operation and maintenance of resources on the cloud
Before configuration, you need to know
| |
|
|---|---|
| |
|
| |
|
| |
|
| |
|
| |
|
| |
|
| |
|
| |
|
Configuration steps
Environmental preparation
Initialize Terraform
-
Sign in Terraform Download the package applicable to your operating system from the official website. -
Configure the terraform baidu provider information. The configuration file can refer to the following code and be saved as version.tf in the current folder.
 terraform  {
   required_providers  {
     baiducloud  =  {
       source  =  "baidubce/baiducloud"
       version  =  "1.18.0"  #The version number starts from 1.18.0 and supports file storage CFS
     }
   }
} -
Execute the command terraform init. Terraform will initialize the workspace according to the version.tf file in the current folder. -
Edit the Terraform configuration file. Create a new file main.tf, and specify the VPC, CFS, CFS mount point and other meta information in the file. Refer to the configuration example in the next steps. For more CFS parameter information, refer to Official documents of baidu provider
CFS Creation Configuration Example
 resource "baiducloud_vpc"  "vpc"  {
   name  =  "terraform_vpc"
   cidr  =  "172.16.0.0/16"
 }
 resource "baiducloud_subnet"  "subnet"  {
   name         =  "terraform_subnet-c"
   zone_name    =  "cn-bj-c"
   cidr         =  "172.16.128.0/24"
   vpc_id       = baiducloud_vpc.vpc.id description  =  "terraform test subnet"
 }

 resource "baiducloud_cfs"  "default"  {
   #CFS name
   name  =  "terraform_test"
   #Zone
   zone  =  "zoneD"
   #The default protocol type is nfs
   protocol  =  "nfs"
   #The storage type defaults to cap
   type  =  "cap"
 }
Example of mount point creation configuration
 resource "baiducloud_cfs_mount_target"  "mount1"  {
   fs_id  = baiducloud_cfs.default.id subnet_id  = baiducloud_subnet.subnet.id vpc_id  = baiducloud_vpc.vpc.id }
Application Configuration
-
Execute the following command to view the resource change plan
$ terraform plan -
Execute the following command to apply the resource change plan to complete the creation or update of resources, as shown in the figure
$ terraform apply 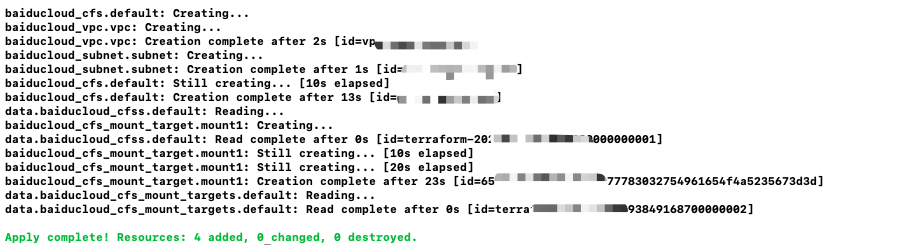
CFS management
Change CFS name
To modify the name of CFS, just modify the value of the name field, and then go to Step 7
Query CFS information
 data "baiducloud_cfss"  "default"  {
   #The following CFS filters fs_id=fsxxxx filter {
     name  =  "fs_id"
     values  =  [ "fsxxxx" ]
   }
 }
Resource deletion
-
If you need to delete the mount point, just delete the resource baiducloud_cfs_mount_target. You can use the following command
#Delete resources specified by - target terraform destroy -target baiducloud_cfs_mount_target.mount1
Note: Uninstall the mount point before deleting it
-
To delete the CFS, just delete the resource baiducloud_cfs. You can use the following command
#Delete resources specified by - target terraform destroy -target baiducloud_cfs.default -
You can release all resources in the current main.tf through the following command
terraform destroy Test verification
-
Check whether the corresponding resources are created successfully in the product interface of Baidu Intelligent Cloud Console. -
After the above steps are configured, you can use CFS according to the steps in this document to check whether it works correctly. Document Link