WordPress University 2013 new theme (currently used) wpdx has been released. Please go to《 Responsive CMS/Blog Dual Layout Theme wpdx 》The following is a brief introduction to the use of the topic.
On December 6, 2013, point 10 was added: how to add advertisements
2014-02-12: Install and configure the DW Question&Answer plug-in under the wpdx theme
If you are using WordPress for the first time, it is recommended to read Getting Started with WordPress
Theme installation
- Disable all plug-ins, and then install the wpdx theme
- When using the wpdx theme for the first time, click "Restore Default Settings" at the bottom of the theme setting page to reduce the configuration time
- Install and enable WP-PostViews Plug in. You can simply set this plug-in according to your own needs
- Install and enable your favorite plug-ins
FAQ
1. How to change the logo
Method 1: replace logo.png in the theme images directory; Method 2: Upload the logo in the general settings of the theme setting interface. The size of the logo is 160 * 24, and the transparent png image
2. How to replace the favicon icon
Method 1: Replace the favicon.ico in the theme root directory; Method 2: Upload the favicon icon in the general settings of the theme setting interface.
3. How to set website menu
Five menus are reserved for this theme: the left Main Menu , top user login management menu( Administrator Menu 、 User Menu ), Bottom menu , and one more Bottom Friendly Chain It is used to add home page friendship links. They are all set in the background>Appearance>menu. If you don't understand, you can refer to http://www.wpdaxue.com/wordpress-nav-menus.html

The management menu after the user logs in is divided into the administrator menu (only visible to the administrator) and the user menu (visible to all logged in users), as shown in the figure above.
The main menu, administrator menu and user menu all support custom small icons , expand the menu item, and add small icon codes in the "Title Properties", such as icon home on the home page:

For more icons, visit http://fortawesome.github.io/Font-Awesome/3.2.1/icons/ , find the small icon you like, and each icon code starts with icon.
4. How to add a friendship link
Called on the home page : In the background of wpdx theme setting>home page setting, enable the home page friend chain, then access the appearance>menu, and set the "bottom friend chain" menu.
Called in the sidebar : Use the "Customize Menu" gadget and select the corresponding menu.
Called in the page : Create a new page and add the following simple code to the content to call the "bottom link":
one | [ menu name = "foot-link" ] |
[menu name="foot-link"]
5. What if there is a negative number on the comment floor?
Access Settings>Discussion, refer to the following figure for settings

6. JS error occurs on some pages?
This situation is generally caused by the fact that no gadget has been added to the sidebar. After adding a gadget, it will be normal.
7. How to add message books, article archives and tag cloud pages?
a. Add guestbook: create a new page with the title "guestbook"
b. Add article archive: create a new page and select a page template archive
c. Add tag cloud: create a new page and select a page template Tag Sort
8. How to set the top toolbar
If you add the corresponding management menu above, I suggest you close the top toolbar of WP for all users, and you can set it in the [Header Settings] of the theme (version 1.1 and above)
Let's talk about how to set the toolbar on the top of wpdx. Let's look at the picture first

The corresponding background setting interface is as follows

Login module : Including registration, login, logout, etc. If you want to display the registration link, you need to set a general in the background and open "Anyone can register". You can customize the password retrieval and registration link, and leave blank to use the WP default address.
Join Q group : Access http://shang.qq.com/widget/group.php After logging in, select a group and see the corresponding code:

QQ conversation : Access http://shang.qq.com/widget/consult.php , log in to get QQ code:

Sina Weibo follow : Access http://open.weibo.com/widget/followbutton.php Sign in, fill in your Weibo nickname, and get the UID:

Tencent Weibo follow : Access http://dev.t.qq.com/ After logging in, enter http://dev.t.qq.com/websites/followcomp/ Here is the listening component. Fill in the name and address of the website, submit it, and after approval, find this component in the management center>My Component, and you can see the following figure:

Baidu search : Please read https://www.cmhello.com/baidu-custom-search.html
9. Add in station messages and article collections
1) Install the two modified plug-ins together with the theme pack Cartpauj PM and WP Favorite Posts, Do not install their originals.
2) Create a new alias as user On the "User Center" page, select the template "No sidebar and no comment page":

3) Create a new alias as pm , select the User Center just created as the parent, select the User Center Page template, and then fill in the content:

At this point, the site letter page will be added. Address is Http://your domain name/user/pm
4) Create a new page with the alias of favorites. Select User Center as the parent, select the User Center Page template, and then fill in the contents:
one | { { wp - favorite - posts } } |
{{wp-favorite-posts}}
After saving, add the favorite page of the article at Http://your domain name/user/navigates
5) Access the setting interface of the WP Favorite Posts plug-in, and set it as follows:

6) Access the Appearance>menu, and set the new in station message( Http://your domain name/user/pm )And my collection( Http://your domain name/user/navigates )Add "User Menu" to these two pages!

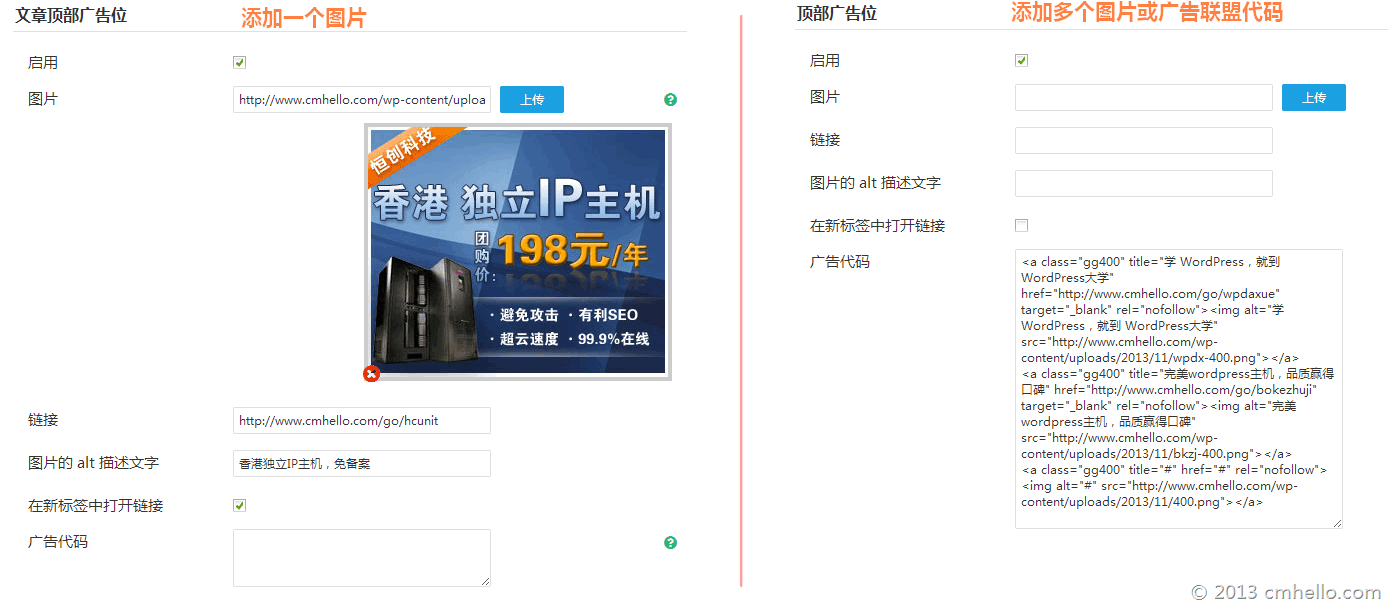
10. How to add advertisements
Four advertising spaces are reserved for this theme, namely the top banner, the right side of the front slide, the top and bottom of the article. Advertisements in the sidebar can be added using the "Text or HTML" widget.
If you want to add an image advertisement to the reserved advertising space, you can upload it online; If you want to add more than one picture or advertising alliance code, add the advertising code directly:
The wpdx theme is full screen within 1680 resolution width. If it is larger than this resolution, it will be a bit blank on the right.
Top banner advertisement
The size and adding method of advertising image in the top banner:
Due to the large width, we do not recommend adding 1 image, but at least 2 images, so we can only add ad codes directly.
Two pictures: the width is 728px. It is recommended that all pictures have the same height. Use codes similar to the following:
one two three four five six seven eight nine ten | < div class = "span6" >
< a href = " http://www.wpdaxue.com/ " title = "WordPress University" target = "_blank" rel = "nofollow" >
< img src = " http://img.wpdaxue.com/2013/12/728.png " alt = "WordPress University" >
< / a >
< / div >
< div class = "span6" >
< a href = " http://www.wpdaxue.com/ " title = "WordPress University" target = "_blank" rel = "nofollow" >
< img src = " http://img.wpdaxue.com/2013/12/728.png " alt = "WordPress University" >
< / a >
< / div > |
<div class="span6"> <a href=" http://www.wpdaxue.com/ "Title=" WordPress University "target=" _blank "rel=" nofollow "> <img src=" http://img.wpdaxue.com/2013/12/728.png "Alt=" WordPress University "> </a> </div> <div class="span6"> <a href=" http://www.wpdaxue.com/ "Title=" WordPress University "target=" _blank "rel=" nofollow "> <img src=" http://img.wpdaxue.com/2013/12/728.png "Alt=" WordPress University "> </a> </div>
From the above code, we can see that<div class="span6 ″></div>is used, span6 is half the width, so two advertisements are added. The picture will be adaptive.
Three pictures: the width is 465px. It is recommended that all pictures have the same height. Use codes similar to the following:
one two three four five six seven eight nine ten eleven twelve thirteen fourteen fifteen | < div class = "span4" >
< a href = " http://www.wpdaxue.com/ " title = "WordPress University" target = "_blank" rel = "nofollow" >
< img src = " http://img.wpdaxue.com/2013/12/728.png " alt = "WordPress University" >
< / a >
< / div >
< div class = "span4" >
< a href = " http://www.wpdaxue.com/ " title = "WordPress University" target = "_blank" rel = "nofollow" >
< img src = " http://img.wpdaxue.com/2013/12/728.png " alt = "WordPress University" >
< / a >
< / div >
< div class = "span4" >
< a href = " http://www.wpdaxue.com/ " title = "WordPress University" target = "_blank" rel = "nofollow" >
< img src = " http://img.wpdaxue.com/2013/12/728.png " alt = "WordPress University" >
< / a >
< / div > |
<div class="span4"> <a href=" http://www.wpdaxue.com/ "Title=" WordPress University "target=" _blank "rel=" nofollow "> <img src=" http://img.wpdaxue.com/2013/12/728.png "Alt=" WordPress University "> </a> </div> <div class="span4"> <a href=" http://www.wpdaxue.com/ "Title=" WordPress University "target=" _blank "rel=" nofollow "> <img src=" http://img.wpdaxue.com/2013/12/728.png "Alt=" WordPress University "> </a> </div> <div class="span4"> <a href=" http://www.wpdaxue.com/ "Title=" WordPress University "target=" _blank "rel=" nofollow "> <img src=" http://img.wpdaxue.com/2013/12/728.png "Alt=" WordPress University "> </a> </div>
<div class="span4 ″></div>is used. span4 is one third of the width of the class, so three advertisements are added.
Advertisement on the right side of the home slide
1 picture: 430px in width and 330px in height, which can be added directly by using the upload function.
Two pictures: use code to add, the width is 430px, the height is 160px, and use code similar to the following:
one two three four five six | < a href = " http://www.wpdaxue.com " target = "_blank" title = "WordPress University" >
< img class = "gg430" src = " http://img.wpdaxue.com/2013/12/wpdx430.png " alt = "WordPress University" >
< / a >
< a href = " http://www.wpdaxue.com " target = "_blank" title = "WordPress University" >
< img class = "gg430 mt10" src = " http://img.wpdaxue.com/2013/12/wpdx430.png " alt = "WordPress University" >
< / a > |
<a href=" http://www.wpdaxue.com "Target=" _blank "title=" WordPress University "> <img class="gg430" src=" http://img.wpdaxue.com/2013/12/wpdx430.png "Alt=" WordPress University "> </a> <a href=" http://www.wpdaxue.com "Target=" _blank "title=" WordPress University "> <img class="gg430 mt10" src=" http://img.wpdaxue.com/2013/12/wpdx430.png "Alt=" WordPress University "> </a>
Notice the img tag above. Both add the gg430 class to use the preset style; The second one adds an additional mt10 class, which is used to make the top of the second image 10px high.
Sidebar ads
The sidebar can use the "Text or HTML" gadget to add advertising code, and the image width is also 430px. The code is similar to the above:
1 picture:
one two three | < a href = " http://www.wpdaxue.com " target = "_blank" title = "WordPress University" >
< img class = "gg430" src = " http://img.wpdaxue.com/2013/12/wpdx430.png " alt = "WordPress University" >
< / a > |
<a href=" http://www.wpdaxue.com "Target=" _blank "title=" WordPress University "> <img class="gg430" src=" http://img.wpdaxue.com/2013/12/wpdx430.png "Alt=" WordPress University "> </a>
More than 2 pictures:
one two three four five six | < a href = " http://www.wpdaxue.com " target = "_blank" title = "WordPress University" >
< img class = "gg430" src = " http://img.wpdaxue.com/2013/12/wpdx430.png " alt = "WordPress University" >
< / a >
< a href = " http://www.wpdaxue.com " target = "_blank" title = "WordPress University" >
< img class = "gg430 mt10" src = " http://img.wpdaxue.com/2013/12/wpdx430.png " alt = "WordPress University" >
< / a > |
<a href=" http://www.wpdaxue.com "Target=" _blank "title=" WordPress University "> <img class="gg430" src=" http://img.wpdaxue.com/2013/12/wpdx430.png "Alt=" WordPress University "> </a> <a href=" http://www.wpdaxue.com "Target=" _blank "title=" WordPress University "> <img class="gg430 mt10" src=" http://img.wpdaxue.com/2013/12/wpdx430.png "Alt=" WordPress University "> </a>
Starting from the second picture, we need to add an additional mt10 class. That is to say, except for the first picture, we recommend adding an mt10 class in the following to add a gap above.
Advertisements at the top and bottom of the article
You can directly use the background upload function to add pictures, or directly add advertising codes.