Unity Helicopter Flight HeliHell Source Code Analysis (2) - Flight Control

This article is the second in the series "Analysis of HeliHell Source Code for Unity Helicopter Flight".
Please refer to《 Unity Helicopter Flight HeliHell Source Code Analysis (1) - Camera Slow Motion Tracking 》。

Hinge joint

The flight effect is mainly achieved through hinge joints. First, analyze the structure of hinge joints in this project:
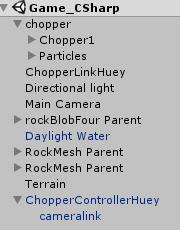
 hierarchy view

In the hierarchical view, you can find an empty object, ChopperControllerHuey, which is the end of the hinge joint. According to the HingeJoint script attached to it, one end of the joint is ChopperLinkHuey, and the top end is chopper.
Several key attributes of hinge joints are as follows:

 Connected Body The joint connector assigned to the rigid body, if not set, is connected to the world Anchor Anchor coordinates around which the main body swings, based on the local coordinate system Axis Coordinates of swing direction, based on local coordinate system

It is troublesome to adjust the hinge joint, so skip the table.

Heli_land script and Heli_Physics script

The Heli_land script is a script for detecting whether a helicopter is landing. The code is very simple. Heli_Physics script is the helicopter control script, which mainly handles user input, and the code is not complex.
Here we review the conditions under which collisions occur:

 //When two objects collide, at least one object is attached to a rigid body component and Is Kinematic is not checked, and both objects have collision bodies and is Trigger is not checked, the OnCollisionXXXX series methods will be called back. //When two objects collide, at least one object is attached to a rigid body component, and Is Kinematic is not checked for the rigid body component, and both have collision bodies, and any collision body checks Is Trigger, the OnTriggerXXXX series of methods will be called back. //When Is Kinematic is selected for the rigid body component, it will not produce physical effects due to external forces, but it can still affect other normal rigid bodies, and other normal rigid bodies will also recall the corresponding collision method.

First, analyze the Heli_land script, which is attached to Chopper. The key code is as follows:

 private void OnCollisionEnter(Collision collision) { hit = true; }

When the collision occurs, update the hit value to True;
Analyze the Heli_physics script, which is mounted on ChopperControllerHuey.

 mousex = (Input.mousePosition.x - (Screen.width / 2)) / (Screen.width / 2); mousex = Mathf.Clamp(mousex, -1.0f, 1.0f); mousey = (Input.mousePosition.y - (Screen.height / 2)) / (Screen.height / 2); mousey = Mathf.Clamp(mousey, -1.0f, 1.0f);

The above four lines of code mainly deal with mouse input. The coordinate point obtained by input.mousePosition takes the lower left corner of the screen as the origin. Use input.mousePosition. x – half the screen width to obtain the mouse coordinate when the origin is in the center of the screen. Then divide this value by half the screen width to obtain the position scale. Finally, use Mathf Clamp limits the value. The effect is that when the mouse pointer exceeds the left and right boundaries of the screen, the value is - 1 or 1. When it is inside the screen, the value is the corresponding proportion. The y-axis is the same.
This script uses a lot of slow motion methods similar to those in camera scripts, taking rotation as an example:

 rot = rot * 0.9f + mousex * 0.1f; m_Transform.Rotate(0, rot, 0);

This code shows that the rotation value will accumulate slowly, and the rot increment will be smaller and smaller (when the mousex is unchanged). At this time, the rotation increase speed will be slower and slower: when the reverse rotation is performed, the forward rotation speed will be slowly reduced, and finally the reverse rotation will be achieved.
This principle is mostly used in the later translation and will not be explained any more.
The slightly complicated part of the code is the rise and fall, which are as follows:

 //Get direction input var vert = Input.GetAxis("Vertical"); if (vert > 0) {//Press ↑ key updown = 0.5f * Input.GetAxis("Vertical"); //set hit false heliModel.GetComponent<Heli_land>().hit = false;// Move up and set the collision flag to false GetComponent<Rigidbody>().isKinematic = true;// Move up to turn off dynamic simulation } else if (heliModel. GetComponent<Heli_land>().hit) {//VERT is less than 0 and is in collision state, landing GetComponent<Rigidbody>().isKinematic = false;// Turn on dynamics simulation,/move forward and backward, shift left and right, reset to 0, then the aircraft will not move. forw = 0; side = 0; alti = 0; } else if (vert < 0) {//vert is less than 0 and there is no collision, indicating that it is descending at this time updown = 0.5f * vert; }else {//vert is 0 updown = 0; } //Fly forward/backward will increase/decrease some altitude. alti = alti * 0.995f + (updown + (forw * updown)) * 0.005f; m_Transform.Translate(0, alti, 0);

The key point of this code is to judge whether to land according to the Hit value, and control whether the aircraft can fly by setting the isKinematic of the rigid body. When isKinematic is checked, flight control points will not be affected by external forces. That is to say, we will set it at any coordinate.
Since the flight control point is in the hinge joint, the upper two joints will also follow.

References

1. [Header] [Unity] Unity Japan UnityChanSD Role

Zimiao haunting blog (azimiao. com) All rights reserved. Please note the link when reprinting: https://www.azimiao.com/4196.html
Welcome to the Zimiao haunting blog exchange group: three hundred and thirteen million seven hundred and thirty-two thousand

Comment

*

*

Comment area

  1. mikusa 09-28 10:32 reply

    Google ad affects the experience too much