1、 Server configuration
1. Install NFS
yum -y install nfs-utils portmap
2. Create a shared directory
mkdir /usr/local/share
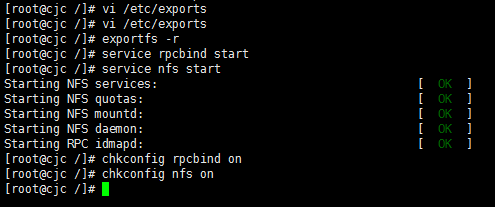
3. Modify the configuration file/etc/exports
vi /etc/exports
Add one line: /usr/local/share 192.168.186.*(insecure, rw,async,no_root_squash)
Ro: set the output shared directory to be read-only and cannot be used together with rw
Rw: set the output shared directory to be readable and writeable, and cannot be used together with ro
Sync: Set the NFS server to write to the disk synchronously, so that data will not be lost easily. It is recommended that all NFS shared directories use this option
4. Make the configuration file effective and execute:
exportfs -r
5. Open the rpcbind service and set the startup:
service rpcbind start
chkconfig rpcbind on
6. Open the nfs service and set the startup
service nfs start
chkconfig nfs on

7. Fix the nfs port, vi /etc/sysconfig/nfs Add the following at the end:
RQUOTAD_PORT=6005 LOCKD_TCPPORT=6004 LOCKD_UDPPORT=6004 MOUNTD_PORT=6002 STATD_PORT=6003 STATD_OUTGOING_PORT=6006
8. Open port: vi/etc/sysconfig/iptables Add the following rules
-A INPUT -m state --state NEW -m tcp -p tcp --dport 111 -j ACCEPT -A INPUT -m state --state NEW -m udp -p udp --dport 111 -j ACCEPT -A INPUT -m state --state NEW -m tcp -p tcp --dport 6002 -j ACCEPT -A INPUT -m state --state NEW -m udp -p udp --dport 6002 -j ACCEPT -A INPUT -m state --state NEW -m tcp -p tcp --dport 6003 -j ACCEPT -A INPUT -m state --state NEW -m udp -p udp --dport 6003 -j ACCEPT -A INPUT -m state --state NEW -m tcp -p tcp --dport 2049 -j ACCEPT -A INPUT -m state --state NEW -m udp -p udp --dport 2049 -j ACCEPT -A INPUT -m state --state NEW -m tcp -p tcp --dport 6004 -j ACCEPT -A INPUT -m state --state NEW -m udp -p udp --dport 6004 -j ACCEPT -A INPUT -m state --state NEW -m tcp -p tcp --dport 6005 -j ACCEPT -A INPUT -m state --state NEW -m udp -p udp --dport 6005 -j ACCEPT -A INPUT -m state --state NEW -m tcp -p tcp --dport 6006 -j ACCEPT -A INPUT -m state --state NEW -m udp -p udp --dport 6006 -j ACCEPT
9. Restart the firewall: service iptables restart
2、 Client Configuration
1. Install nfs utils
yum -y install nfs-utils
2. Create the mount directory:
mkdir /test1
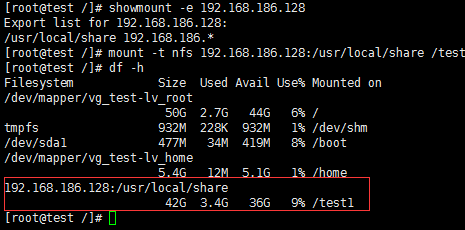
3. View the mount directory
showmount -e 192.168.186.128
4. Mount
mount -t nfs192.168.186.128:/usr/local/share /test1
Or use tcp to mount: mount -t nfs 192.168.186.128:/usr/local/share /test1 -o proto=tcp -o nolock
5. Check the mount status
df –h

6. Test whether it is readable and writable:
New file on the server vi 1.txt Write anything
Client opening and modification vi 1.txt No error is required.
7. Set the boot start mount
Add a line under/etc/rc.local:
mount -t nfs192.168.186.128:/usr/local/share /test1 -o proto=tcp -o nolock
-----Attachment:
Dismount: umount /test1
If umount. nfs:/test1: device is busy appears
solve:
fuser -m -v /test1 #View those process pid
Kill - 9 pid port

