IPad User Manual
-
Welcome -
-
-
IPad models compatible with iPadOS 17 -
IPad mini (5th generation) -
IPad mini (6th generation) -
IPad (6th generation) -
IPad (7th generation) -
IPad (8th generation) -
IPad (9th generation) -
IPad (10th generation) -
IPad Air (3rd generation) -
IPad Air (4th generation) -
IPad Air (5th generation) -
11 inch iPad Air (M2) -
13 inch iPad Air (M2) -
10.5 inch iPad Pro -
11 inch iPad Pro (1st generation) -
11 inch iPad Pro (2nd generation) -
11 inch iPad Pro (3rd generation) -
11 inch iPad Pro (4th generation) -
11 inch iPad Pro (M4) -
12.9 inch iPad Pro (2nd generation) -
12.9 inch iPad Pro (3rd generation) -
12.9 inch iPad Pro (4th generation) -
12.9 inch iPad Pro (5th generation) -
12.9 inch iPad Pro (6th generation) -
13 inch iPad Pro (M4)
-
-
Set basic functions -
Make iPad your exclusive device -
Keep in touch with friends and relatives -
Customize your workspace -
Take advantage of Apple Pencil -
Customize the iPad for children
-
-
New features of iPadOS 17 -
-
Change or turn off sound -
Create a custom lock screen -
Change Wallpaper -
Adjust screen brightness and color balance -
Customize text size and zoom settings -
Change the name of the iPad -
Change date and time -
Change language and region -
Using and customizing the Control Center -
Change or lock screen orientation -
Customize sharing options
-
-
-
Read PDF -
-
Getting Started with FaceTime Call -
Create FaceTime call link -
Take live photos -
Open Live Caption -
Use other apps during calls -
Use simulcast sharing to watch, listen and play together -
Share screen in FaceTime calls -
Collaborate on documents in FaceTime calls -
Using video conferencing -
Relay FaceTime calls to another Apple device -
Change FaceTime video settings -
Change FaceTime Audio Settings -
Change your appearance -
Exit the call or switch to Info -
Block unwanted calls -
Report harassment calls
-
-
-
Introduction to "Family" -
Upgrade to the new "family" architecture -
Set accessories -
Control accessories -
Use Siri to control your home -
Planning electricity use using "grid forecasting" -
Set HomePod -
Control your home remotely -
Creating and Using Scenes -
Use automation -
Set security camera -
Using facial recognition -
Configure Router -
Invite others to control accessories -
Add more new homes
-
-
-
Set Info -
About iMessage information -
Sending and replying to messages -
Recall and edit information -
Tracking information -
search -
Forward and share information -
Group conversation -
Use simulcast sharing to watch, listen or play together -
Collaborate on projects -
Use the iMessage messaging app -
Take and edit photos or videos -
Share photos, links, etc -
Send sticker -
Send and receive audio information -
Share your location -
Add animation effect to information -
Send and store GIF -
Turn read receipts on or off -
Change notification -
Masking, filtering, and reporting information -
Delete messages and attachments -
Restore deleted information
-
-
-
Getting Started with Notes -
Add or remove accounts -
Create and format notes -
Graffiti or writing -
Add photos, videos, etc -
Scan text and documents -
Process PDF -
Add Link -
Create a quick memo -
Search Memos -
Organize using folders -
Use labels to organize -
Use Smart Folders -
Sharing and collaboration -
Export or print memo -
Lock memo -
Change Memo settings -
Using keyboard shortcuts
-
-
-
View photos and videos -
Play videos and slides -
Delete or hide photos and videos -
Edit photos and videos -
Trim video length and adjust slow motion -
Edit Live Photo -
Edit Movie Effects video -
Edit portrait -
Use Album -
Edit, share, and organize albums -
Filter and sort photos and videos in the album -
Make stickers with photos -
Copy and copy photos and videos -
Merge duplicate photos -
Search for photos -
Identify people and pets -
Browse photos by location -
Share photos and videos -
Share long videos -
View photos and videos shared with you -
Watch memories -
Personalized memory -
Manage memories and select photos -
Import and export photos and videos -
Print photos
-
-
-
Browse the website -
Search website -
Customize Safari Browser Settings -
Change Layout -
User scenarios using Safari browser -
Listen to web pages using Siri -
Bookmark a website -
Mark site as a favorite -
Store the page in the Reading List -
Find links shared with you -
Annotate web pages and store as PDF -
form autofill -
Get extension -
Hide advertising and distractions -
Clear cache and cookies
-
-
Quick Instructions -
Tips
-
-
Power adapter and charging cable -
Using the headset volume function -
-
Apple Pencil compatibility -
Apple Pencil (1st generation) pairing and charging -
Apple Pencil (2nd generation) pairing and charging -
Apple Pencil (USB-C) pairing and charging -
Pairing and charging Apple Pencil Pro -
Enter text by using random handwriting -
Draw with Apple Pencil -
Use Apple Pencil to take screenshots and mark screenshots -
Quickly write memos
-
-
HomePod and other wireless speakers -
External storage equipment -
Bluetooth Accessories -
printer -
Polishing cloth
-
-
-
Share Internet connection -
Answer and make calls -
Using the iPad as a second display for the Mac -
Use keyboard and mouse or touch pad between Mac and iPad -
Handle tasks by relay between equipment -
Cut, copy and paste between iPad and other devices -
Stream video or mirror iPad screen -
Send items using "Space Delivery" -
Connect iPad and PC with cable
-
-
-
Getting Started with Accessibility -
Turn on accessibility for settings -
Change Siri accessibility settings -
Turn on functions via accessibility shortcut keys -
-
overview -
enlarge -
Enlarge text by hovering -
Change color and brightness -
Make text easier to read -
Reduce screen dynamics -
Customize visual settings by app -
Listen to the screen or type -
Listen to the oral video -
-
Open and practice Narration -
Change Narration settings -
Use the voice over gesture -
Operate iPad when Narration is on -
Use rotor to control "narration" -
Using the on-screen keyboard -
Writing with fingers -
Keep screen off -
Use narration with Apple external keyboard -
Using the Braille Display -
Type Braille on the screen -
Customize gestures and keyboard shortcuts -
Use narration with pointer device -
Use Narration for images and videos -
Use narration in App
-
-
-
-
overview -
Using the Auxiliary Touch -
Using eye tracking devices -
Adjust the iPad's response to touch -
Automatically answer a call -
Change face ID and look settings -
Use voice control -
Adjust top button or home button -
Using the buttons on the Apple TV remote control -
Adjust pointer settings -
Adjust keyboard settings -
Use external keyboard to control iPad -
Adjust AirPods settings -
Adjust Apple Pencil tap and pinch settings
-
-
-
-
Use built-in privacy and security protection -
Secure Apple ID -
-
Use your passkey to log in to apps and websites -
Sign in through Apple -
Share Password -
Auto fill strong password -
Change weak password or disclosed password -
View your password and related information -
Share the passkey and password securely through "space delivery" -
Make passkeys and passwords available on all your devices -
Auto fill verification code -
Reduce CAPTCHA testing during login -
Dual authentication -
Use security key
-
-
Create and manage Hidden Mail Addresses -
Protect web browsing with iCloud dedicated proxy -
Use private network address -
Using Advanced Data Protection -
Use lock mode -
Receive sensitive content warnings -
Use Contact Key Verification
-
-
-
Important safety information -
Important operating information -
Find more software and service resources -
FCC Compliance Statement -
Canadian ISED Compliance Statement -
Statement of micro power short-range equipment -
Wireless charging device statement -
Apple and the environment -
Class 1 laser information -
Processing and recycling information -
Unauthorized modification of iPadOS -
ENERGY STAR Compliance Statement
-
-
copyright
Use Real Time Voice typing to speak on the iPad
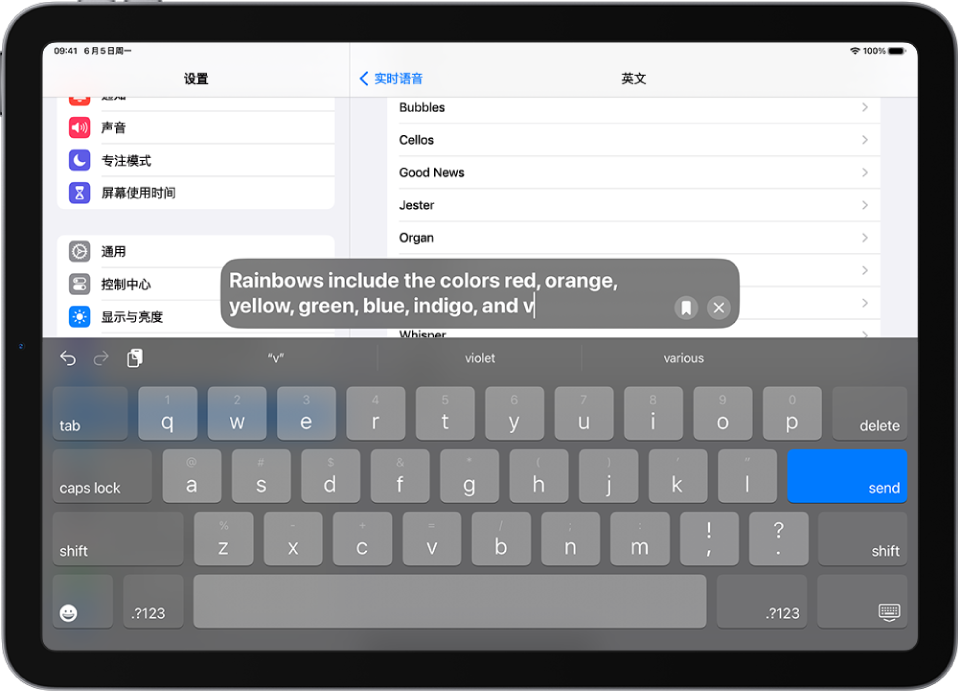
Go to Settings 
>Accessibility>Live Voice, then turn on Live Voice. Select a sound. You can use any sound you choose with "real-time voice", including your Personal Voice 。 Press the top button or the home button three times (depending on the iPad model), and then perform one of the following operations: Type the content you want to convert to speech. Tap the suggested words that appear above the on-screen keyboard. Paste the copied text into the field. Lighter 
To quickly access Common Phrases. (You must first add the most commonly used phrase in Settings>Accessibility>Real time Voice>Common Phrases.)
Tap Send to turn your text into voice.