How to install Nezha probe

1.1 First, we need to create OAuth Apps with github,

Click to enter https://github.com/settings/developers , and then click the New OAuth App button,

1.2 We fill in it,

1.3. After filling in, click register.

1.4 After setting here, we also need to obtain the github login name. The github login name is our user name, which is copied and recorded directly here.

1.5、 So far, we have finished setting up github. We need to write down three things: 1. Client ID, 2. Client secrets, and 3. github login name

2.1 We choose a server as the web display page of our probe

We ssh into this server

Then we enter the code

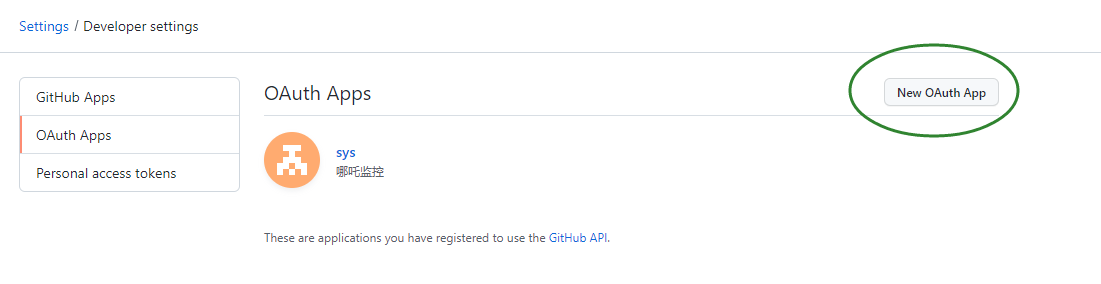
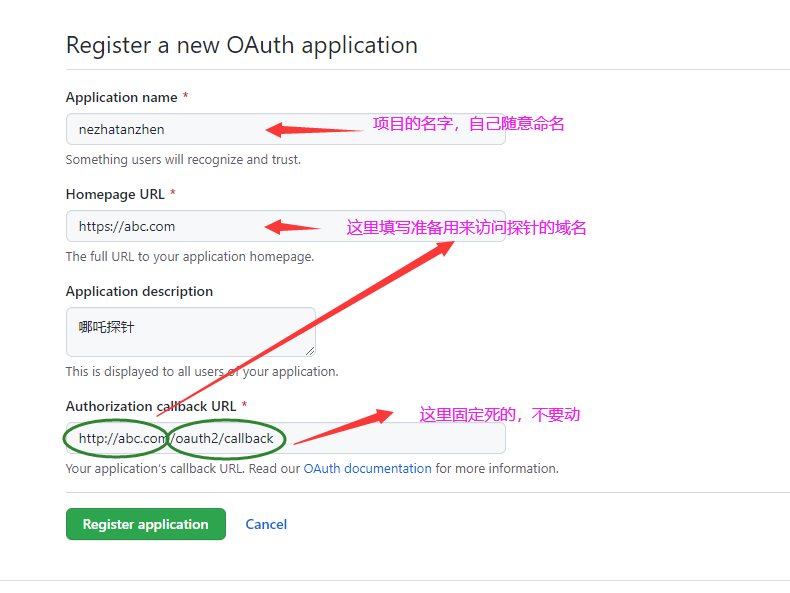
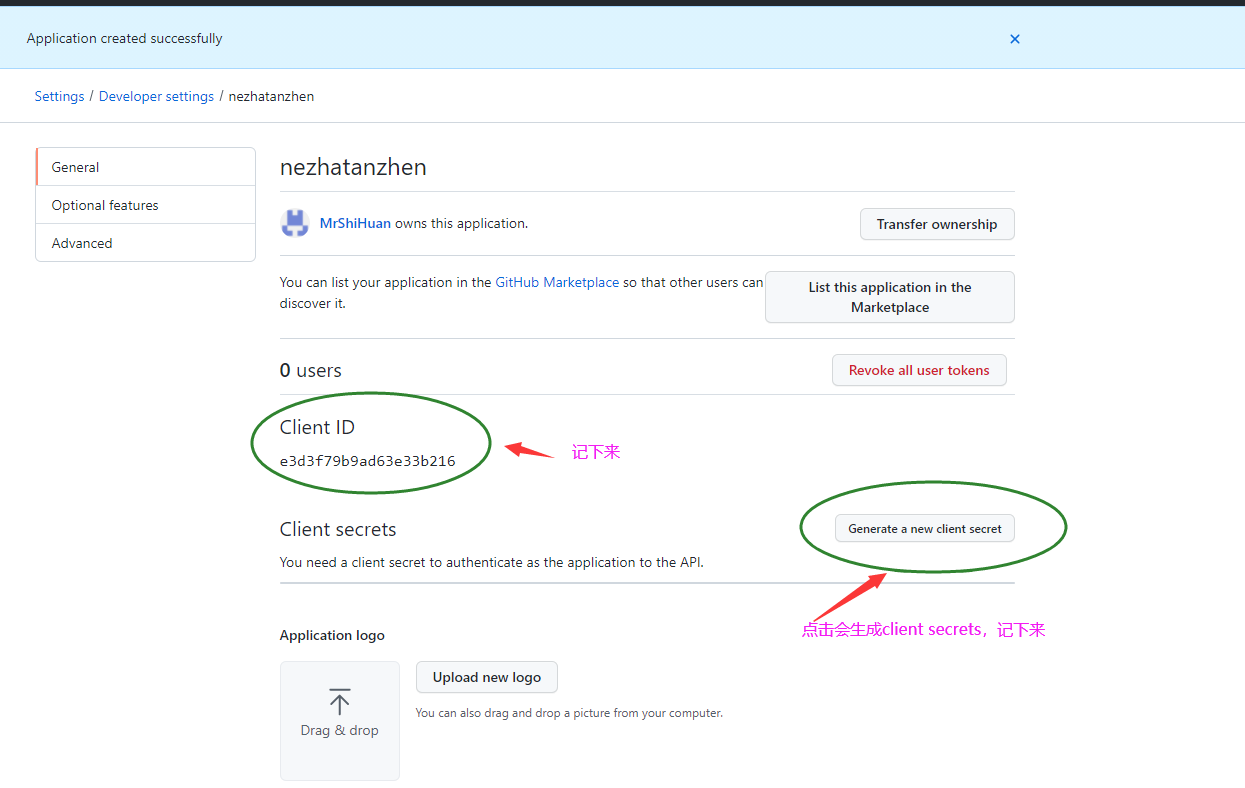
 curl -L  https://raw.githubusercontent.com/naiba/nezha/master/script/install.sh   -o nezha.sh && chmod +x nezha.sh sudo ./nezha.sh

Domestic image acceleration

 curl -L  https://jihulab.com/nezha/nezha/-/raw/master/script/install.sh  -o nezha.sh && chmod +x nezha.sh && sudo CN=true ./ nezha.sh

2.2. Then, we follow the prompts and operate step by step. The web page of our Nezha probe shows that the installation of the server is completed. We can access it by entering ip: 8008

3.1 Next, we use the pagoda configuration reverse generation to remove the 8008 port (if you need the pagoda installation tutorial, you can use Baidu)

3.2 We choose to add sites in the pagoda

3.3. Click the new site to set the reverse proxy

3.4 Modify the configuration file after saving

Copy, paste and overwrite the following information

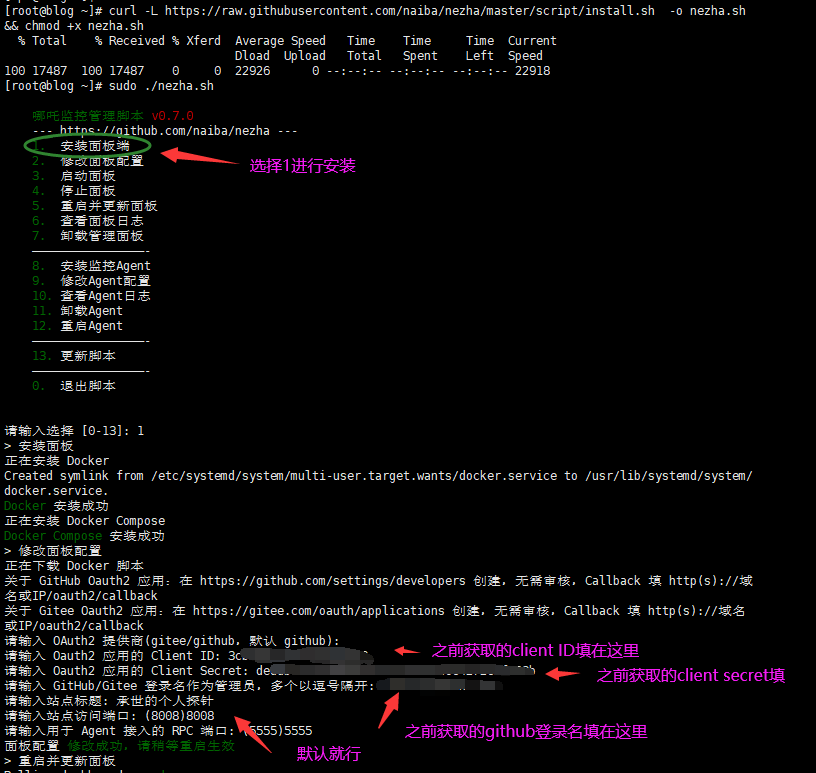
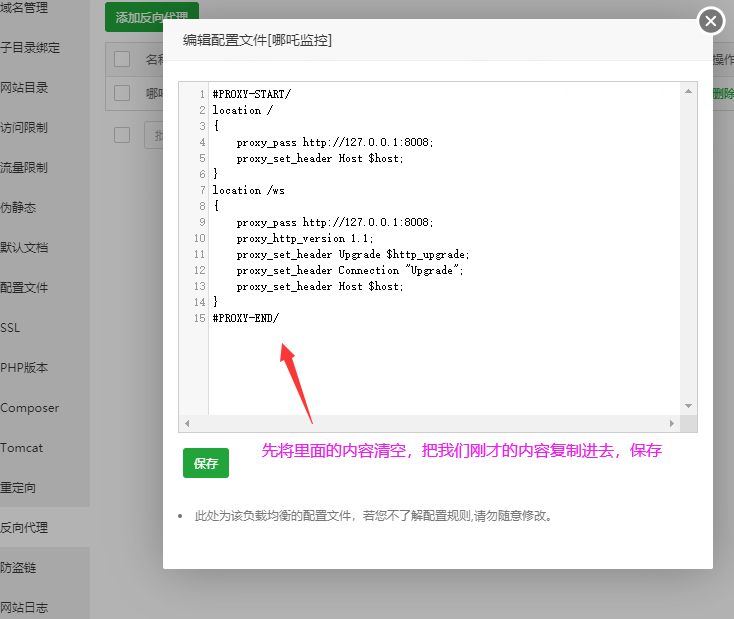
 #PROXY-START/ location / { proxy_pass  http://127.0.0.1:8008 ; proxy_set_header Host $host; } location /ws { proxy_pass  http://127.0.0.1:8008 ; proxy_http_version 1.1; proxy_set_header Upgrade $http_upgrade; proxy_set_header Connection "Upgrade"; proxy_set_header Host $host; } #PROXY-END/

3.5 After that, we configure SSL and click Apply. The mandatory HTTPS beside it is also checked. The screenshot forgot to check it.

3.6 Here, our pagoda counter generation has been completed.

4.1. Then, the browser enters its own reverse domain name, enters the web display page of the probe, and we click Login.

4.2 Then choose to log in with githup account and choose authorization

4.3 In this way, the web display page of our probe is configured successfully

5.1. Then we add the server to be monitored by the probe

5.2. We click Management Background

5.3. Next, we configure the probe domain name

5.4. Here, we can fill in the server to be probed

5.5. After adding, this page will appear. We will copy the one click installation code

5.6 We open the VPS to be probed through ssh and paste the previously copied one click installation code directly

5.7 In this way, our probe VPS is configured. Open our probe domain name, and the


If the above steps are successfully executed, this step does not need to be executed

6.0. Monitored end of domestic system installation
6.1 Enter the following code on the server to be probed, and then enter 8 to install the monitoring agent

 curl -L  https://jihulab.com/nezha/nezha/-/raw/master/script/install.sh  -o nezha.sh && chmod +x nezha.sh && sudo CN=true ./ nezha.sh


6.2. Then look at the figure below and configure according to the prompts,
The probe domain name we set earlier is entered into the part of picture 2
Enter the part of 3 in the picture without entering
Let's look at step 5.5. The secret key above is the part we need to fill in to 4
Then successfully configure

👍 The body ends here 👍
  • Author: Inheritance
  • Link to this article: https://blog.shi.wiki/archives/7.html
  • Copyright notice: Unless otherwise stated, all articles in this blog are adopted by default CC BY-NC-SA 4.0 License agreement, please attach the original source link and this statement for reproduction.
Last modification: May 27, 2022
If you think my article is useful to you, please feel free to appreciate it