WordPress

New WordPress Tutorial 1: Background Settings

Previous Tutorial #Building a website # Build a WordPress website tutorial in the pagoda panel After that, we will introduce the related content of WordPress from this tutorial. We will teach you how to use WordPress to build your own website.

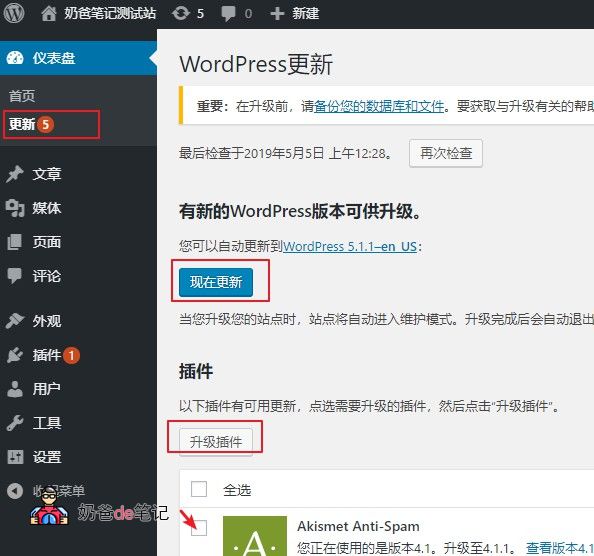
First, you are logged in WordPress In the background, there is usually an update prompt. Because we are a newly built website, we can update all the contents first to ensure the new version of the program and avoid bugs and other problems.

Note: Dad's personal habit is to update whenever there is an update, but when your website has content, you need to backup it first (although Dad doesn't have this habit, not backing up is a bad habit). Now you just need to remember that if there is an update in the future, especially the theme update you use, remember to back up the theme first, or you will have no modified theme content.

 WordPress background settings

Meet WordPress backstage
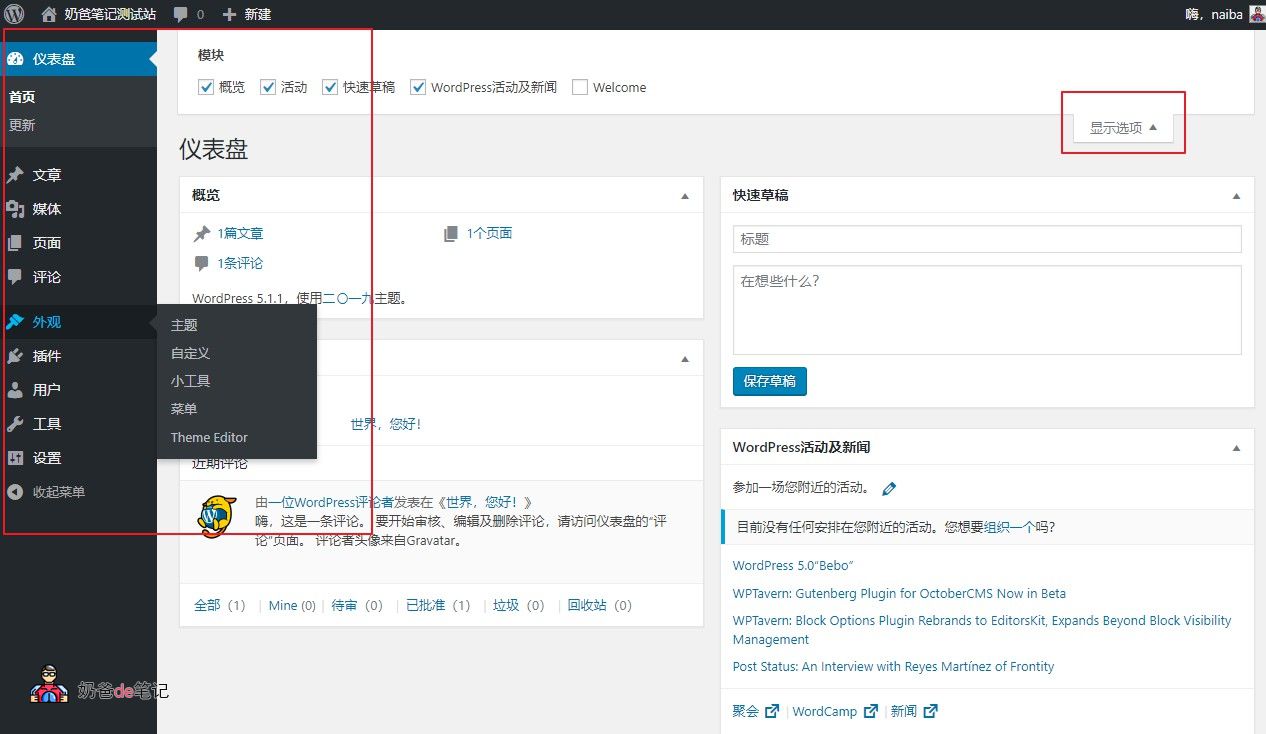
Look at your own backstage here. Daddy explains what each place does. WordPress background settings First of all, the display option in the upper right corner can be turned on, and you can choose which content to display in the default background. In the future, if you install more plug-ins, there may be a lot of content here, which looks very messy.

Then all the options of WordPress are in the left menu bar. Here are some explanations.

  • Dashboard - just understand it as the background home page
  • Articles - related to articles. For the first time, you need to set the category directory
  • Media - some pictures and files you upload are here
  • Page - similar to the article, but it will not appear in the update article on the homepage of the website, such as about the page
  • Comments - well, comments and messages.
  • Appearance - what others on your website look like is set here. You can set themes, gadgets, etc
  • Plug ins - the place to manage plug-ins. Different plug-ins can enable you to implement different functions of WordPress.
  • Users - you are the only user in most people's websites. You can add users here, or you can set the permission for users to register. However, it is useless for others to register personal blogs, unless your website has commercial needs.
  • Tools - seldom used, some plug-ins will add the setting menu to it.
  • Settings - Set some content of your entire website, which is introduced by Daddy below.

Novice needs to set some WordPress options for the first time

The menu functions are described above. Now let's start setting your own website.

 WordPress Settings

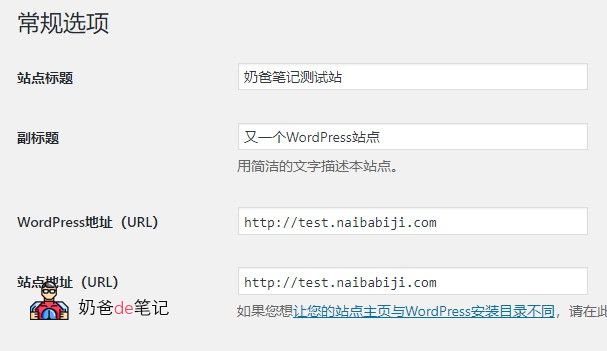
In the general options, you need to set "site title" and "subtitle"

 WordPress Site Title

The site title is the name of your website, and the subtitle, such as the subtitle of Daddy's Notes on Building a Website, is to record life and work. The browser tab will display the site title+subtitle by default (some topics will not display this way, and the display content can also be controlled through plug-ins)

WordPress address (URL) Site address (URL)

These two items usually don't need to be modified. They are set up when the site is created. If you want to enable https access in the future, you can change them to https domain names here. (To be written after the https tutorial is opened on the website)

Membership

It is unchecked by default. You can only comment after you have enabled login, otherwise you don't need to open it here. (If it is enabled, it will also involve sending registered emails. Basically, the email system needs to be set up separately, so it is not recommended for novices to enable it. The WordPress email sending tutorial will be written later.)

Then there is nothing special to say in the general settings.

There are no writing options that need to be set by yourself. You can skip them directly.

The reading options can be set according to your needs.

Your homepage displays new articles by default. Some topics have their own homepage (using the page function), which needs to be modified to display a static page.

For the visibility of search engines, if checked, search engines will not include your website.

Settings for discussion options

By default, WordPress will not mention the options selected for you, just a few things you need to know.

This must be checked, otherwise you will open the anonymous comment function, and spam or harmful comments will harass you.

Do not check this unless you have a lot of spam comments on your website and you are too lazy to filter them.

Show comments cookies opt in checkbox, allowing comment author cookies to be set.

Nested comments check, pagination comments Unless you have a lot of comments on an article, it is unnecessary to check.

Email me

By default, it is the same whether it is checked or not, because most hosts cannot send mail directly, and you need to configure your own mail system later.

Before the comment is displayed, check at least one of the two options, or it will be directly displayed in the comment area. You can't control what appears in the comment area.

Comment review and comment blacklist

You can understand what to do by looking at the default comments of WordPress.

The default option of avatar is OK. The avatar is called by default, which is a globally recognized avatar. You can also implement a local avatar through plug-ins, as described later.

 WordPress Media Library

In media settings

It is recommended to set the medium size and large size to 0, so that WordPress will not automatically generate large and medium-sized pictures for you. (WordPress sends a picture by default, which will generate several sizes of pictures for you, wasting space. Of course, if the pictures you post are usually more than 800 pixels, it is recommended that you set the medium size picture to be about 600px wide. After inserting the picture, the medium size picture will be displayed by default, linking to the original picture, so that the web page will open faster.)

Fixed link

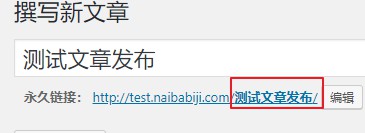
If you are lazy, you can choose the digital type directly from the father. If you are diligent, you can choose the article name.

The article name is that you can customize the content in the red box below every time you post an article, and change it into English or Pinyin, which is friendly to search engines.

 Wordpress article link

In addition, if you choose the fixed link of the article name and want to modify it to English or Pinyin, you need to Disable Wordpress's new Gutenberg editor Otherwise, if there is no place set when you post an article, the Chinese website will appear directly, which is very long and long, too ugly.

Category Directory Settings

Classified directory is what content you want to post on your website, such as Daddy's Notes on Building a Station Of VPS server discount Classification Plug in theme software Classification.

Appearance settings

The appearance settings may need to be introduced in a separate article, but you can also take a look first. By default, the theme interface can click Add, and then select some themes from the WordPress theme library to use. For most themes, including the default, you need to set the menu. If you don't understand, just set it.

Then the gadget is also a place where most themes support setting. Similarly, you can set it and refresh the homepage of the website to see the changes.

If you are interested in building a website, please check How do novices build websites Page.

4.7/5 - (12 votes)
Scroll to top