WordPress Tutorial for Pagoda Panel Installation

2024 New Pagoda Panel Installation WordPress Website Tutorial

How to install the website after installing the pagoda panel? This article uses Example of installing WordPress in pagoda , introduce specific methods to you. For other station building procedures, please refer to this tutorial.

It should be noted that this tutorial is based on the fact that you have installed the pagoda panel and Add domain name resolution and Add a good website on the pagoda panel (If automatic deployment is used, there is no need to add a new website), and then install the WordPress website program from the pagoda panel.

If you haven't already installed 2 pagoda panels, please refer to the previous tutorial to install pagoda panels.

  1. #Website building # Website friendly tower panel building tutorial for novices
  2. How to add websites in the pagoda panel _ bind more websites

Installing WordPress Graphic Tutorial with Pagoda Panel

There are two ways to install WordPress on the pagoda panel:

  1. Install manually( recommend
  2. One click deployment of pagoda background

Manual installation is the installation method recommended by my father, because the WordPress version deployed by one click is not the latest, and the files uploaded by myself are more secure.

Step 1: upload the WordPress installation package

Manually upload the installation package (recommended)

There are two ways to upload the WoredPress installation package: local upload and direct server download.

If your server is domestic, please select manual upload , because the remote download may fail if the network is blocked.

Download the new WordPress installation package: WordPress New Simplified Chinese Local Download

 Pagoda panel upload WordPress installation package

If the server downloads remotely, click: Website → Website root directory folder → Remote download in the pagoda panel, fill in the following URL, and click OK.

https://cn.wordpress.org/latest-zh_CN.zip

After uploading or downloading the WordPress installation package, move the mouse to the installation package line and click the decompression button. As shown below:

 Unpack the installation package

Click "Unzip" directly in the unzip window.

 decompression

The decompression will be completed soon, and a folder named WordPress will appear. Click to enter the folder.

 Enter WordPress folder

After entering the WordPress folder, click the check box in front of the file name to select all folders and files.

Then click the Cut button in the upper right corner, and the steps are as follows:

 Select all folders and cut

Then click the folder of your website to return to the root directory, and click the Paste All button in the upper right corner, as shown below:

 Paste All Files

Finally, your pagoda panel file interface looks like the following figure.

The WordPress folder and installation package files can be deleted, and 404.html and index.html can also be deleted. It doesn't matter if you don't delete it.

 Pagoda folder interface

Next, we can start building the website.

One click deployment installation package

One click deployment of the installation package is a function provided by the pagoda background. Relatively speaking, there are fewer steps to manually add websites and upload WordPress, but the WordPress version provided may not be the latest.

To deploy WordPress with the pagoda one click, you need not add the website you need to install in the pagoda. If it has already been added, please delete it first.

After entering the pagoda background, select [Software Store] from the left menu bar, and then select [One click deployment] from the top.

After finding WordPress, click [One click deployment].

 One click deployment of WordPress on pagoda panel

Then an interface like the one below will pop up, enter the domain name of the website you want to install, leave other information as default, and click Submit.

 One click deployment of WordPress on pagoda panel

Soon, you will download the installation file of WordPress from the pagoda server to your website folder, as shown in the following figure, save the information that appears, and then open the website address.

 One click deployment of WordPress on pagoda panel


After opening this access address, you will see the second step below, which is to build the interface of the WordPress program website and follow the operation.

Step 2: Build a WordPress program website

Now open your bound domain name, and the following interface will appear. Click "Start Now"

 WordPress installation interface

Enter the corresponding database name, database user name and database password in the following interface, and then click Submit.

 WordPress installation interface

If the database is correct, the following interface will appear. Click Install Now.

 WordPress installation interface

The following interface will appear soon, asking you to set the site title, user name, password and email information yourself. Click "Install WordPress" after setting

 WordPress installation interface

Successful, you can log in.

 WordPress installation interface

Step 3: Set the Wordpress pseudo static rules on the pagoda panel

For us to Customize the fixed link structure of WordPress , we also need to add pseudo static rules to the website.

The specific method of adding pseudo static rules to the WordPress website from the pagoda panel is: log in to the pagoda panel management background, click "Website", click "Settings" for the website you want to set, find "pseudo static", select WordPress, and save.

 Pagoda Wordpress pseudo static rule

WordPress secondary directory pseudo static rule

If you install WordPress in the secondary directory instead of the URL root directory, for example Website/blog

Then the pseudo static rule is inserted into wp2, as shown below: After testing, the following rules are invalid under the pagoda panel. Please see the rules below the picture.

 Wordpress secondary directory pseudo static

The normally available secondary directory of the pagoda panel installs the pseudo static rules of WordPress.

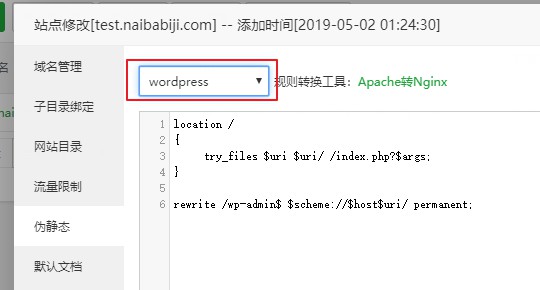
 location /blog/ { index index.html index.php;  if (-f $request_filename/index.html){  rewrite (.*) $1/index.html break;  }  if (-f $request_filename/index.php){  rewrite (.*) $1/index.php;  }  if (!- f $request_filename){  rewrite (.*) /blog/index.php;  }  }  rewrite /blog/wp-admin$ $scheme://$host$uri/ permanent;

Change the blog in the above rule code to your own subdirectory name. If the rule does not take effect, restart nginx yourself.

WordPress Video Tutorial for Pagoda Panel Installation

If you don't understand the above image text tutorial of installing WP on the pagoda panel, you can take a look at the following video tutorial.

For background settings and basic use of WordPress, see: WordPress Website Settings Optimization Tutorial

Collection of frequently asked questions about pagoda panel

①、 Pagoda wordpress installation plug-in needs connection information

This is caused by incorrect folder permissions. In the background of the pagoda panel, set the file and folder permissions to 755 in the folder of your website.

②、 The pagoda can't upload pictures when the firewall website is opened

This is usually caused by incorrect firewall rules. You can check the rules, or uninstall the firewall and reinstall a new version of the firewall for testing.

③ How to install SSL certificates for websites on the pagoda panel

Please refer to the previously shared Tutorial of Installing SSL Security Certificate in Pagoda By doing so, you can open https access to the website.

How to use WordPress after installation?

After installing WordPress through the above tutorial, the novice may not know how to use it. Here are some tutorials shared by the father for your reference.

First, the basic WordPress operation method can be accessed WordPress Tutorial Network Check, with video commentary, which can be understood by novices.

Then, click the link below to enter the corresponding teaching article.

This is the 5th/14th article in the series: Tower Panel Tutorial

4.1/5 - (12 votes)

7 people commented on the "2024 new version of the pagoda panel installation WordPress website tutorial"

Comment

Your email address will not be disclosed. Required items have been used * tagging

Scroll to top