The Amazon ECS of our basic solution generally uses EC2 and Lightsail lightweight hosts. If we have applied for a free Amazon Cloud account, not only is there a free EC2 server available, but also there is a free Lightsail lightweight host application for 12 months. We can use image applications to quickly create applications such as WordPress programs. This tutorial shows you how to start and configure a WordPress instance on Lightsail. It includes the steps of using SSH to connect to your instance, logging in to the WordPress website, creating a static IP and attaching it to the instance, creating a DNS zone, and mapping it to the instance.
1. Create an Amazon Lightsail account
Now register your AWS account to try Amazon Lightsail products for free. Registered address
2. Create a WordPress instance in Lightsail
Complete the following steps to start and run the WordPress instance in Lightsail.
Note: For more information about creating instances in Lightsail, see Creating Amazon Lightsail Instances in the Lightsail documentation.
a. Log in to the Lightsail console.
b. On the Instances tab of the Lightsail home page, select Create Instance.

c. Select AWS region and availability zone for your instance.

d. Select an instance image.
• Choose Linux/Unix as the platform.
• Choose WordPress as the blueprint.

e. Select an instance plan.
The plan includes predictable low-cost, machine configurations (RAM, SSD, vCPU), and data transfer licenses. You can try the Lightsail program worth 3.50 USD for one month (up to 750 hours) for free. AWS will provide your account with one month's free use qualification.

f. Enter a name for the instance.
Resource Name Guide:
• It must be unique within each AWS area in your Lightsail account.
• Must contain 2 to 255 characters.
• Must start and end with alphanumeric characters or numbers.
• Can contain alphanumeric characters, numbers, periods, dashes, and underscores.

g. Select Create Instance.
3. Connect to your instance through SSH and obtain the password of WordPress website
The default password of the management control panel used to log in to the WordPress website is stored on the instance.
Complete the following steps, use the browser based SSH client in the Lightsail console to connect to your instance, and obtain the password of the management control panel.
Note: For more information, see Get the application user name and password of the instance "authenticated by Bitnami" in Amazon Lightsail 。
a. On Lightsail Home On the Instance tab of, select the SSH Quick Connect icon for the WordPress instance.

b. After the browser based SSH client window opens, enter the following command to retrieve the default application password:
cat $HOME/bitnami_application_password
c. Write down the password displayed on the screen. Later, you will use it to log into the WordPress website's administration control panel.

4. Log in to the WordPress website management control panel
Now that you have the password of the WordPress website management control panel, you can log in. In the management control panel, you can change the user password, install plug-ins, change the website theme, and so on.
Complete the following steps to log into the WordPress website's management control panel.
Note: For more information, see Get the application user name and password of the instance "authenticated by Bitnami" in Amazon Lightsail.
a. In the browser, go to:
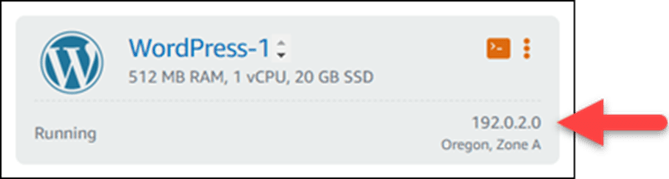
http://PublicIpAddress/wp-login.php
In the address, replace PublicIpAddress with the public IP address of the WordPress instance. You can obtain the public IP address of the instance from the Lightsail console, as shown in the following figure:
b. Log in to your instance.
In the User name or e-mail address box, enter user.
In the Password box, enter the default password obtained earlier in this tutorial.
Select Login.
Now you have logged into the WordPress website's management control panel, where you can perform management operations.
5. Create a Lightsail static IP address and attach it to the WordPress instance
If you stop and start the instance, the default public IP address of the WordPress instance will change. Even if you stop and start the instance, the static IP address attached to the instance will remain unchanged.
Complete the following steps to create a static IP address and attach it to the WordPress instance.
Note: For more information, see Create a static IP and attach it to an instance in Amazon Lightsail.
a. On Lightsail Home On the Instance tab of the, select the running WordPress instance.
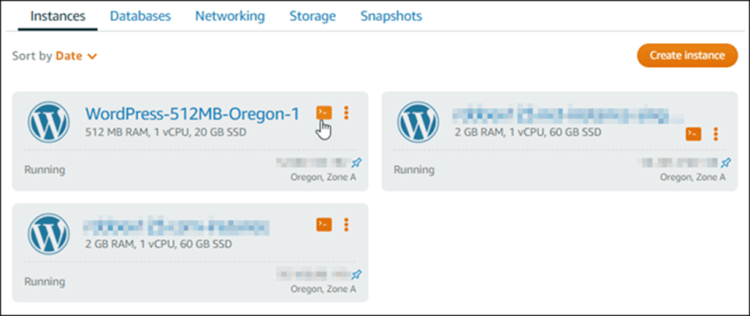
b. Select networking Tab and select Create Static IP 。
c. The static IP location and additional instances are pre selected according to the instance you selected earlier in this tutorial
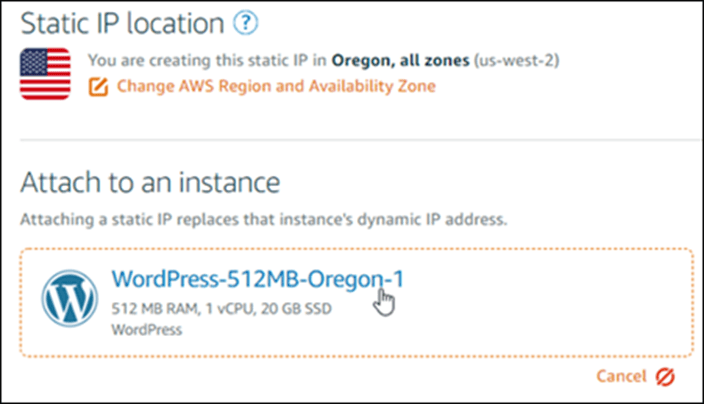
d. Name the static IP and select Create.
6. Create a Lightsail DNS zone and map the domain to a WordPress instance
Transfer the management permissions of DNS records of the domain to Lightsail. In this way, you can more easily map the domain to the WordPress instance and use the Lightsail console to manage more resources of the website.
Complete the following steps to create a Lightsail DNS zone and map the domain to a WordPress instance.
Note: For more information, see Create DNS zones in Amazon Lightsail to manage DNS records for the domain.
a. On Lightsail Home On the Networking tab of the, select Create DNS Zone.

b. Enter the field and select establish DNS zone 。
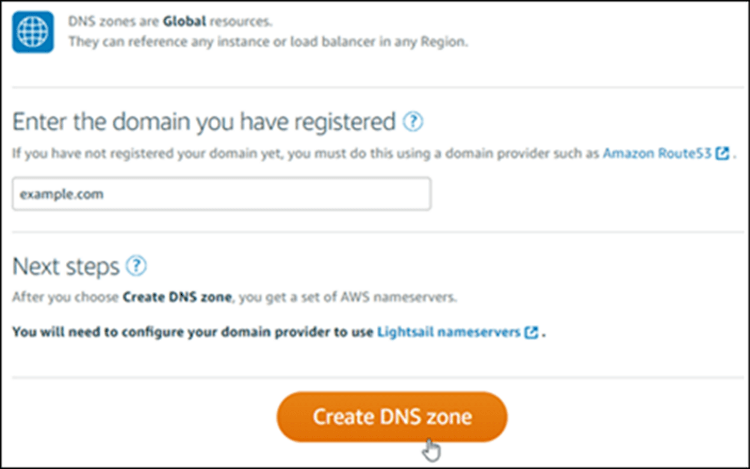
c. Note the name server addresses listed on the page.
You can add these name server addresses to your domain name registrar to transfer the management rights of DNS records of the domain to Lightsail.
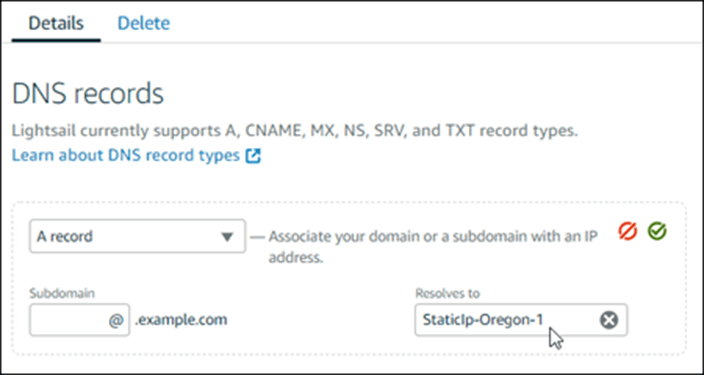
d. After transferring the domain's DNS record management authority to Lightsail, add an A record to point the domain's top-level domain name to the WordPress instance, as shown below:
You can add these name server addresses to your domain name registrar to transfer the management rights of DNS records of the domain to Lightsail.
1. In the DNS zone of the domain, select Add Record.
2. In the sub domain box, enter an @ symbol to map the top-level domain name of the domain (for example. com) to the instance@ The symbol clearly indicates that you want to add a top-level domain name record. It was not added as a child domain.
3. In the Map to box, select the static IP attached to the WordPress instance in the previous step of this tutorial.
4. Select the Save icon.
Before the domain starts to route traffic to the WordPress instance, please allow time to propagate changes in the DNS of the Internet.