Who doesn't love free things? Who doesn't want the website to visit faster? Let's try it together. With the free package provided by Amazon Cloud Technology CloudFront CDN service, you can speed up your WordPress website through simple configuration. As a powerful CMS (content management system) platform, WordPress is widely praised for its perfect functions, first-class customization ability and rich plug-ins. From personal blogs to corporate websites, from start-ups to large multinational enterprises, many websites we visit daily are based on WordPress.
If you have such a website and want to provide fast and smooth access experience for visitors around the world, what should you do? The simplest way is to use CDN. With the help of CDN service providers in major regions around the world, they can deliver content to users nearby. But will such a solution be very expensive? Choosing the right CDN service can also be very cheap, even for many websites with low traffic, it can be realized for free. Please note that all operations in this article will be subject to the global Amazon cloud technology platform.
Basic conditions:
To use the methods described in this article, you need to have:
A ready-made website based on WordPress platform;
Install a plug-in named "WPAdmin AWS CDN" for the website;
An Amazon Cloud Technology account. If we don't have an account, we can register one.
Recommended reading
 Lao Zuo personally tested the process of applying for free Amazon Cloud AWS 12 month account qualification (verify and activate the complete tutorial)
Presumably, many of us have heard of Amazon ECS, database, cloud storage, and machine learning applications. However, because AWS Amazon ECS only provides English, we have some difficulties for many friends who need to buy it. We may have heard that Amazon AWS has the qualification to apply for free accounts, and it is generous in the industry [...]
Updated: 2022/7/18
read the whole passage
Lao Zuo personally tested the process of applying for free Amazon Cloud AWS 12 month account qualification (verify and activate the complete tutorial)
Presumably, many of us have heard of Amazon ECS, database, cloud storage, and machine learning applications. However, because AWS Amazon ECS only provides English, we have some difficulties for many friends who need to buy it. We may have heard that Amazon AWS has the qualification to apply for free accounts, and it is generous in the industry [...]
Updated: 2022/7/18
read the whole passage
What is Amazon CloudFront service
Amazon CloudFront is a CDN service provided by Amazon Cloud Technology, which can realize the global delivery of content with extremely low latency and extremely high transmission speed. At present, the service has covered more than 90 cities in 47 countries/regions around the world through more than 310 nodes, basically covering all major population gathering areas.
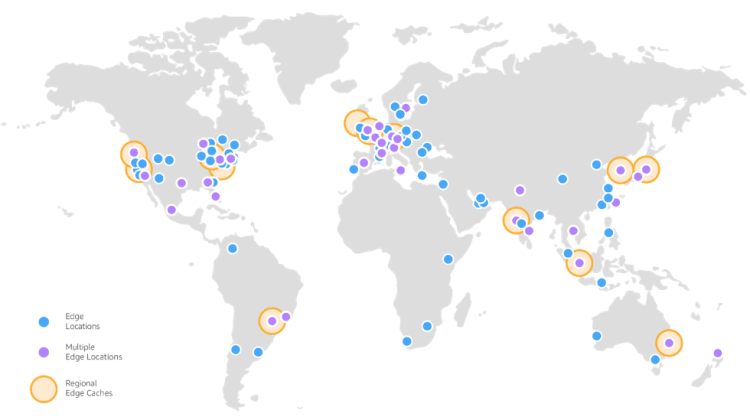
Amazon CloudFront node distribution map, source: Amazon Cloud Technology official website
So why can this service be used for free? In fact, this is mainly due to the "free package" provided by Amazon Cloud Technology for all users. The package covers hundreds of products of Amazon Cloud Technology. Some of these products can be "tried for free", some can be "free within 12 months", and some can be "permanently free". For CloudFront, under the free package, users can get 1TB of outgoing data traffic, 10 million HTTP or HTTPS requests, and 2 million function calls for free every month. The free package is permanently valid. Only when the monthly usage exceeds the package limit, will the excess be charged according to the actual usage. The specific charging method and rate of CloudFront can be referred to here: https://aws.amazon.com/cn/cloudfront/pricing/ 。
1. Register an account and open CloudFront service
First visit the Amazon Cloud Technology official website (amazon. com) to register an account, or use an existing account to log in to the management background.
Then click "Services" in the upper left corner, and click "Security, Identity and Compliance" and "IAM" in turn:
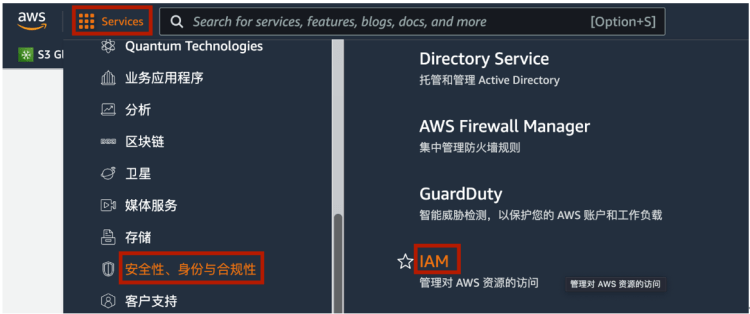
Next, the IAM interface will be opened. We need to create a CloudFront user here, and then we need to configure the WordPress website to use this user to access the CloudFront service.
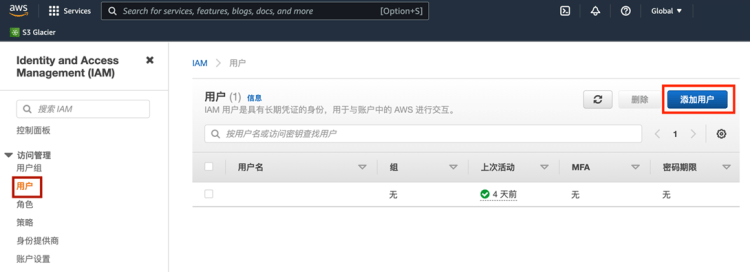
Please click "User" on the left side of the page, and then click "Add User":
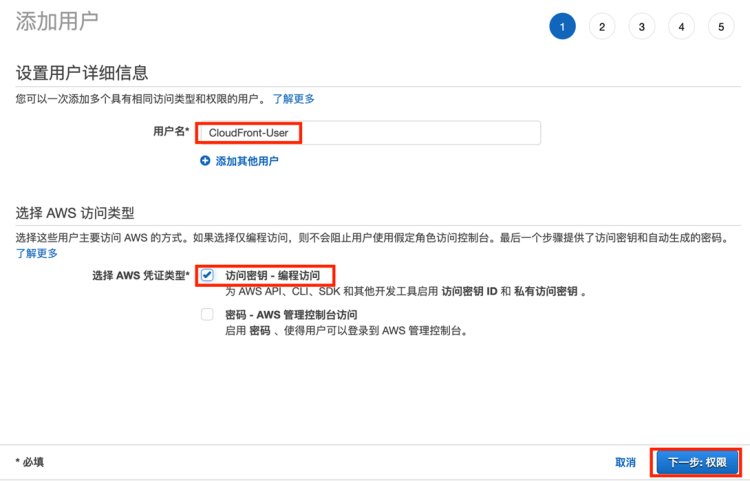
Enter a meaningful name in "User Name", such as "CloudFront User"; Select "Access Key - Programmed Access" as "AWS Credential Type"; Then click "Next: Permission":
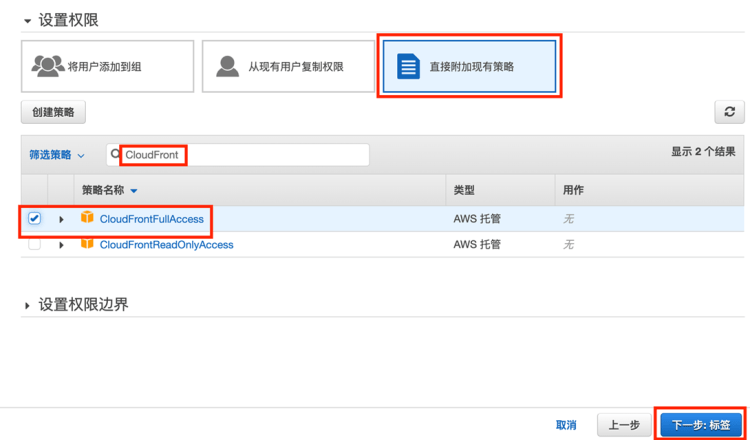
Select "Attach existing policy directly"; Enter "CloudFront" in the policy search box, and select "CloudFrontFullAccess" from the search results; Then click "Next: Label":
On the tag page that appears later, you can set some descriptive tags for the IAM user. However, for general small-scale cloud deployment, tags do not play a significant role, so it is OK not to set them. However, for large-scale deployments involving dozens or hundreds of users, it is strongly recommended to set labels in order to simplify subsequent management. Here we do not set the label, but directly click "Next: Review".
Check all settings on the following page, and click "Create User" after confirming that there is no error.
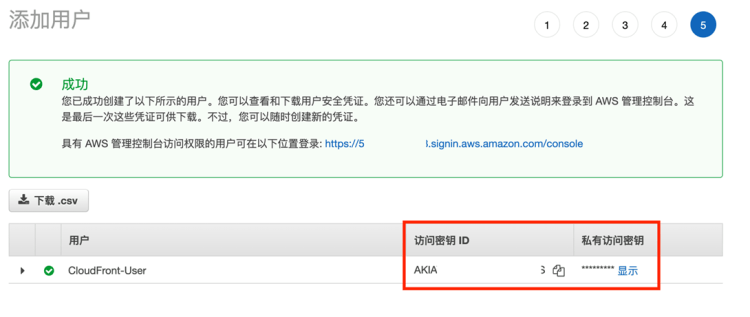
Then you will see the interface shown in the following figure. The access key ID and private access key are listed here. Please record these two information and keep them properly (they will also be used in subsequent operations). And you need to keep it confidential. Anyone who knows these two information will be able to use your CloudFront service!
So far, the configuration of CloudFront has been completed. Next, you need to configure the WordPress website.
2. Enable CloudFront CDN for WordPress websites
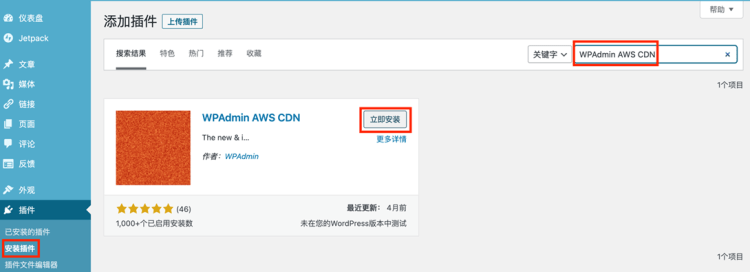
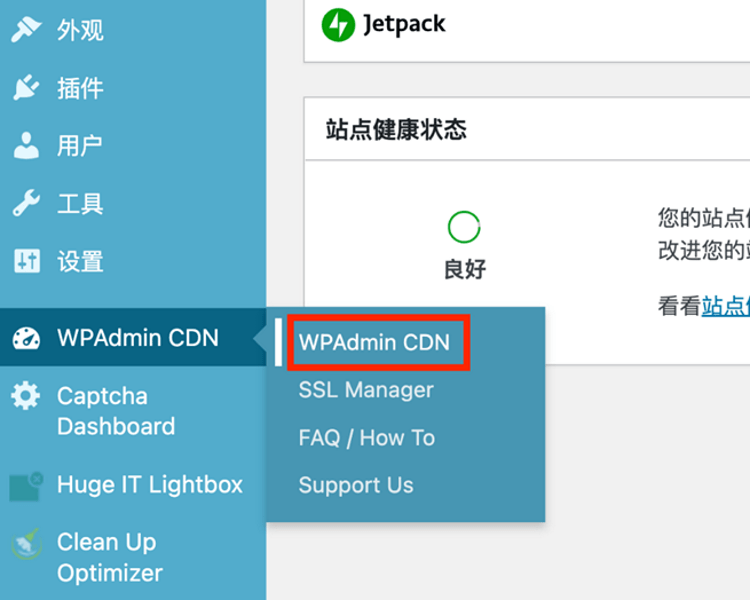
Log in to the WordPress website management background, and click "Plug in" and "Install Plug in" in the left list. Then enter "WPAdmin AWS CDN" in the plug-in search box; Click the corresponding "Install Now" button:
After the installation is completed, click Enable, and then a menu item "WPAdmin CDN" will appear on the left side of the WordPress background interface. Point to this option and select "WPAdmin CDN" from the pop-up menu:
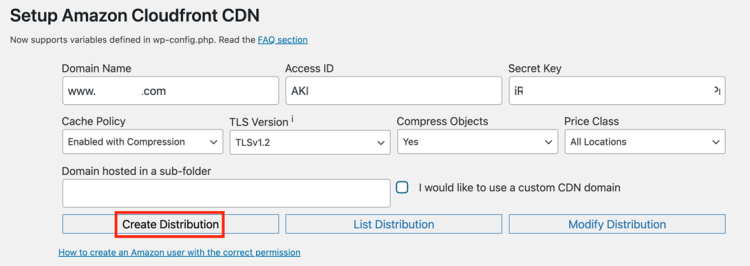
Next, you will see the configuration interface of the plug-in. Here, you need to enter "Access ID" and "Secret Key". These are the two values obtained after IAM user creation. Please fill it in here.
Fill the Access Key ID into the Access ID and the Private Access Key into the Secret Key. For Cache Policy, select Enabled with Compression; For Price Class, select All Location. Other settings can use default values. Click "Create Distribution":
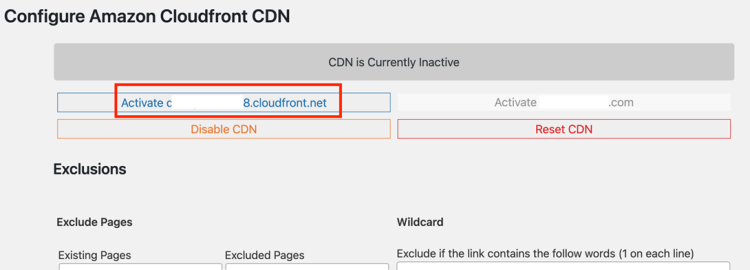
Wait a moment, the page will show that CloudFront assignment has been successfully created, and then click the "Reload the page" link, you can see that the assigned CloudFront secondary domain name is displayed on the left, and click the "Active" button corresponding to the domain name:
So far, the settings of the WordPress website have been completed.
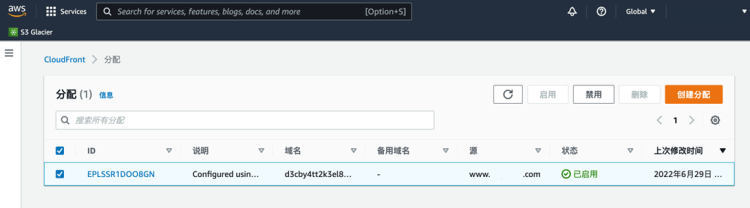
Then if you return to the background interface of CloudFront, you will see a "allocation" listed here, which is the CDN allocation automatically created by the WPAdmin plug-in for the WordPress website. It can also be seen from here that the CDN has been successfully created and enabled. Since then, when global users visit this website, they can get a faster and smoother experience through CloudFront CDN service.
So what's the actual effect? Let's use the browser's built-in Lighthouse performance test tool to test. Before enabling CloudFront CDN, the website performance results tested by this tool are as follows:

After the CDN is enabled, the re test results are as follows:
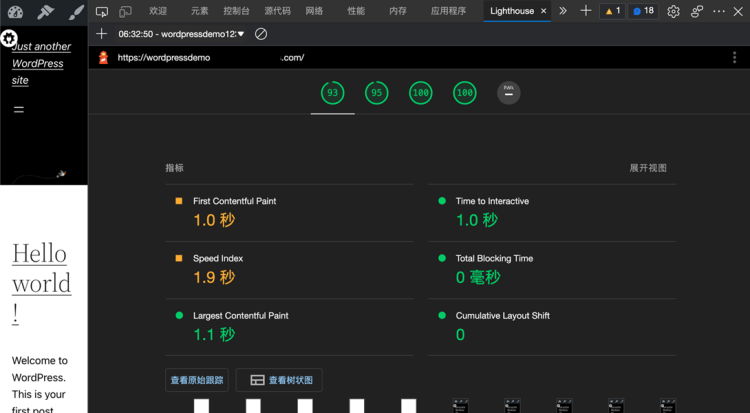
All performance test indicators have improved to a certain extent. The increase seems to be small, mainly because this is a newly built blank WordPress website for testing, which does not contain any content other than a automatically generated placeholder article, so its loading speed is not slow, but CloudFront CDN still improves the website performance to a certain extent. For websites that have been in operation for a long time and contain a large number of articles, pictures and other contents, it is natural to achieve better acceleration effect.
1TB of free traffic per month can meet the needs of individuals or most low load websites. Even if it exceeds the free limit, you can also pay at a very low rate, so that your website can enjoy the professional CDN service that only large enterprises can use in the past. More importantly, the related opening and setting operations are very simple. As long as you install a WordPress plug-in and conduct simple configuration, you can easily do it in a few minutes without advanced technical capabilities.