Distribute Layer 4 or Layer 7 traffic to ECS through CLB
One click configuration
Tutorial Introduction

Description of probationary benefits
The monthly CLB includes 750 hours of free trial quota (shared by multiple CLB instances) The monthly CLB includes 15 LCUs for free trial (shared by multiple CLB instances)
What can I learn
Learn how to create CLB instances. Learn how to configure Layer 4 monitoring with one click to complete the request forwarding of Layer 4 load balancing. Learn how to configure Layer 7 monitoring with one click to complete the request forwarding of Layer 7 load balancing.
| |
| |
|
|
| |
Prepare resources and environment
Resource requirements
Get free benefits
| |
| |
| |
|
Check Resources
Deploy application
Sign in ECS Console 。 In the upper left corner of the top menu bar, select the same region as ECS 01 and ECS 02 instances. Set ECS 01 and ECS 02 instance login passwords. Click in the Action column 
>Instance Properties>Reset Instance Password , set the login password of the ECS instance according to the interface prompts. After saving the password, on the pop-up page, click Restart Now Make the password effective. Resetting the instance password is supported about 3-5 minutes after the instance creation is completed. If it cannot be reset, please wait patiently and try again. Connect ECS 01 and ECS 02 instances remotely. return example Page, click Remote connection 。 In the pop-up connection and command dialog box, click Connect remotely through Workbench Corresponding Sign in now 。 In the pop-up login instance dialog box, enter the login information.
Execute the following commands to deploy the Nginx static page for the ECS 01 instance. The following command takes CentOS 7.9 64 bit operating system as an example. yum install -y nginx systemctl start nginx.service cd /usr/share/nginx/html/ echo "Hello World ! This is ECS01." > index.html Execute the following commands to deploy the Nginx static page for the ECS 02 instance. The following command takes CentOS 7.9 64 bit operating system as an example. yum install -y nginx systemctl start nginx.service cd /usr/share/nginx/html/ echo "Hello World ! This is ECS02." > index.html
One click configuration
Configure listening Configure Virtual Server Group
Operation steps
Select the following link to go to the ROS console. The system opens automatically Use new resources (standard) Create a page of the resource stack, and Template content The area shows the details of the YAML file. The ROS console is in the region you last accessed the console by default. Please modify the region according to the region of the resource you created before proceeding to the next step. After confirming the region, keep all the options on the page unchanged and click next step get into Configure template parameters Page. stay Configure template parameters Page, complete the configuration of the following parameters, and then click establish Start one click configuration. to configure explain Example Resource stack name Modify the resource stack name. test CLB instance ID Select the created private network CLB instance from the drop-down box. lb-bp1g9vutth8xvnznn**** ECS instance ID list single click Select Instance In the pop-up dialog box, select the two ECS instances that have been created, and then click determine 。 The selected ECS instances have deployed application services, and the ECS instances and CLB instances belong to the same region. single click Select Instance And select two ECS in the pop-up dialog box When Resource stack information Of the page state Show as Created successfully Indicates that one click configuration is complete. It usually takes about 1~2 minutes to create a monitor through one click configuration, but there may be some delay due to network and other reasons. Please wait patiently for a few minutes. 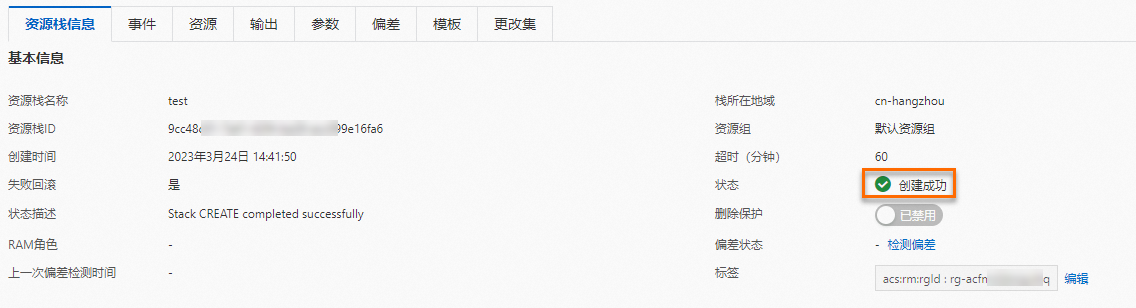
complete
Verifying Layer 7 Load Balancing
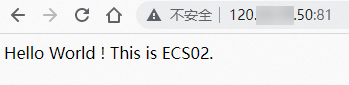
Sign in Traditional load balancing CLB console , at CLB Instance management Page, on Service address Column to view and copy the public network service address of the CLB instance. Enter the public service address of the CLB instance in the browser http://120.XX.XX.50:81 To verify the CLB's 7-layer load balancing forwarding capability. Refresh the browser, and you can observe that the request is converted between two ECSs. The above verification process shows that CLB can distribute client traffic to different back-end servers. 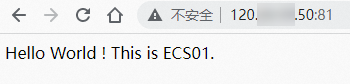
Verifying Layer 4 Load Balancing
Sign in Traditional load balancing CLB console , at CLB Instance management Page, on Service address Column to view and copy the public network service address of the CLB instance. Enter the public service address of the CLB instance in the browser http://120.XX.XX.50 You can observe that the request has been forwarded to a backend ECS server. The following operations take ECS01 as an example. Deactivate ECS01, refresh the public service address of the browser accessing the CLB instance, and you can observe that the request has been forwarded to ECS02. start-up ECS01 and wait for a few minutes. Deactivate ECS02, refresh the public service address of the browser accessing the CLB instance, and observe that the request has been forwarded to ECS01.
The above verification process shows that when a single back-end server fails, CLB can still ensure service availability. 

Cleaning and follow-up
clear
The free trial rights of CLB are limited in duration, and CLB instances that are not released after the expiration of the rights may incur costs. After completing the tutorial, refer to the following scenarios to process CLB instances: If you do not need to use the CLB instance, you can log in Traditional load balancing CLB console , In the left navigation bar, select Traditional load balancing CLB (original SLB) > Instance management , on Instance management Page, find the target CLB instance in the operation Column Click 
> Release Settings , manually release the instance according to the interface prompts. If you need to continue using the CLB instance, please recharge your AliCloud account at least one hour before the trial expires to ensure that the account amount is not less than 100.00 yuan. The CLB instance that has not been renewed upon expiration will be automatically stopped due to arrears. The CLB instance will be retained within 7 days of downtime, and the CLB instance and data will be automatically released after 7 days.
This tutorial uses a personal ECS instance, which defaults to pay as you go instances. After completing the tutorial, please refer to the following scenarios to process ECS instances: If you do not need to continue using the instance, you can Log in to the ECS console , find the target instance, and click in the operation column 
, search and click Release Settings , release the instance according to the interface prompt. If you need to continue using the instance, please recharge your AliCloud account at least one hour before the trial expires to ensure that the account amount is not less than 100.00 yuan. Instances that have not been renewed upon expiration will be automatically shut down due to arrears. The instance will be retained within 15 days of downtime, and the instance and data will be automatically released after 15 days.
follow-up
summary
Common knowledge points
Only Layer 4 (TCP or UDP protocol) listening Layer 4 (TCP or UDP protocol) and Layer 7 (HTTP or HTTPS protocol) listening
The backend ECS may not deploy the service Health check is not enabled
Extended Reading
Manual configuration
Tutorial Introduction

Description of probationary benefits
The monthly CLB includes 750 hours of free trial quota (shared by multiple CLB instances) The monthly CLB includes 15 LCUs for free trial (shared by multiple CLB instances)
What can I learn
Learn how to create CLB instances. Learn how to configure Layer 4 monitoring and complete the request forwarding of Layer 4 load balancing. Learn how to configure Layer 7 monitoring and complete the request forwarding of Layer 7 load balancing.
| |
| |
|
|
| |
Prepare resources and environment
Resource requirements
Get free benefits
| |
| |
| |
|
Check Resources
Deploy application
Sign in ECS Console 。 In the upper left corner of the top menu bar, select the same region as ECS 01 and ECS 02 instances. Set ECS 01 and ECS 02 instance login passwords. Click in the Action column >Instance Properties>Reset Instance Password , set the login password of the ECS instance according to the interface prompts. After saving the password, on the pop-up page, click Restart Now Make the password effective. Resetting the instance password is supported about 3-5 minutes after the instance creation is completed. If it cannot be reset, please wait patiently and try again. Connect ECS 01 and ECS 02 instances remotely. return example Page, click Remote connection 。 In the pop-up connection and command dialog box, click Connect remotely through Workbench Corresponding Sign in now 。 In the pop-up login instance dialog box, enter the login information.
Execute the following commands to deploy the Nginx static page for the ECS 01 instance. The following command takes CentOS 7.9 64 bit operating system as an example. yum install -y nginx systemctl start nginx.service cd /usr/share/nginx/html/ echo "Hello World ! This is ECS01." > index.html Execute the following commands to deploy the Nginx static page for the ECS 02 instance. The following command takes CentOS 7.9 64 bit operating system as an example. yum install -y nginx systemctl start nginx.service cd /usr/share/nginx/html/ echo "Hello World ! This is ECS02." > index.html
Configure CLB listening
Configure Layer 4 Monitoring
Sign in Traditional load balancing CLB console 。 In the top menu bar, select the region where the CLB instance belongs. Selection of this article East China 1 (Hangzhou) 。 stay Instance management Page, click the created CLB instance ID. After receiving the free trial benefits of CLB, the system will automatically create a CLB instance for you. It usually takes 1~3 minutes to create a CLB instance. Please wait patiently. When the instance status changes to In operation The CLB instance creation is completed. single click monitor Tab, in monitor Tab Click Add listening 。 stay Protocol&Listening The configuration wizard completes the configuration of the following main parameters. The remaining parameters remain in the default configuration, and then click next step 。 Listening configuration explain Sample value Select a load balancing protocol Select the protocol type to listen to. TCP Listening port Set the front-end protocol port, that is, the listening port used to receive requests and forward requests to the back-end server. Listening port range: 1~65535. eighty Listening name The name of the custom listener. TCP_80 stay Back-end server Configuration wizard, selecting Default Server Group , and then click Continue adding 。 stay Select Server In the configuration wizard, select the created ECS01 and ECS02 instances, and then click next step 。 stay Configure Ports and Weights Configuration wizard, keep the default configuration, click add to 。 Enter the ports of ECS01 and ECS02. In this tutorial, set them to 80, and then click next step 。
stay Health Check Configuration Wizard, keep the default configuration, click next step , and then click Submit 。 After the configuration is successful, click got it 。
Configure Layer 7 monitoring
stay monitor Tab Click Add listening 。 stay Protocol&Listening The configuration wizard completes the configuration of the following main parameters. The remaining parameters remain in the default configuration, and then click next step 。 Listening configuration explain Sample value Select a load balancing protocol Select the protocol type to listen to. HTTP Listening port Set the front-end protocol port, that is, the listening port used to receive requests and forward requests to the back-end server. Listening port range: 1~65535. eighty-one Listening name The name of the custom listener. HTTP_81 stay Back-end server Configuration wizard, selecting Default Server Group , you can see the added ECS01 and ECS02. Enter the ports of ECS01 and ECS02. In this tutorial, set them to 80, and then click next step 。 stay Health Check Configuration Wizard, keep the default configuration, click next step , and then click Submit 。 After the configuration is successful, click got it 。
complete
Verifying Layer 7 Load Balancing
Sign in Traditional load balancing CLB console , at CLB Instance management Page, on Service address Column to view and copy the public network service address of the CLB instance. Enter the public service address of the CLB instance in the browser http://120.XX.XX.50:81 To verify the CLB's 7-layer load balancing forwarding capability. Refresh the browser, and you can observe that the request is converted between two ECSs. The above verification process shows that CLB can distribute client traffic to different back-end servers.
Verifying Layer 4 Load Balancing
Sign in Traditional load balancing CLB console , at CLB Instance management Page, on Service address Column to view and copy the public network service address of the CLB instance. Enter the public service address of the CLB instance in the browser http://120.XX.XX.50 You can observe that the request has been forwarded to a backend ECS server. The following operations take ECS01 as an example. Deactivate ECS01, refresh the public service address of the browser accessing the CLB instance, and you can observe that the request has been forwarded to ECS02. start-up ECS01 and wait for a few minutes. Deactivate ECS02, refresh the public service address of the browser accessing the CLB instance, and observe that the request has been forwarded to ECS01.
The above verification process shows that when a single back-end server fails, CLB can still ensure service availability.
Cleaning and follow-up
clear
The free trial rights of CLB are limited in duration, and CLB instances that are not released after the expiration of the rights may incur costs. After completing the tutorial, refer to the following scenarios to process CLB instances: If you do not need to use the CLB instance, you can log in Traditional load balancing CLB console , In the left navigation bar, select Traditional load balancing CLB (original SLB) > Instance management , on Instance management Page, find the target CLB instance in the operation Column Click > Release Settings , manually release the instance according to the interface prompts. If you need to continue using the CLB instance, please recharge your AliCloud account at least one hour before the trial expires to ensure that the account amount is not less than 100.00 yuan. The CLB instance that has not been renewed upon expiration will be automatically stopped due to arrears. The CLB instance will be retained within 7 days of downtime, and the CLB instance and data will be automatically released after 7 days.
This tutorial uses a personal ECS instance, which defaults to pay as you go instances. After completing the tutorial, please refer to the following scenarios to process ECS instances: If you do not need to continue using the instance, you can Log in to the ECS console , find the target instance, and click in the operation column 
, search and click Release Settings , release the instance according to the interface prompt. If you need to continue using the instance, please recharge your AliCloud account at least one hour before the trial expires to ensure that the account amount is not less than 100.00 yuan. Instances that have not been renewed upon expiration will be automatically shut down due to arrears. The instance will be retained within 15 days of downtime, and the instance and data will be automatically released after 15 days.
follow-up
summary
Common knowledge points
Only Layer 4 (TCP or UDP protocol) listens Layer 4 (TCP or UDP protocol) and Layer 7 (HTTP or HTTPS protocol) listening
The backend ECS may not deploy the service Health check is not enabled