Sign a request and verify the signature
-
When calling an API, you must sign the request sent to Alipay and verify the Alipay response signature accordingly. For more information, see Call an API . -
When receiving a notification, you must verify the Alipay request signature. However, you do not need to sign the response for the notification. For more information, see Receive a notification .
Call an API
Prerequisite
Sign a request

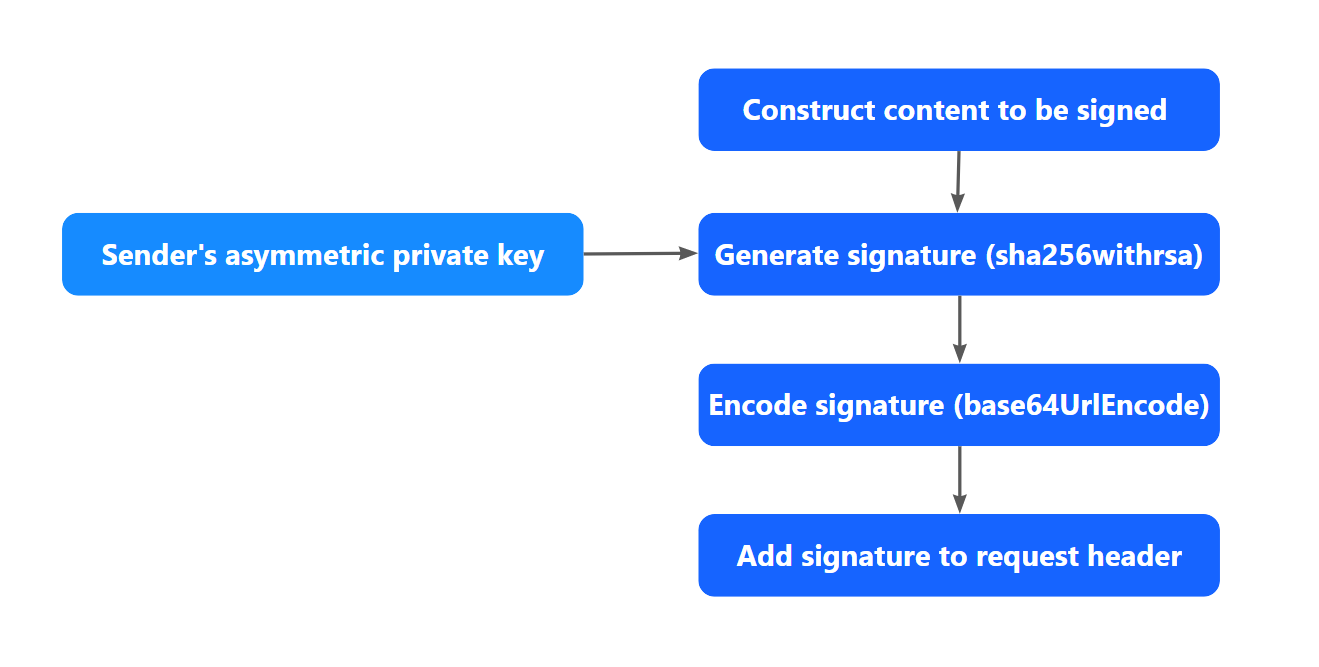
Step 1: Construct the content to be signed
<HTTP-Method> <HTTP-URI> <Client-Id>.< Request-Time>.< Request-Body> HTTP-Method : POST HTTP-URI : For example, if the HTTP URL is https://open-na-global.alipay.com /ams/api/v1/payments/pay , this field is /ams/api/v1/payments/pay . Client-Id : Used to identify a client. For example, TEST_5X00000000000000 . You can get this field from the request header. Request-Time : Specifies the timestamp of when a request is sent. The value of this field must be accurate to milliseconds. For example, one trillion and six hundred and eighty-five billion five hundred and ninety-nine million nine hundred and thirty-three thousand eight hundred and seventy-one . You can get the timestamp from the request header. Request-Body : The data body of the request. For example:
{ "order" :{ "orderId" : "OrderID_0101010101" , "orderDescription" : "sample_order" , "orderAmount" :{ "value" : "100" , "currency" : "JPY" } } }
POST /ams/api/v one /payments/pay TEST_ five X zero zero zero zero zero zero zero zero zero zero zero zero zero zero .2019 -05 -28 T one two : twelve : twelve + 08 : zero { "order" :{ "orderId" : "OrderID_0101010101" , "orderDescription" : "sample_order" , "orderAmount" :{ "value" : "100" , "currency" : "JPY" } } } Step 2: Generate the signature
generatedSignature=base64UrlEncode(sha256withrsa(<Content_To_Be_Signed>), <privateKey>)) sha256withrsa : The method to generate a digital signature for the provided content base64UrlEncode : The method to encode the generated digital signature Content_To_Be_Signed : The content obtained from Step 1 privateKey : The private key value obtained from Prerequisite
KrwDE9tAPJYBb4cUZU6ALJxGIZgwDXn5UkFPMip09n%2FkYKPhEIII%2Fki2rYY2lPtuKVgMNz%2BtuCU% 2FjzRpohDbrOd8zYriiukpGAxBQDIVbatGI7WYOcc9YVQwdCR6ROuRQvr%2FD1AfdhHd6waAASu5Xugow9 w1OW7Ti93LTd0tcyEWQYd2S7c3A73sHOJNYl8DC1PjasiBozZ%2FADgb7ONsqHo%2B8fKHsLygX9cuMkQY TGIRBQsvfgICnJhh%2BzXV8AQoecJBTrv6p%xxxx
 /** *  * @param requestURI // domain part excluded, sample: /ams/api/v1/payments/pay * @param clientId * @param requestTime * @param privateKey * @param requestBody * @return */
     public  static String sign (String requestURI, String clientId, String requestTime, String privateKey, String requestBody)  { String content = String.format( "POST %s\n%s.%s.%s" , requestURI, clientId, requestTime, requestBody); try { java.security. Signature signature = java.security. Signature .getInstance( "SHA256withRSA" ); PrivateKey priKey = KeyFactory.getInstance( "RSA" ).generatePrivate( new PKCS8EncodedKeySpec(Base64.decodeBase64(privateKey.getBytes( "UTF-8" )))); signature.initSign(priKey); signature.update(content.getBytes( "UTF-8" )); byte [] signed = signature.sign(); return URLEncoder.encode( new String(Base64.encodeBase64(signed), "UTF-8" ), "UTF-8" ); } catch (Exception e) { throw  new RuntimeException(e); } }
Step 3: Add the generated signature to the request header
-
Assemble a signature string based on the following syntax:
'Signature: algorithm=<algorithm>, keyVersion=<key-version>, signature=<generatedSignature>' algorithm , keyVersion : See the header of the Message structure chapter. generatedSignature : The signature generated in Step 2 .
'Signature: algorithm=RSA256, keyVersion=1, signature=KrwDE9tAPJYBb4cUZU6ALJxGIZgwDXn5UkFPMip09n%2FkYKPhEIII%2Fki2rYY2lPtuKVgMNz%2BtuCU%2FjzRpohDbrOd8zYriiukpGAxBQDIVbatGI7WYOcc9YVQwdCR6ROuRQvr%2FD1AfdhHd6waAASu5Xugow9w1OW7Ti93LTd0tcyEWQYd2S7c3A73sHOJNYl8DC1PjasiBozZ%2FADgb7ONsqHo%2B8fKHsLygX9cuMkQYTGIRBQsvfgICnJhh%2BzXV8AQoecJBTrv6p%****' -
Add the signature string to the request header. For details about the request header, see the Message structure chapter.
Send a request
curl -X POST \ https://www.example.com/ams/api/v one /payments/pay \ -H 'Content-Type: application/json' \ -H 'Client-Id: TEST_ five X zero zero zero zero zero zero zero zero zero zero zero zero zero zero ' \ -H 'Request-Time: one trillion and six hundred and eighty-five billion five hundred and ninety-nine million nine hundred and thirty-three thousand eight hundred and seventy-one ' \ -H 'Signature: algorithm=RSA two five six , keyVersion= zero , signature=KrwDE nine tAPJYBb four cUZU six ALJxGIZgwDXn five UkFPMip zero nine n% two FkYKPhEIII% two Fki two rYY two lPtuKVgMNz% two BtuCU% two FjzRpohDbrOd eight zYriiukpGAxBQDIVbatGI seven WYOcc nine YVQwdCR six ROuRQvr% two FD one AfdhHd six waAASu five Xugow nine w one OW seven Ti nine three LTd zero tcyEWQYd two S seven c three A seven three sHOJNYl eight DC one PjasiBozZ% two FADgb seven ONsqHo% two B eight fKHsLygX nine cuMkQYTGIRBQsvfgICnJhh% two BzXV eight AQoecJBTrv six p%xxxx' \ -d '{ "order" :{ "orderId" : "OrderID_0101010101" , "orderDescription" : "sample_order" , "orderAmount" :{ "value" : "100" , "currency" : "JPY" } }, "paymentAmount" :{ "value" : "100" , "currency" : "JPY" }, "paymentFactor" : { "isInStorePayment" : "true" } }' Handle a response

-
Code sample of the response header:
Client-Id: 5X00000000000000 Response-Time: 2019-05-28T12:12:14+08:00 signature: algorithm=RSA256, keyVersion=0, signature=p9T2hXxIjek0UOLw3fwlthNsV6ATaioIvu8X1uFx8a9tE87d2XEhqylnf0KjifJ3WhCoMokl GwwlDS3tsSenwnL0Ha6BsXbJvUHRC5qcVlNy5Oq%2FpNqx2%2BKdwbw4eY7tZBDQhMKoaMVSbqbCb3eRBX sw9ZwOO%2FFCyq1zICzllOd4pbhpvES3gcw2X%2B0Ye4hQJBghcLCJxCizSv9lMyTmV%2BYA39B9gRouha N0dM2aeAXMlVJAWtJdcL%2Bdub%2F3LrzxBnY%**** -
Code sample of the response body:
{ "result" : { "resultCode" : "SUCCESS" , "resultStatus" : "S" , "resultMessage" : "success" } }
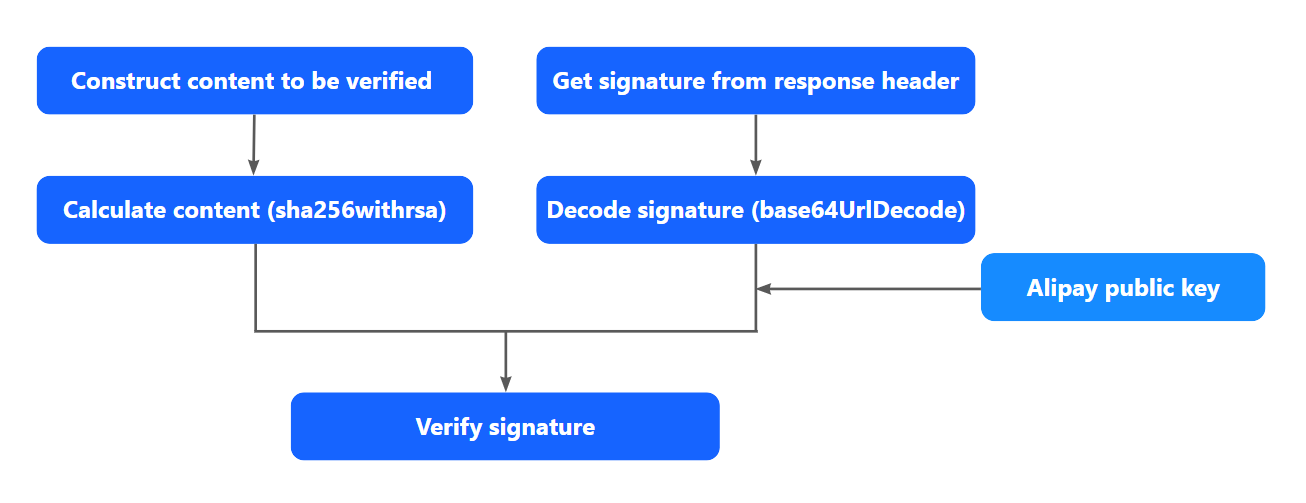
Step 1: Obtain Alipay public key
Note: Only when you upload your asymmetric public key to Antom Dashboard , can you obtain the Alipay public key used to verify the corresponding response from Alipay.
Step 2: Construct the content to be verified
<HTTP-Method> <HTTP-URI> <Client-Id>.< Response-Time>.< Response-Body> HTTP-Method : POST HTTP-URI : For example, if the HTTP URL is https://open-na-global.alipay.com /ams/api/v1/payments/pay , this field is /ams/api/v1/payments/pay . Client-Id : Used to identify a client. You can get this field from the response header. Response-Time : Specifies the time when a response is returned, as defined by ISO 8601 . This field must be accurate to milliseconds. For example, 2019-05-28T12:12:14+08:00 . You can get this field from the response header. Response-Body : The data body of the response.
POST /ams/api/v one /payments/pay TEST_ five X zero zero zero zero zero zero zero zero zero zero zero zero zero zero .2019 -05 -28 T one two : twelve : fourteen + 08 : zero { "result" : { "resultCode" : "SUCCESS" , "resultStatus" : "S" , "resultMessage" : "success" } } Step 3: Get the signature from the response header
Step 4: Verify the signature
IS_SIGNATURE_VALID=sha256withrsa_verify(base64UrlDecode(<target_signature>), <Content_To_Be_Validated>, <serverPublicKey>) sha256withrsa_verify : The method to verify the signature base64UrlDecode : The method to decode the signature target_signature : The target signature obtained from step 3 content_to_be_verified : The content to be verified, created from step 2 serverPublicKey : The Alipay public key obtained from step 1 IS_SIGNATURE_VALID : A Boolean value that specifies whether the signature is valid
true : The signature is valid. false : The signature is not valid. The cause can be a mismatch between the private key and public key, or Content_To_Be_Validated is not correctly constructed.
 /** *  * @param requestURI // domain part excluded, sample: /ams/api/v1/payments/pay * @param clientId * @param reponseTime * @param alipayPublicKey * @param responseBody * @param signatureToBeVerified * @return */
     public  static  boolean  verify (String requestURI, String clientId, String reponseTime, String alipayPublicKey, String responseBody, String signatureToBeVerified)  { //signatureToBeVerified would not be present in the response when AMS returns a SIGNATURE_INVALID
         if (StringUtil.isBlank(signatureToBeVerified)) { return  false ; } String content = String.format( "POST %s\n%s.%s.%s" , requestURI, clientId, reponseTime, responseBody); try { java.security. Signature signature = java.security. Signature .getInstance( "SHA256withRSA" ); PublicKey pubKey = KeyFactory.getInstance( "RSA" ).generatePublic( new X509EncodedKeySpec(Base64.decodeBase64(alipayPublicKey.getBytes( "UTF-8" )))); signature.initVerify(pubKey); signature.update(content.getBytes( "UTF-8" )); return signature.verify(Base64.decodeBase64(URLDecoder.decode(signatureToBeVerified, "UTF-8" ).getBytes( "UTF-8" ))); } catch (Exception e) { throw  new RuntimeException(e); } }
Receive a notification
Handle a request
-
Obtain the Alipay public key for the request to verify the signature. -
Construct the request to be verified b y complying with the syntax of Content_To_Be_Validated :
<HTTP-METHOD> <Request-URI> <Client-Id>.< Request-Time>.< Request-Body> -
Get the signature from the request header. -
Verify the signature.