How to integrate Keycloak SAML with your self-hosted Teamwork/License server
Visual Paradigm integration with different authentication methods for self hosting is “questionable” to say the least. We have used DS Connector to connect to an internal LDAP server and it works somewhat, but it has its caveats. But a new problem has arisen, how to integrate the Teamwork/License server with an SSO service?
There are guides for Okta and Azure and for other methods they say: “Though this is specific to Okta the concepts could be adapted to any other SAML Identity Provider.” NB! We will be focusing on disecting the Okta version. The reason why Okta, will come later.
Now back to the setup.
Setting up the keycloak client
Keycloak is an fast evolving service with a major UI change that happened recently. This guide follows version 20.0.3, but in the future things might be different with how to set it up.
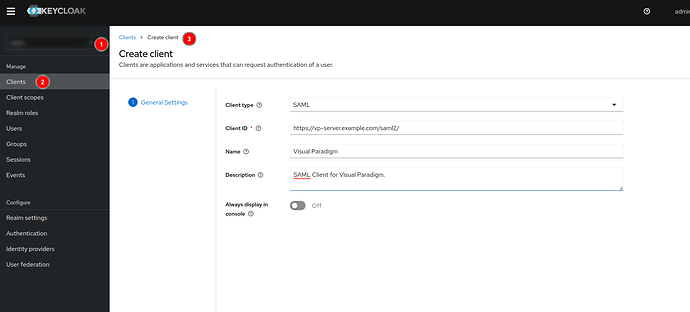
1. Create client
- Choose your realm (usually not the master realm, that is for administration only)
- Under Clients → Create client → SAML Client type
- Client ID needs to be the “Audience URI (SP Entity ID)”
- Other fields are optional.
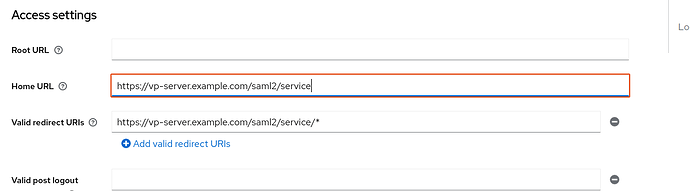
2. Modify client
Single Sign On URL (ACS) that is written in the Visual Paradigm Admin url is the Home URL / Valid redirect URIs. I am not sure where it should be, but I put it in both of them.
- Name ID format → email (I guess this kind of depends on your setup, but for me its email)
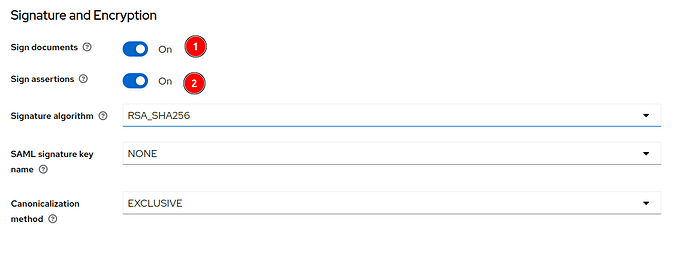
- Allow Sign documents
- Allow Sign assertions
Both of these needed to be on for the SSO to function.
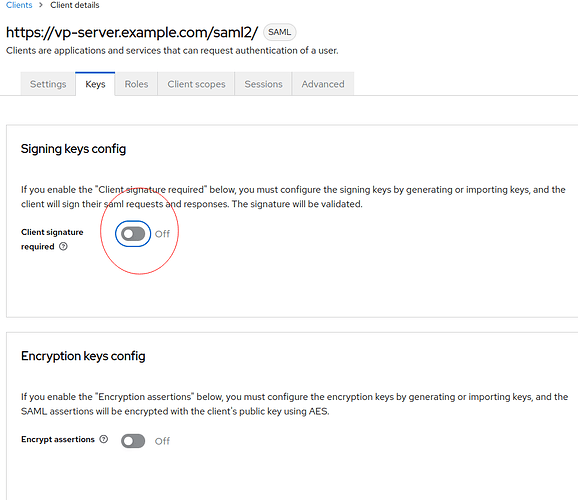
Under the “Keys” section you need to disable Client signature.
Now we have Keycloak configured!
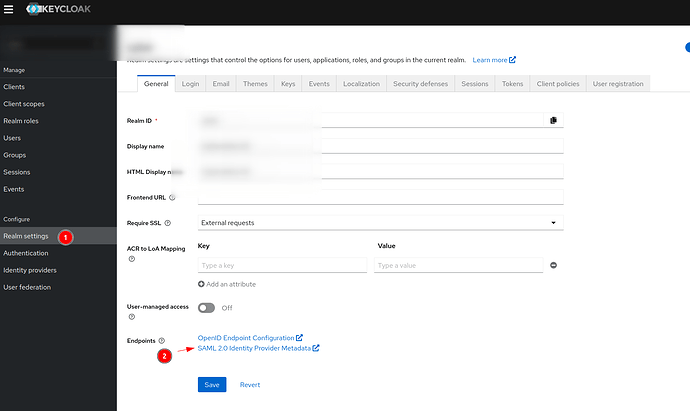
Download the IDP metadata for SAML for your realm.
3. Modify IDP metadata
As I mentioned before I used the Okta setup myself, but why?
Because uploading the metadata failed for me!
So I created a Okta trial and went through all of the trouble to get the Okta SAML metadata file and I compared the one from Okta and the other from Keycloak. And what I discovered? The XML parser that VP users or the logic, is broken!
In the first rows the XML says to use: xmlns:ds="http://www.w3.org/2000/09/xmldsig#"
For Keycloak, this is not repeated in Tag. Any other SAML service we have integrated has not complained, but for XML parser in VP this was a issue. And the tag that comes from the Okta provided metadata contains that little piece of information.
In the end we changed the XML from keycloak to include this.
Before
<ds:KeyInfo></ds:KeyInfo>
After
<ds:KeyInfo xmlns:ds="http://www.w3.org/2000/09/xmldsig#"></ds:KeyInfo>
After this change VP accepted the metadata file and we can continue on.
4. Upload configuration to VP
Now in the VP Admin panel under “Configure SSO”
- Add a nice name for your SSO (Identity Provider Name)
- Upload the modified metadata.xml file
5. Create a user for Admin
After this we need to create an Admin user.
As it turns out, the user you do the first connection to your SSO IDP becomes an Admin!
A little bit of background
Visual Paradigm sets up the Admin account with name: Admin, email: Admin.
We tried to change this email to admin@example.com where example.com might be our domain.
After this we could not log in to the Admin panel. Some hardcore hardcoded stuff.
# Our backend server, where we looked what the email is.
MariaDB [vp_db]> select * from VPUserInfo ;
+----+---------+-----------------------+--------+-------+---------------+------------------------+------------+---------------+-------------+---------------------+----------+------------------+------------------+
| Id | Name    | Email                 | Active | OrgId | ModifiedAt    | ProfilePictureFilePath | UserInfoId | ForgotPwdCode | ForgotPwdAt | ForgotPwdRemoteHost | GoogleId | VpId             | BaggageId        |
+----+---------+-----------------------+--------+-------+---------------+------------------------+------------+---------------+-------------+---------------------+----------+------------------+------------------+
|  1 | Admin   | Admin                 |      1 |     1 | 1675157196943 | NULL                   |          1 | NULL          |        NULL | NULL                | NULL     | REDACTED | REDACTED
Now back to the Admin user creation!
In the VP Admin UI we add a new user and now comes the important part: Has a email/username that can log in to the SSO service.
So myself for example user.name@example.com, can login to the keycloak SSO service, because I have an account there.
After creating this account in the UI (NB VP demands that you put a password for the user, eventhough it is never used, because that account will be generated to a SSO account)
5. Logging in
After creating the new “Member” in the UI, continue with the SSO setup.
- Add the Name for IDP
- Upload Metadata.xml
- Accept
Now you need to login in to the Keycloak. If this is successful, then VP Server will accept the SSO and your account will be made have Admin rights and it can log in to the server.
MariaDB [vp_db]> select VPUserInfoId, adminSystem, adminRole from VPUser;
+--------------+-------------+-----------+
| VPUserInfoId | adminSystem | adminRole |
+--------------+-------------+-----------+
|            1 |           1 |         1 |
|            2 |           1 |         1 |
|            4 |           0 |         0 |
+--------------+-------------+-----------+
- VPUserInfoId 1 is the ‘Admin’ account when the server is in normal mode.
- VPUserInfoId 2 is the account(member) you made to connect to the sso AND it is now an Admin as you can see.
- VPUserInfoId 3 is an account invite to use the VP server using “Invite Member” functionality.
So you can’t login to the VP Admin panel using the original account after setting up the SSO.
Thank you for reading this and I hope this guide might help some other Admins.