Let’s Encrypt Free SSL certificate It has been compatible and supported by many mainstream browsers, including FireFox and Chrome. At present, domestic applications are mainly available on major e-commerce websites and portals to improve access and transaction security. Many foreign trade company websites also use it because Google has made it clear that providing SSL certificates will be a plus factor. So for our webmasters, maybe one day your website will need to add such an SSL certificate.
There are many ways to add SSL certificates to websites. Lao Wei will write tutorials separately in the future. Today, Weiaisi blog (www.vpsss. net) Official recommendation of Let's Encrypt Certbot tool Quickly deploy SSL certificates 。
Installation environment: CentOS6 military brother lnmp1.3
1、 What to prepare before installing Let's Encrypt
Install the CentOS system, Configure the lnmp environment and add the domain name and virtual host complete.
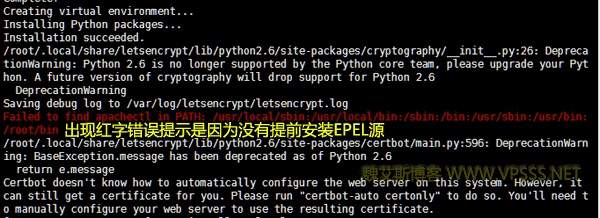
The following two steps are based on your own system conditions. According to the measured results of Lao Wei, if CentOS6/7 must install the epel source in advance Otherwise, an error may be reported when the certificate is generated later.
Upgrade the python version of CentOS 5, click me to check Upgrade the python version from 2.4 to 2.7 Operation process of.
CentOS 6/7 installs epel, click me to check Centos install the epel source Operation process of.
2、 Certbot Select Deployment Version
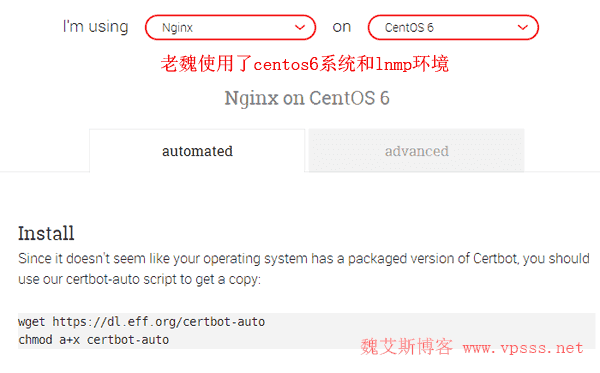
Select the system and release version according to your actual situation, and then jump to the automated installation wizard.
3、 Using Certbot to Deploy SSL Certificates in CentOS6
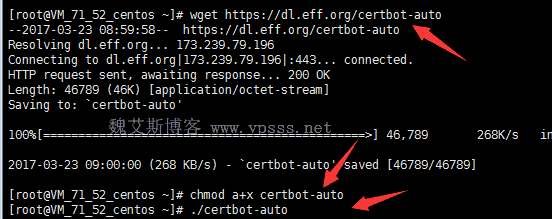
1. Lao Wei selects the CentOS6 system and the lnmp environment, and enters the following command to start the automatic installation:
cd /root/ wget https://dl.eff.org/certbot-auto chmod a+x certbot-auto ./certbot-auto
The illustration is as follows
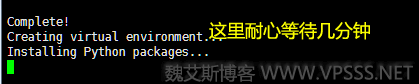
The process of "Installing Python packages" takes a few minutes. In the middle of the process, if you encounter Is this OK, enter y and press Enter.
The python source downloaded here is in foreign countries by default. If you use a foreign VPS, it is no problem, but Lao Wei needs to wait patiently when testing the VPS in China. If you use a domestic VPS card in the Installing Python packages... place for a long time, you can execute the following command to change the pip source to domestic:
mkdir ~/.pip
cat > ~/.pip/pip.conf <<EOF
[global]
index-url = https://pypi.doubanio.com/simple/
[install]
trusted-host=pypi.doubanio.com
EOF
After execution, re run the command of certbot to install the python package normally.
2. Generate domain name SSL certificate
The admin @ domain name represents the email address corresponding to your domain name. Try to fill in the foreign email address. I don't know whether the domestic email address is good or not.
A – Single domain name
./certbot auto certonly – email admin @ domain name. com – agree tos – webroot - w/home/wwwroot/website folder - d www.domain.com
B – Multi domain list directory generates a single certificate: (that is, multiple domain names of a website use the same certificate)
./certbot auto certonly – email admin @ domain name. com – agree tos – webroot - w/home/wwwroot/www. domain name. com - d www. domain name. com - d www. domain name. com
C – Generate multiple certificates for multiple domain names and directories: (that is, generate multiple certificates for multiple domain names at one time)
./certbot auto certonly – email admin @ domain name. com – agree tos – webroot - w/home/wwwroot/website folder 1 - d domain name 1.com - d www. domain name 1.com - w/home/wwwroot/domain name 2 - d domain name 2.com - d www. domain name 2.com
Now a window will pop up, which roughly means to submit your email to a partner of Let's Encrypt. Lao Wei chose n here, and you can choose whatever you want.

Here are two possible mistakes (Lao Wei met them all) and solutions:
If the following red ink error occurs, it is because the EPEL source is not installed in advance.
If you are prompted: access https://domain name/. well known/acme challenge/* * * * this link returns 403 errors (the screenshot is incomplete), so you must
location ~ /\.
{
deny all;
}
Delete or comment out this configuration or add in front of this configuration
location ~ /.well-known {
allow all;
}

At last, the following prompt indicates that the certificate installation was successful.
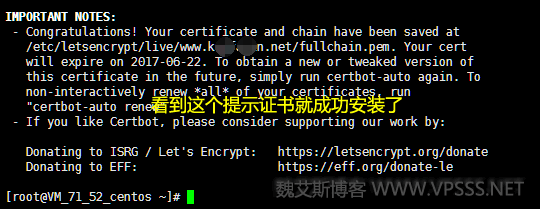
2. The generated certificate is placed in/etc/setsencrypt/live/your domain name/directory, which is based on your own URL directory. You can see four files: cert.pem, chain.pem, fullchain.pem, and privkey.pem.
3. After you know the installation path of the certificate, you need to add a path to the Nginx configuration file or APACHE file on the website.
The virtual host configuration file of Nginx is located at:/usr/local/nginx/conf/vhost/domain.conf
Command: vi/usr/local/nginx/conf/vhost/domain.conf
Enter a to enter the editing status, and then copy and paste the following configured code (no problem in the actual measurement of Lao Wei) to you. Note that all the following domain names. com are replaced with your domain names, and the certificate path is also replaced with your own. The result is that the main domain name and www domain name will automatically 301 jump to https://www You can adjust the domain name to https://the main domain name or the www domain name according to your own situation.
server { listen 80; #listen [::]:80; Server_name www.domain.com domain.com; return 301 https://$server_name$request_uri; } server { listen 443 ssl https2; Ssl_certificate/etc/setsencrypt/live/www.domain.com/fullchain.pem; Ssl_certificate_key/etc/setsencrypt/live/www.domain.com/privkey.pem; ssl_ciphers "EECDH+CHACHA20:EECDH+CHACHA20-draft:EECDH+AES128:RSA+AES128:EECDH+AES256:RSA+AES256:EECDH+3DES:RSA+3DES:! MD5"; ssl_protocols TLSv1 TLSv1.1 TLSv1.2; ssl_prefer_server_ciphers on; ssl_session_cache shared:SSL:10m; # HSTS (ngx_https_headers_module is required) (15768000 seconds = 6 months) add_header Strict-Transport-Security max-age=15768000; # OCSP Stapling --- # fetch OCSP records from URL in ssl_certificate and cache them ssl_stapling on; ssl_stapling_verify on; index index.html index.htm index.php default.html default.htm default.php; Server_name www.domain.com domain.com; Root/home/wwwroot/www.domain.com; include wordpress.conf; #error_page 404 /404.html; include enable-php.conf; location ~ .*\.(gif|jpg|jpeg|png|bmp|swf)$ { expires 30d; } location /wp-content/uploads/ { location ~ .*\.(php)?$ { deny all; } } location ~ .*\.(js|css)?$ { expires 12h; } location ~ /\. { deny all; } access_log off; }
Then press ESC to exit editing status, and enter: wq to save.
4. Restart nginx to make the above operation effective. The command is as follows:
/etc/init.d/nginx reload
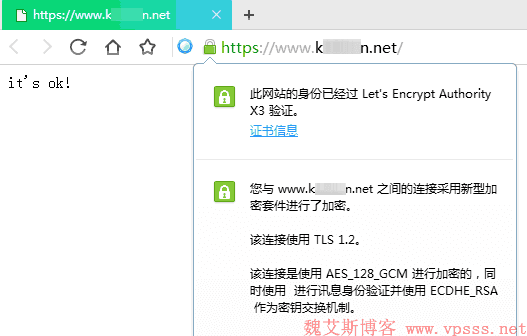
5. Open the main domain name or domain name with www in the browser, and 301 will automatically jump to the result shown in the following figure, that is, a small green lock appears in front of the domain name, and clicking the green lock will display the certificate information of Let's Encrypt verification, indicating that the addition was successful.
Tips: 1. Old Wei created an index.html and threw it into the virtual host directory. If the new website has no content, it will display "403 Forbidden", but it will not affect the main domain name and www domain name to automatically 301 redirect to the https domain name.
2. This is limited to the newly installed WordPress blog. As for the WordPress blog that is already running, it is limited to the length of this article. Old Wei will keep it for later supplement.
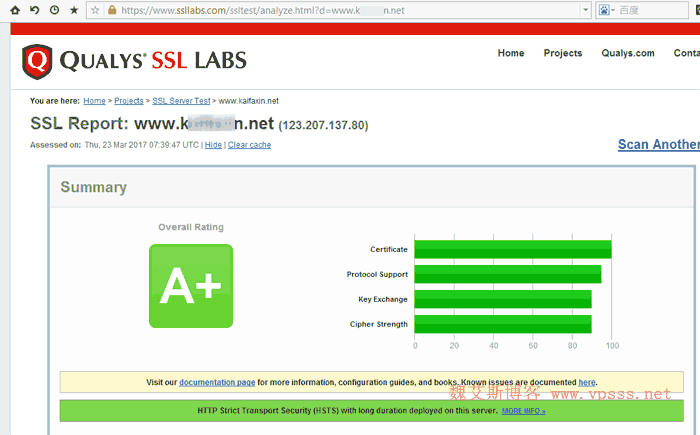
6. This website https://www.ssllabs.com/ssltest/ You can test whether the SSL certificate works normally. My test result is A+, a perfect result!
At present, the Let's Encrypt free SSL certificate is valid for 90 days by default. You can manually renew it for 90 days in advance with the following command:
./certbot-auto renew –dry-run
Afraid of forgetting to renew the contract Crontab executes the command regularly and automatically renews the contract upon expiration , so you can rest assured.
In order to write this article, it took Lao Wei 3 days to complete the whole process. At first, the domestic VPS I used was tested. Every time, it was always stuck in the Installing Python. Because the default Python source is foreign, the download speed is too slow. Later, I changed to a foreign VPS and got various error prompts. Finally, I returned to the domestic VPS. Many of the online tutorials are copied and pasted, and have not passed their own actual tests, which can easily mislead you. In short, from the perspective of the installation process, the Cerbot tool is not as fast as the official said. If you are not careful, you will report an error. When you install it, you must follow the process of Lao Wei. I have no problem here.