RuleUser installation and configuration tutorial to modularize your Typecho user system

Read this article for 11 minutes
advertisement

RuleUser, as the third link in the original plan, has officially released version 1.0. Its purpose is simple. It completely takes over the user system of typecho through the API way, so that Typecho website can have an independent member center, and at the same time, it can also API all the operations of the foreground users. However, this article is mainly about the installation and configuration process of RuleUser, hoping that every user can easily use RuleUser to upgrade the user system of their website.

Note: Any question about installation, configuration and use can be asked in groups (all are free, I will answer as long as I am online, and there is no charge)
QQ group: 776176904

Tips

I have added more detailed documents in Yuque. It is recommended to read: RuleProject Community Application Help Document

In the front, do not think it is difficult to configure. In fact, it is just copying and pasting. The code is ready-made.

In addition, in order to let you use it quickly, I have configured the following templates, which can be downloaded directly in the group file. If you need to support more templates, you can also add groups to submit them.

 JOE template Small bulb Spimes 5.0

RuleUser's code scanning function is implemented with this open source and free APP, and many data and operations are synchronized. If you are interested, you can learn about: Click to enter

Detailed introduction and download address:

Go to the previous article: Typecho independent member center, front and rear end separation, recharge and payment function integration, APP code scanning login

Installation tutorial:

1. RuleUser is a front end and rear end separation application based on the interface, so you need to install RuleApi first. This is a comprehensive interface of typecho, which can directly meet the subsequent support of front end and rear end separation, mobile phone client, WeChat applet, etc. Through the installation of the following article, all problems encountered can be asked in the group.

RuleApi one click installation&update script, fool configuration, super fast running

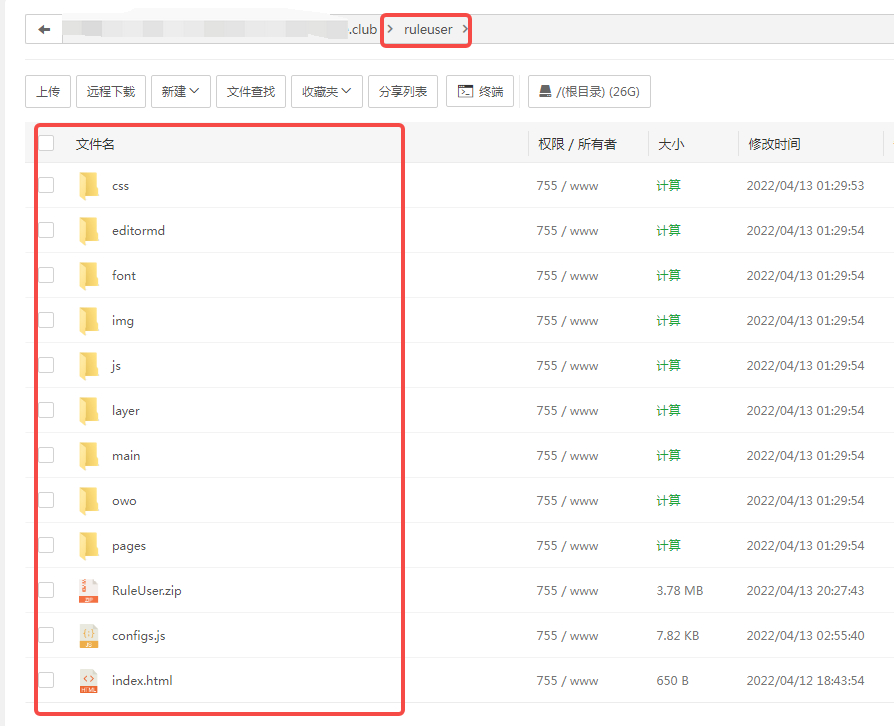
2. After installing RuleApi, create a new folder in the root directory of the typecho website, upload the downloaded RuleUser to it, and unzip it. For example, I create a new folder called ruleuser, which is the effect of unzipping.
 1.png

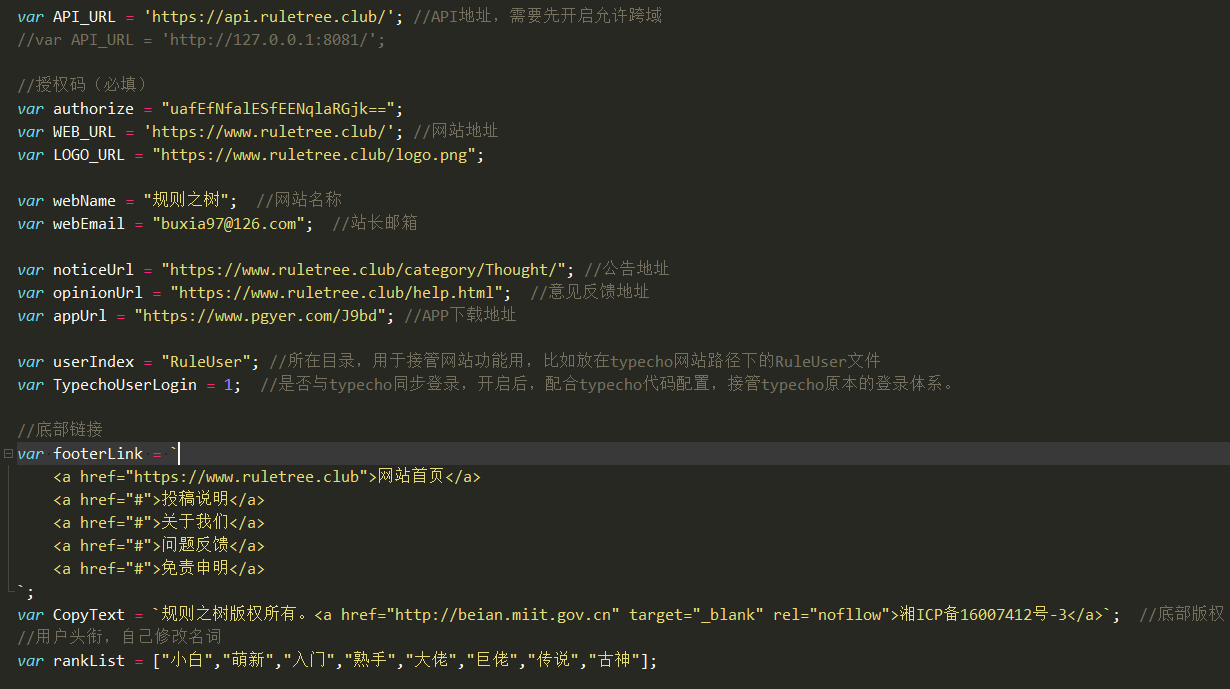
3. Edit the configs.js file under the directory, and you can see the following information. First, focus on configuring API_URL and userIndex, which correspond to the RuleApi interface address and the access directory of RuleUser respectively. For example, I put it in the ruleuser folder in the previous step, so userIndex is ruleuser. Other information can be configured according to comments. Note here that the basic version does not need to manage the authorization code. It is completely free!!
 2.png

4. Access the path, the login interface appears, and the installation is completed. Here you can check the effect of my website, or directly experience the login registration of my website (there is a cdn cache on the home page, which can be skipped).

Rule Tree - Member Center

Description of secondary development:

The CSS of the source code can be modified at will, so it can be beautified by itself. The specific functions can also be realized by referring to the interface document of RuleAPi with the knowledge of js.
RuleApi Interface Document

Tutorial of member system takeover (it's OK if you don't take over, just look at your mood):

When you visit the rule tree, you will find that the rule tree can log in and register on the website, and the API has taken over the likes, collections, rewards, and comments. So the next content is to guide users how to use RuleUser to take over user operations. There are two solutions. The first is the php implementation, and the second is the js implementation.

Before this, you need to import RuleUser into the typecho template. You only need to modify the template's footer.php file, and add the following code above the</body>(ruleuser is the folder name I customized in the previous step, representing the directory where RuleUser is located):

 <script src="/ruleuser/configs.js?v1.02"></script> <script src="/ruleuser/main/RuleUser.js?v1.02"></script> <script> loadPostBtn(<? php echo $this->cid; ?>); loadPostShop(<? php echo $this->cid; ?>) </script>

Then, in the appropriate position of the article template, post.php (generally under the article content, add the following code):

 <div id="RuleUser-PostShop"></div> <div id="RuleUser-PostBtn"></div>
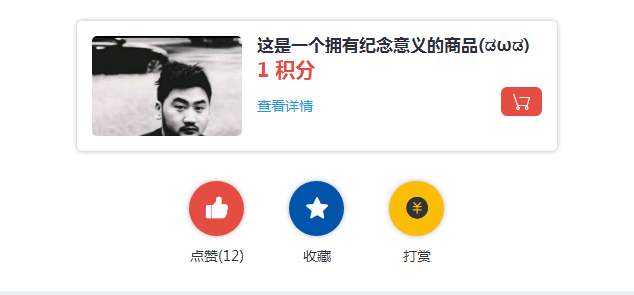
In this way, the paid goods and operation buttons inserted in the article can be called. The screenshot is as follows:
 7.png

In addition, the login and registration of members can be taken over in the following way, The focus is only in onclick , essentially binding click events:

 <button type="button" onclick="UserLogin()">Login</button> <button type="button" onclick="UserRegister()">Register</button> <button type="button" onclick="UserForgot()">Retrieve the password</button> <button type="button" onclick="UserScan()">Scan code to log in</button> <button type="button" onclick="UserQuit()">Log out</button>

For example, the default login link of typecho is as follows:

 <a href="<?php $this->options->adminUrl('login.php'); ?> "><? Php _e ('Login ');?></ a>

Change to the following to be taken over by RuleUser, which essentially changes the href content to javascript:;, Then bind the onclick event.

 <a href="javascript:;" onclick="UserLogin()" ><? Php _e ('log in ');?></ a>

It is also mentioned here that you can wake up the app in the article and open the article. The code reference is as follows, which should be used together with RuleAPP.

 <a href="javascript:;" onclick="openApp ('? Info=<? Php echo $this ->cid;?>')">Read in APP</a>

Scheme 1: PHP takeover (simple and fast, requiring PHP foundation)

This method will fully comply with the original module development specification of typecho. After the configuration is completed, there is no need to modify the template in a large arc, which can ensure that some novice users will not damage the template.

1. Add the following code at the bottom of the function.php file of the typecho template:

 function toLogin($token,$uid){ //If it does not exist, write the cookie Typecho_Cookie::set('__typecho_token', $token); Typecho_Cookie::set('__typecho_token_uid', $uid); if($uid==0){ Typecho_Cookie::set('__typecho_token', 0); Typecho_Cookie::set('__typecho_token_uid', 0); Typecho_Cookie::delete('__typecho_token'); Typecho_Cookie::delete('__typecho_token_uid'); } } function getLogin(){ if (empty($recording = Typecho_Cookie::get('__typecho_token'))) { return 0; } else { $uid = Typecho_Cookie::get('__typecho_token_uid'); return $uid; } } function quitUser(){ Typecho_Cookie::set('__typecho_token', 0); Typecho_Cookie::set('__typecho_token_uid', 0); Typecho_Cookie::delete('__typecho_token'); Typecho_Cookie::delete('__typecho_token_uid'); } //Get user information according to fields function userInfo($value,$uid) { $db   = Typecho_Db::get(); $prow = $db->fetchRow($db->select($value)->from('table.users')->where('uid = ?', $uid)); $text = $prow[$value]; return $text; }

2. Modify the header.php (header file) of the template, and change the following code:

 <? php if (! defined('__TYPECHO_ROOT_DIR__')) exit; ?>

Revised as:

 <? php if (! defined('__TYPECHO_ROOT_DIR__')) exit;  if(isset( $_POST["token"])){ $token =  $_POST["token"]; $uid =  $_POST["uid"]; toLogin($token,$uid); } if(isset( $_GET["quit"])){ toLogin(0,0); } ?>

3. After the above operations are completed, the login status of typecho can be judged by the following methods to replace the login status judgment in the template:

 <? php if(getLogin()!= 0): ?> //Logged in <? php else : ?> //Not logged in <? php endif; ?>

The user related tags are called as follows:

 <? php echo getLogin(); ?> // Output Member ID <? php echo userInfo('mail',getLogin()); ?> // Member Email <? php echo userInfo('name',getLogin()); ?> // Member user name <? php echo userInfo('screenName',getLogin()); ?> // Member nickname <? php echo userInfo('url',getLogin()); ?> // Member website <? php echo userInfo('group',getLogin()); ?> // Member user group <? php echo userInfo('assets',getLogin()); ?> // Member Assets //In short, all the fields in the user table of the database can be called out
In this way, it can be replaced and flexibly matched to realize the user's data call at the php level.

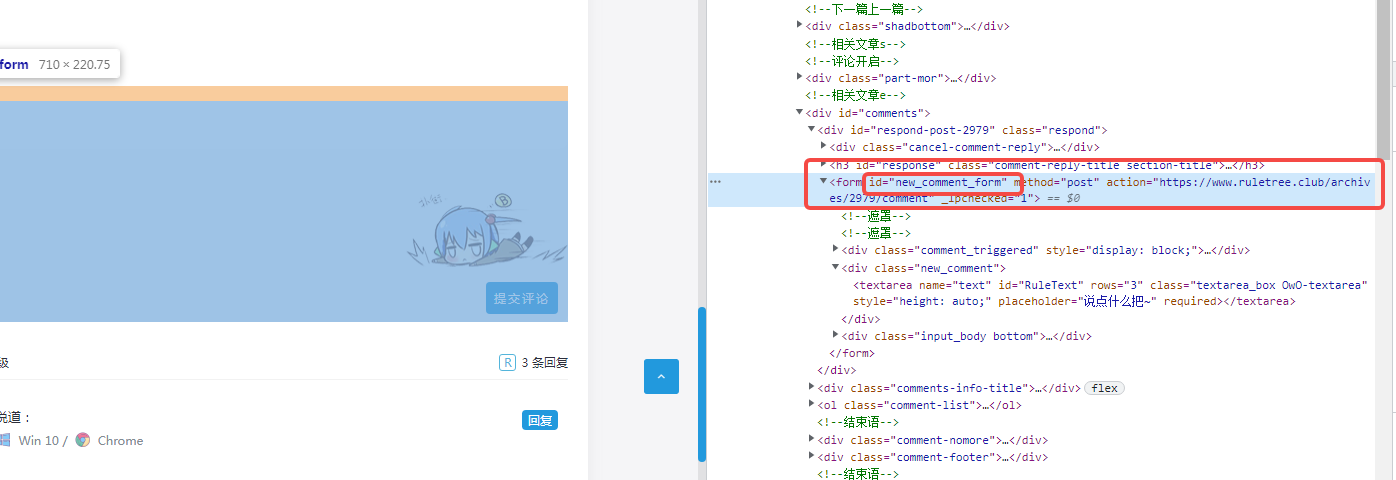
4. To take over comments, you need to first f12 view the form of typecho comments. Taking my own example, I can see that the ID of the comment form is called new_comment_form. In fact, if there is no comment form, you can edit the comments.php file of the template by yourself, and change the ID by yourself.
 3.png

Then, edit the comments. php file to find the button for submitting the form. Take the following code as an example:

 <button type="submit" class="submit"><? Php _e ('submit comments');?></ button>

Change type="submit" to type="button", and then add a click event as follows:

 <button type="button" class="submit" onclick="addComments(<?php echo $this->cid; ?>,'#new_comment_form')"><? Php _e ('submit comments');?></ button>

The key is this sentence:

 onclick="addComments(<?php echo $this->cid; ?>,'#new_comment_form')"

You can see that the new_comment_form is marked with #, which is actually the ID name of the form tag. After these changes, if the user logs in, the comment will be submitted through the API. If the user does not log in, the comment will follow the typecho mode.

Then find the textarea code of the comment text box, as shown in the following figure, and add the id as RuleText.
 2.png

Scheme II: js mode (JS foundation is required)

1. For the user login area, you can create your own js file, or create a new script tag in footer.php and write the following code to determine the login status.

 if(localStorage.getItem("token")){ //Logged in }else{ //Not logged in }

For example, take a small light bulb as an example of an old version template, and give a login area:

 <div class="login" id="login"> </div>

Js can be written as follows:

 var html=``; if(localStorage.getItem("token")){ var userData = JSON.parse(localStorage.getItem('userinfo')); if(userInfo.screenName){ name = userInfo.screenName; } html = ` <a href="javascript:;" id="auStats" class="dropdown-toggle"><img src="${userData.avatar}" width="32px" height="32px" class="navtar" > ${userData.name} </a> <div class="austats" id="aus"> <ul>                         <li><a href="javascript:;" onclick="UserQuit()"><i class="icon iconfont icon shibai"></i>Log out</a></li> </ul> </div>                     ` }else{ html=` <i class="icon iconfont icon-zengjia"></i><a href="javascript:;" onclick="UserLogin()"><? Php _e ('log in ');?></ a> `; } $("#login").html(html);

All user information can be obtained through the userinfo field of localStorage. If you really can't understand it, you can right click the homepage of my website and drag it to the end. I believe people with a little knowledge of js can understand it.

2. For functions in other locations, after all, there is already a js foundation. You can refer to my RuleAPI interface document for self docking.

Click to enter

Front end submission js reference:

Here I will disclose some of the code I wrote, and then I can add or modify it with reference.

1. User login:

 function toLogin(){ var username = $("#username").val(); var userpass = $("#userpass").val(); if(username==""||userpass==""){ Layer.msg ("Please input correct parameters", {icon: 2}); return false; } var data = { name: username, password: userpass, } var index = layer.load(1, { shade: [0.4,'#000'] }); $.ajax({ type : "post", data:{"params":JSON.stringify(API.removeObjectEmptyKey(data))}, url : API.userLogin(), dataType: 'json', success : function(result) { layer.close(index);  if(result.code==1){ Layer. msg ("Login succeeded!", {icon: 1}); //Save user information localStorage.setItem('userinfo',JSON.stringify(result.data)); localStorage.setItem('token',result.data.token); //The following is responsible for synchronizing login status with typecho typechoLogin(result.data.token,result.data.uid,1); if(TypechoUserLogin==0){ var timer = setTimeout(function() { location.reload(); clearTimeout('timer') }, 1000) } }else{ layer.msg(result.msg, {icon: 2}); } }, error : function(e){ layer.close(index); Layer. alert ("Request failed, please check the network", {icon: 2}); } }); }

2. Submit comments:

 function addComments(cid,sumbit){ //Judge whether the user information exists var token; if(localStorage.getItem("token")){ token = localStorage.getItem("token"); }else{ //If it doesn't exist, go to typecho's default comment login $(sumbit).submit(); return false; } //Superior comment ID and typocho template are basically the following ID var coid = $("#comment-parent").val(); var text =  $("#RuleText").val(); if(coid==""||cid==""||text==""){ Layer.msg ("Please input correct parameters", {icon: 2}); return false; } var data = { "cid":cid, "parent":coid, "text":text, } var index = layer.load(1, { shade: [0.4,'#000'] }); $.ajax({ type : "post", url: API.setComments(), data:{ "params":JSON.stringify(API.removeObjectEmptyKey(data)), "token":token }, dataType: 'json', success : function(result) { layer.close(index);  if(result.code==1){ Layer. msg ("Publish successfully!", {icon: 1}); var timer = setTimeout(function() { location.reload(); clearTimeout('timer') }, 1000) }else{ layer.msg(result.msg, {icon: 2}); } }, error : function(e){ layer.close(index);  Layer. alert ("Request failed, please check the network", {icon: 2}); } }); }

One more point

The advantage of Scheme 1 is that the template will not be greatly changed, and it can be taken over in many ways, and it is completely in accordance with the PHP label specification. But the disadvantage is that if the cdn is hung, the login status will be cached, such as the home page of my own website. And the performance improvement is not as good as the separation of front and rear ends of pure js.

The advantage of Scheme 2 is that the front and rear ends of js are completely separated, and both user interaction and website performance can be highly improved by relying on js. The disadvantage is that you need to have basic knowledge of js, have requirements for personal ability, and if you encounter complex templates, it will take time to change them.

last

The functions and configurations in this article may change due to the upgrade and improvement of RuleUser, which is not equal to the final function. I am a very patient person. If there is a problem, I can speak directly in groups. I may be busy or not online, but I will reply soon when I go online. They are free. Please rest assured.

I hope typecho will become better and better.

This article is from a contribution and does not represent our position. If it is reproduced, please indicate the source: https://www.ruletree.club/archives/2990/
Typecho independent member center, front and rear end separation, recharge and payment function integration, APP code scanning login
« Previous 04-08
Rules tree client, Android&IOS officially released
Next » 04-23
advertisement

Comment

V Registered member L Comment Level
R 9 replies
  1. Hua Chenyu Lv.1 say:
    2023-01-06      Android /    Chrome

    Too powerful

  2. Mr. Safe Lv.1 say:
    2022-12-25      Android /    Chrome

    Group II is blocked and cannot be searched

    1. Too busy V Lv.6 say:
      2022-12-25      Android /    Chrome

      @Mr. Safe

      The group number is 692117682. If you can't join, you can directly find the group leader and add my friends. I will try to bring you into the group.

  3. Yunmeng V Lv.1 say:
    2022-12-09      Android /    Chrome

    What's wrong with this software? It's getting more and more muddled

  4. maple leaves Lv.1 say:
    2022-11-08      Android /    Chrome

    Why should I wait until I finish my blog topic to see this API? I searched for an API plug-in that was 19 years old or 17 years old. Then I successfully completed my needs. But I find that all comments of a single article obtained by the API are rendered to the front page. Will they burst later?

    1. Too busy V Lv.6 say:
      2022-11-12      Android /    Chrome

      @Maple leaf

      Comments are obtained in pages, not all at once, so they will not explode.

  5. Skywind Lv.1 say:
    2022-09-03      Win 10 /    Chrome

    A little dizzy

    1. Too busy V Lv.6 say:
      2022-09-03      Android /    Chrome

      @A Gang

      If you don't understand, you can add a group and let me configure it for you

  6. Big A V Lv.4 say:
    2022-07-11      iPhone /    Google Chrome

    Test reply

  7. zhjbbt V Lv.1 say:
    2022-04-20      Win 7 /    Chrome

No more comments

Author Information

Popular articles

TAG

Popular articles