Photoshop It is the abbreviation of the commonly known "ps" software. It is a very powerful image processing software developed and distributed by Adobe. Photoshop mainly deals with numbers composed of pixels image 。 Photoshop Contains Numerous edits and mapping Tools, each of which has a very practical effect and has strong practicability in many fields. Need Photoshop Come and download it. Huajun Software Park provides free downloads for you. Similar software
Version Description
Software address
Green version
see
Green version
see
Green version
see
Green version
see
Green version
see
Photoshop tutorial
I How does Photoshop cut pictures?
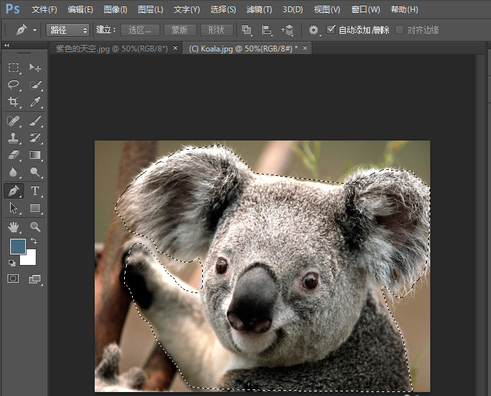
1. First open Photoshop, select and open the required Matting Picture of.
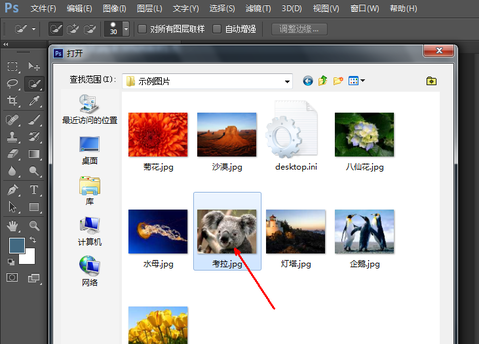
2. Click Select Pen Tool in the left toolbar.
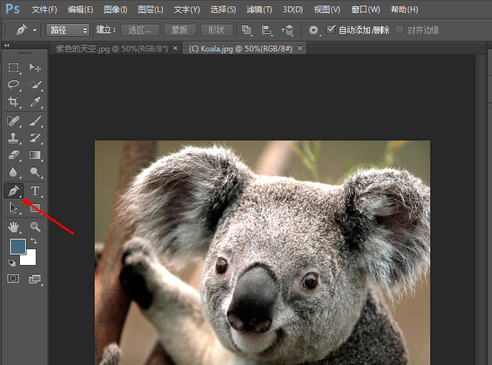
3. Use the pen tool to stroke along the edge of the image to be cut out, and press Ctrl+Enter to select after tracing.
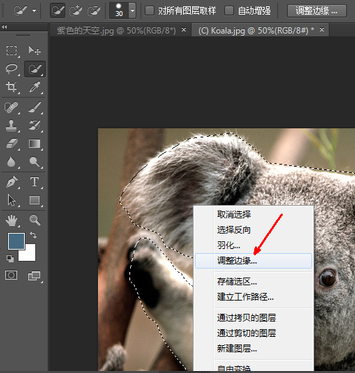
4. Right click the picture and select the "Adjust Edges" option in the drop-down menu.
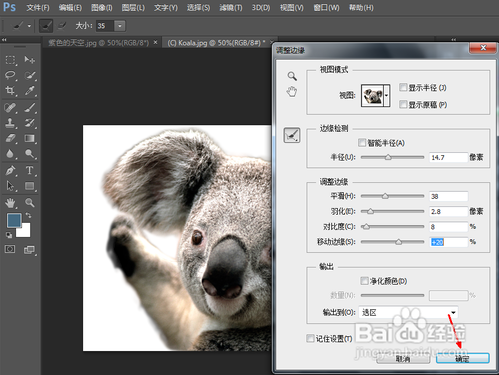
5. In the Adjust Edge window, you can set multiple values such as edge smoothness, feathering value and contrast, and view the adjustment results in real time. When the adjustment results meet the requirements, click OK below.
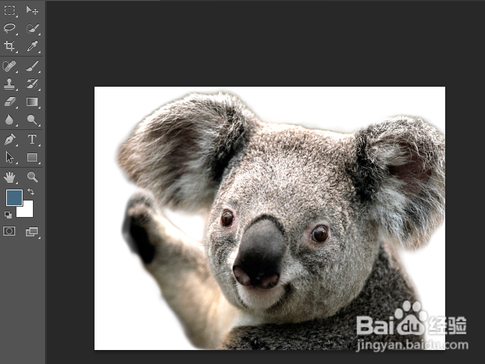
6. This completes the matting. Come and try it.
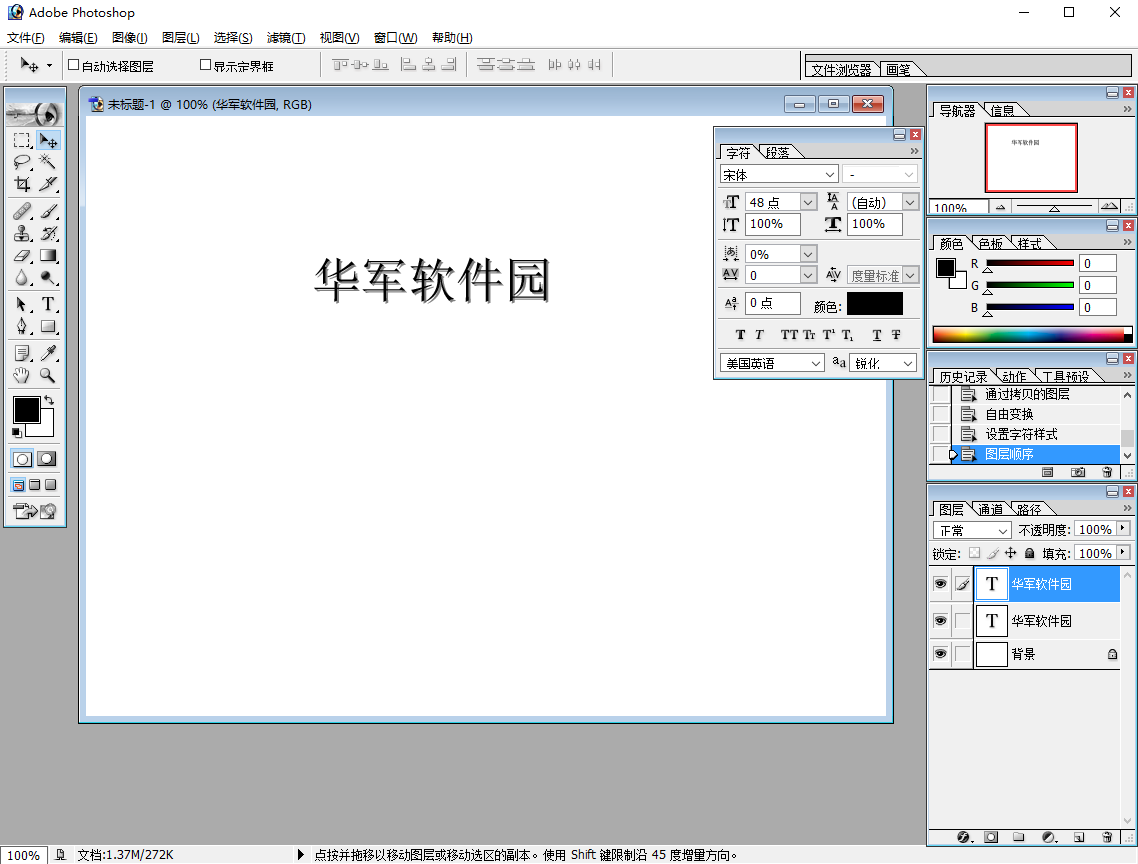
2、 How does Photoshop do three-dimensional characters?
1. First, create a new blank layer in Photoshop, and use the text function to input the required text.
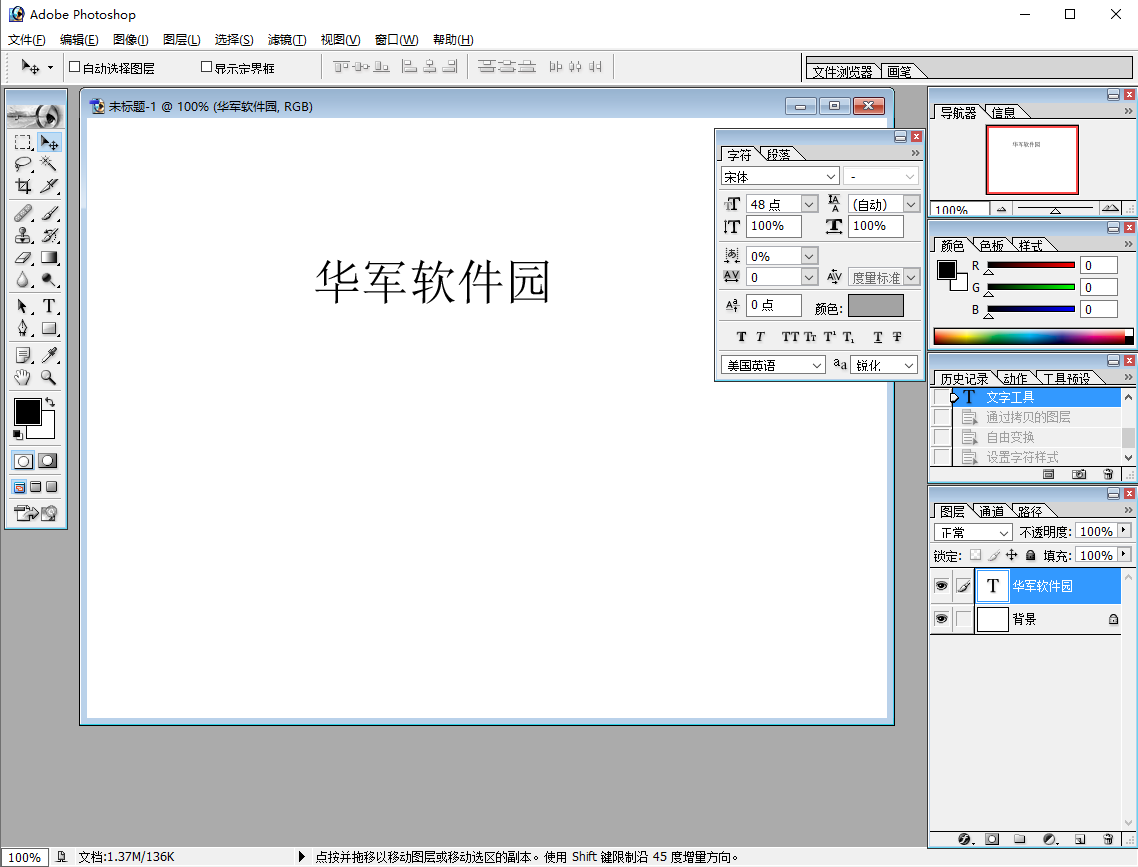
2. Then use the shortcut key "Ctrl+J" to copy the text layer.
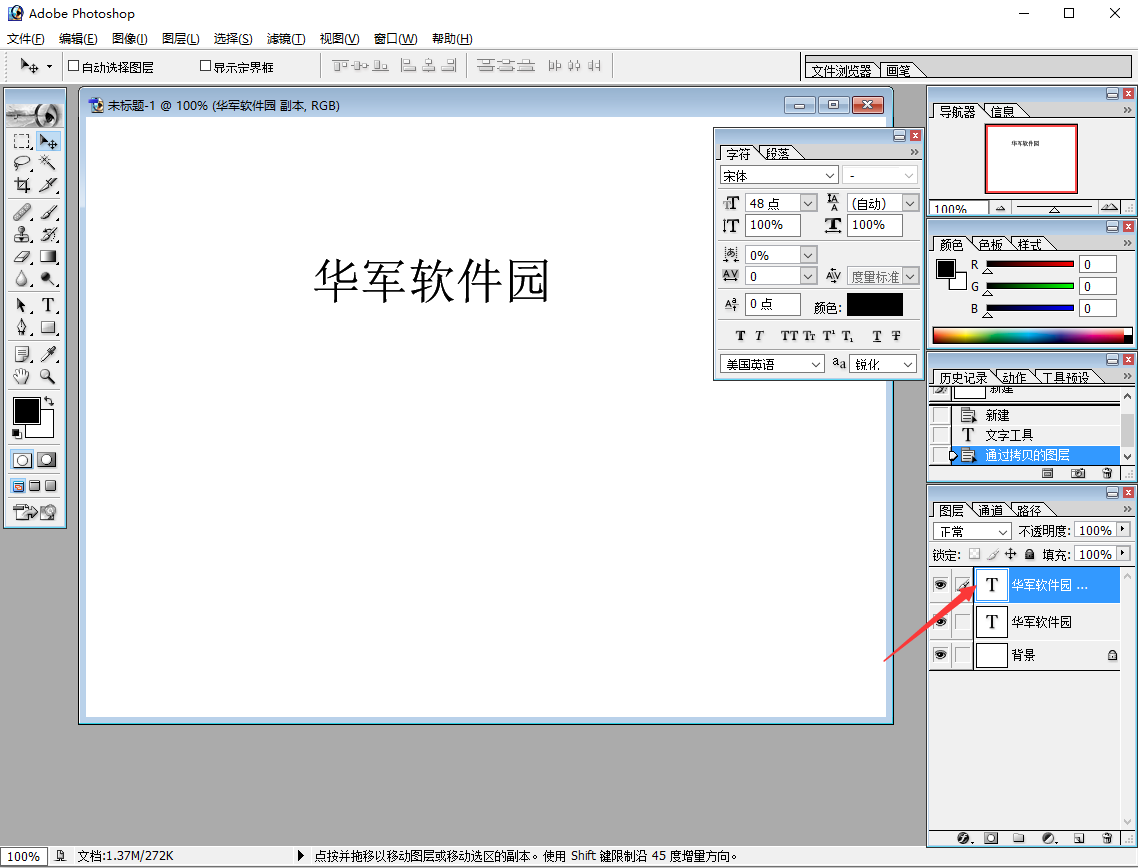
3. Drag the copied layer slightly to the lower right, and click the "Color Module" in the text editing box on the right.
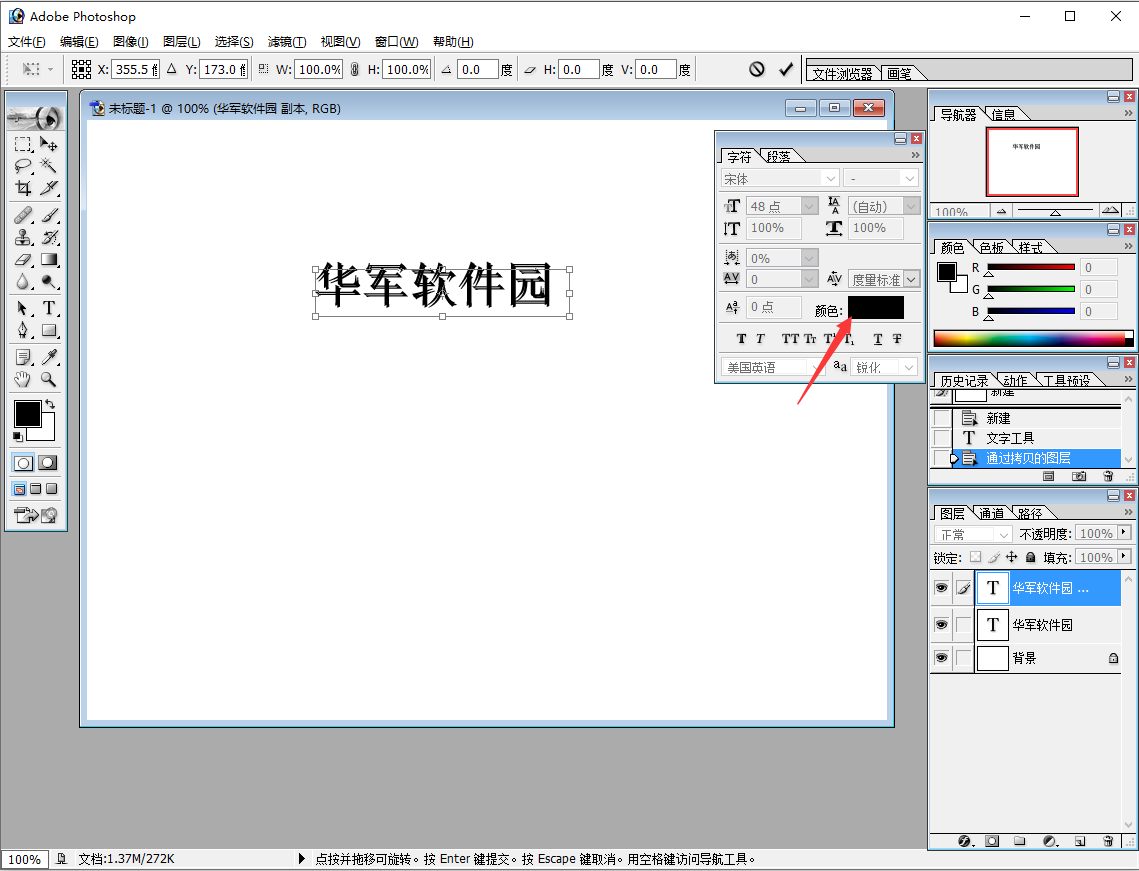
4. It is suggested to change the color to gray, and then click "OK".
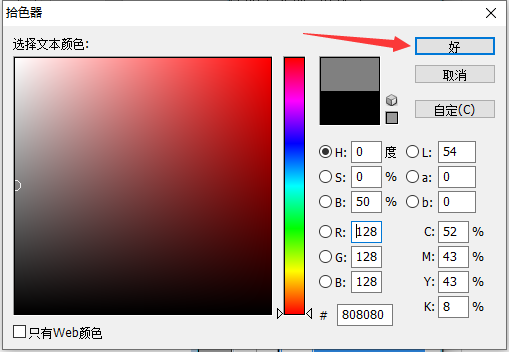
5. In this way, the three-dimensional effect can be reflected. Come and try it.
How does Photoshop change the words on the picture
Method 1. Use and repair paint brush tool
1. Open the picture to be modified in PS.
2. Select the repair brush tool and set the brush size and hardness.
3. Press and hold the Alt key, and click the position near the text to be modified to sample.
4. Smear the text to be modified until it disappears.
5. Use the text tool to enter the text to be modified.
6. Adjust the size, position and font of the text to make it consistent with the overall style of the picture.
7. Repeat the above steps until all the words to be modified have been processed.
2、 Populate with content recognition
1. Open the picture to be modified in PS.
2. Select the Rectangular Marquee tool to select the text to be modified.
3. Select Edit ->Content Identification Fill in the menu bar.
4. In the pop-up window, click OK.
5. PS will automatically recognize and fill in the content in the selected area, and overwrite the original text.
6. Use the text tool to enter the required text in the corresponding position.
7. Adjust the size, position and font of the text to make it consistent with the overall style of the picture.
8. Repeat the above steps until all the words to be modified have been processed.

How to use Photoshop to splice the two pictures together?
Step 1: First, make the two pictures the same height, and open the two pictures to be put together in PHOTOSHOP.
Step 2: Select Canvas Size in Image.
Step 3: widen the canvas size to the same width as another picture, and set it according to the following figure.
Step 4: Reduce the window of another picture.
Step 5: Use the move tool to move the second picture to the first picture, and adjust the second picture to the appropriate position.
Step 6: merge the two picture layers together, and press Ctrl+S to save the spliced pictures.
How does Photoshop remove unwanted things?
Introduce three methods of matting
1、 Mixed channel matting
1. Open PS, Ctrl+O Open the material, return to the layer panel, double-click the background layer, and change it to a normal layer
2. Back to the layer panel, double-click layer 0 to call up the layer style box, change the mixed color band to blue, adjust the layer, press and hold the Alt key with the left hand, divide the triangle into two halves, and move to the left
3. Back to the layer panel, click the adjustment layer below the layer, select the solid color inside, select a color you like (00fffa), and move to the bottom of layer 0
2、 Color range matting
1. Ctrl+O Open the material, Ctrl+J copy a layer to get layer 1, return to the menu bar, execute [Select] - [Color Range], use the straw tool to absorb the color, adjust the tolerance to the maximum, and click OK
2. Back to the layer panel, press Ctrl+J to copy 4 layers consecutively
3. Go back to the layer panel, press Shift, select Layer 2 to Layer 2 Copy 3, press Ctrl+E to merge layers, click the adjustment layer below the layer, select a solid color, and select a color you like (b5Beff)
3、 Channel matting
1. Open a piece of material you like, Ctrl+J copy a layer, get layer 1, enter the channel, select the blue channel, and copy a layer of blue channel
2. Open [Color Scale] from [Menu Bar] - [Image] - [Adjust] to further adjust the color scale
3. Further blacken the bright color on the face and clothes with the brush tool. The brush hardness is 100%, and the opacity is 100%
4. Hold down the Ctrl key, left click [Blue Copy] to zoom in, return to [Menu Bar] - [Select] - [Invert Selection], return to the top RGB, click the layer, Ctrl+J to copy a layer, and get Layer 2
5. We can press Ctrl with the left hand on the soft lower edge, click [Layer 2] with the left mouse button, load the selected area, and open the [Select and Mask] tool on the upper right
6. Back to the layer panel, click the adjustment layer below the layer, select the solid color, select a favorite color (edff55), and move to the bottom of the copy of layer 2
Photoshop tool functions are described in detail:
1. Select and move tools: These tools allow users to select, move and crop various parts of the image. For example, the rectangle selection tool can select a rectangular area, and the move tool can move the selected area.
2. Cropping tool: This tool can cut off the edges or unnecessary parts of an image to optimize image composition or remove the background.
3. Image size adjustment: This function can change the size of an image, either by changing its number of pixels or its resolution.
4. Image mode adjustment: The user can convert the image from one color mode to another, such as RGB, CMYK or index mode, as required.
5. Sipper tool: This tool can be used to select the color in the image to help users accurately adjust the color of the image.
6. Seal tool: This tool can be used to copy part of an image and apply it to other places, and is often used to repair flaws in the image.
7. Magic wand tool: This tool can quickly select areas with similar colors, and is often used to quickly select background or other large area color areas.
8. Brush tool: This tool can be used to draw on images, just like drawing on paper.
9. Lasso tool: This tool can be used to select irregular shaped areas, and is often used to select objects with complex contours.
10. Pen tool: This tool can be used to draw vector graphics or selection areas, allowing users to create precise paths and shapes.
11. Masking tool: Masking can be used to protect a part of the image from being modified, while still being able to see the following image.
12. Contrast, brightness and saturation adjustment: These tools can be used to adjust the contrast, brightness and color intensity of an image.
13. Color scale and automatic color scale adjustment: These tools can be used to adjust the color balance and contrast of images.
14. Text tool: This tool can be used to add text to images and adjust the style, size, color and other attributes of text.
15. Filter tools: These filters can be used to process various effects on images, such as blur, sharpen, twist, etc.
16. Layer style: the layer style can be used to add various effects to the layer, such as shadow, glow, reflection, etc.
Photoshop software features
1. Support multiple color forms
The color forms supported by Photoshop include bitmap, grayscale, RBG, CMYK Lab form, index color form, two tone form, multi-channel form, etc., and can complete the transformation of various forms. In addition, using Photoshop can also arbitrarily adjust the scale, resolution and cloth size of the picture, which can not only increase or decrease the resolution of the picture without affecting the resolution, but also increase or decrease the resolution without affecting the scale of the picture.
2. Supporting multiple picture patterns
Photoshop supports a variety of picture patterns including PSD, EPS, DCS, TIF, JEPG, BMP, PCX, FLM, PDF, PICT, GIF, PNG, IFF, FPX, RAW and SCT. Photoshop can save a picture of one pattern as another to meet special needs.

3. It provides a strong function of selecting the size of pictures
By using rectangle, oval mask and covering objects, one or more different scales can be selected. The magnetic selection scale of shapes is larger than that of objects, which can make the selection scale close to the picture to be selected according to the pixel contrast of the selection edge. By using magic wands or color scale commands, you can automatically select what you want according to color, and cooperate with the use of multiple shortcut keys, It can add, subtract and reverse select the selection scale.
4. Be able to make various modifications to drawings
For example, moving, copying, posting, cutting, and uprooting, if there is a mistake in the modification, it can also be revoked and rehabilitated indefinitely. Photoshop can also rotate and deform the picture arbitrarily, such as flipping or rotating in a fixed direction.
5. Be able to adjust the color harmony and color of the picture
It makes the adjustment of hue, saturation, brightness and contrast simple, Photoshop can independently adjust a certain selection scale and a certain selected color. Using color balance reverse order can change the color mixing in the color picture. Using color scale and curve commands can separate the highlight, dark harmony and center tone of the picture, which is difficult for traditional painting tricks to achieve.
6. It provides painting function
The use of airbrush, brush, pencil and straight line can create various shapes. Through the self set brush shape, size and pressure, different brush effects can be created. The use of mutation can produce multiple mutation effects, deepen and dilute the exposure of pictures selectively.
7. Multiple layers are used together
Photoshop users can set up general layers, set layers, text layers, conditioning layers and other layers, and modify each layer conveniently. Users can copy, move, delete, flip, merge and compose layers at will, complete the placement of layers, and also apply operations such as adding shadows to create special effects, Adjusting the layer can control the transparency, saturation and other picture functions of the layer without affecting the picture together. The text layer can modify the text in the picture at any time. The user can also modify the separation of different color channels. Using the mask can accurately select the size for storage and loading operations.
8. Nearly 100 kinds of filters are provided
Each kind of filter is different, and users can use these filters to complete various special functions, such as using wind filters to add dynamic pictures, using relief filters to create relief effects, etc.
Photoshop Installation steps
1. Download the Photoshop software package from Huajun Software Park, unzip the compressed package, and double click the left mouse button to open the installation file.
Note: To decompress the compressed package, you need to use a compression and decompression tool. WinRAR is recommended. The technology is mature and reliable. WinRAR download address: http://www.onlinedown.net/soft/5.htm
2. Enter the installer and click Next.

3. Read the license agreement related to the software, and then click "Agree".
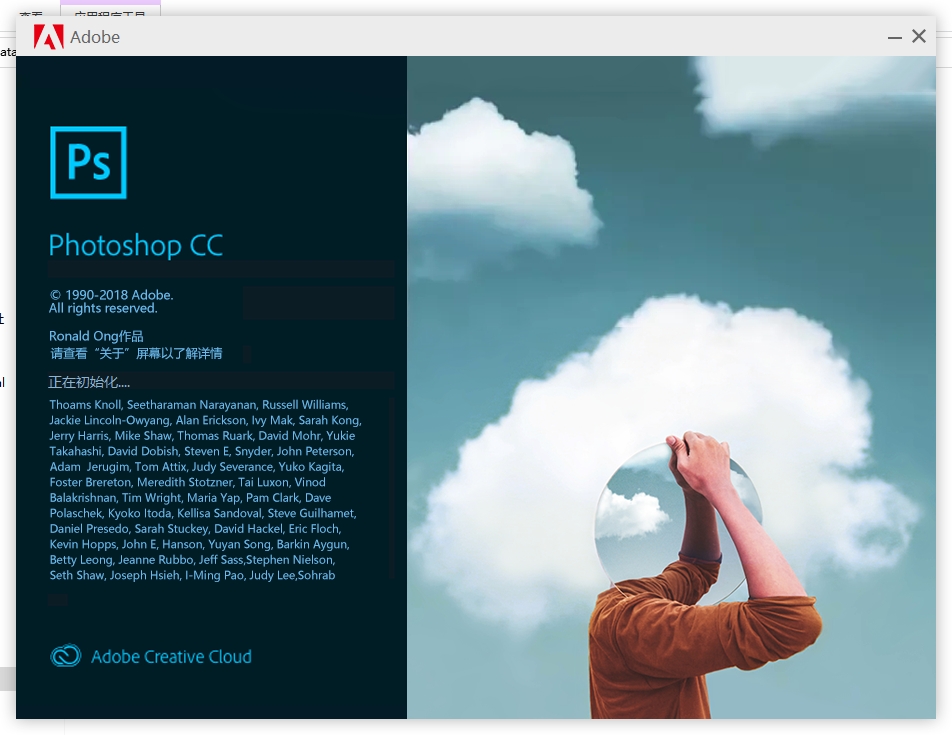
4. To fill in the user information, refer to the list below, and then click "Next".
5. Click "Yes" after confirming that the user information is correct.
6. Select the installation type of Photoshop. If "Typical" is selected, the default settings will be followed; If you select Custom, you need to set it manually. Then click "Browse" to select the installation directory of Photoshop. It is recommended not to install it on disk C. Click "Next" after selection.
7. If you select "Custom" installation, you need to check the required components in the next step, and then click "Next".
8. Select the software format you want Photoshop to use. Generally, you can leave it as default. If you have special needs, you can change it manually, and then click Next.
9. Click "Next" after confirming that the installation selection is correct.
10. The installation process of Photoshop takes about 5 minutes. Please be patient.
11. After installation, if you want to learn more about Photoshop, you can click to tick the "Show Photoshop Readme" option, and then click "Finish".
12. Finally, click "OK" to start using.
Photoshop Shortcut key
If multiple tools share one shortcut key, press [Shift] and add this shortcut key to select
Rectangular and elliptical box selection tool [M]
Cutting tool [C]
Moving tool [V]
Lasso, polygonal lasso, magnetic lasso [L]
Magic Stick Tool [W]
Spray gun tool [J]
Brush tool [B]
Rubber stamp, pattern stamp [S]
History Brush Tool [Y]
Eraser tool [E]
Pencil, straight tool [N]
Blur, sharpen and daub tools [R]
Lightening, deepening, sponge tools [O]
Pen, free pen, magnetic pen [P]
Directly select tools [A]
Text, text mask, straight text, straight text mask [T]
Measurement tool [U]
Linear gradient, radial gradient, symmetrical gradient, angular gradient, diamond gradient [G]
Paint bucket tool [G]
Pipette, color sampler [I]
Default foreground color and background color [D]
Switch the foreground color and background color [X]
Switch between standard mode and fast mask mode [Q]
Standard screen mode, full screen mode with menu bar, full screen mode [F]
Photoshop Basic Tutorials
One Photoshop window composition (title bar, menu bar, toolbar, toolbox, image port, control panel, status bar, Photoshop desktop)
1. Title bar: at the top of the window.
2. Menu bar: including 9 menus. Located below the title block.
3. Toolbar: located below the menu bar. It can change as the tool changes.
4. Toolbox: located at the bottom left of the toolbar.
5. Image window: located directly below the toolbar. The area used to display the image for editing and modifying the image.
6. Control panel: the small window on the right side of the window is called the control panel. Used to change the attributes of an image.
7. Status bar: located at the bottom of the window, provides some help information for the current operation.
8. Photoshop Desktop: The gray area of the Photoshop window is the desktop. This includes the Display Toolbox, Control Panel, and Image Window.
2、 Image window: image window consists of (title bar, image display area, control window icon)
1. Title Block: Displays the image file name, file format, display scale size, layer name, and color mode.
2. Image display area: used to edit and display images.
3. Control window icon: Double click this icon to close the image window. Click this icon to open a menu and select the command.
3、 Toolboxes and toolbars
Photosop tool contains more than 40 tools. Click the icon to select a tool or press the tool combination key. Not all tools are displayed in the toolbox. If you look carefully
It is found that some tool icons have a small triangle symbol, which means that there are related tools in the tool. There are two ways to open these tools:
1. Move the mouse pointer to the tool with triangle, right click to open the hidden tool, or press the left mouse button without putting it on the tool to open or hide the tool for a while. Then select the tool.
2. You can hold down the ALT key, and then click the tool icon. Multiple clicks can switch between multiple tools.
4、 Control panel
The control panel can complete various image processing operations and tool parameter settings. Photosop provides a total of 14 control panels. These include: generic guides, messages, colors, color palettes, layers, channels, paths, history, actions, tool presets, styles, characters, paragraph control panels, and status bars.
1. Nanigator: used to display the thumbnail image on the image. You can zoom the display scale to quickly move the display content of the image.
2. Info: (F8) is used to display the coordinate value of the mouse position and the value of the color of the current mouse position. When selecting an image or moving an image, the size and rotation angle of the first range will be displayed.
3. Color: (F6) is used to facilitate the filling of graphics.
4. Swatches: The function is similar to the color control panel.
5. Layers: (F7) is used to control layer operations.
6. Channels: used to record image color data and save mask content.
7. Paths: used to establish vector image paths.
8. History: used to restore images or specify one step of frost recovery.
9. Actions: (F9) is used to record the editing operation of one string to realize operation automation.
10. ToolPresets: (F5) used to set preset parameters for various tools such as brushes and text.
11. Styles: used to add a style to a drawing.
12. Character: used to control the character format of text.
13. Paragraph: used to control the paragraph format of text
How to cancel selection in Photoshop
1. First, open a picture in the ps software and create a selection area.
2. Press Ctrl+D to cancel the ps selection.
3. You can also right-click the canvas where the selected area has been created, and then click Cancel Selection to cancel the ps selected area.
4. You can also click "Select" - "Cancel Selection" in the ps menu bar after the selection area is created to cancel the ps selection area.
5. You can also confirm the status of "New Selected Area" in the attribute bar after creating the selected area, and then click the mouse in the canvas outside the selected area to cancel the ps selected area.
Photoshop Which version works well?
Photoshop is a kind of image and text processing software that everyone is familiar with. It is very powerful and can be used by many people. Of course, some people are professional and skilled, while others just know a little. photoshop=, Now there are many versions, including Photoshop, Photoshop CS1, CS2, CS3, and so on. Which version of Photoshop is easy to use. What are the differences between each version. Let's get to know:
Photoshop version differences:
1. PHOTOSHOP is classic before CS.
2. There is little difference between CS1 and CS2 from the interface, and there is not much function increase.
3. CS3 has made a breakthrough in the interface and increased its functions. It is a relatively stable version connecting the past and the future.
4. CS4 is average, and CS5 is OK now, stronger than CS4, but the software is too large. Some convenient shortcut keys in previous versions are missing.
5. Each version has its own characteristics, and its functions are slightly different, so I will not introduce them here.
Summary:
In fact, the basic tools of each version of Photoshop are the same, and their functions are basically the same, except that different functions are added in each upgraded version. In other words, the newer the version, the more functions it has. The possible functions of the new version will be easier to operate, but this does not mean that the new version must be used. The old version has small files and runs faster. As long as it is easy to use, it is basically good. However, when a new version comes out, it is very helpful to try it at the first time. You can try more functions, but it does not mean to replace your usual version.
If you are already familiar with Photoshop, Photoshop is enough. It and Photoshop CS 3 are the most classic versions. If you want to learn Photoshop, you are recommended to start with the new Photoshop CS6, because the new version is simpler and more direct. The above is the comparison between the major versions of PS, which I hope will be helpful to you.
Photoshop CS5 Download address: http://www.onlinedown.net/soft/24247.htm
Photoshop CC2017 Download address: http://www.onlinedown.net/soft/577965.htm
Photoshop Update log
1. Lossless editing keeps your original image intact.
2. Share pictures quickly on social media.
3. Crop the image and remove different parts of the image, or combine photos.
4. Perfect combination of photos to create interesting or surreal images.
5. Modify the color and contrast, or add a preset filter layer to your image. One click can optimize the whole image or a part of the image.
Due to copyright and manufacturer requirements, Huajun Software Park provides the official download package of photoshop software
Recommended by the Chinese military editor:
photoshop It is a widely used image processing software. Huajun Software Park also provides all users with other image processing software download channels, coreldraw 、 Photo Picture Editor 、 DICOM Converter , welcome to download!


