Preparation: purchase domain name, server and database
Cloud+Campus Student Discount
Help you quickly get started with cloud computing, swim in the cloud, and achieve the dream of college entrepreneurs
Campus ECS under 25 years old is exempt from student certification: https://curl.qcloud.com/19PPOOrx
Only one set is allowed to be purchased. After completing the student certification, the student can be eligible for three renewals at a discount. The first preferential product will not be included in the renewal at the same price
Tencent cloud domain name registration: https://curl.qcloud.com/FFPhPl9d
The free version certificate and resolution, ". com" global common domain name, and ". cn" Chinese enterprise Internet logo will be sent immediately after the first purchase of domain name for 1 yuan.
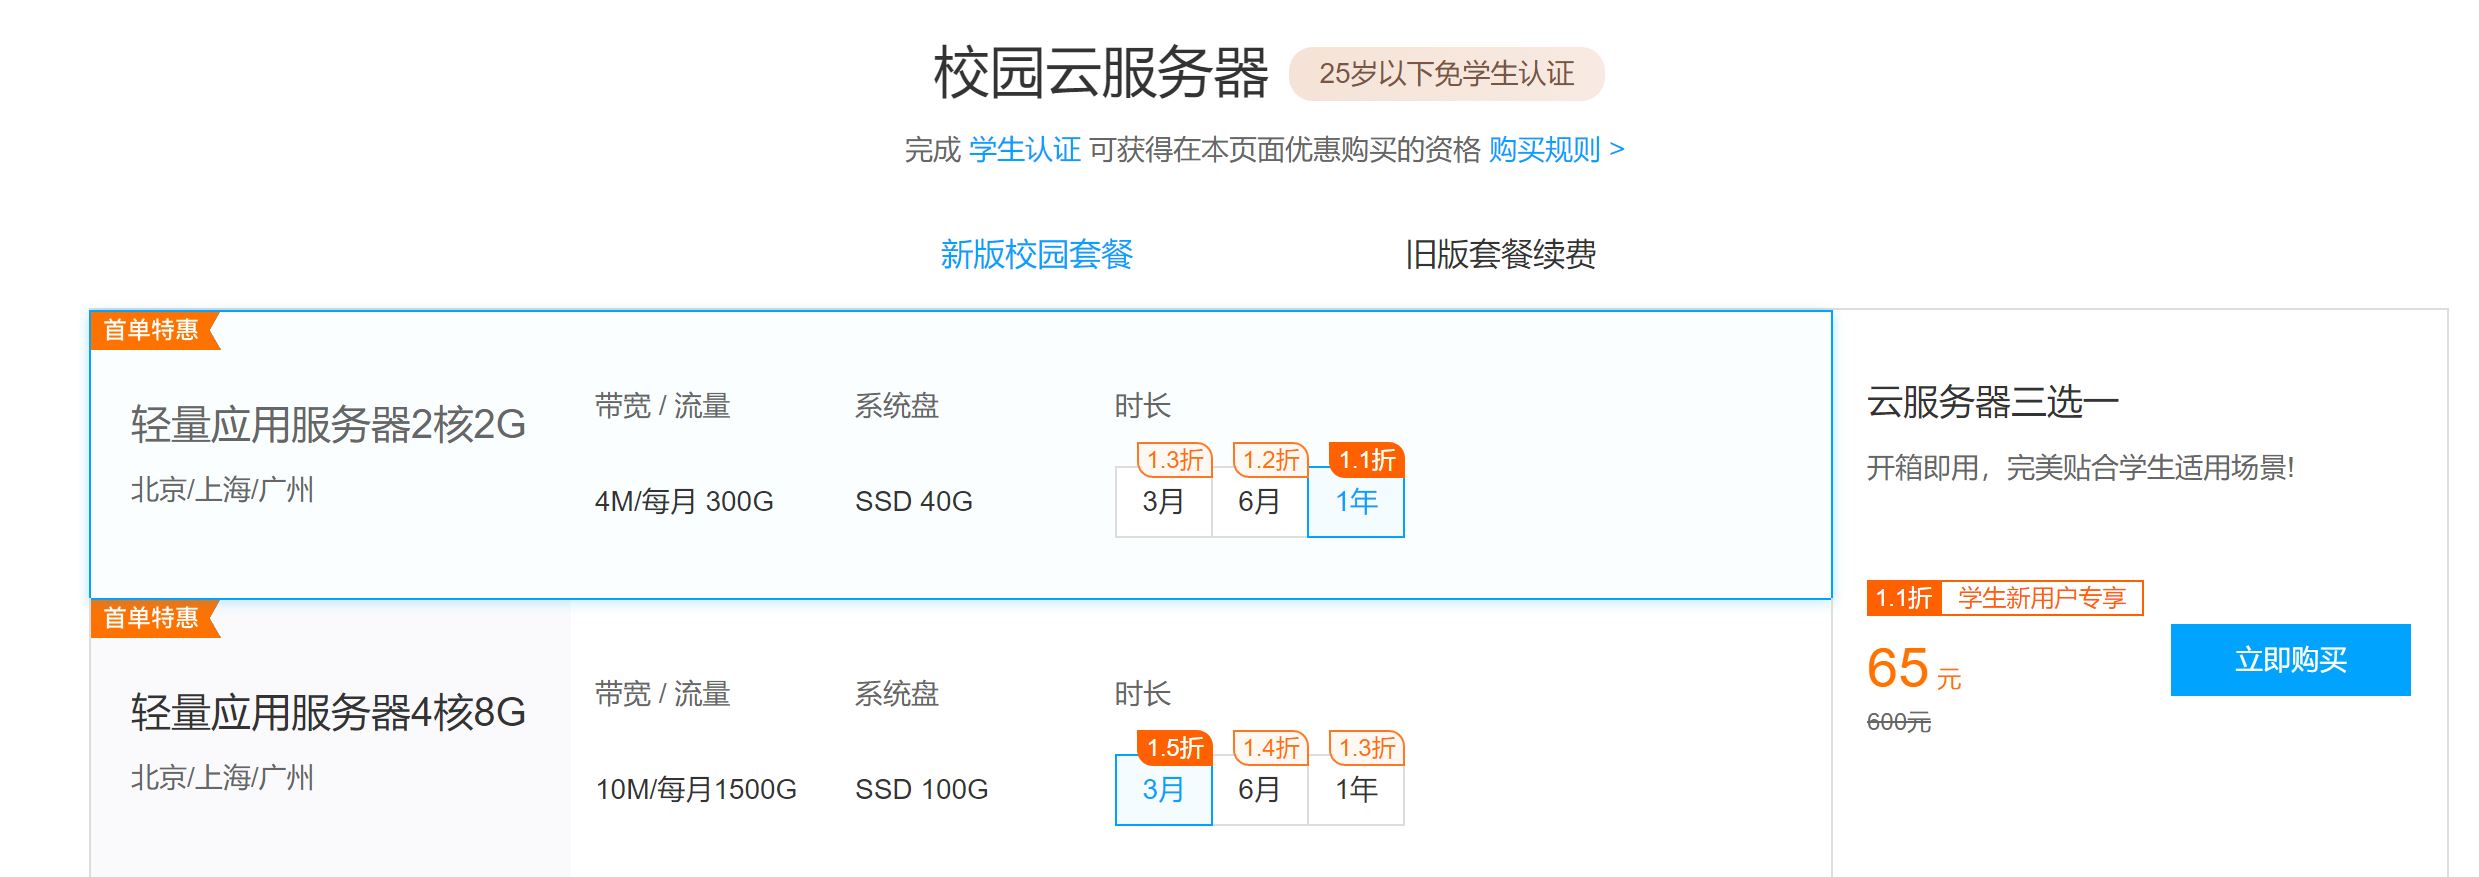
Tencent Cloud lightweight application ECS: https://curl.qcloud.com/elBIPaA9
The lightweight application ECS is suitable for most websites. Compared with ordinary CVM, it has the advantages of low cost, large network bandwidth, and no need to file overseas servers. We choose to configure it
Light weight 2-core 2G30M Price: three hundred and forty-five point six element About 28.8 yuan/month 384 yuan
Instance package 2-core 2G30M (Linux)
Singapore/Silicon Valley/Toronto/Tokyo/Frankfurt/Mumbai
30GB SSD disk 1024GB monthly traffic 30M peak bandwidth
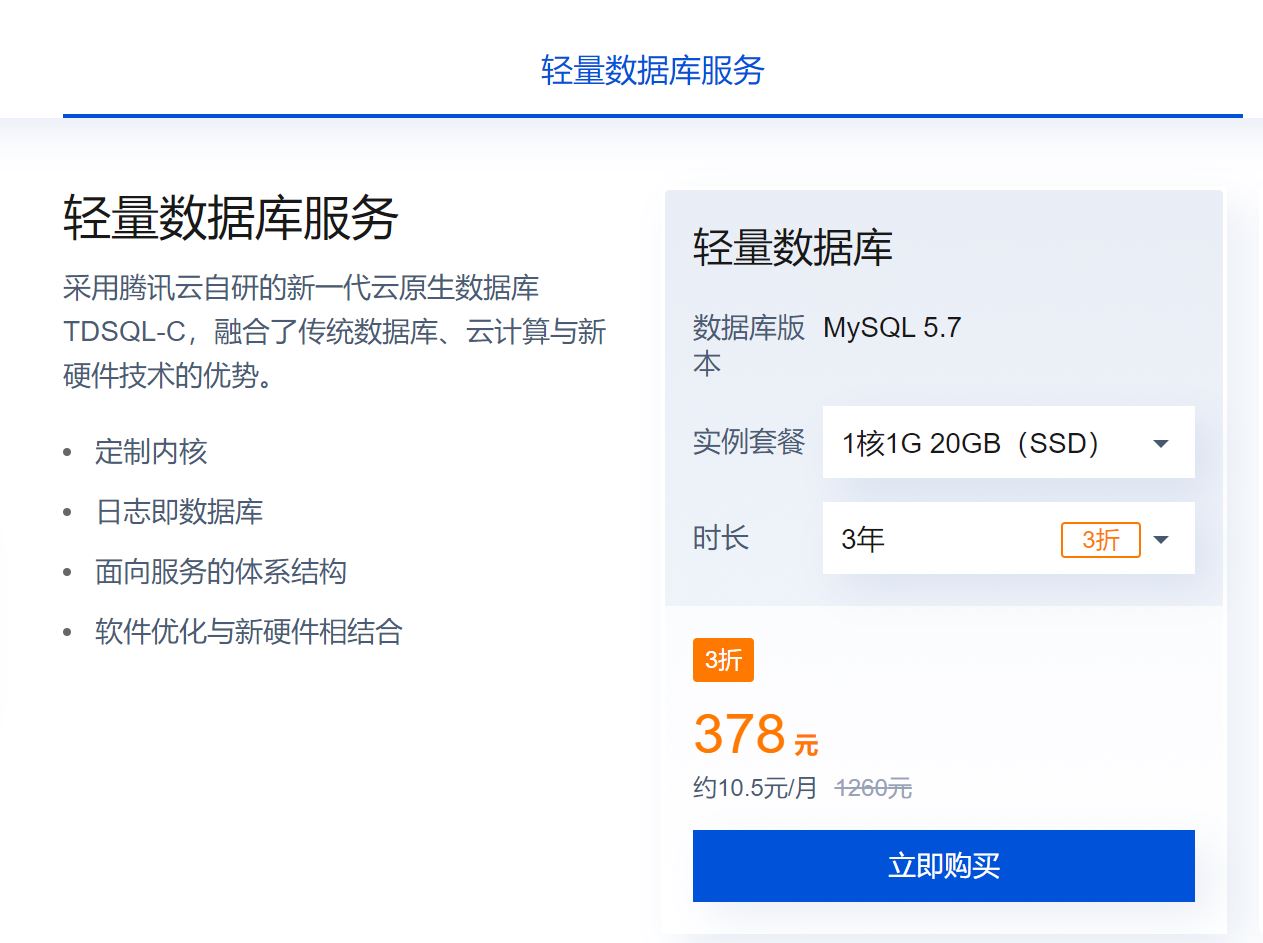
Lightweight MySQL 5.7: https://curl.qcloud.com/3DYuOOXt
In order to ensure data security and better performance, facilitate data migration and protection, the database can be purchased separately rather than installed with the host. In case of server failure, data isolation and security can also be ensured. The minimum configuration price is 168 per year Yuan, Only 378 yuan is needed for three years, and databases in Guangzhou, Shanghai, Beijing, Nanjing, Hong Kong and Silicon Valley can be selected.
Special attention: The database and server must be in the same region to use the intranet connection. Those not in the same region cannot be used.
Database version MySQL 5.7
Instance package 1 core 1G 20GB (SSD)
30% off for 3 years
Set up server
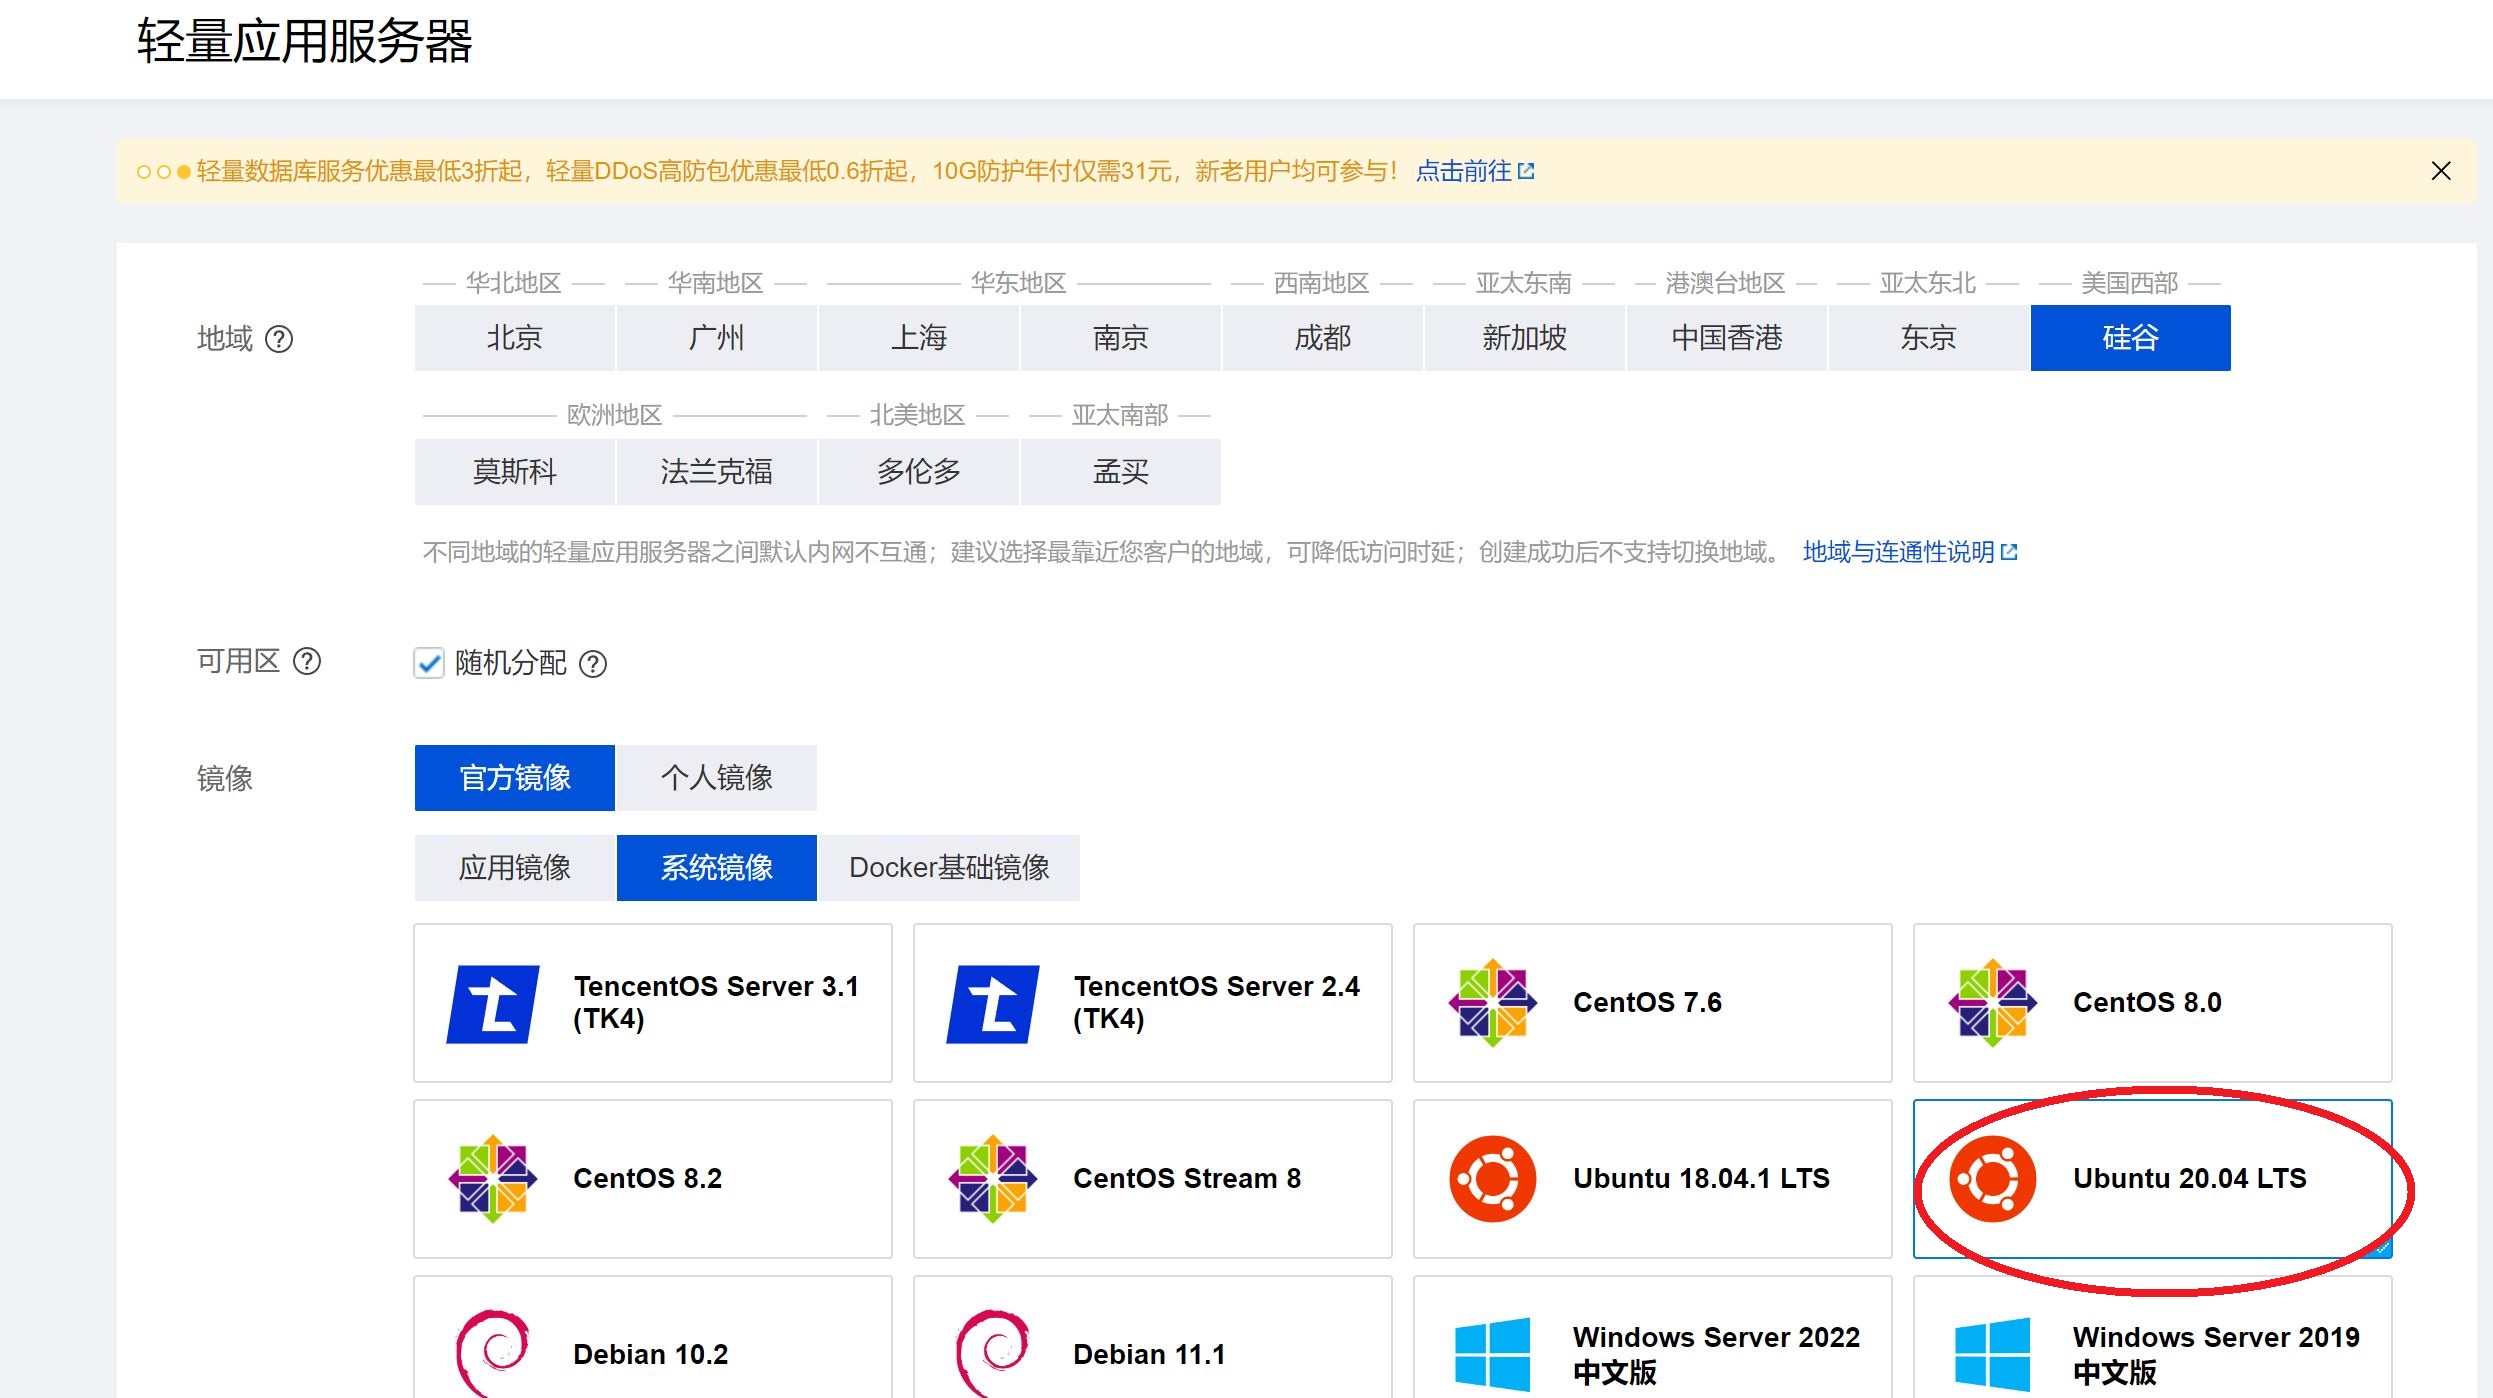
First select the region Silicon Valley in the western United States, and then select Ubuntu 20.04 LTS for the image
Enter the console lightweight application server
Enter the lightweight application server console: https://console.cloud.tencent.com/lighthouse/instance , click the key to generate a login key
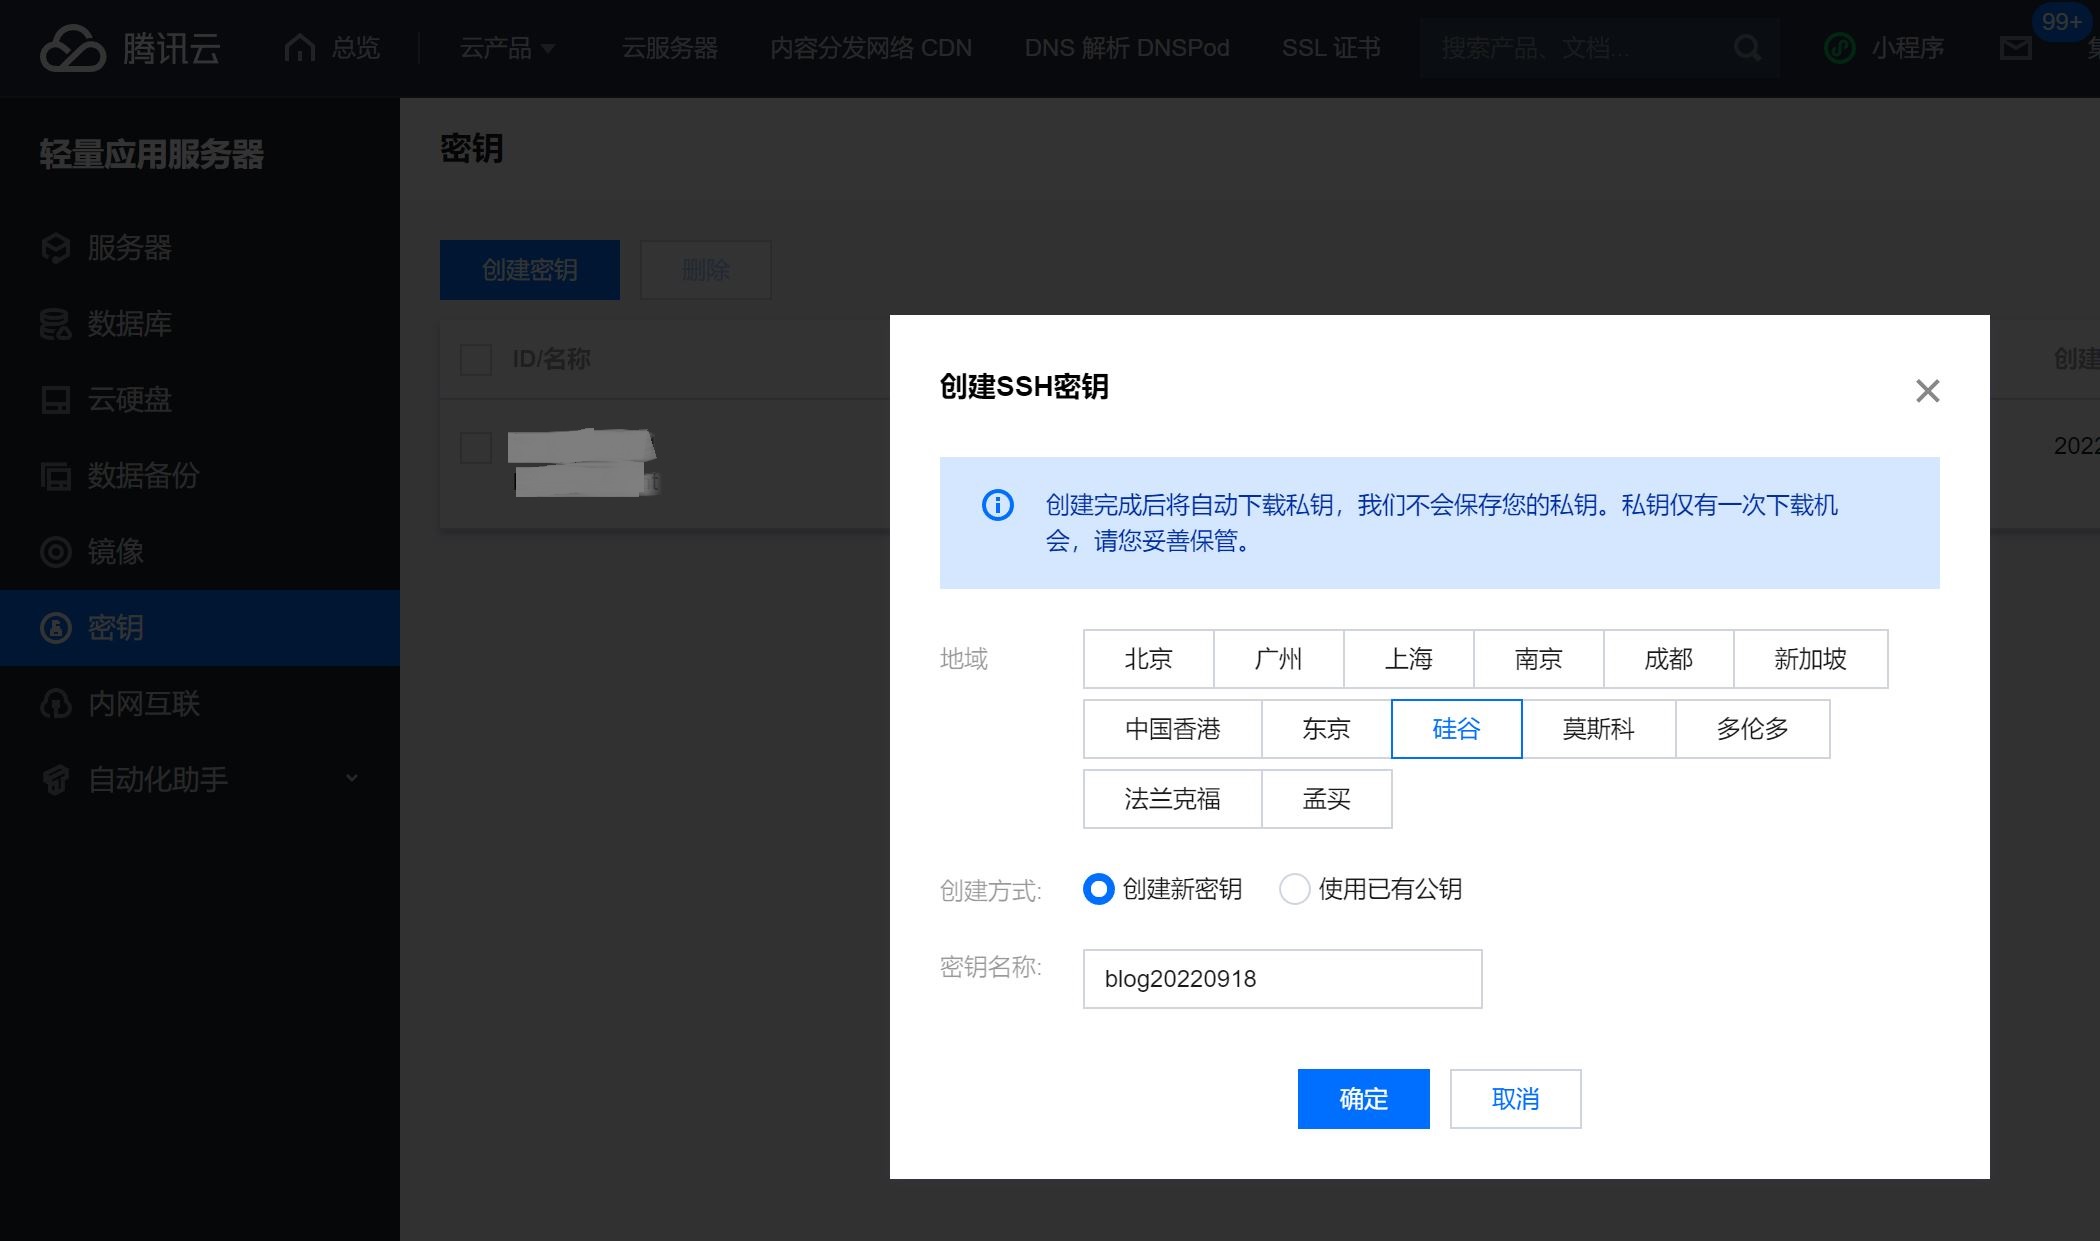
Click the server and select the binding key here for remote login
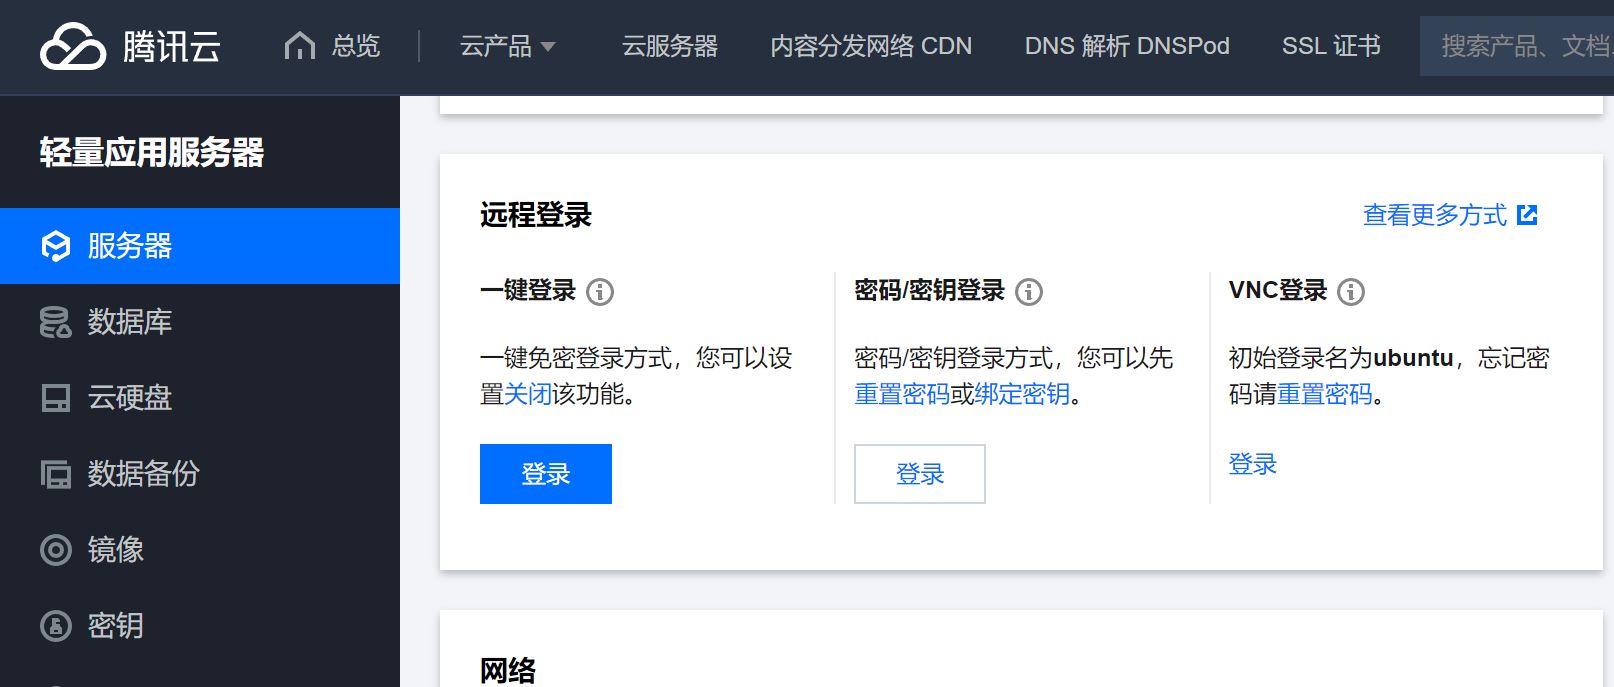
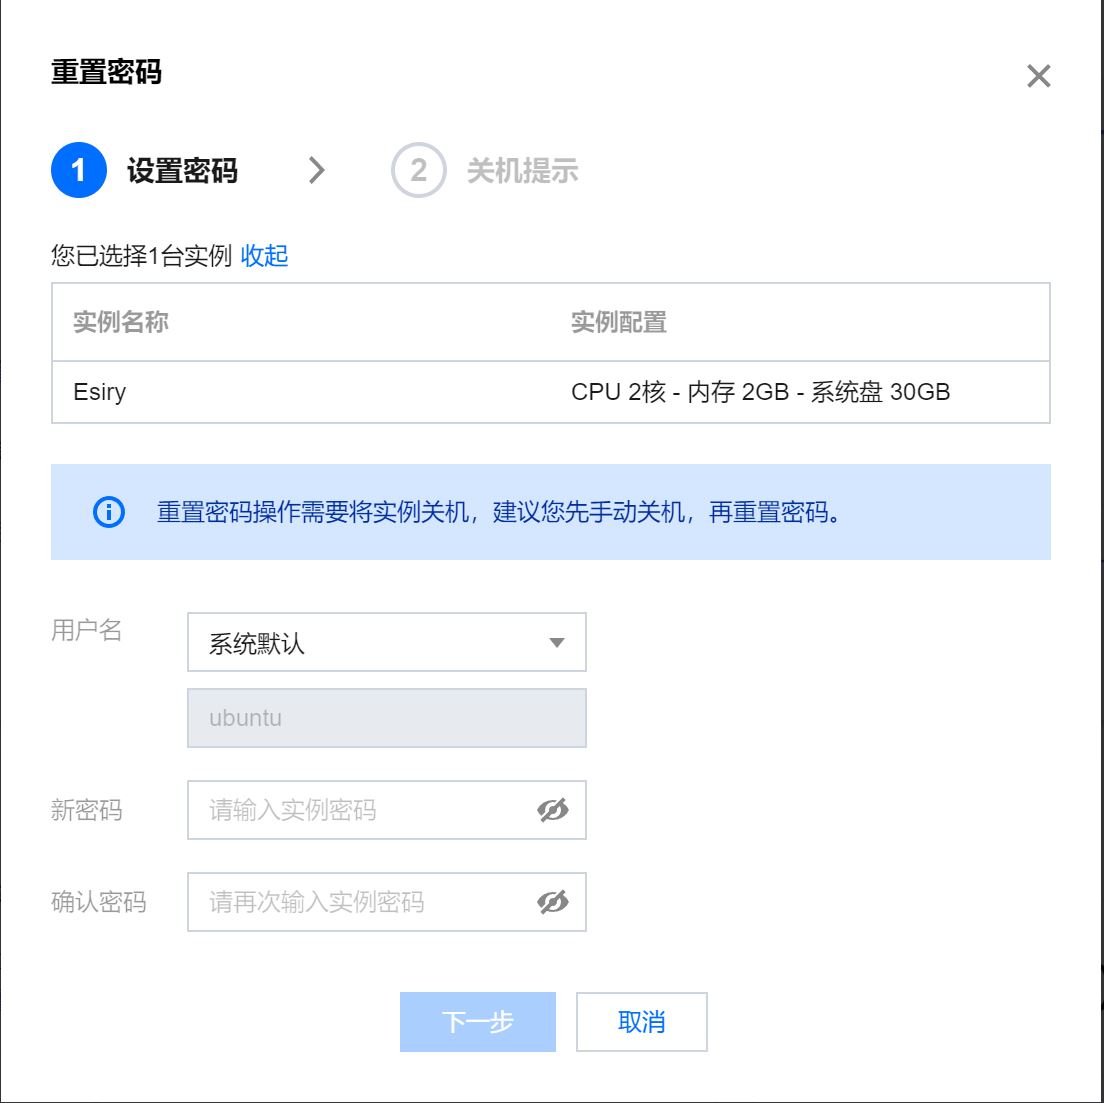
Reset login user ubuntu login password:
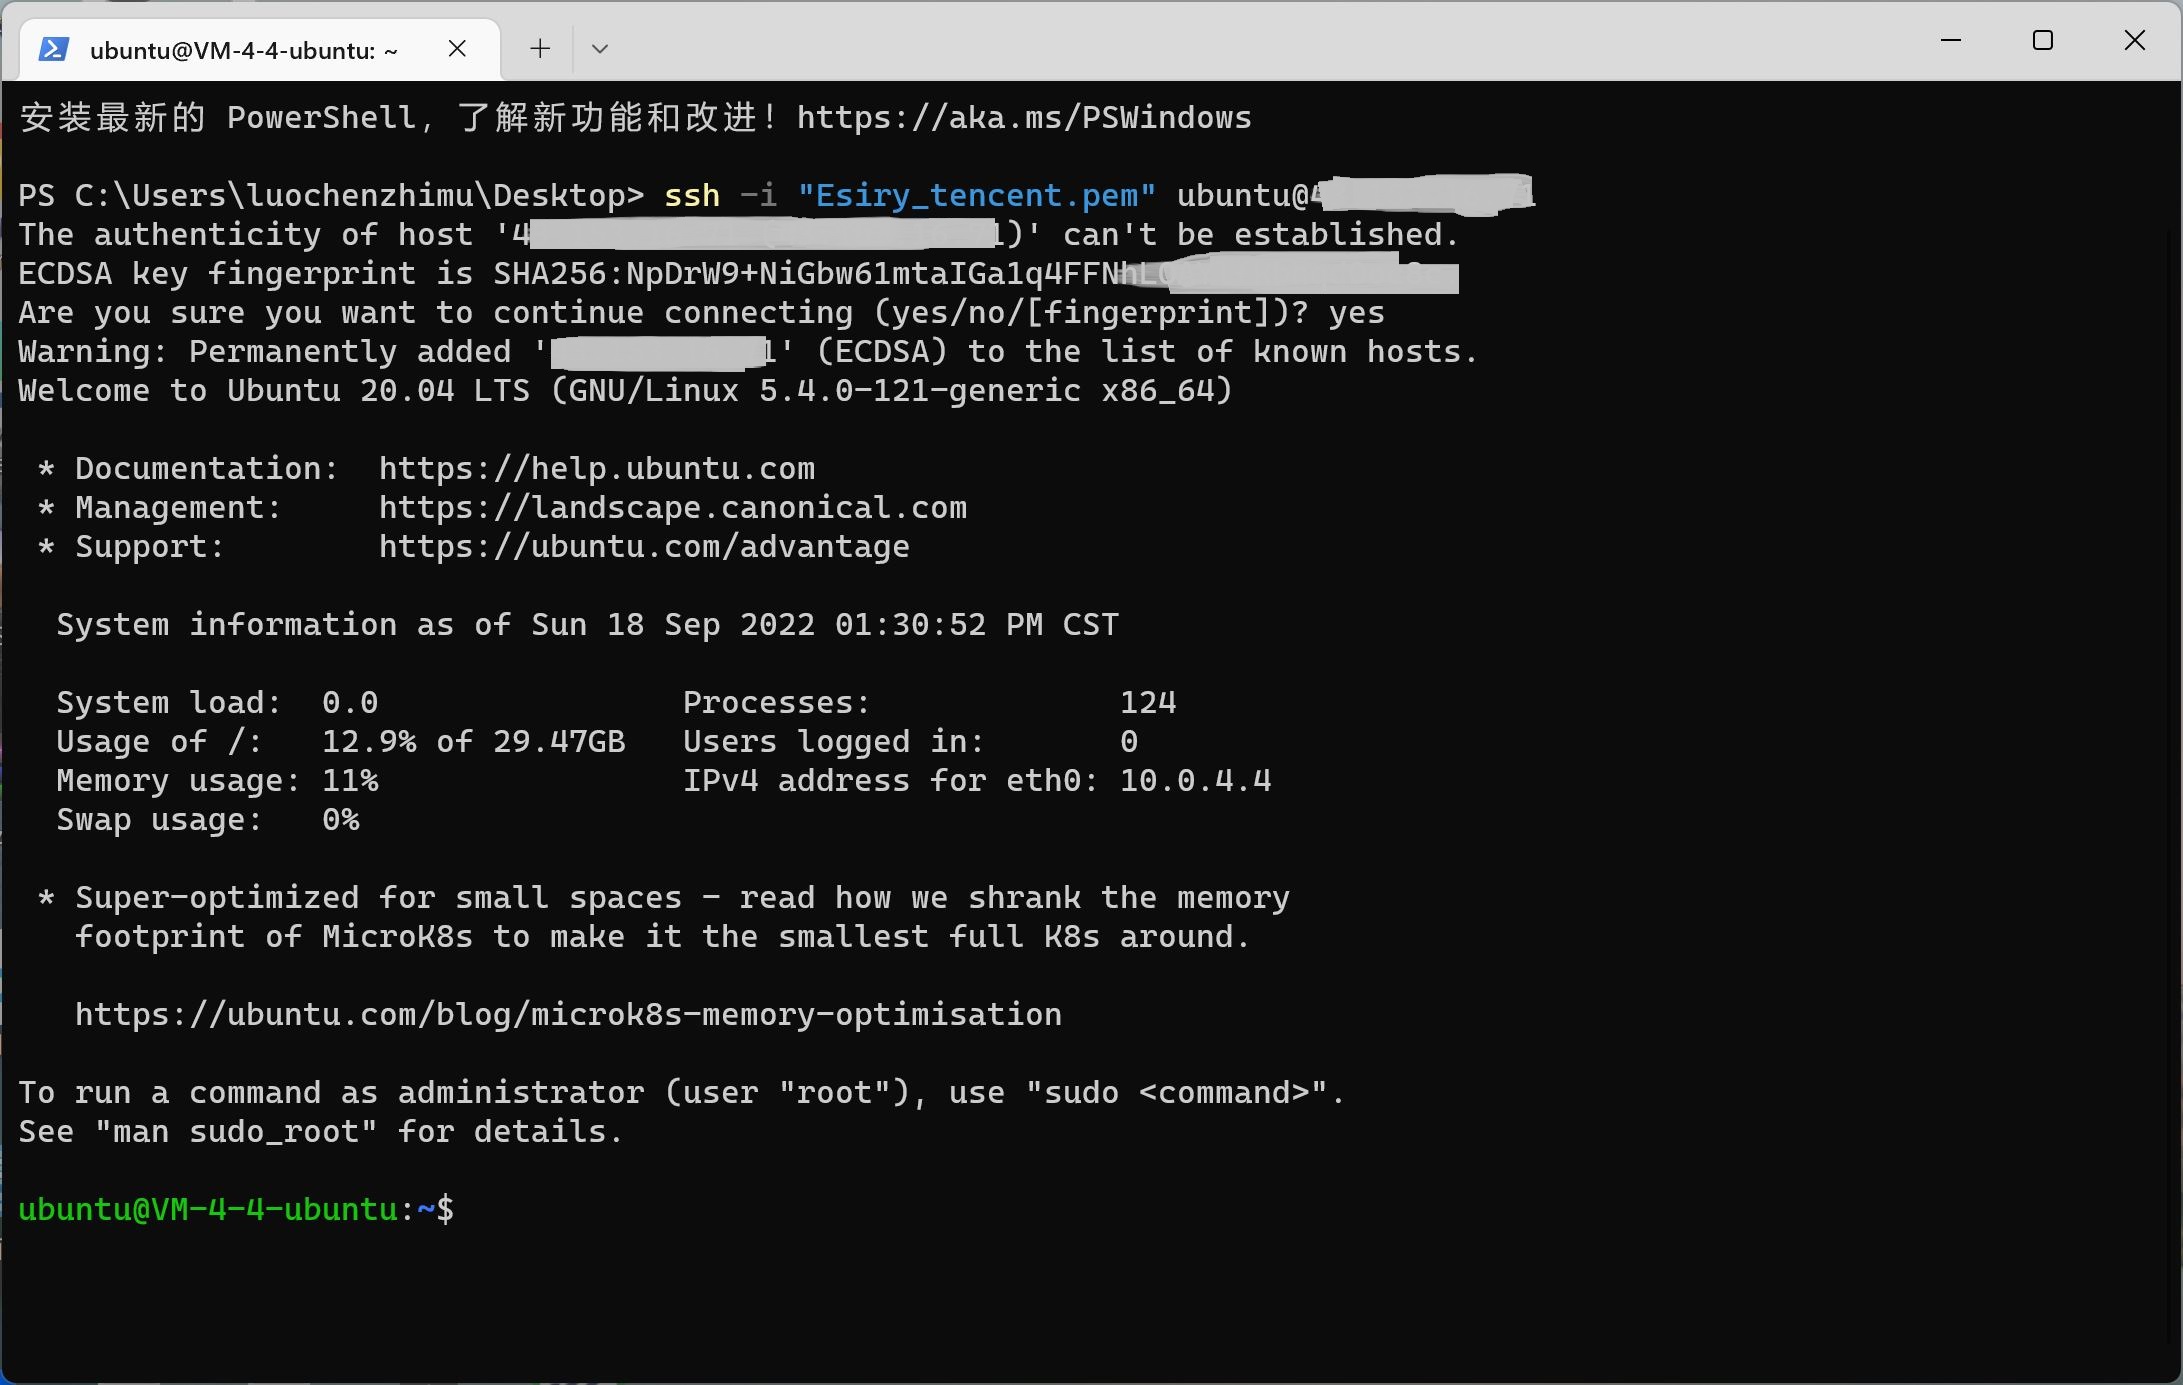
Now you can log in to the server. Key login method:
The key is blog20220918.pem (replace it with your own, and the key is placed in the current command directory), and xx.xx.xx.xx is the public IP address (click the server to view the public address)
ssh -i "blog20220918.pem" ubuntu@xx.xx.xx.xx
Specify the key address such as:
ssh -i "C:\Users\luochenzhimu\Documents\Esiry\Esiry_tencent.pem" ubuntu@xx.xx.xx.xx
Here, use Windows PowerShell to log in and enter yes
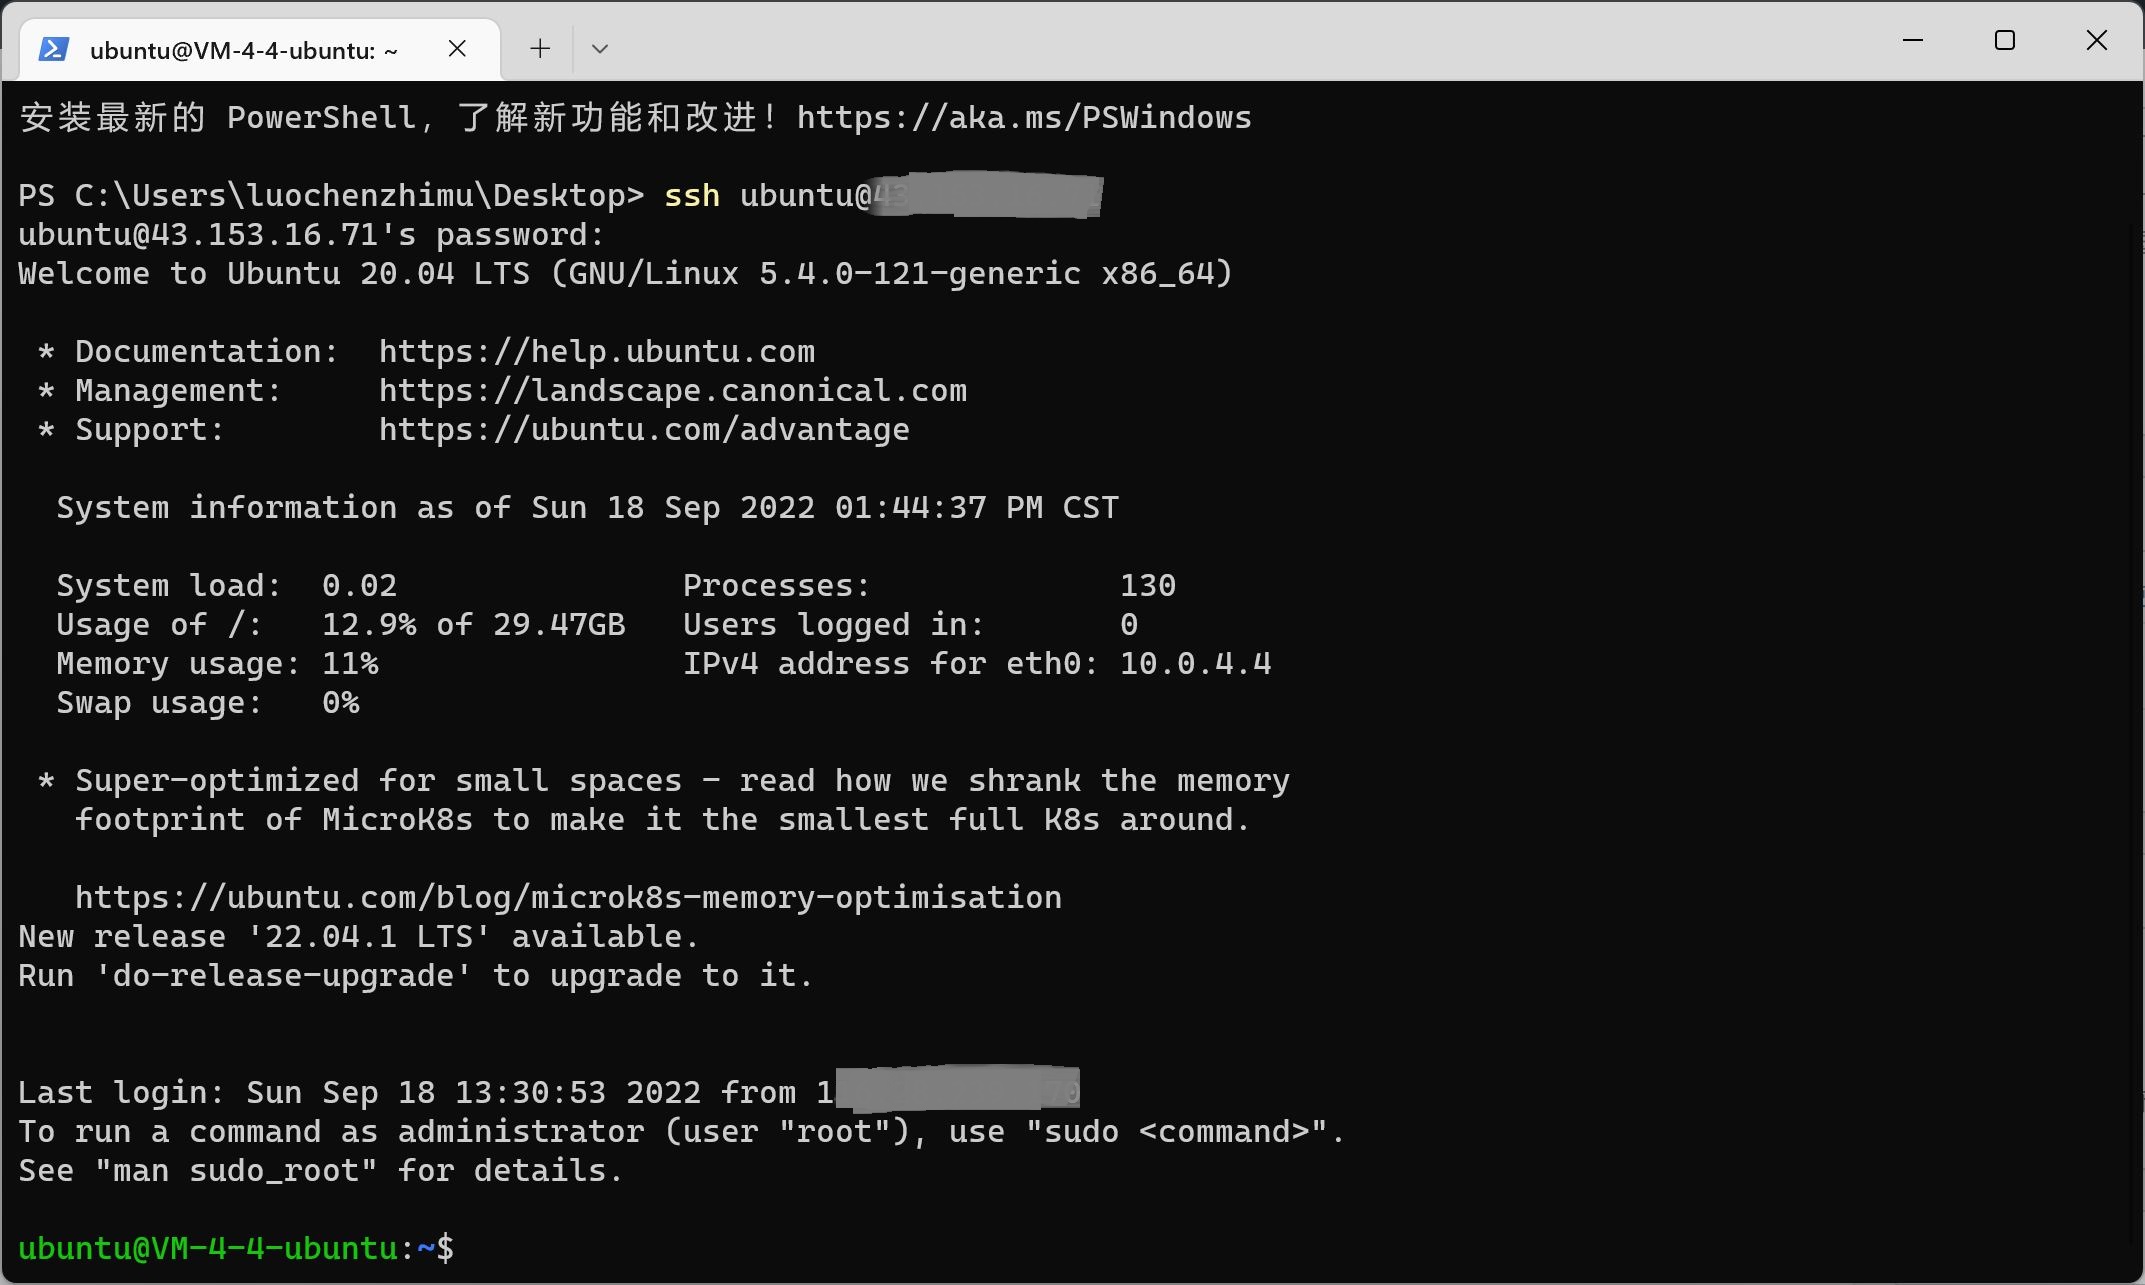
Password login mode:
ssh ubuntu@xx.xx.xx.xx
Administrator root settings
To facilitate processing, let's allow the root administrator to log in:
Reset root password:
sudo passwd root

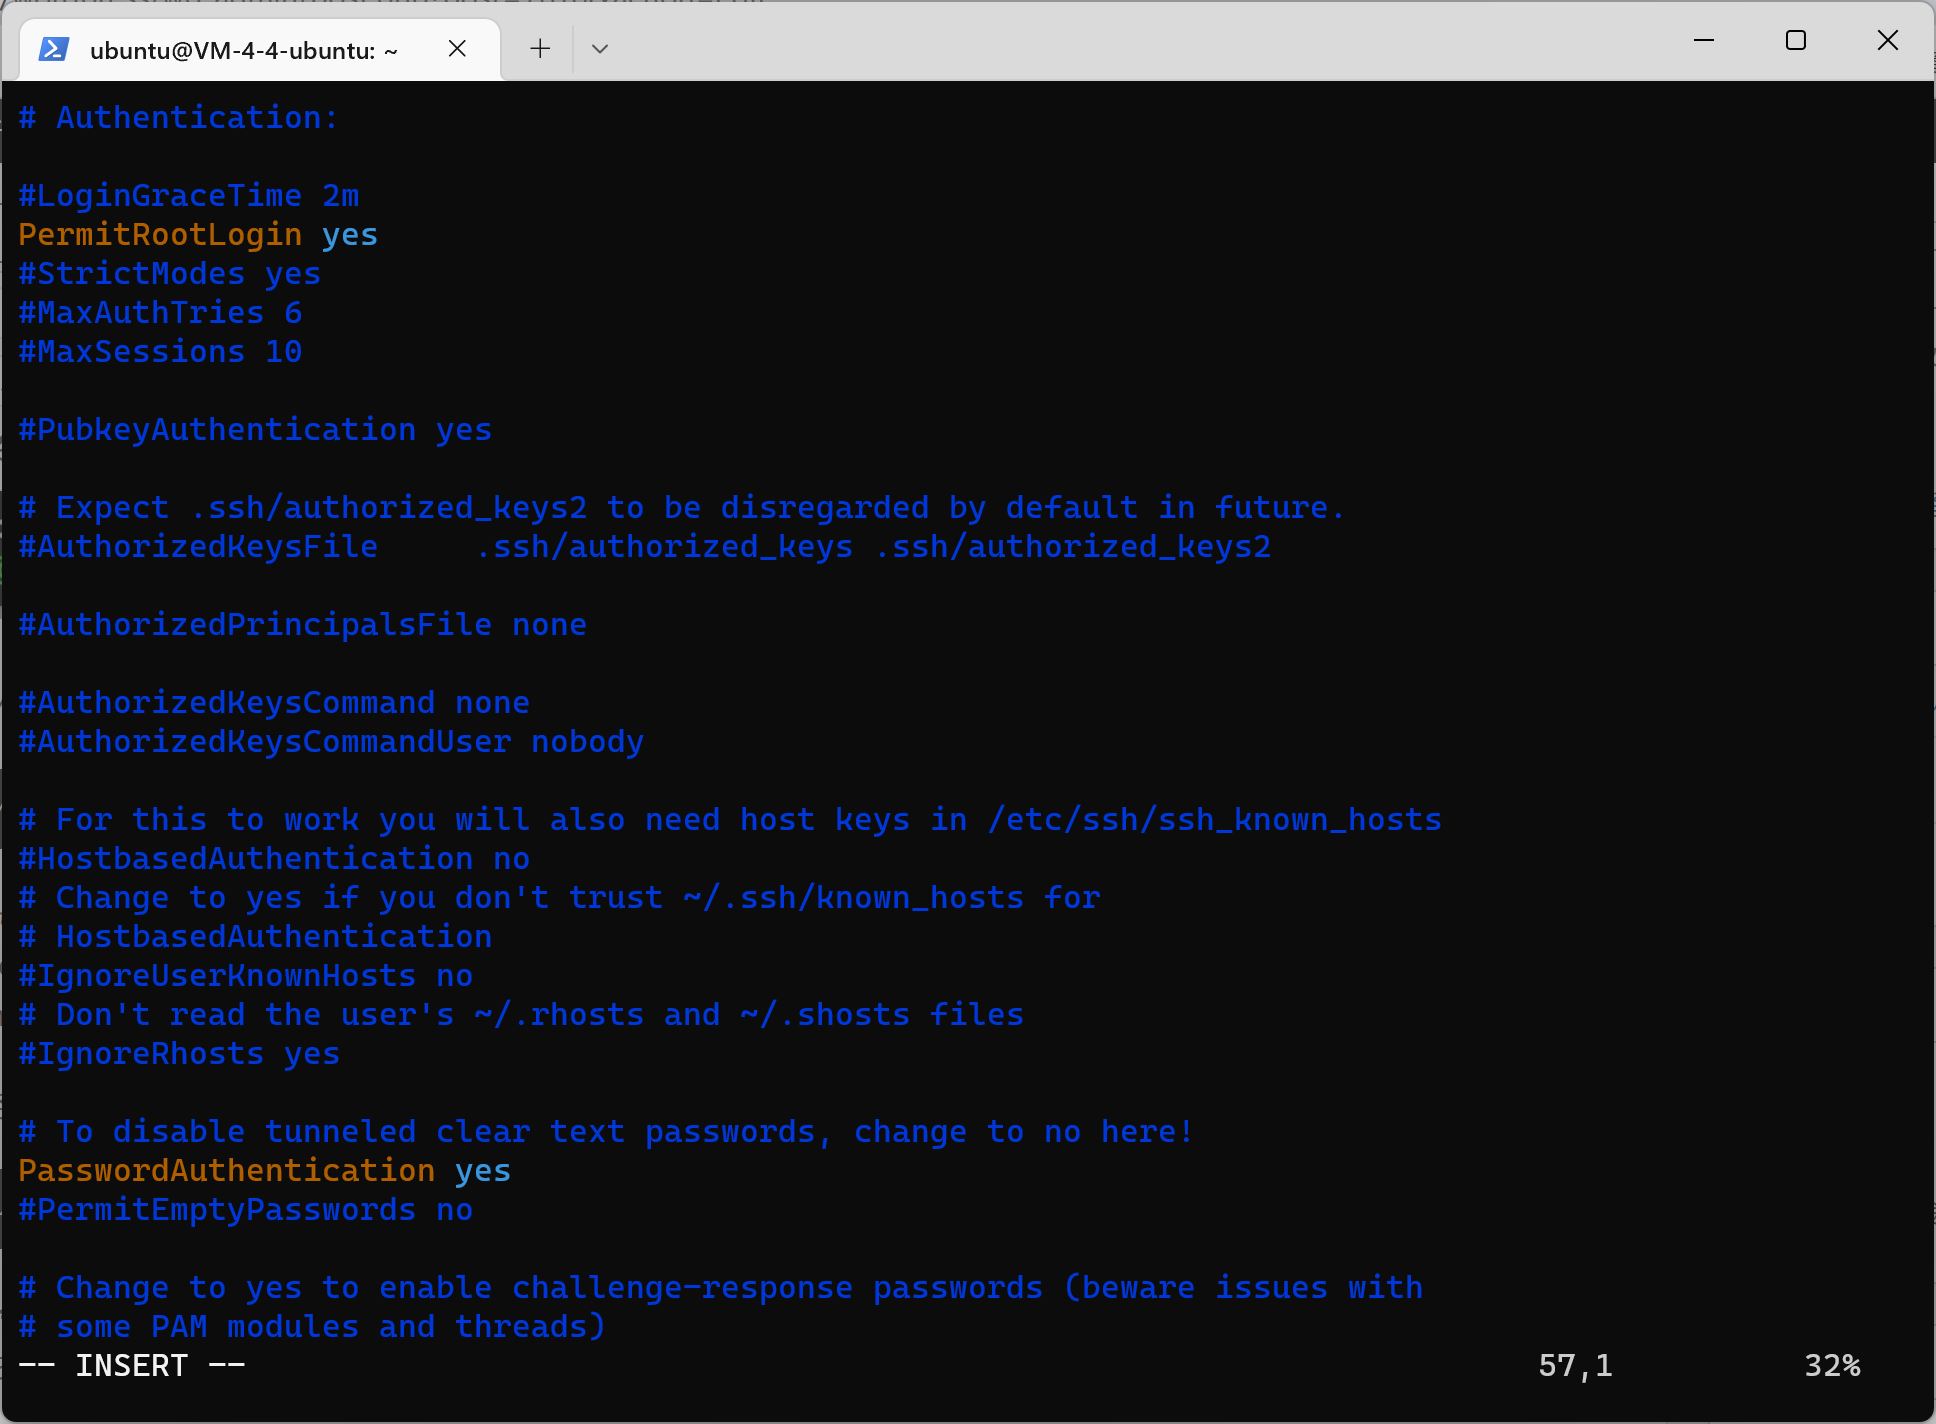
Edit profile:
sudo vi /etc/ssh/sshd_config
Click the keyboard letter i to enter vim editing mode
#PermitRootLogin prohibit-password Change to PermitRootLogin yes
Find the #PasswordAuthentication yes Modify to PasswordAuthentication yes
Click esc to exit editing mode, and finally type: wq to save and exit
Restart the ssh service:
sudo service ssh restart
Root user login command (xx.xx.xx.xx is the IP address):
ssh root@xx.xx.xx.xx
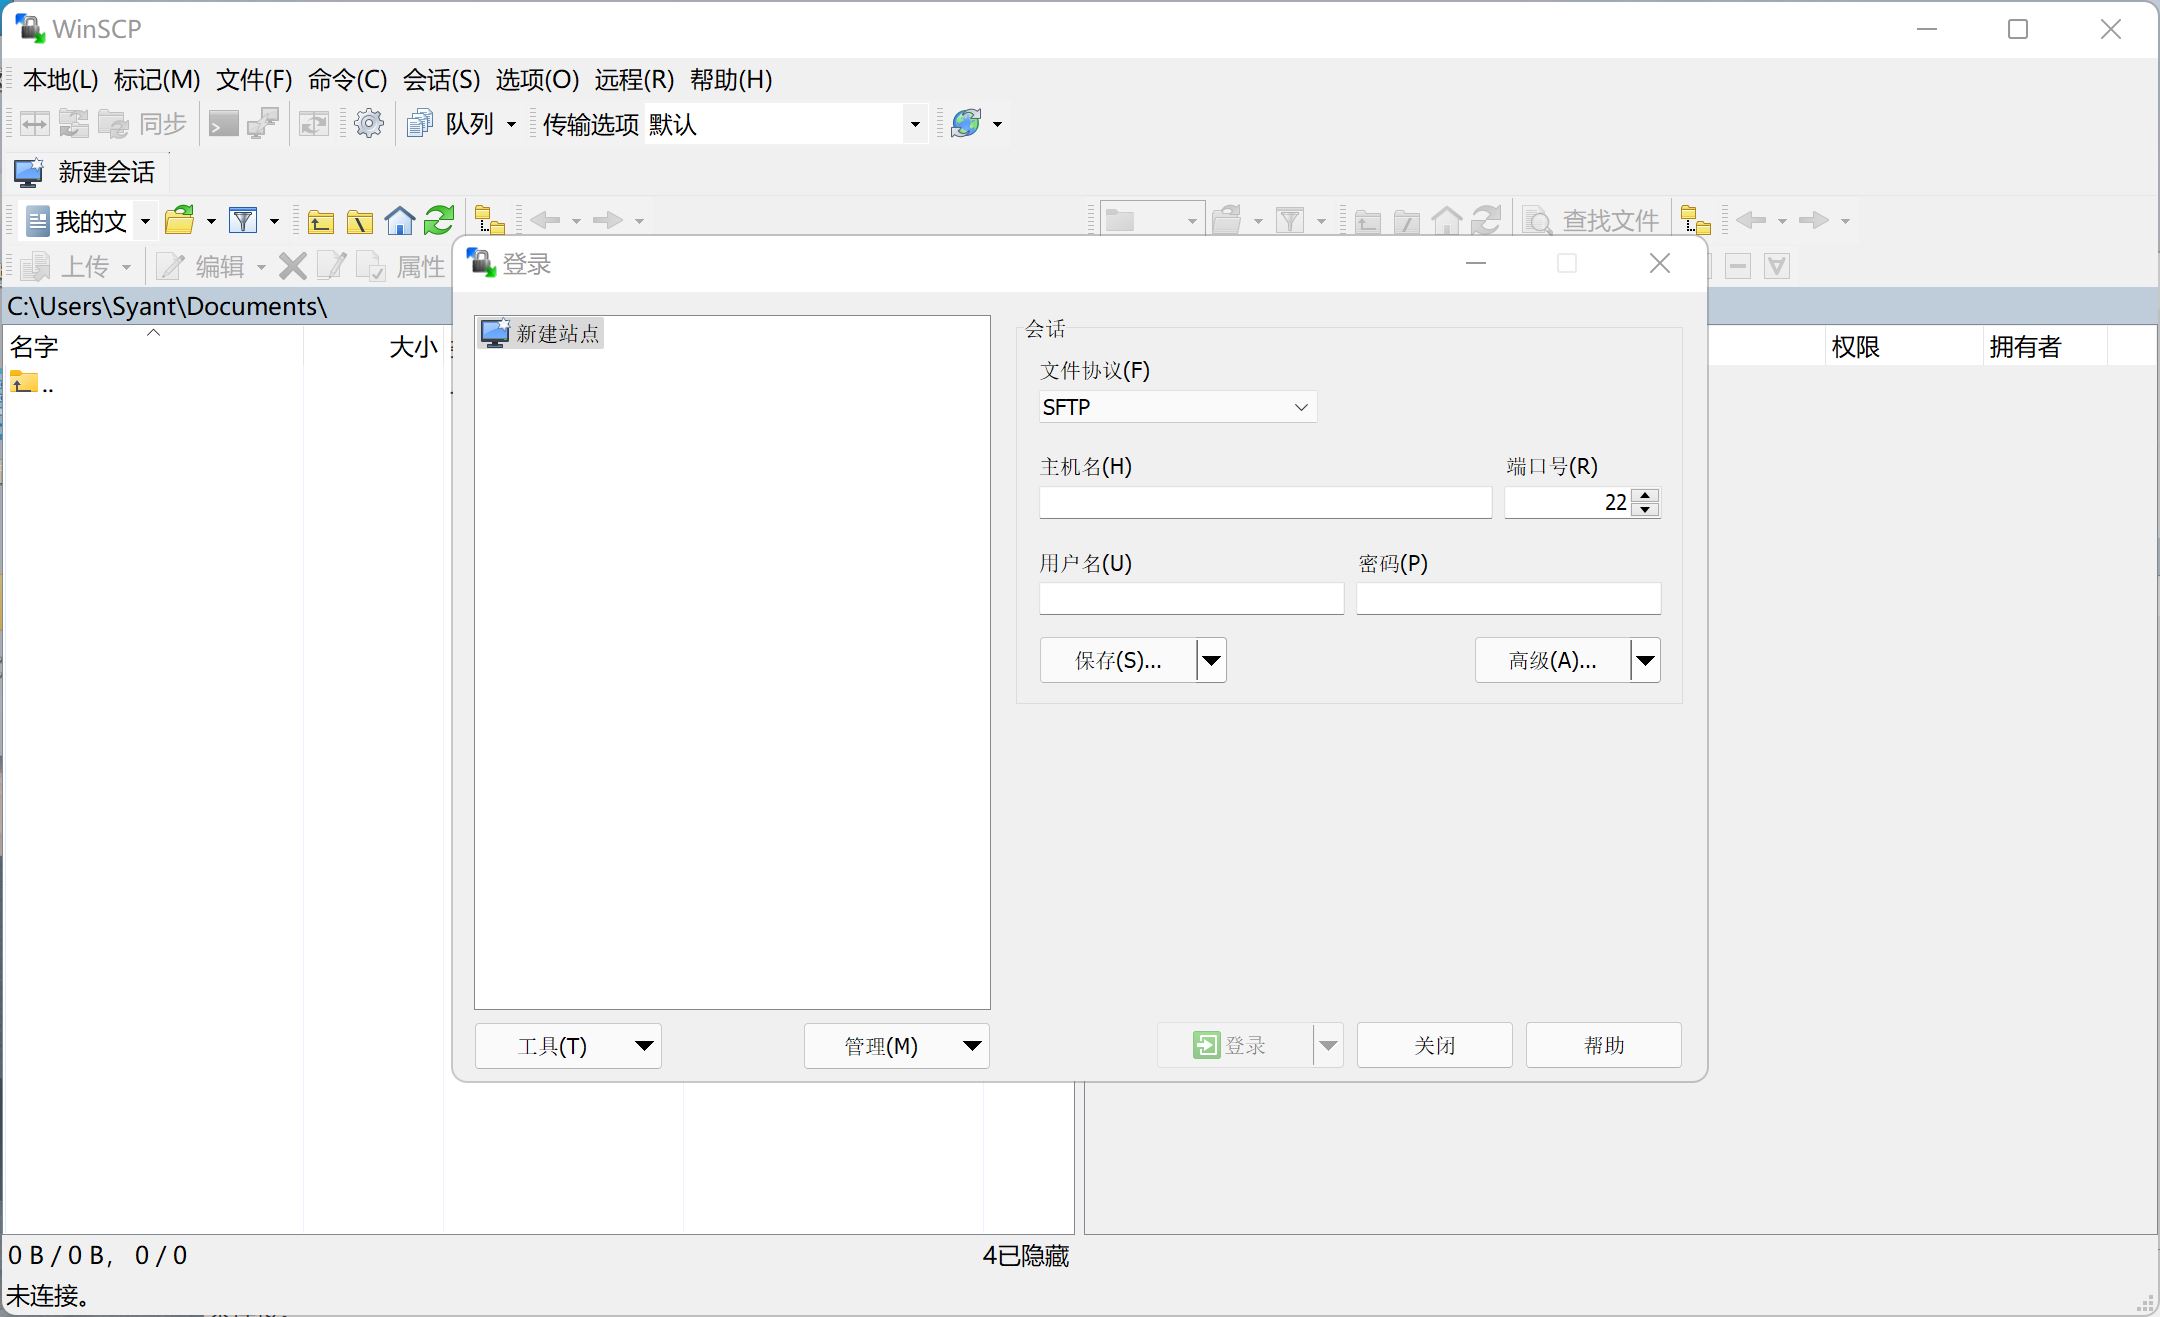
Software WinSCP for file transfer
To facilitate file transfer, we download a remote file manager WinSCP, which includes Notepad++and PuTTY external programs.
Baidu online disk: https://pan.baidu.com/s/1m8pU514ecU6qMbjiCYLOYw?pwd=lsua
Dust falling wood: https://dl.luochenzhimu.com/software/WinSCP/WinSCP.zip
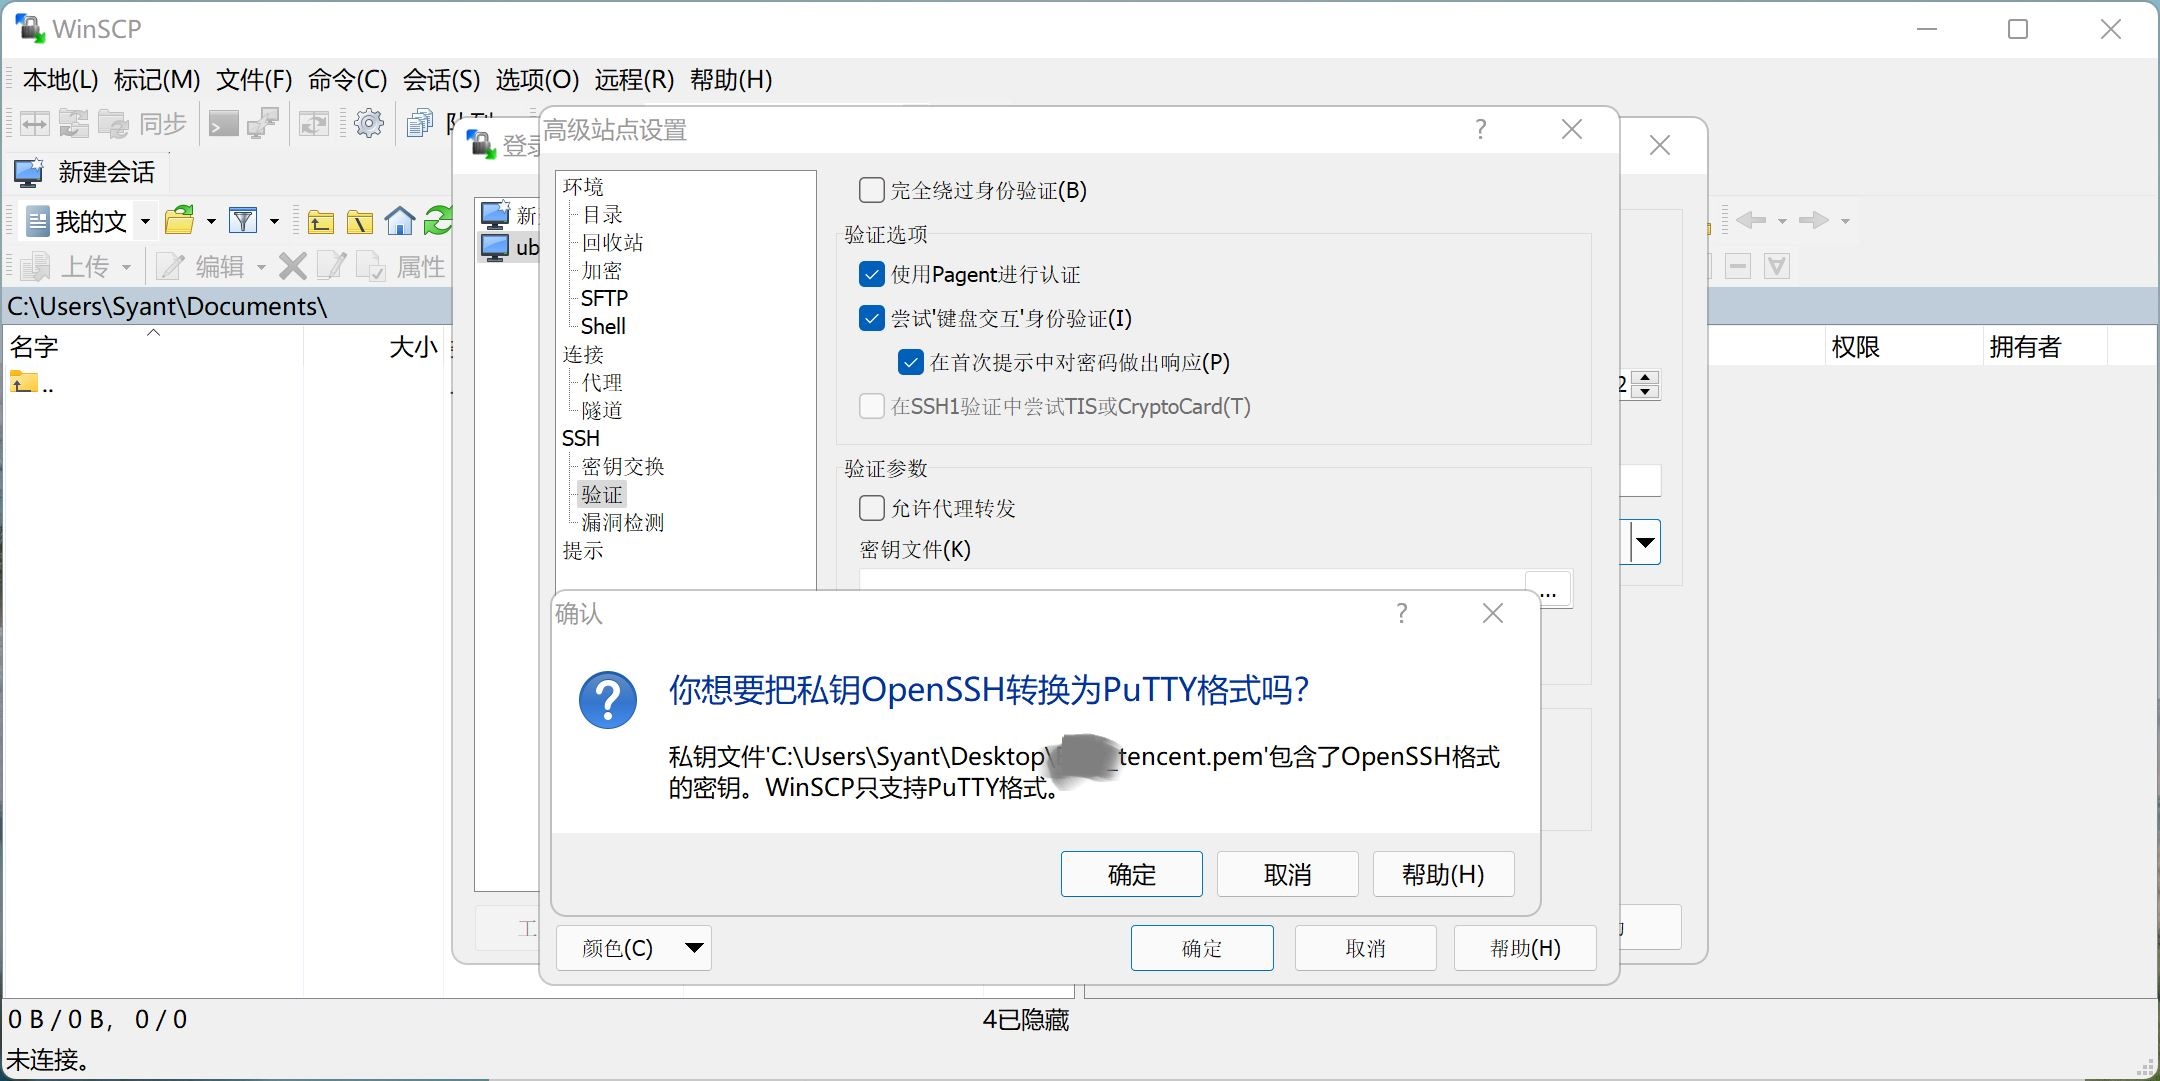
Enter the server IP address for the host name, the user name is ubuntu or root, and the password is the user password (leave blank for key login).
If you use the key to log in, click Advanced SSH Verification Key File Select the key and confirm to convert to PuTTY format
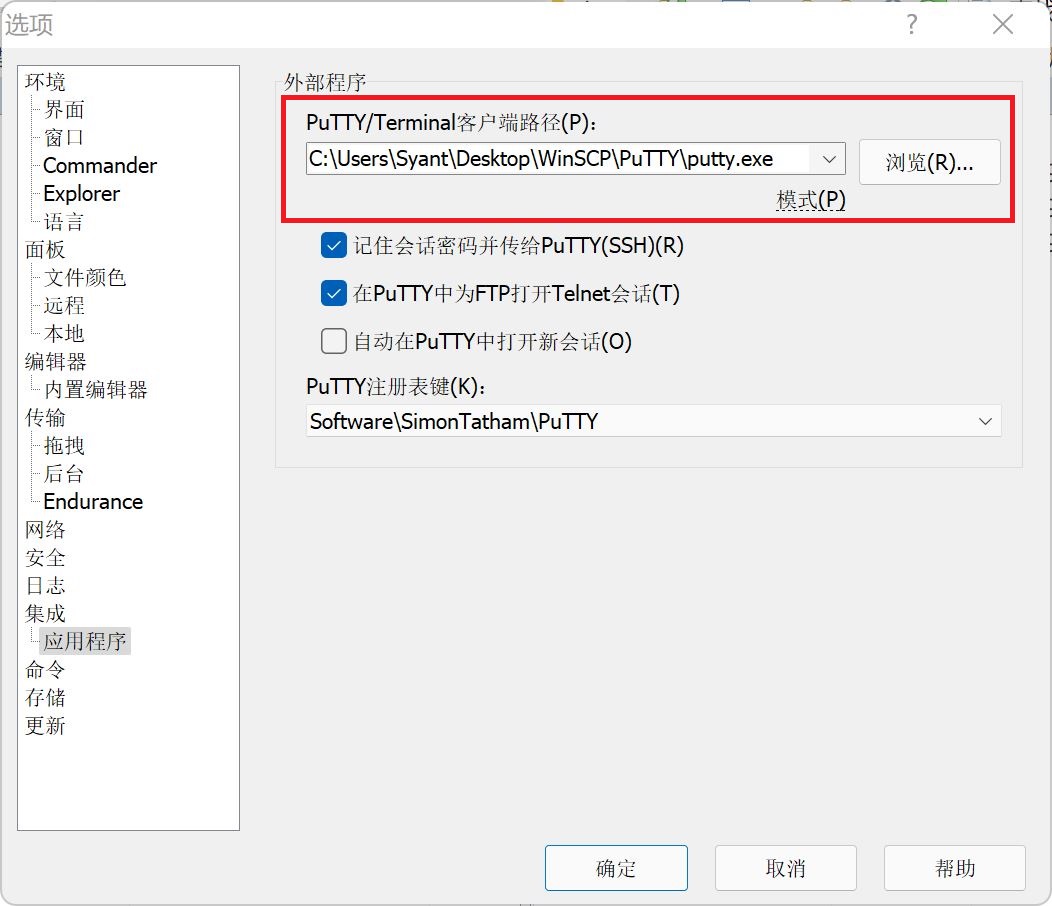
To configure the PuTTY location:
 To configure the Notepad++location:

Build WordPress blog system
Next, open the Windows PowerShell terminal and SSH connect to log in to the server. Run the commands as follows:
First update the data source, run two commands in sequence, and then enter Y to confirm the update:
sudo apt-get update sudo apt-get upgrade

Just confirm what pops up
Install Apache 2 and enter Y to confirm:
sudo apt install apache2

Install MySQL database and enter Y to confirm:
sudo apt-get install mysql-server mysql-client

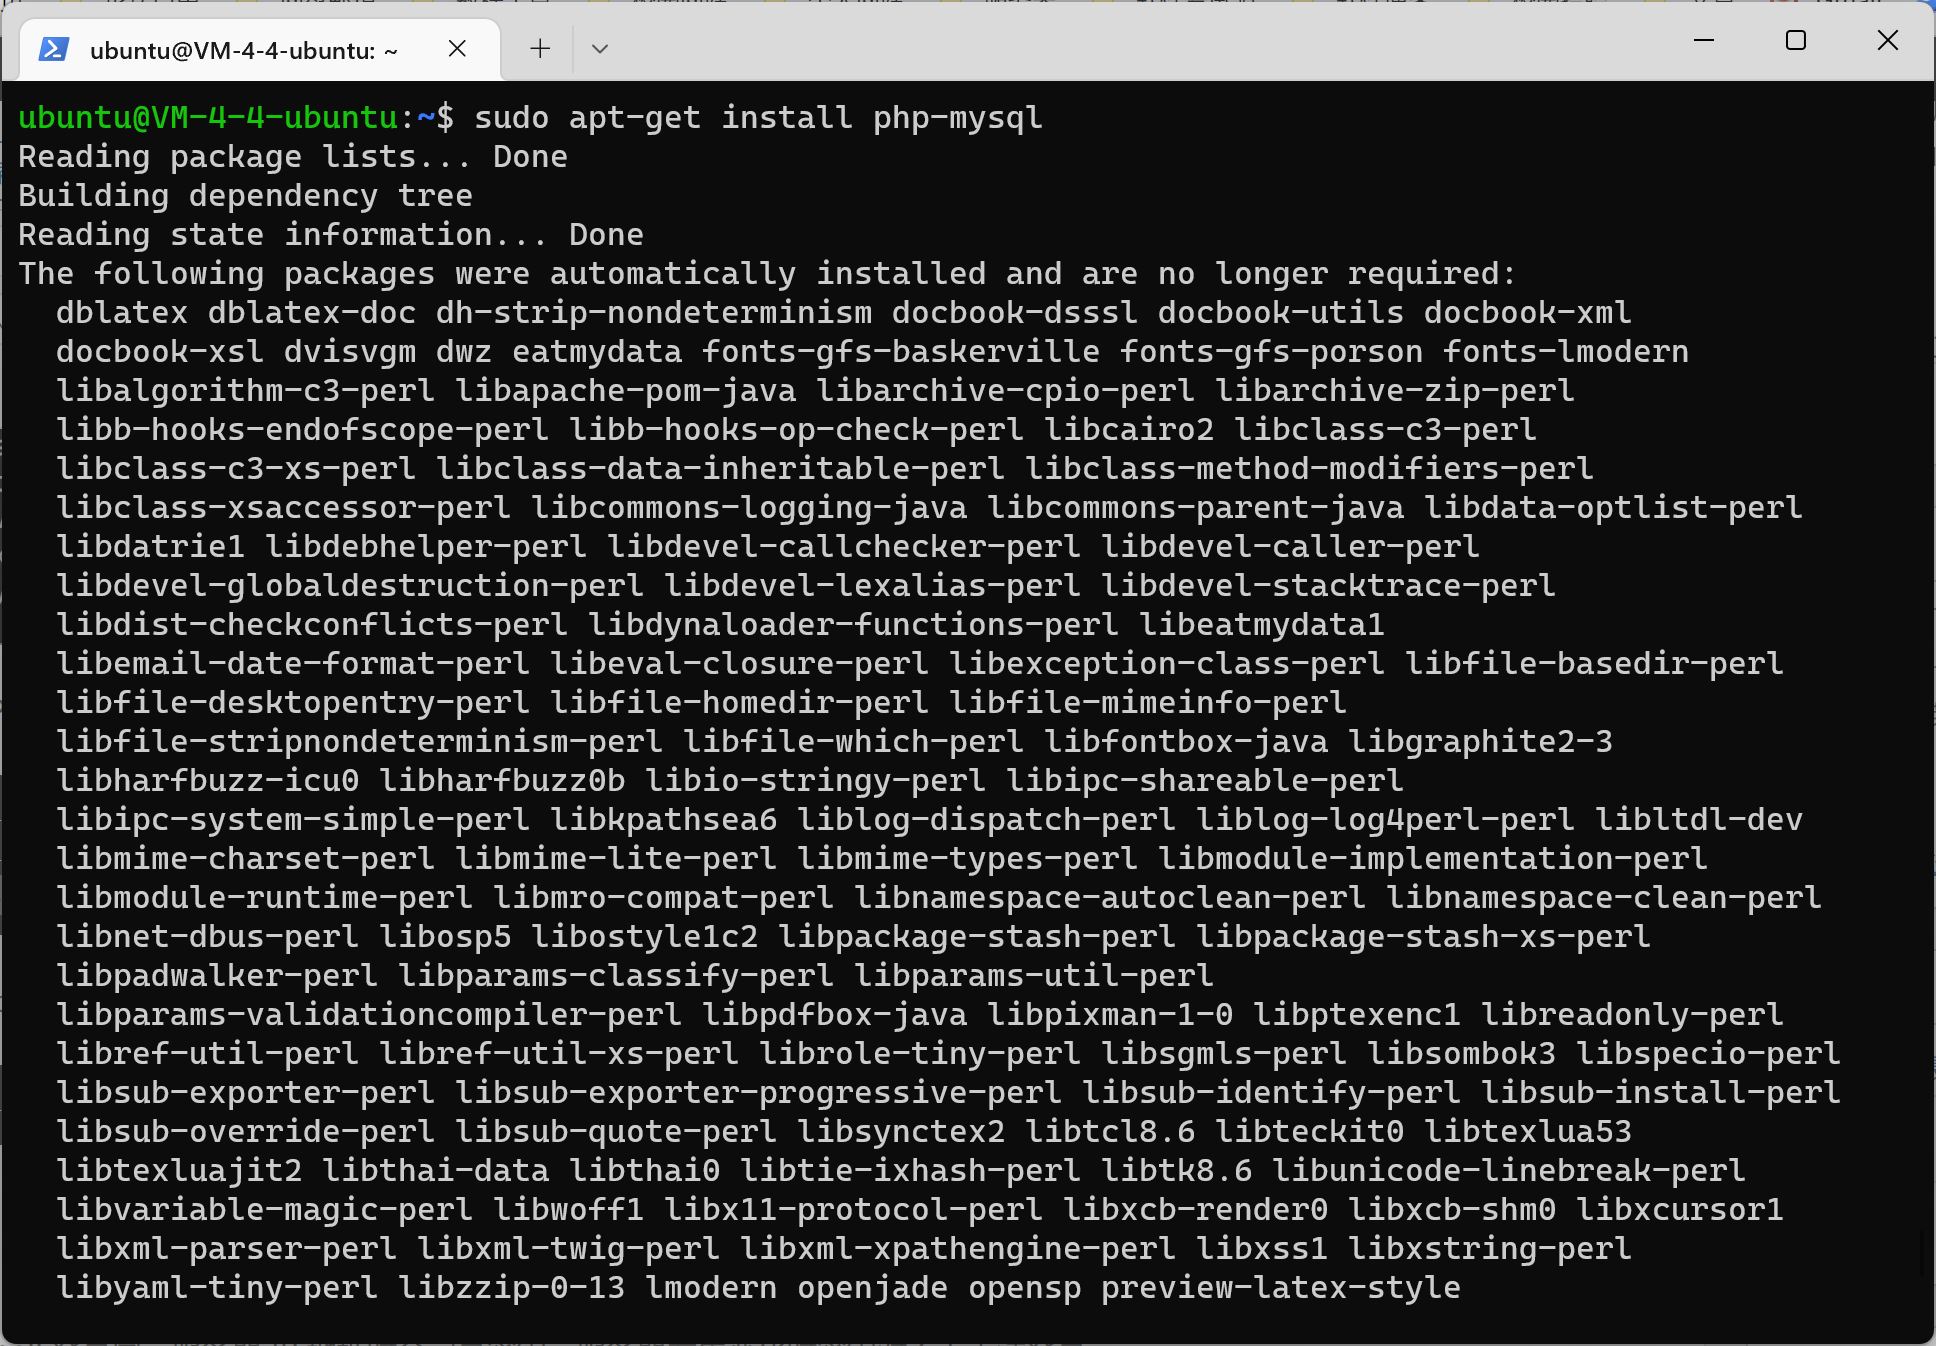
Install PHP, run three commands in sequence, and enter Y to confirm:
sudo apt-get install php sudo apt-get install libapache2-mod-php sudo apt-get install php-mysql
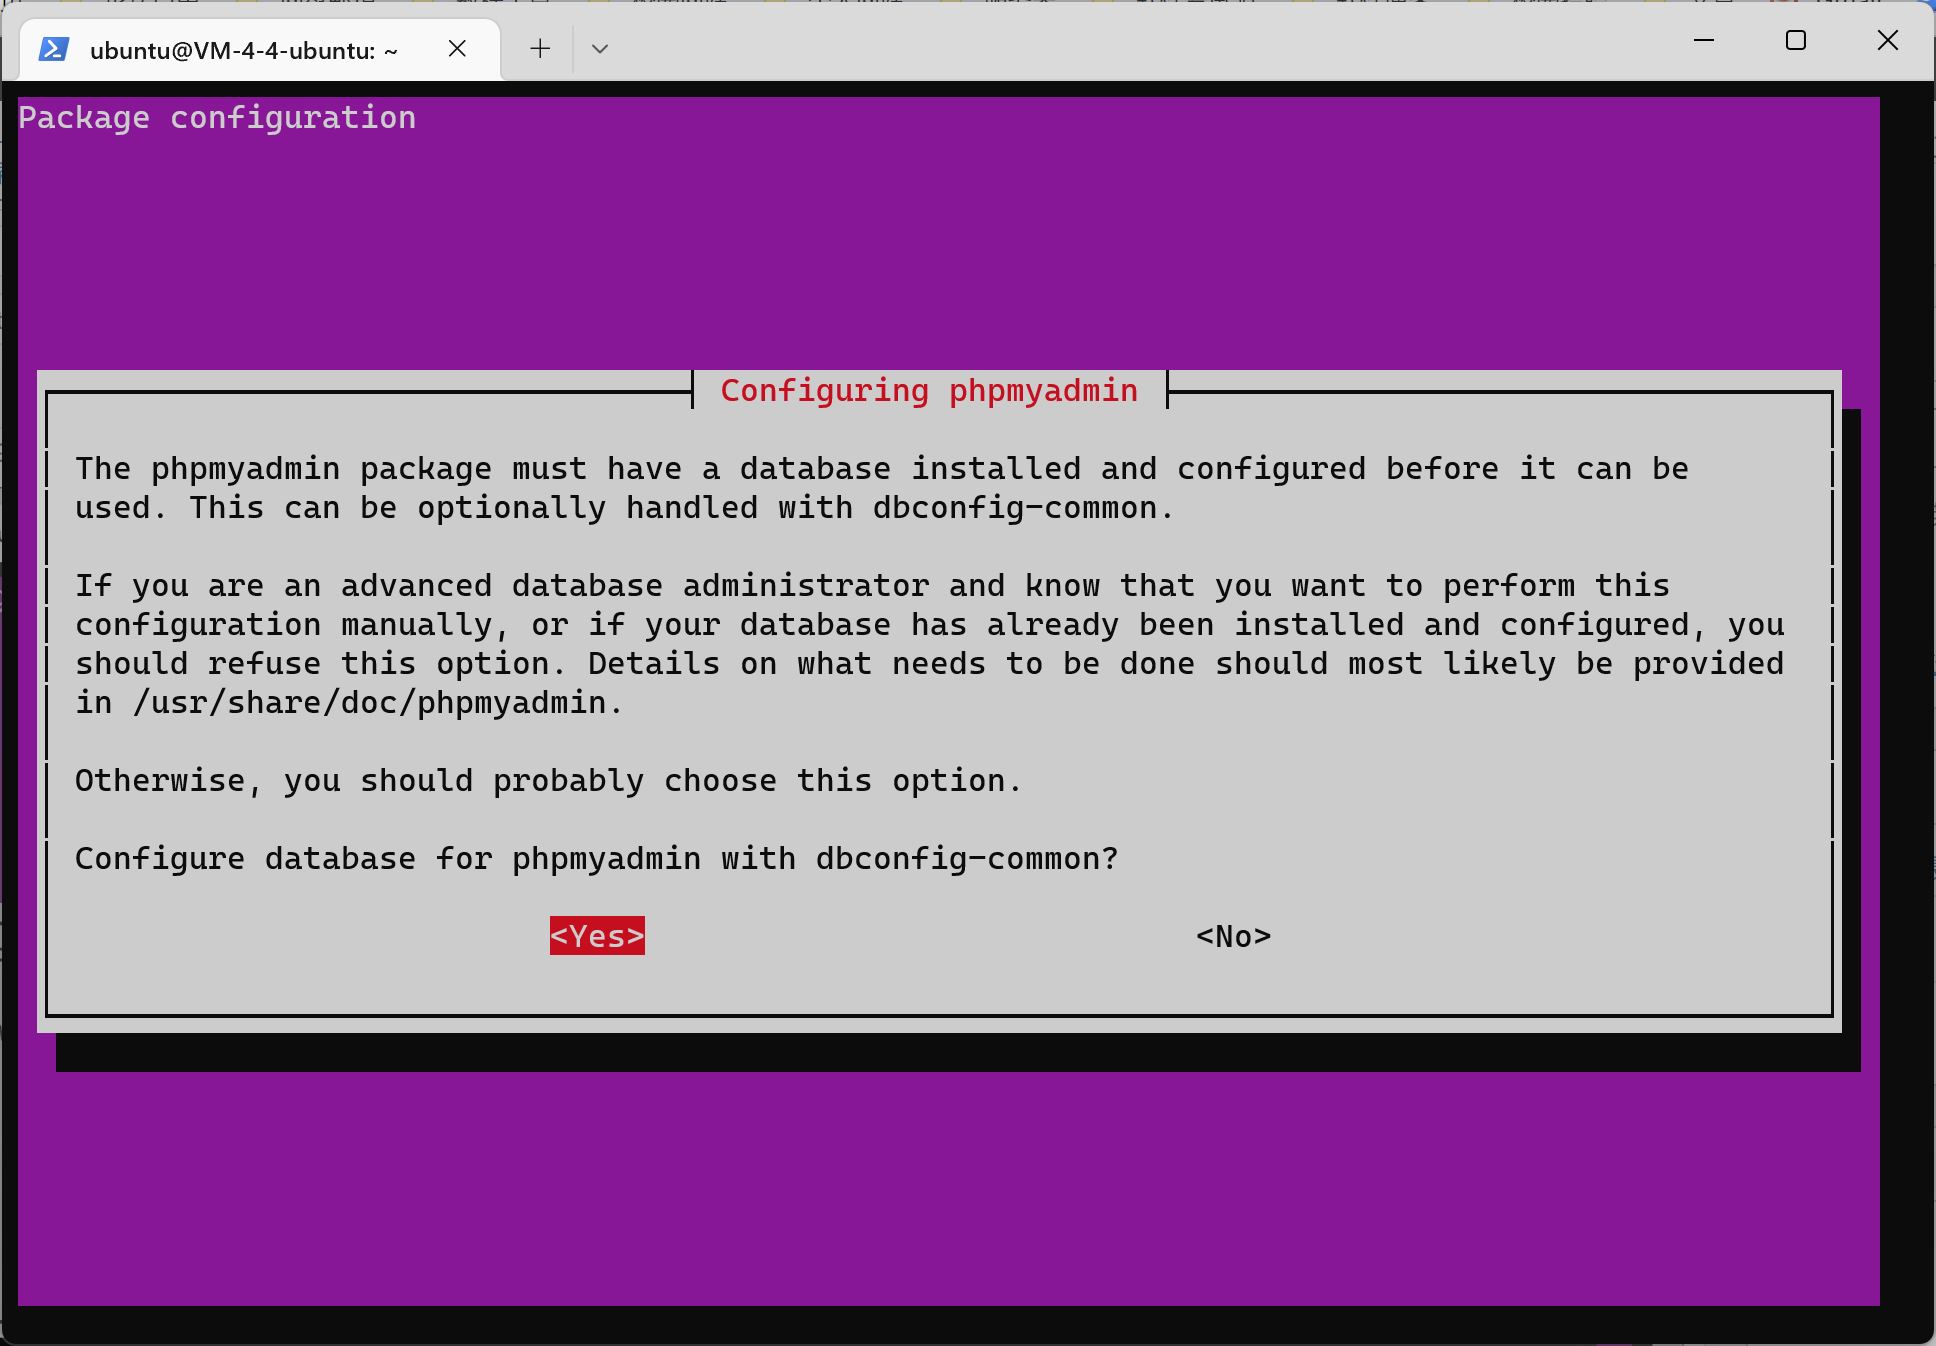
Install phpMyAdmin database management:
sudo apt-get install phpmyadmin
Enter halfway to select apache2

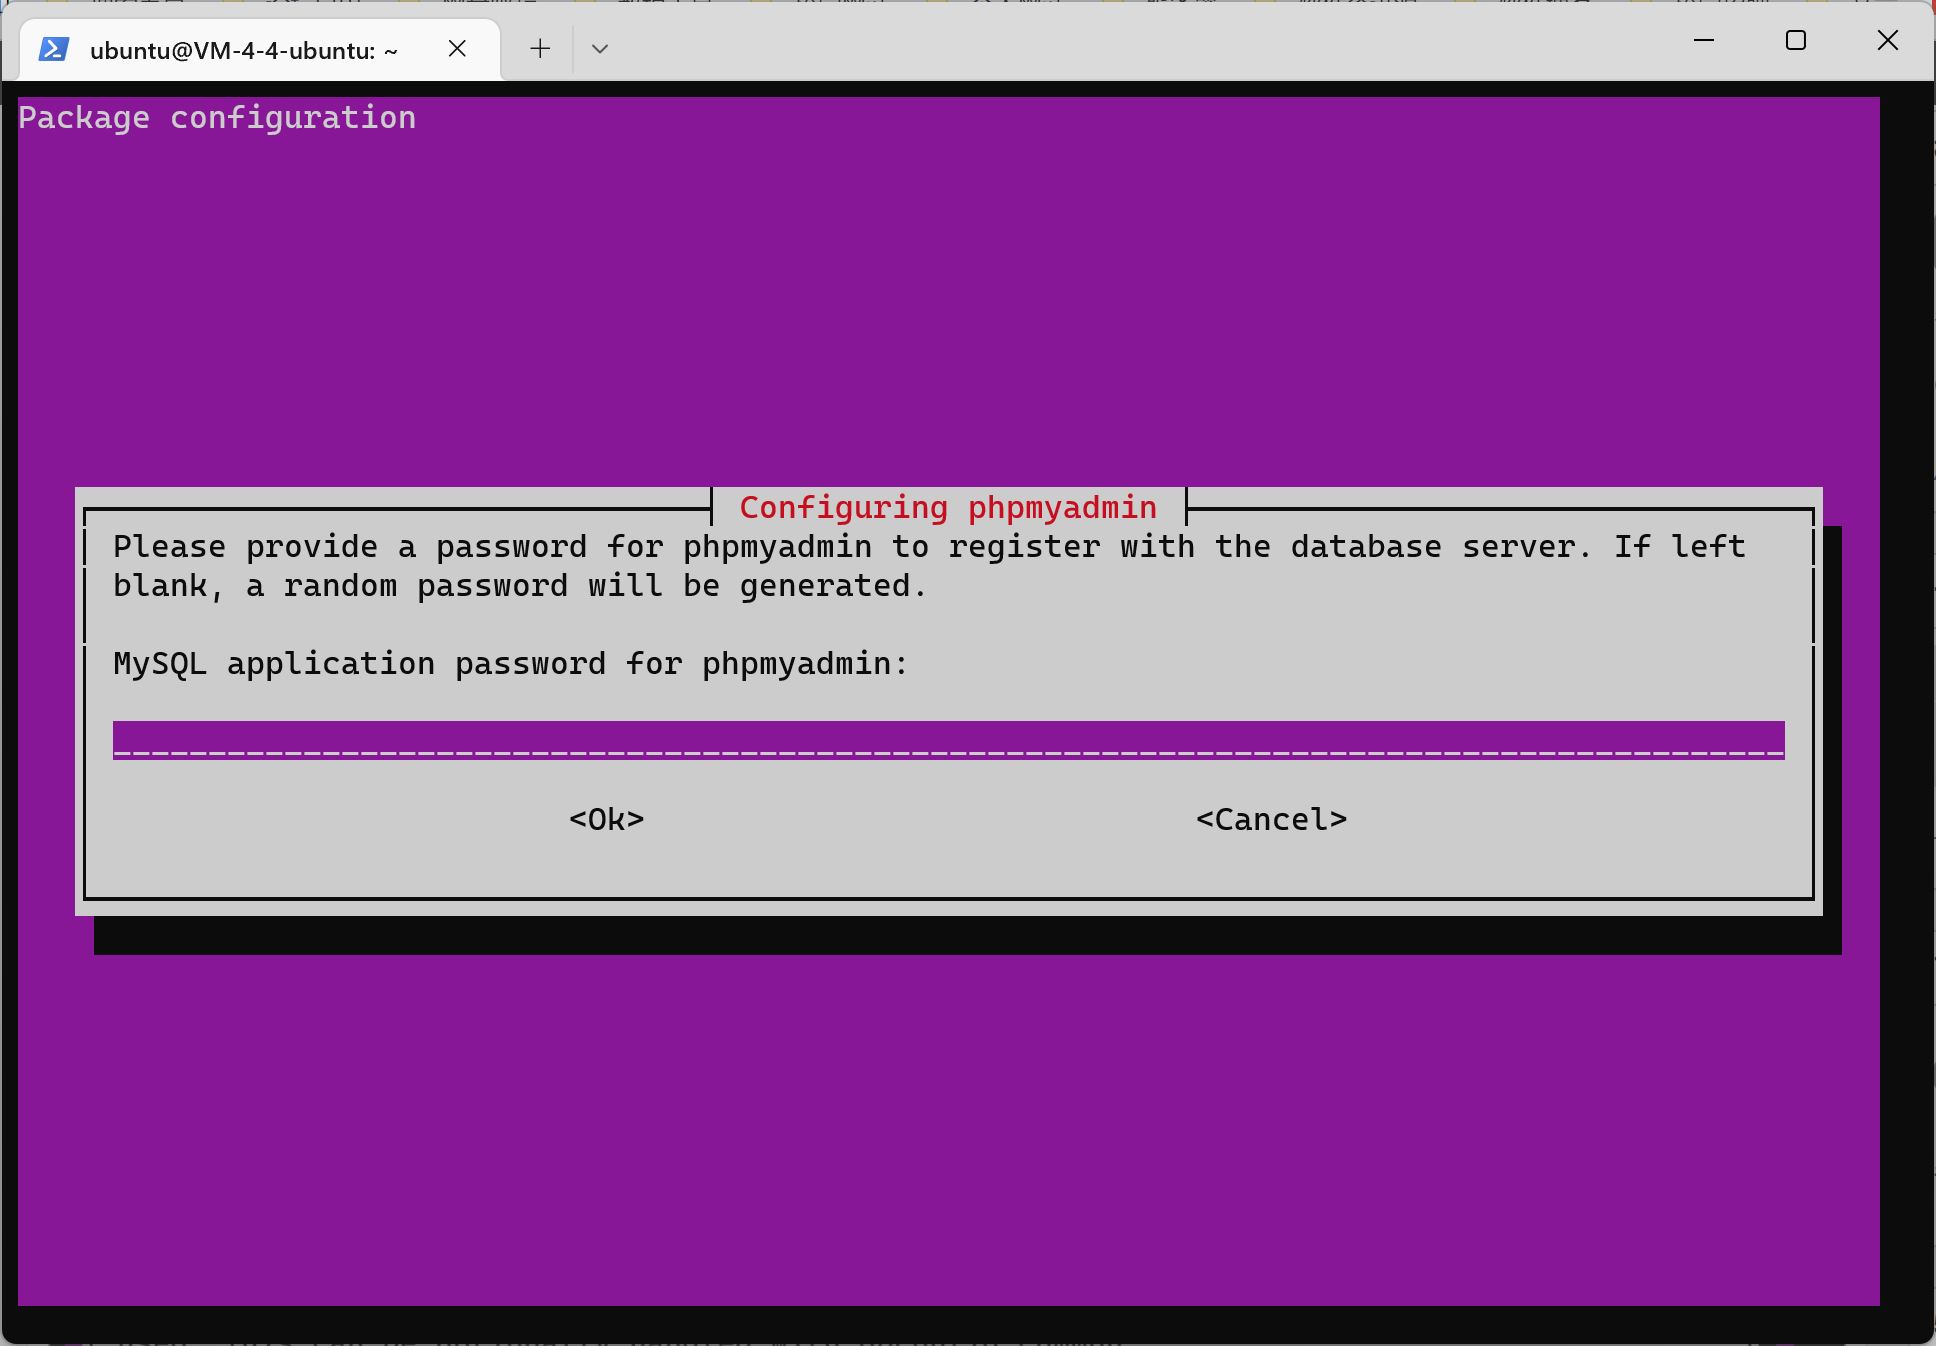
Configure phpmyadmin and press Enter to confirm:
Set administrator password:
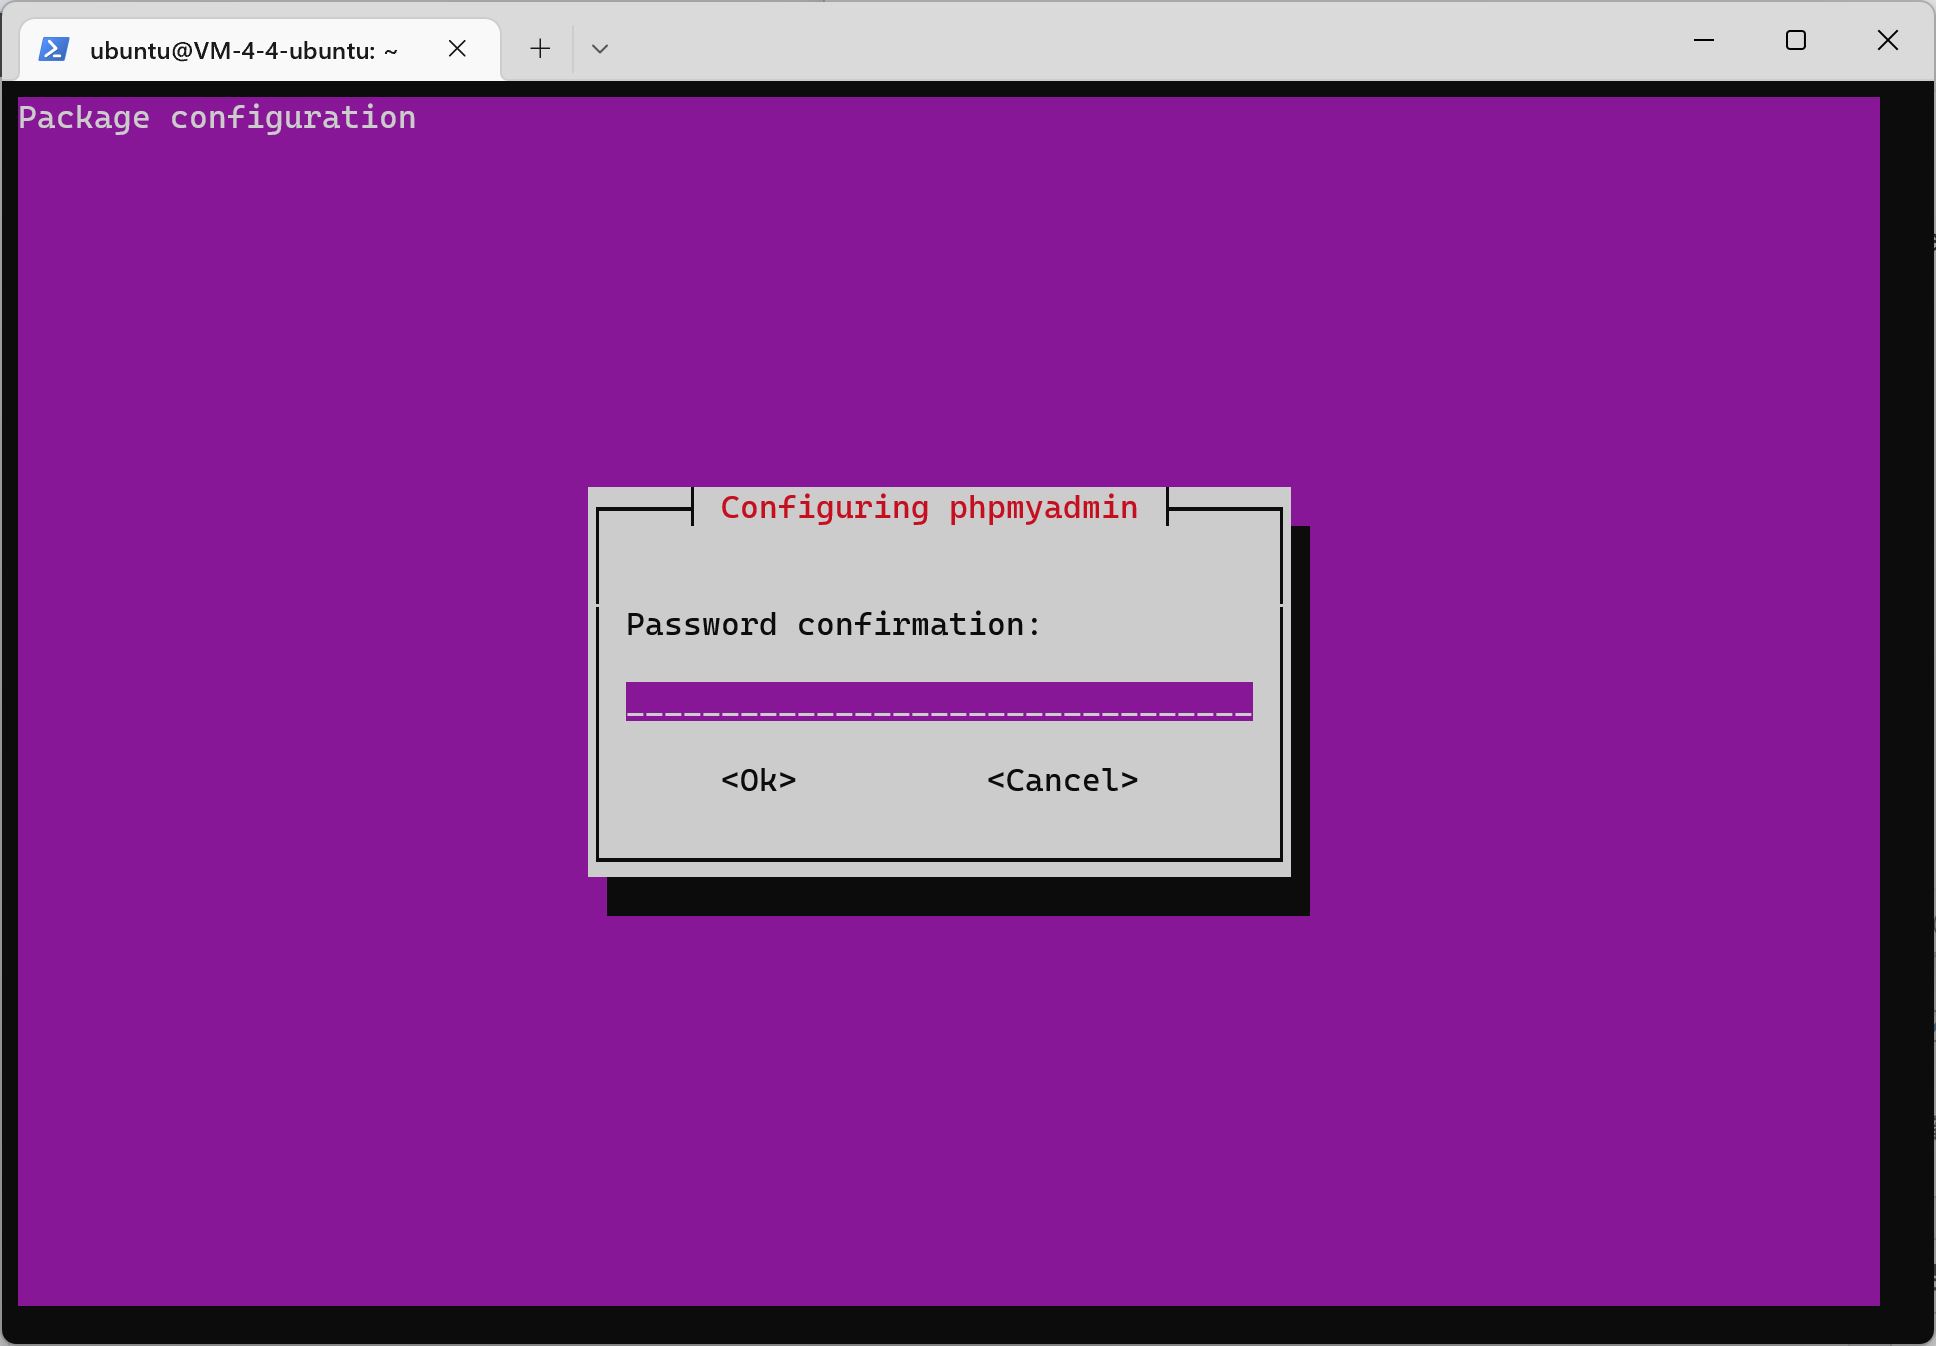
Confirm password again:
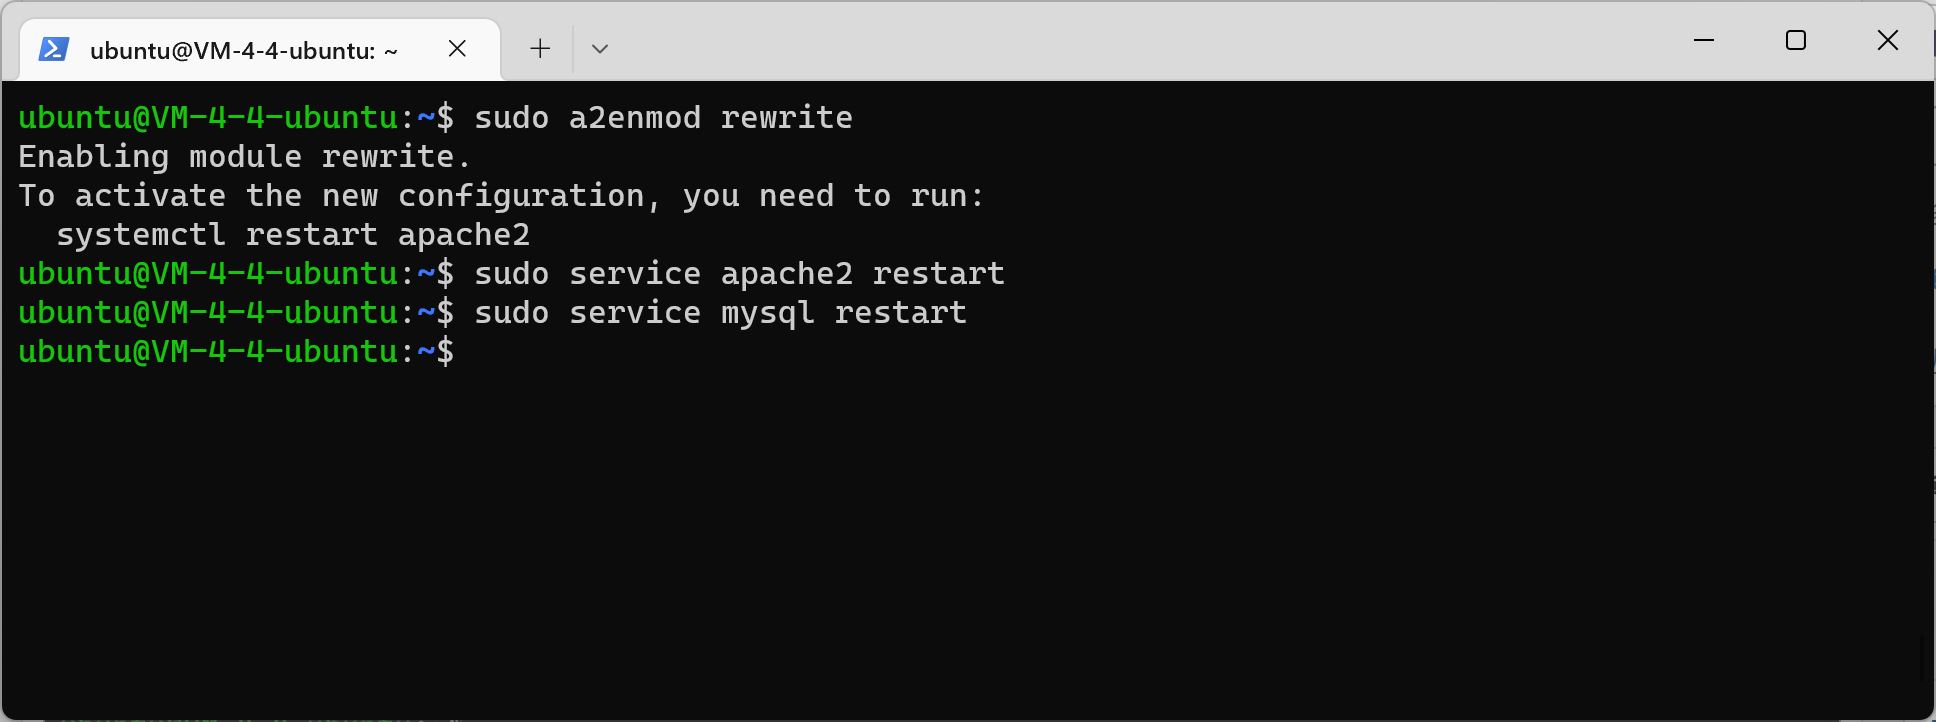
Open mod_rewrite module:
sudo a2enmod rewrite

Restart apache2 and MySQL
sudo service apache2 restart sudo service mysql restart
Configuration database:
Local database:
The newly installed MySQL database does not have a password. You need to find a way to set the database root user password and run the commands in sequence:
sudo systemctl start mysql cd /etc/mysql sudo cat /etc/mysql/debian.cnf
file /etc/mysql/debian.cnf The MySQL temporary user password is recorded
Address (host): localhost
User name: debian sys maint
Password (different for each server): nM2S9cTzlEvUZZ9J

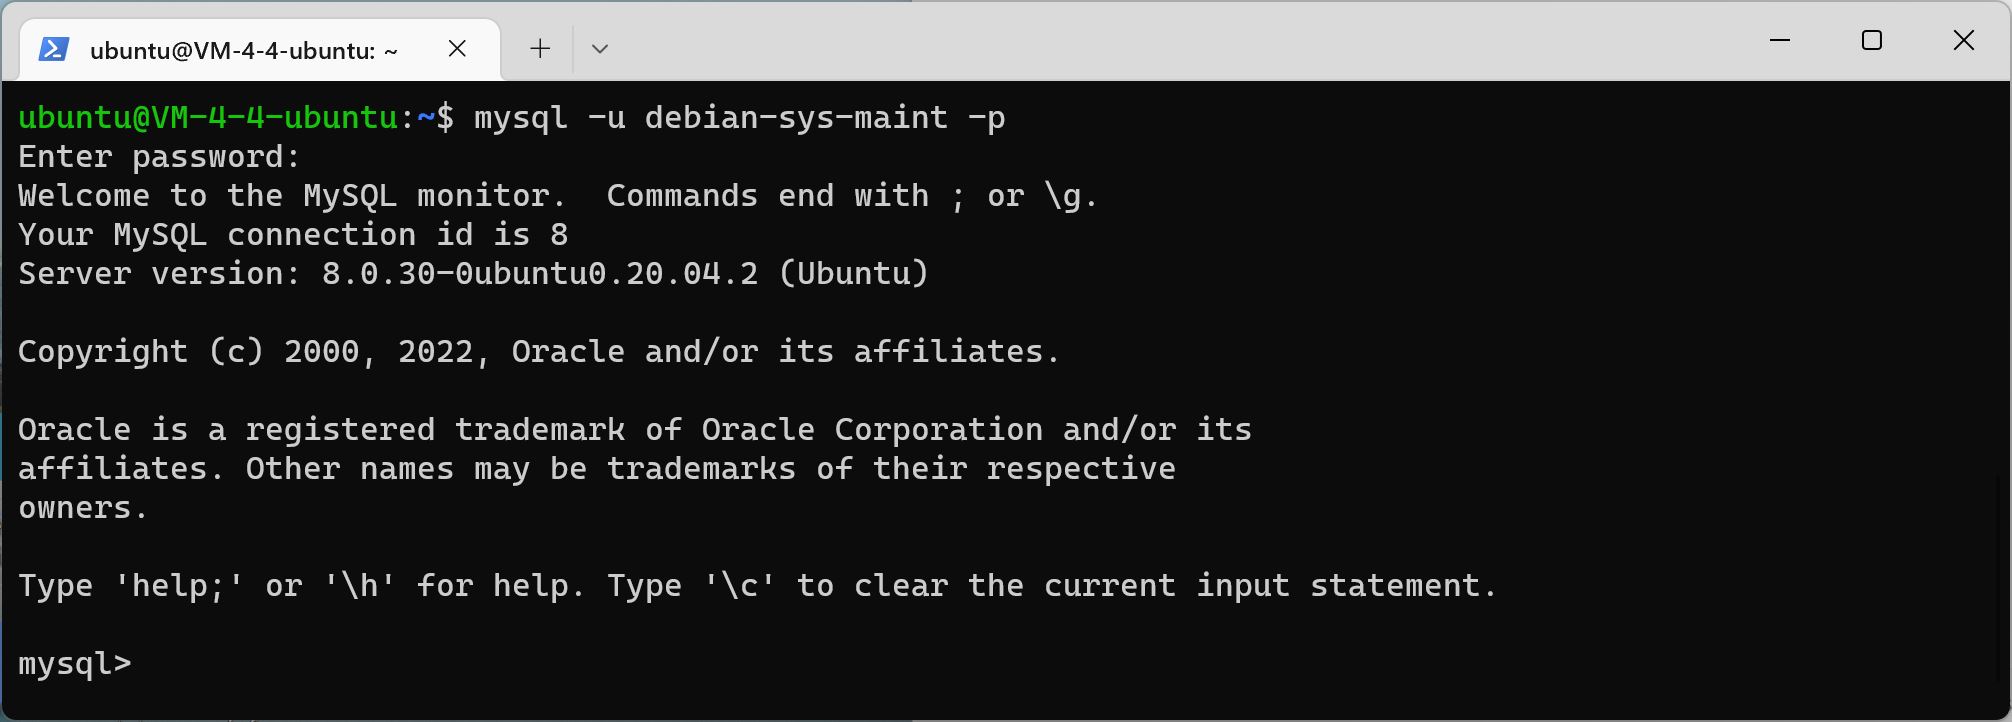
Let's log in and try:
mysql -u debian-sys-maint -p
Successful login:
Next, set the root password of MySQL database and run it in the MySQL command line
use mysql; select user,plugin from user; update user set plugin='mysql_native_password' where user='root';
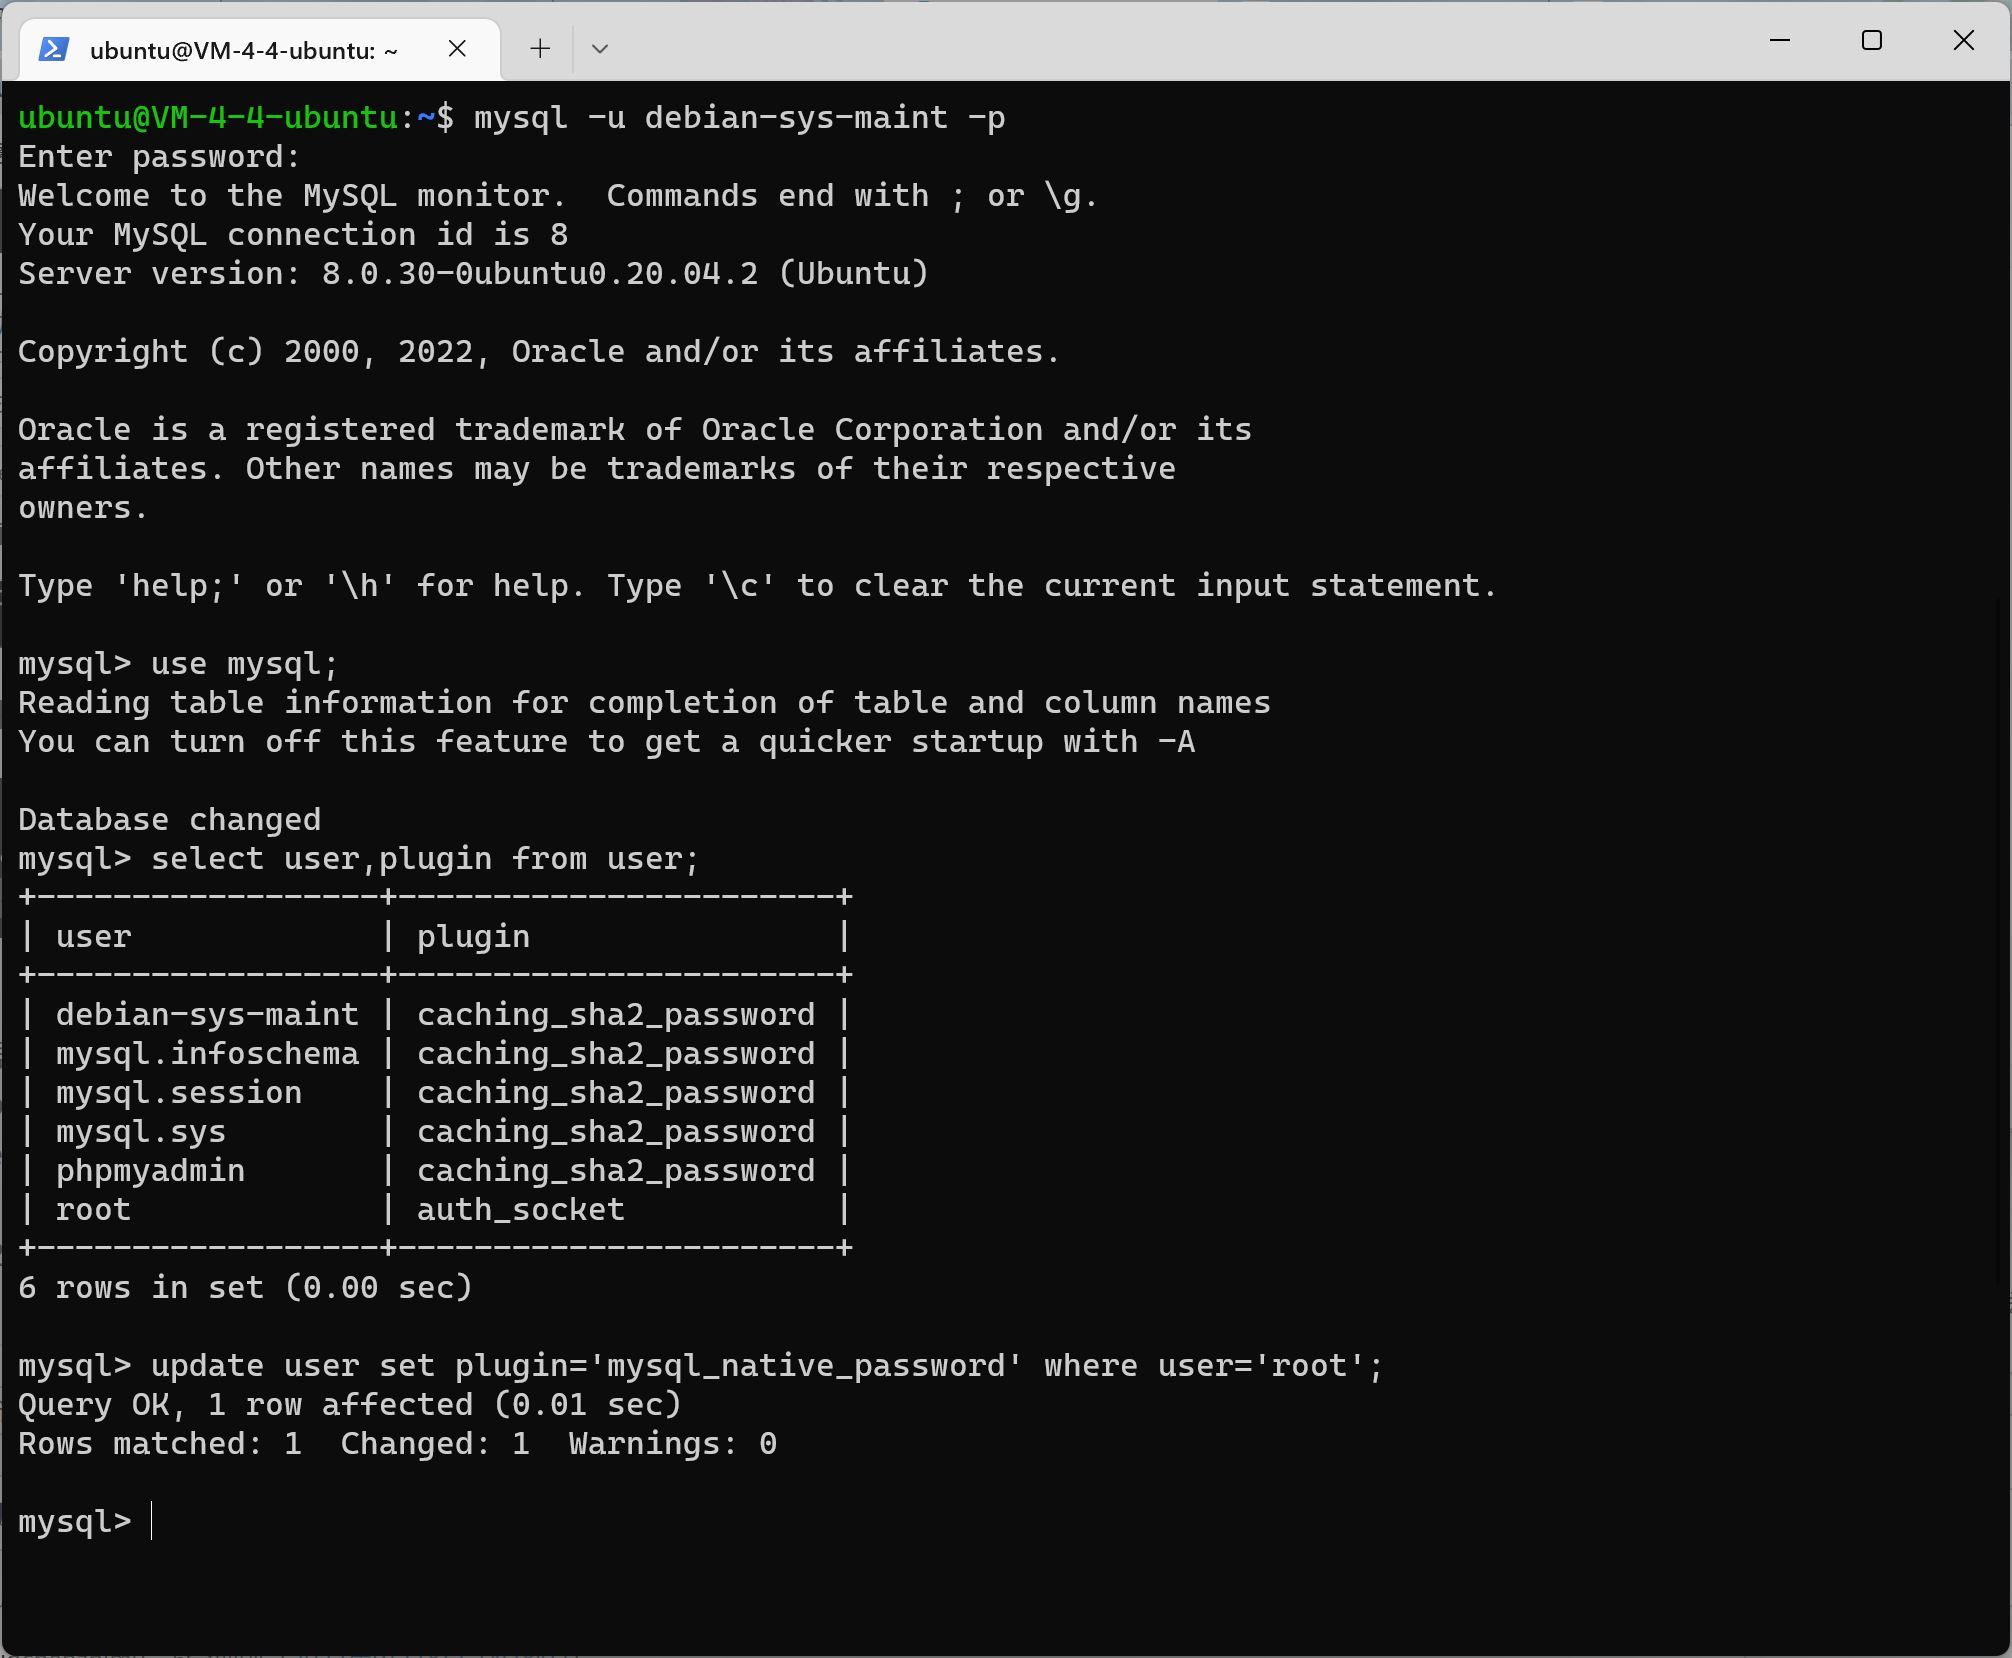
Then run, and see that the plugin value has changed
select user,plugin from user; flush privileges;

Let's change the root password:
alter user 'root'@'localhost' identified by 'your_password'; flush privileges;
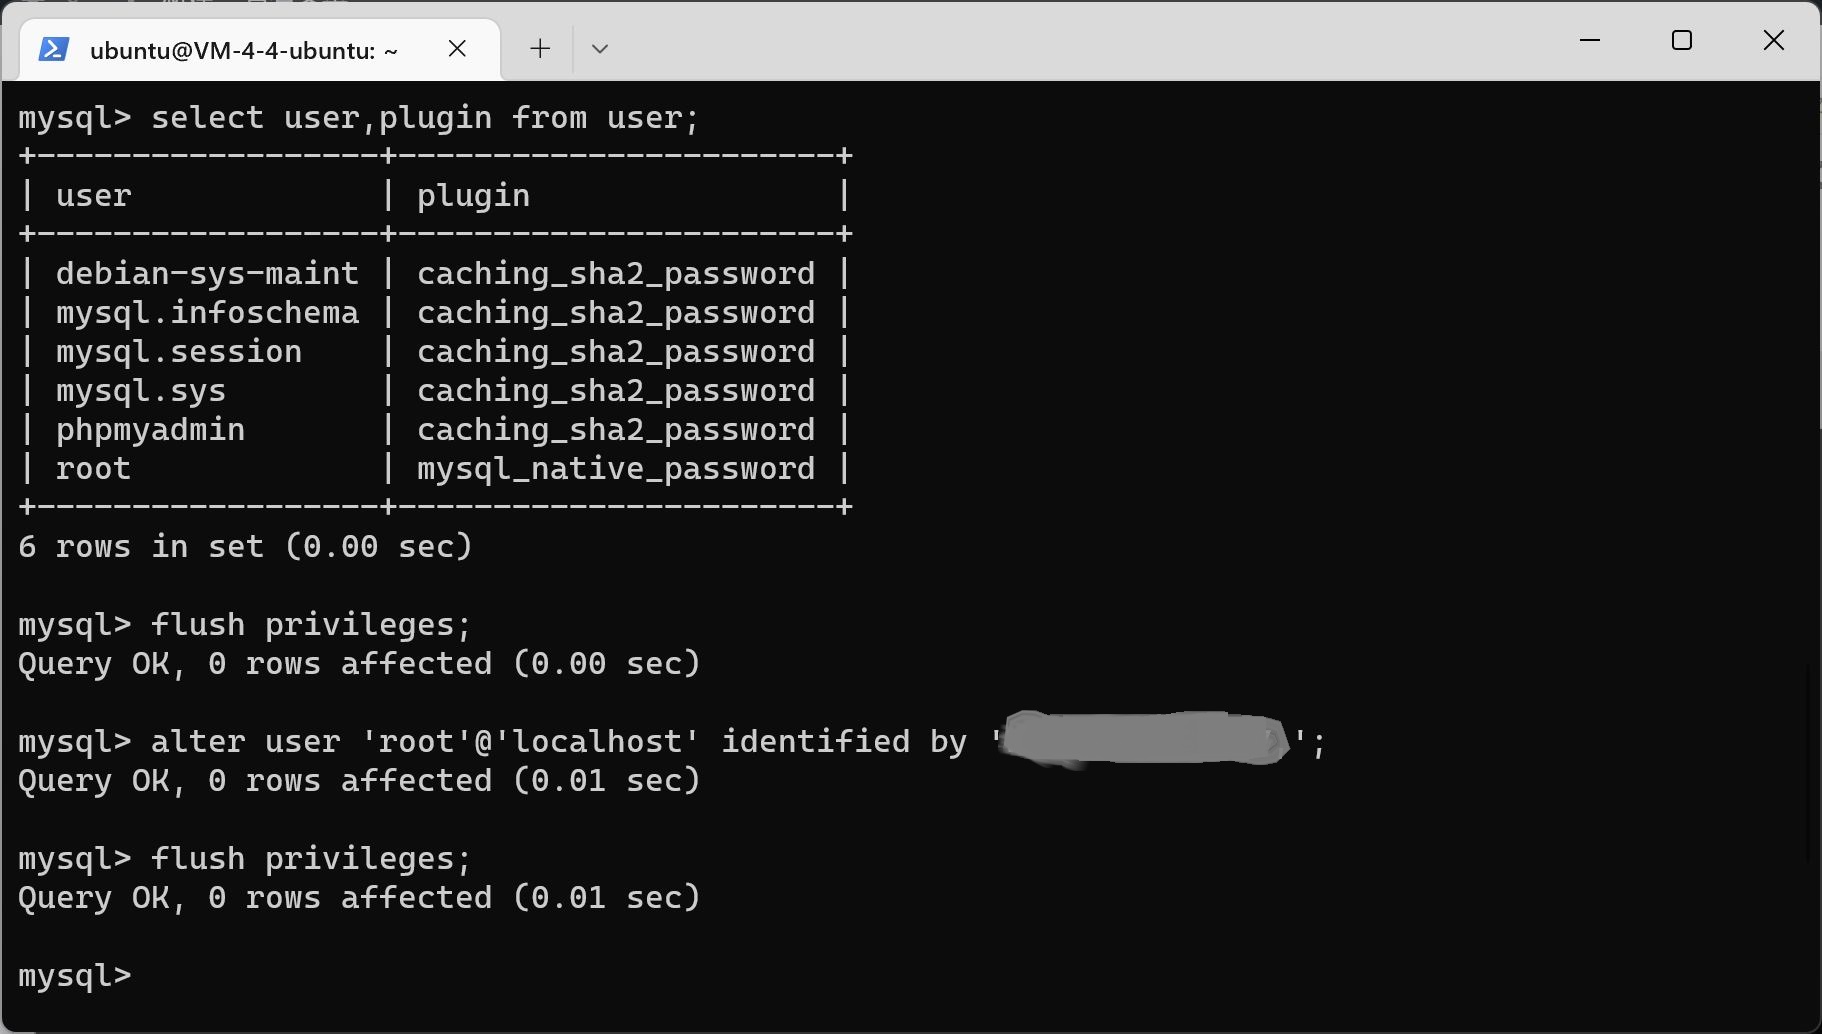
Exit Database
 Try to log in to MySQL with password:
mysql -u root -p use mysql show databases;
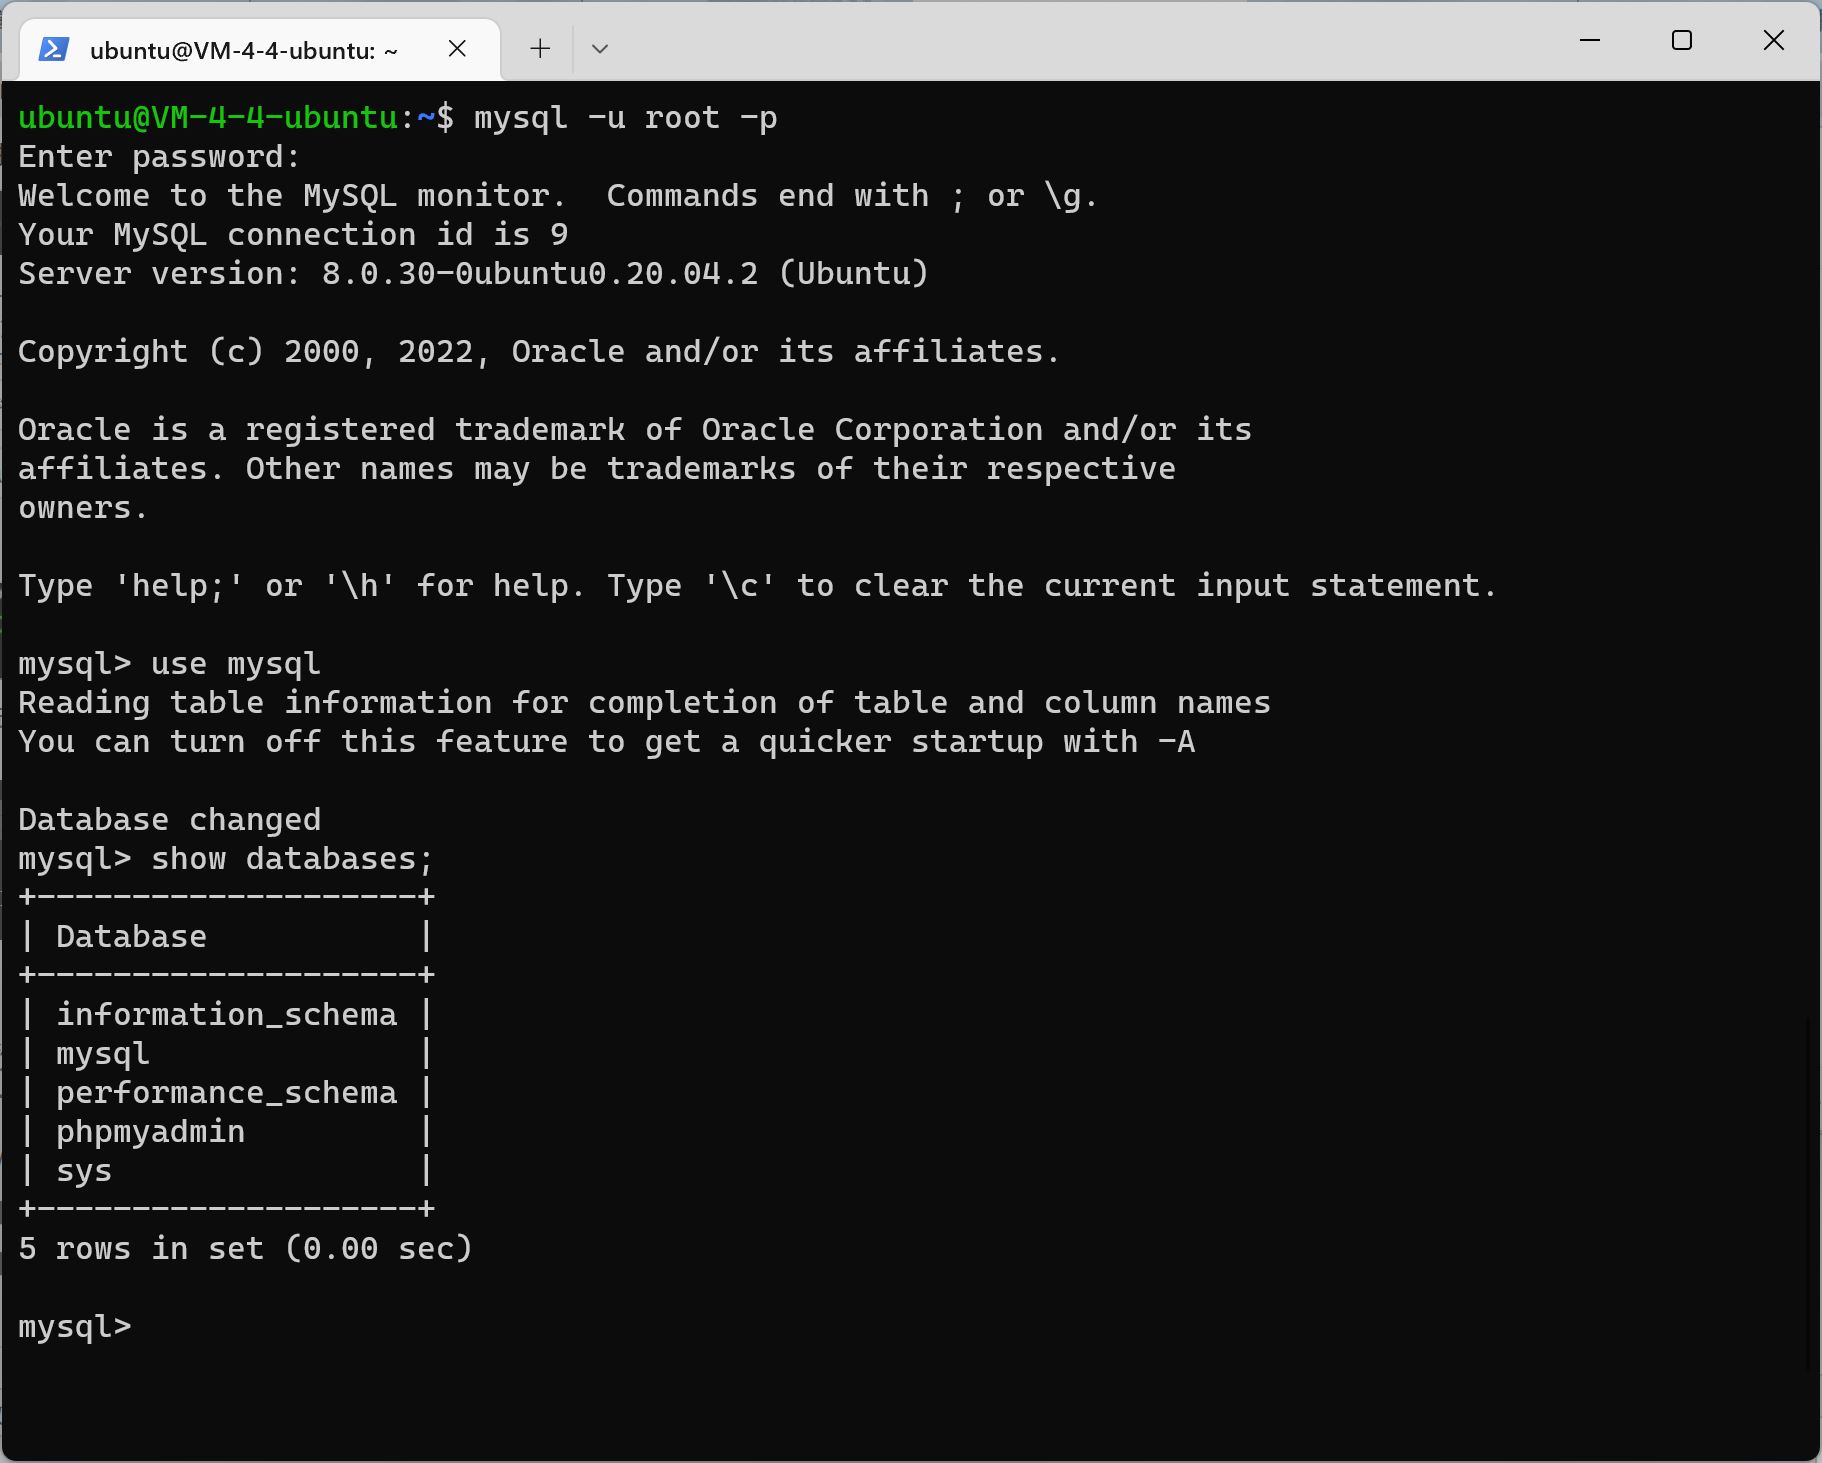
Create a database blog_db:
create database blog_db; show databases;
Because our database is version 8.0 or above, many blogs provide input methods for MySQL 5.7, which are outdated. Therefore, we can use MySQL 8.0 or above syntax directly here.
First create the user, and change the user and password to your own:
create user 'user'@"localhost" IDENTIFIED BY 'Password';
Then perform the following operations respectively. Blog_db and user are changed to your own:
#Authorization grant all on blog_db.* to "user"@"localhost" with grant option; #Make configuration effective flush privileges; #Show all users SELECT DISTINCT User FROM mysql.user; #Exit MySQL. exit;
Cloud database:
Find the intranet address of MySQL, change the localhost of the above code to the intranet IP, and you can perform database management and database user maintenance through the background of Tencent Cloud.

Then download and install WordPress:
WordPress download address: https://wordpress.org/download/releases/
Chinese download address of WordPress: https://cn.wordpress.org/download/releases/
curl -O https://wordpress.org/wordpress-5.7.7.tar.gz tar xzvf wordpress-5.7.7.tar.gz
WordPress Chinese version installation command:
curl -O https://cn.wordpress.org/wordpress-5.7.7-zh_CN.tar.gz tar xzvf wordpress-5.7.7-zh_CN.tar.gz

Since the/var/www/html/folder is accessed by default, we need to copy the wordpress folder to the/var/www/html/folder
sudo mv wordpress /var/www/html/
Set permissions: modify/var/www/html/directory permissions:
sudo chmod -R 777 /var/www/html/
Then some file operations:
#Delete downloaded files sudo rm -r wordpress-5.7.7-zh_CN.tar.gz #Delete the default Apache 2 home page file sudo rm -r /var/www/html/index.html #Copy WordPress home page file sudo cp /var/www/html/wordpress/index.php /var/www/html/
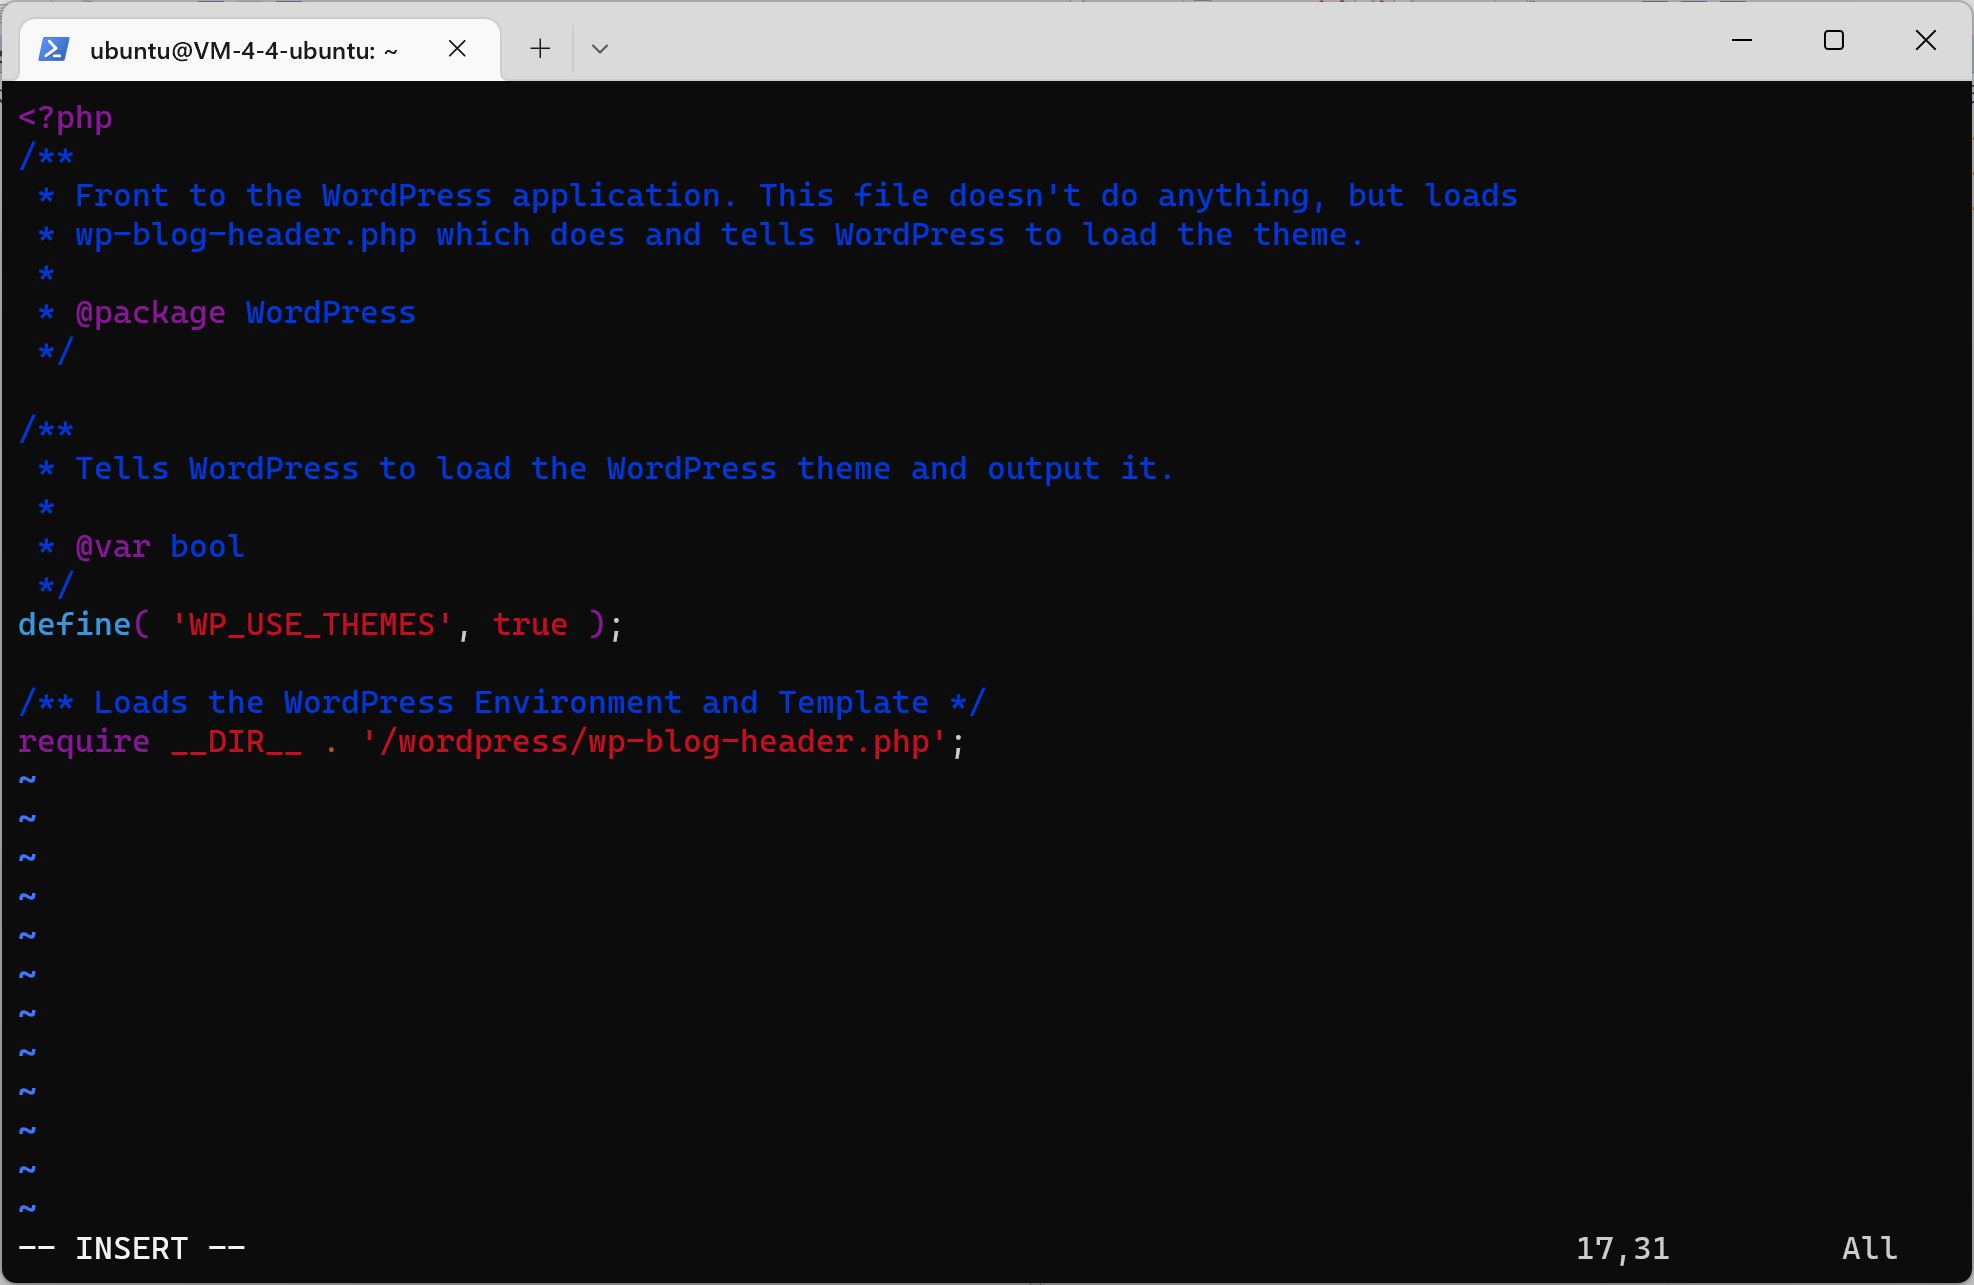
Modify Home Page File
sudo vi /var/www/html/index.php
Change/wp blog header. php to/wordpress/wp blog header. php:
Click the keyboard letter i to enter vim editing mode
Click esc to exit editing mode, and finally type: wq to save and exit
Restart the Apache service:
sudo service apache2 restart
Restart the server:
sudo reboot
Open the public IP address:
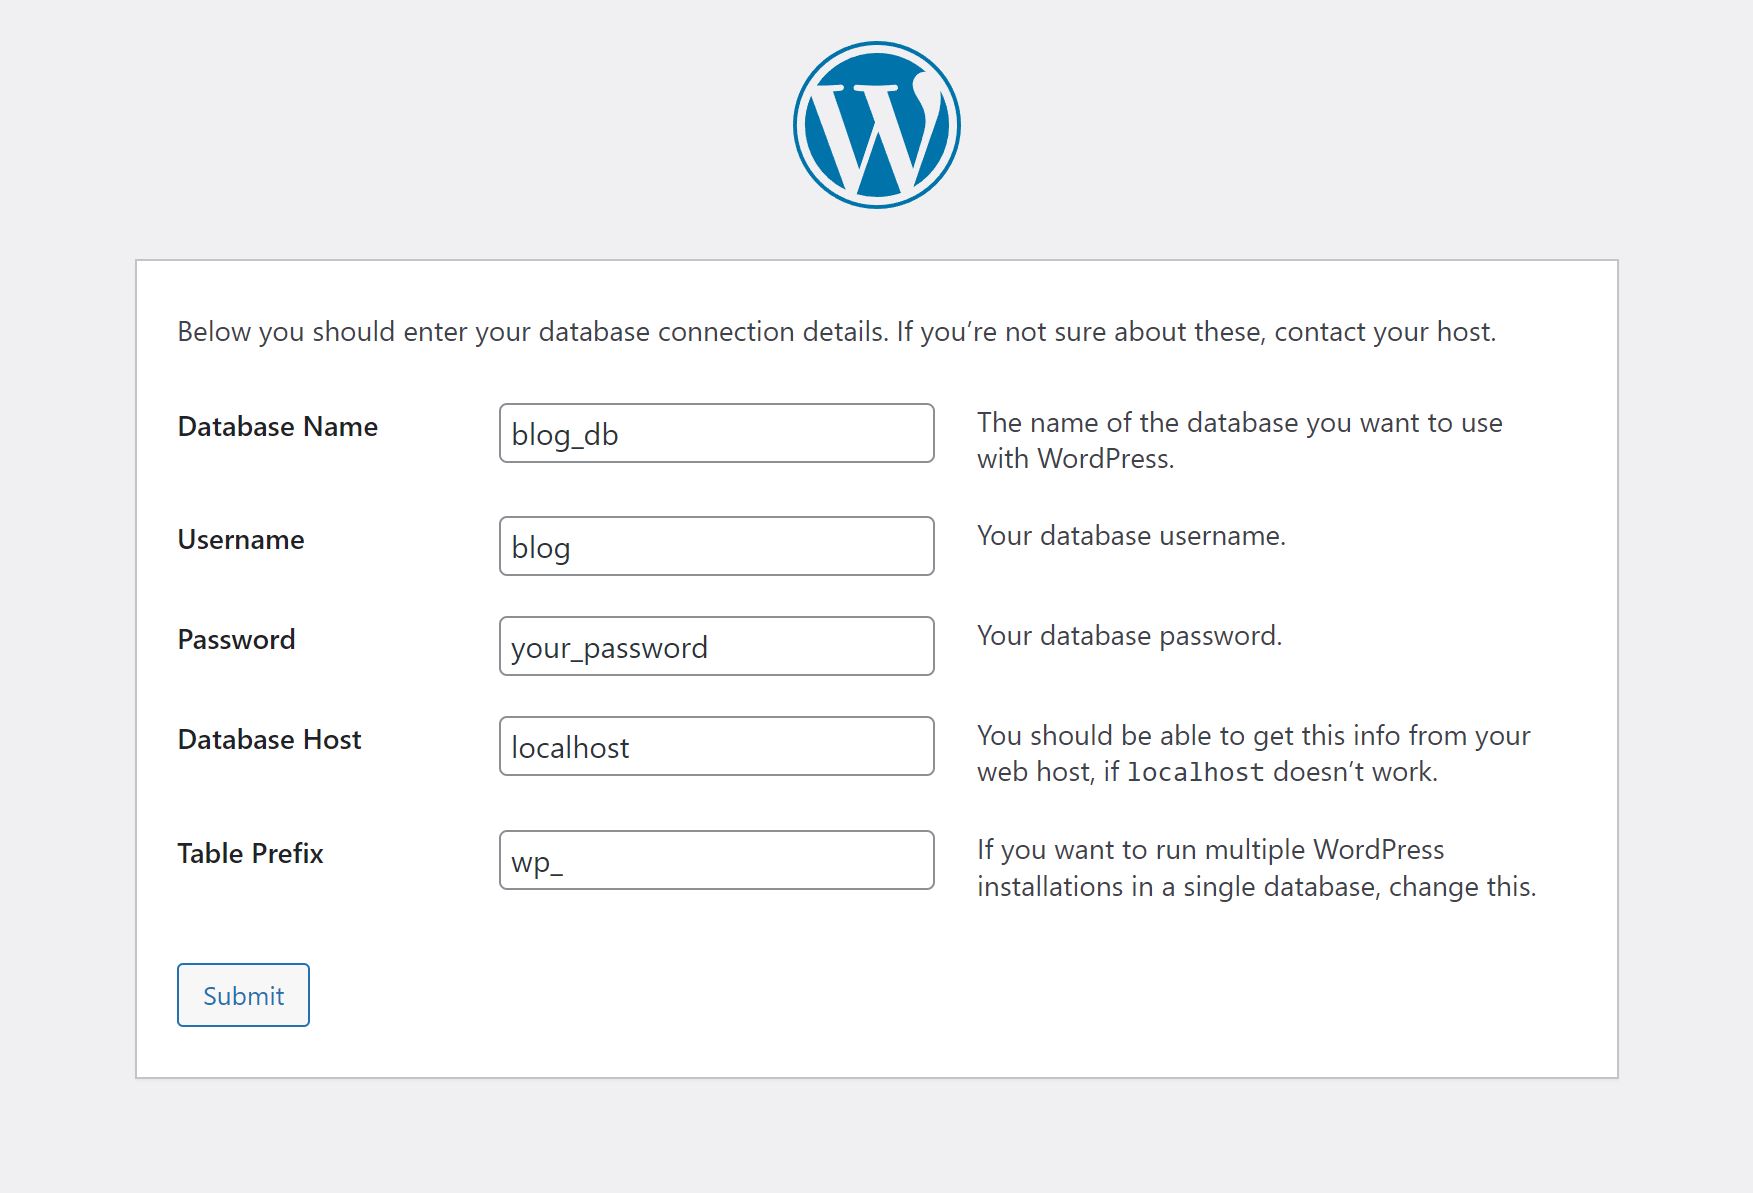
Jump to the installation directory: http://xx.xx.xx.xx/wordpress/wp-admin/setup-config.php , click Let's go! Button

Fill in the database just created, Database Name Database name, Username User name, Password User password, Database Host database address (localhost for local), and Table Prefix data table prefix.
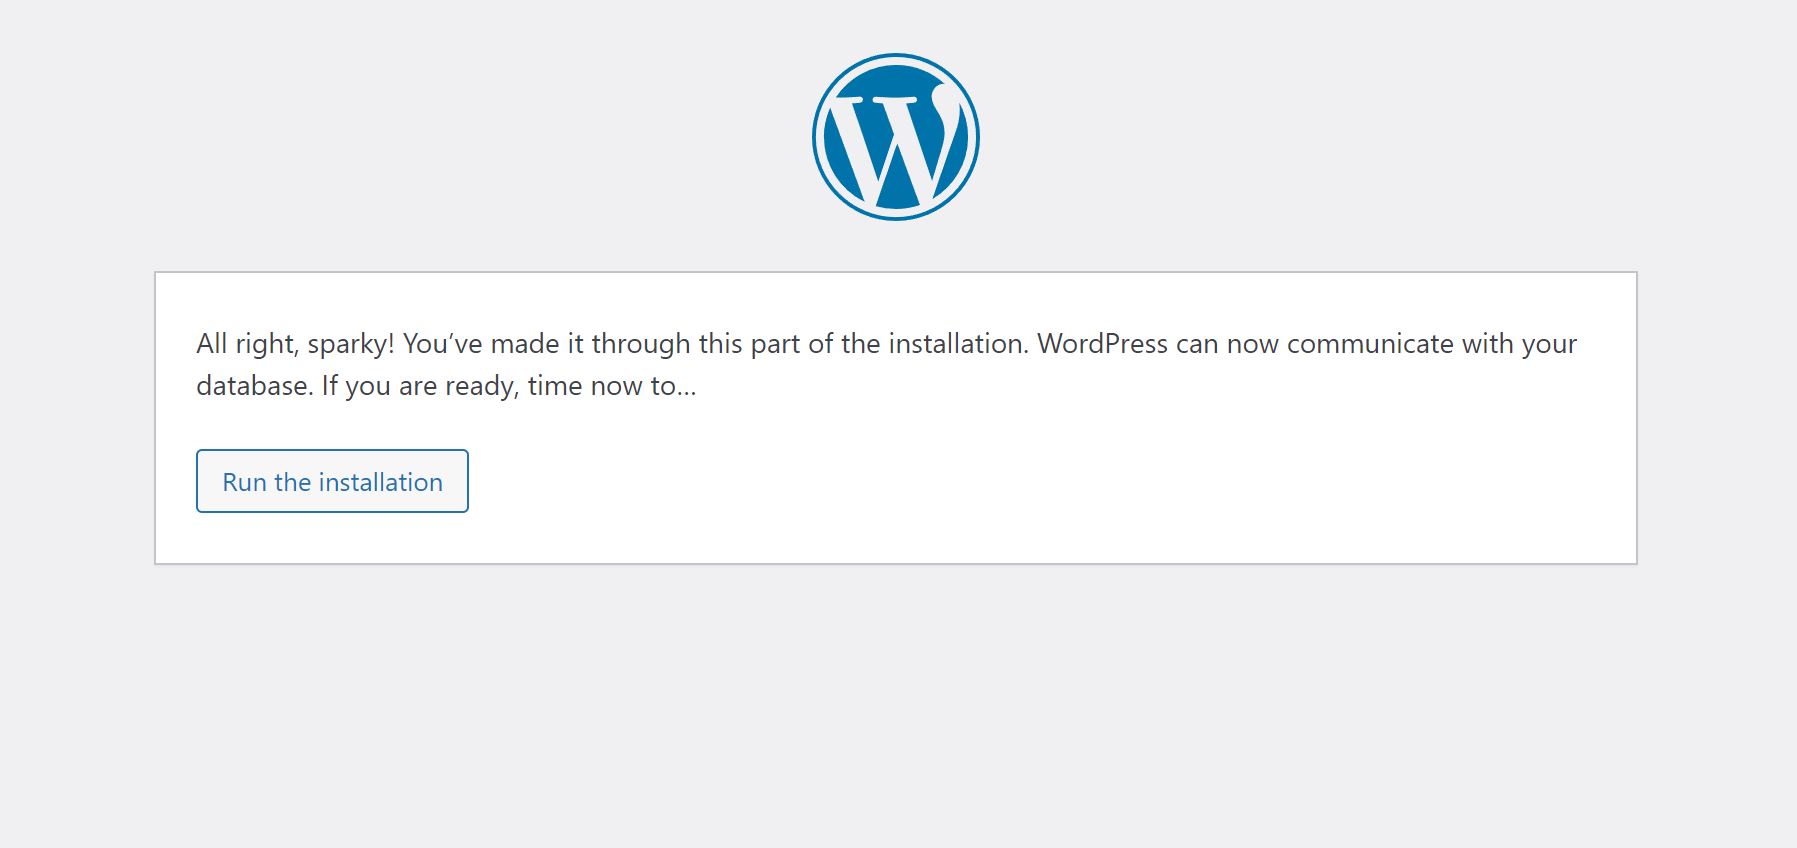
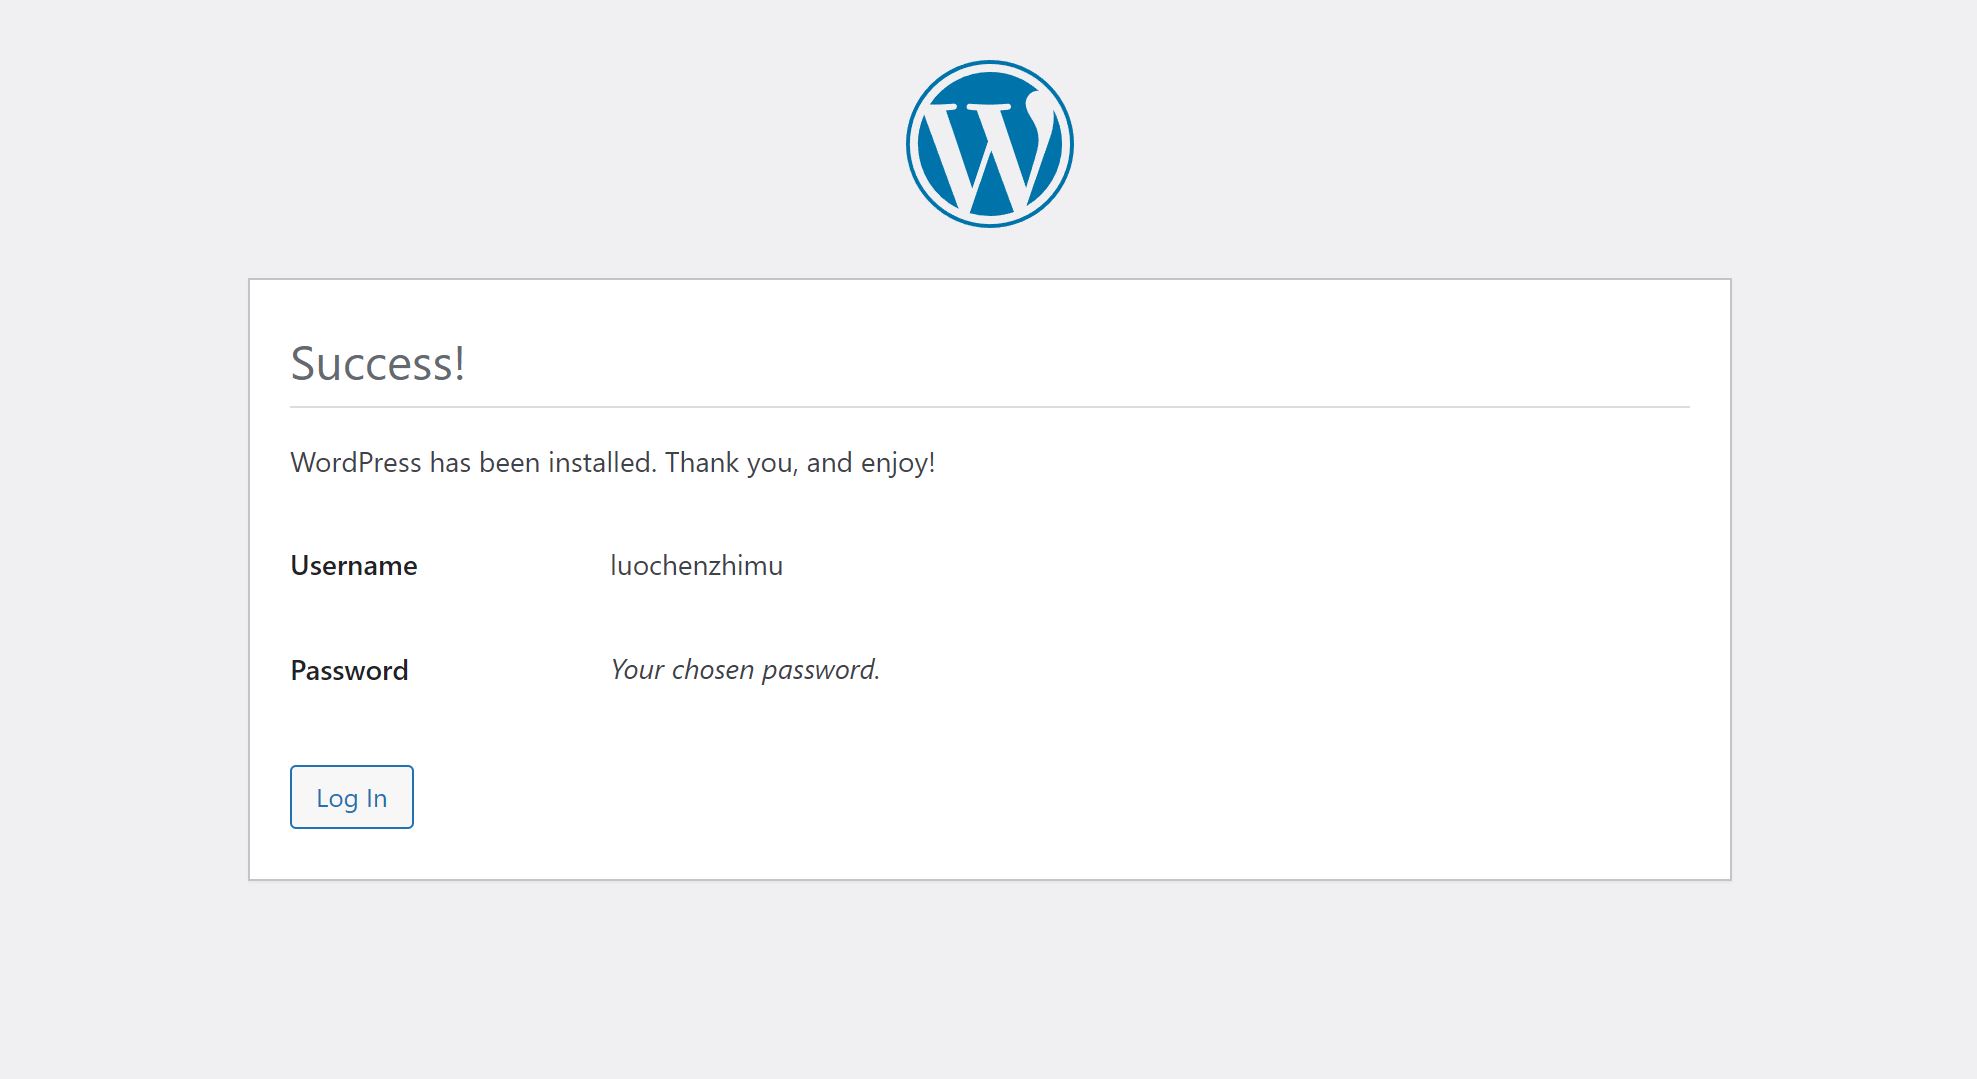
Ready to start the journey!
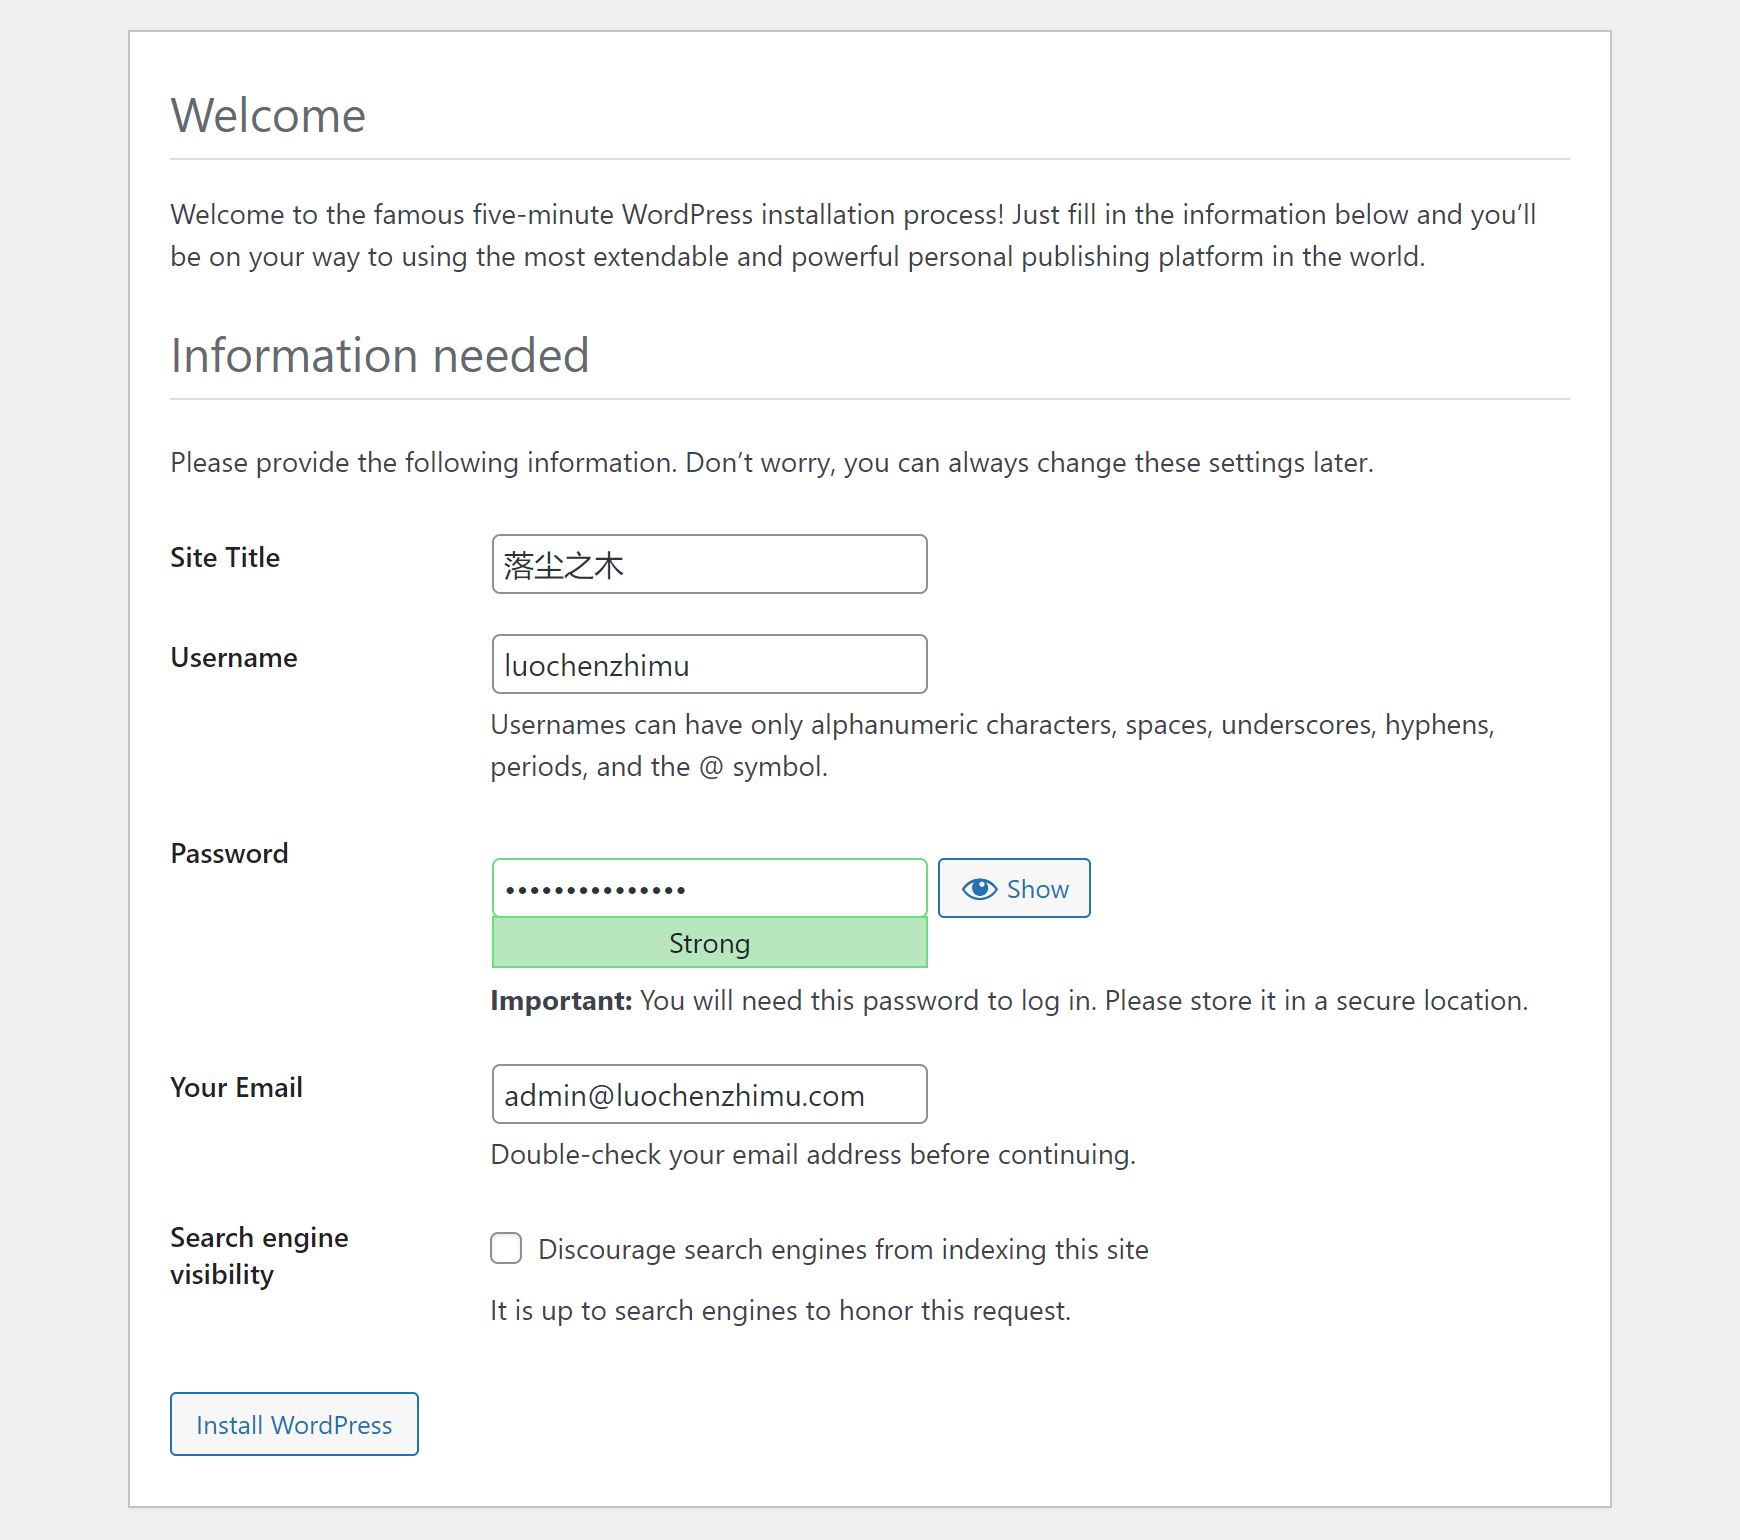
Create WordPress administrator users, including site name, user name, password and email. Do not check Search engine visibility:
Installation succeeded!
Need to fill in FTP to update WordPress? Let's solve this small problem:
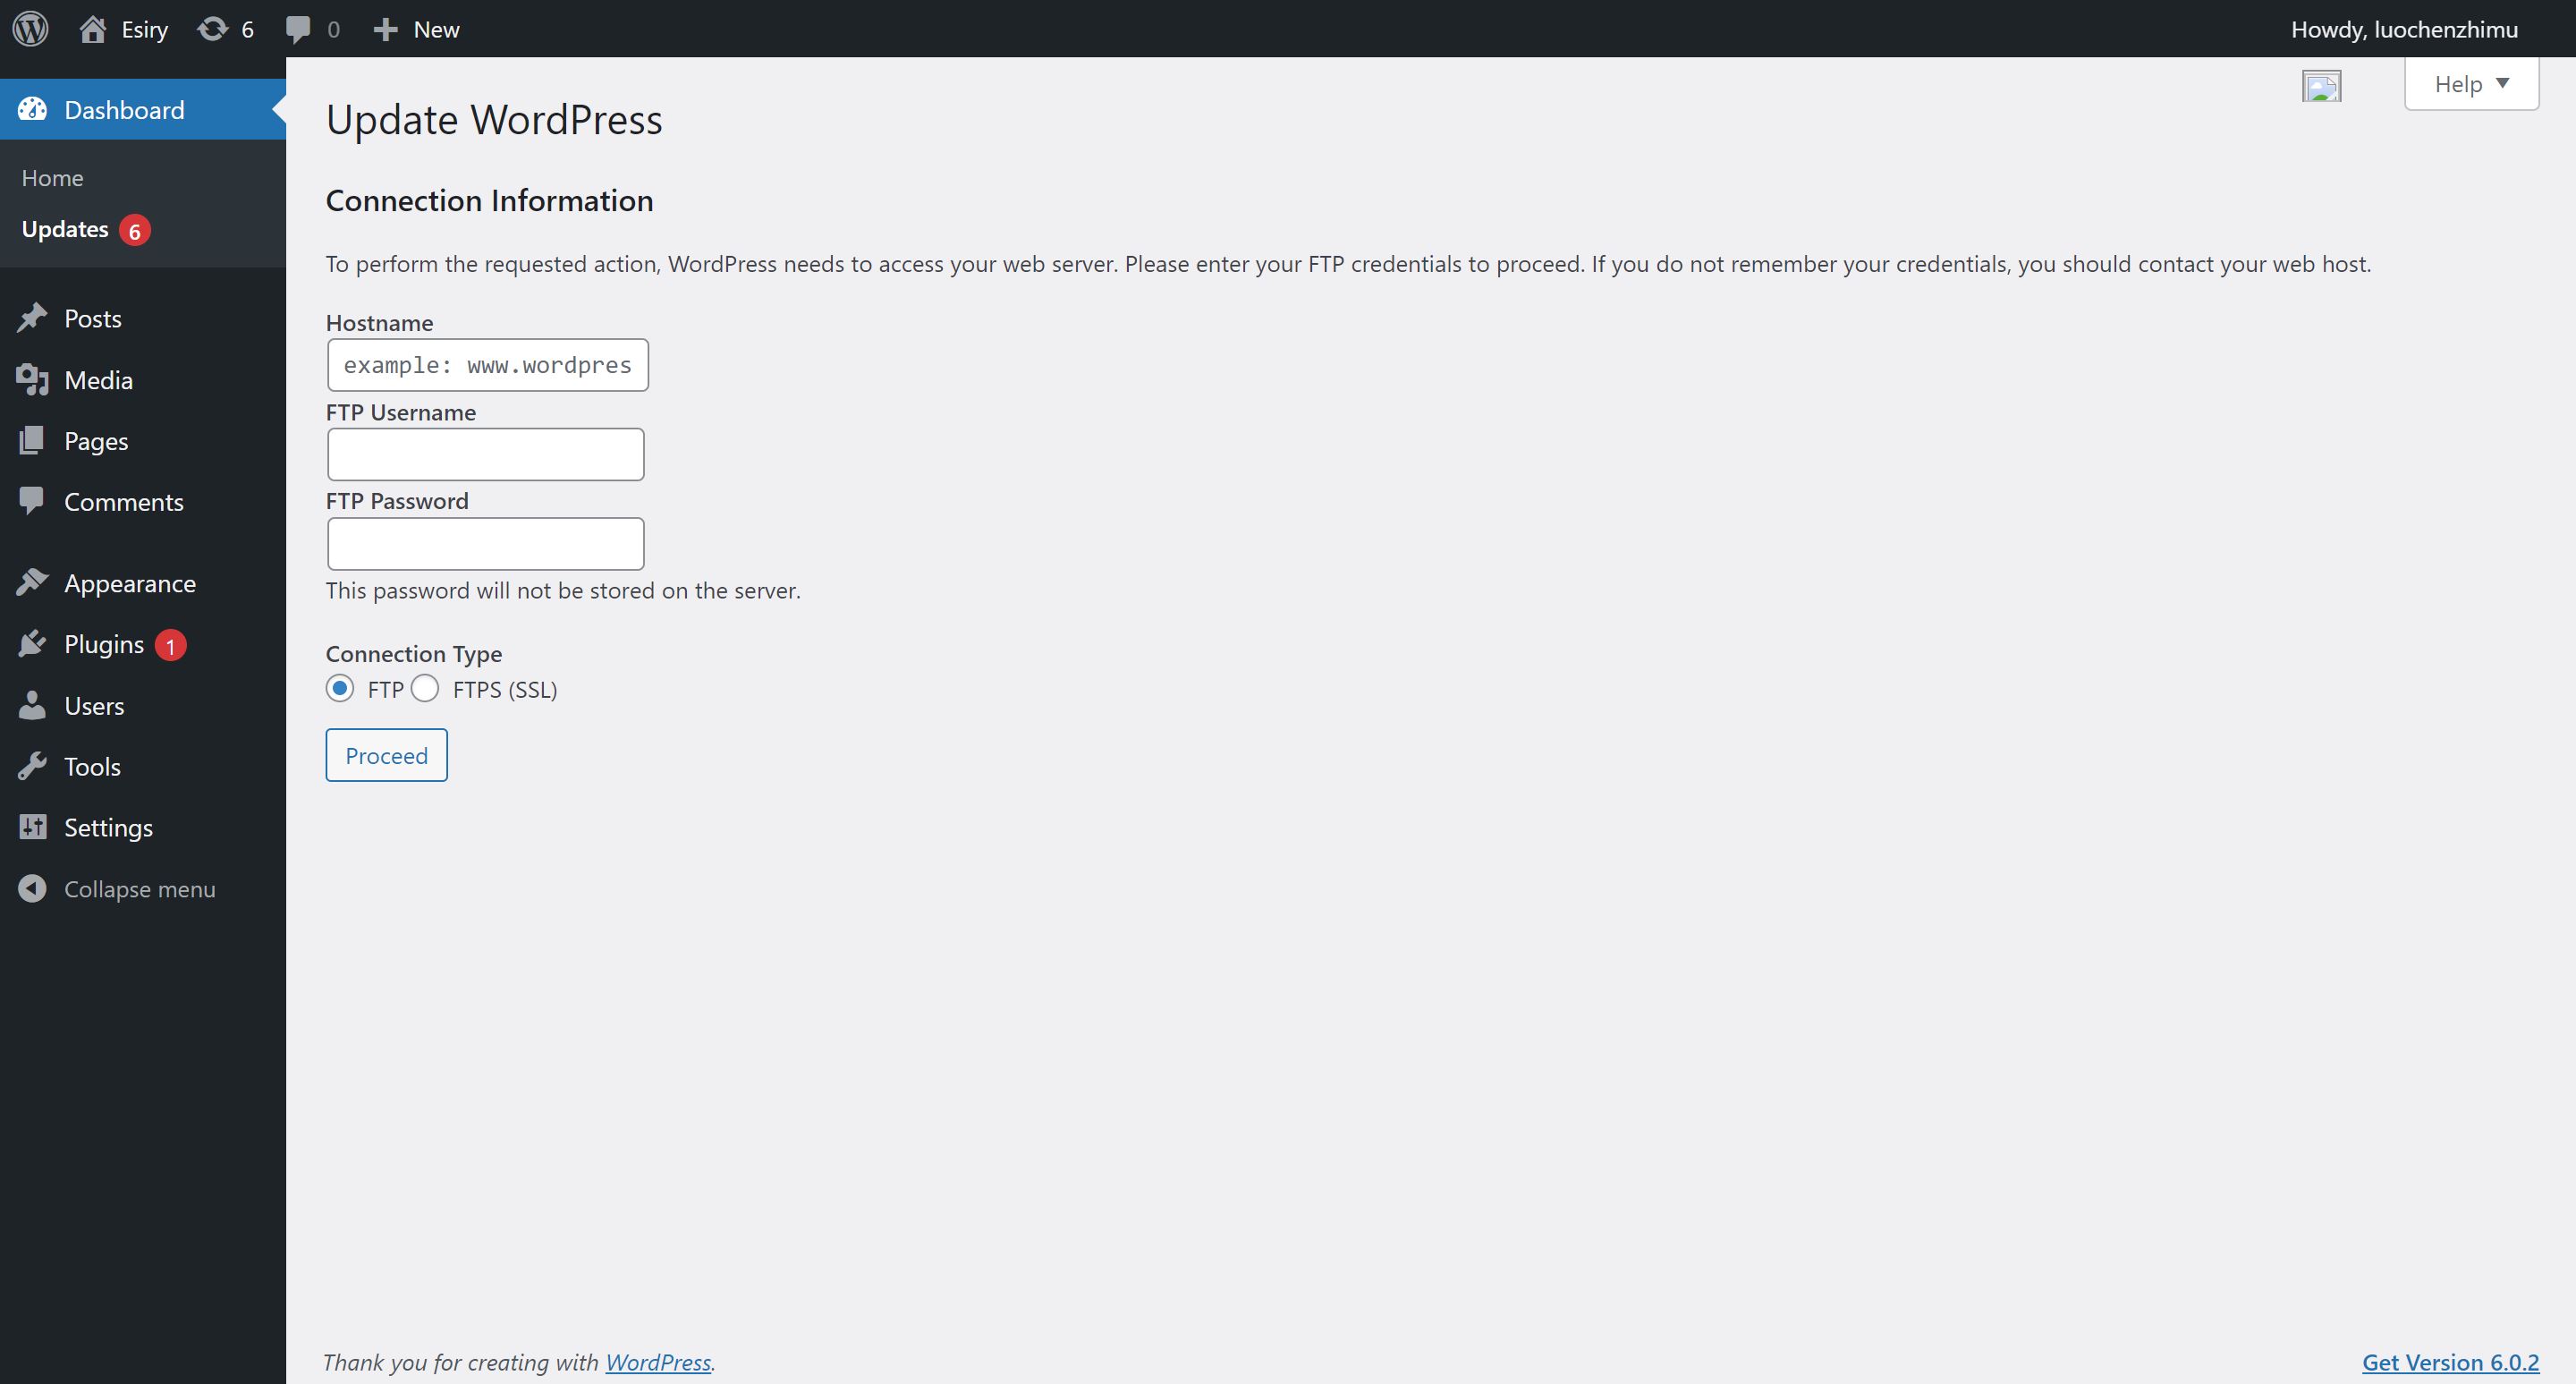
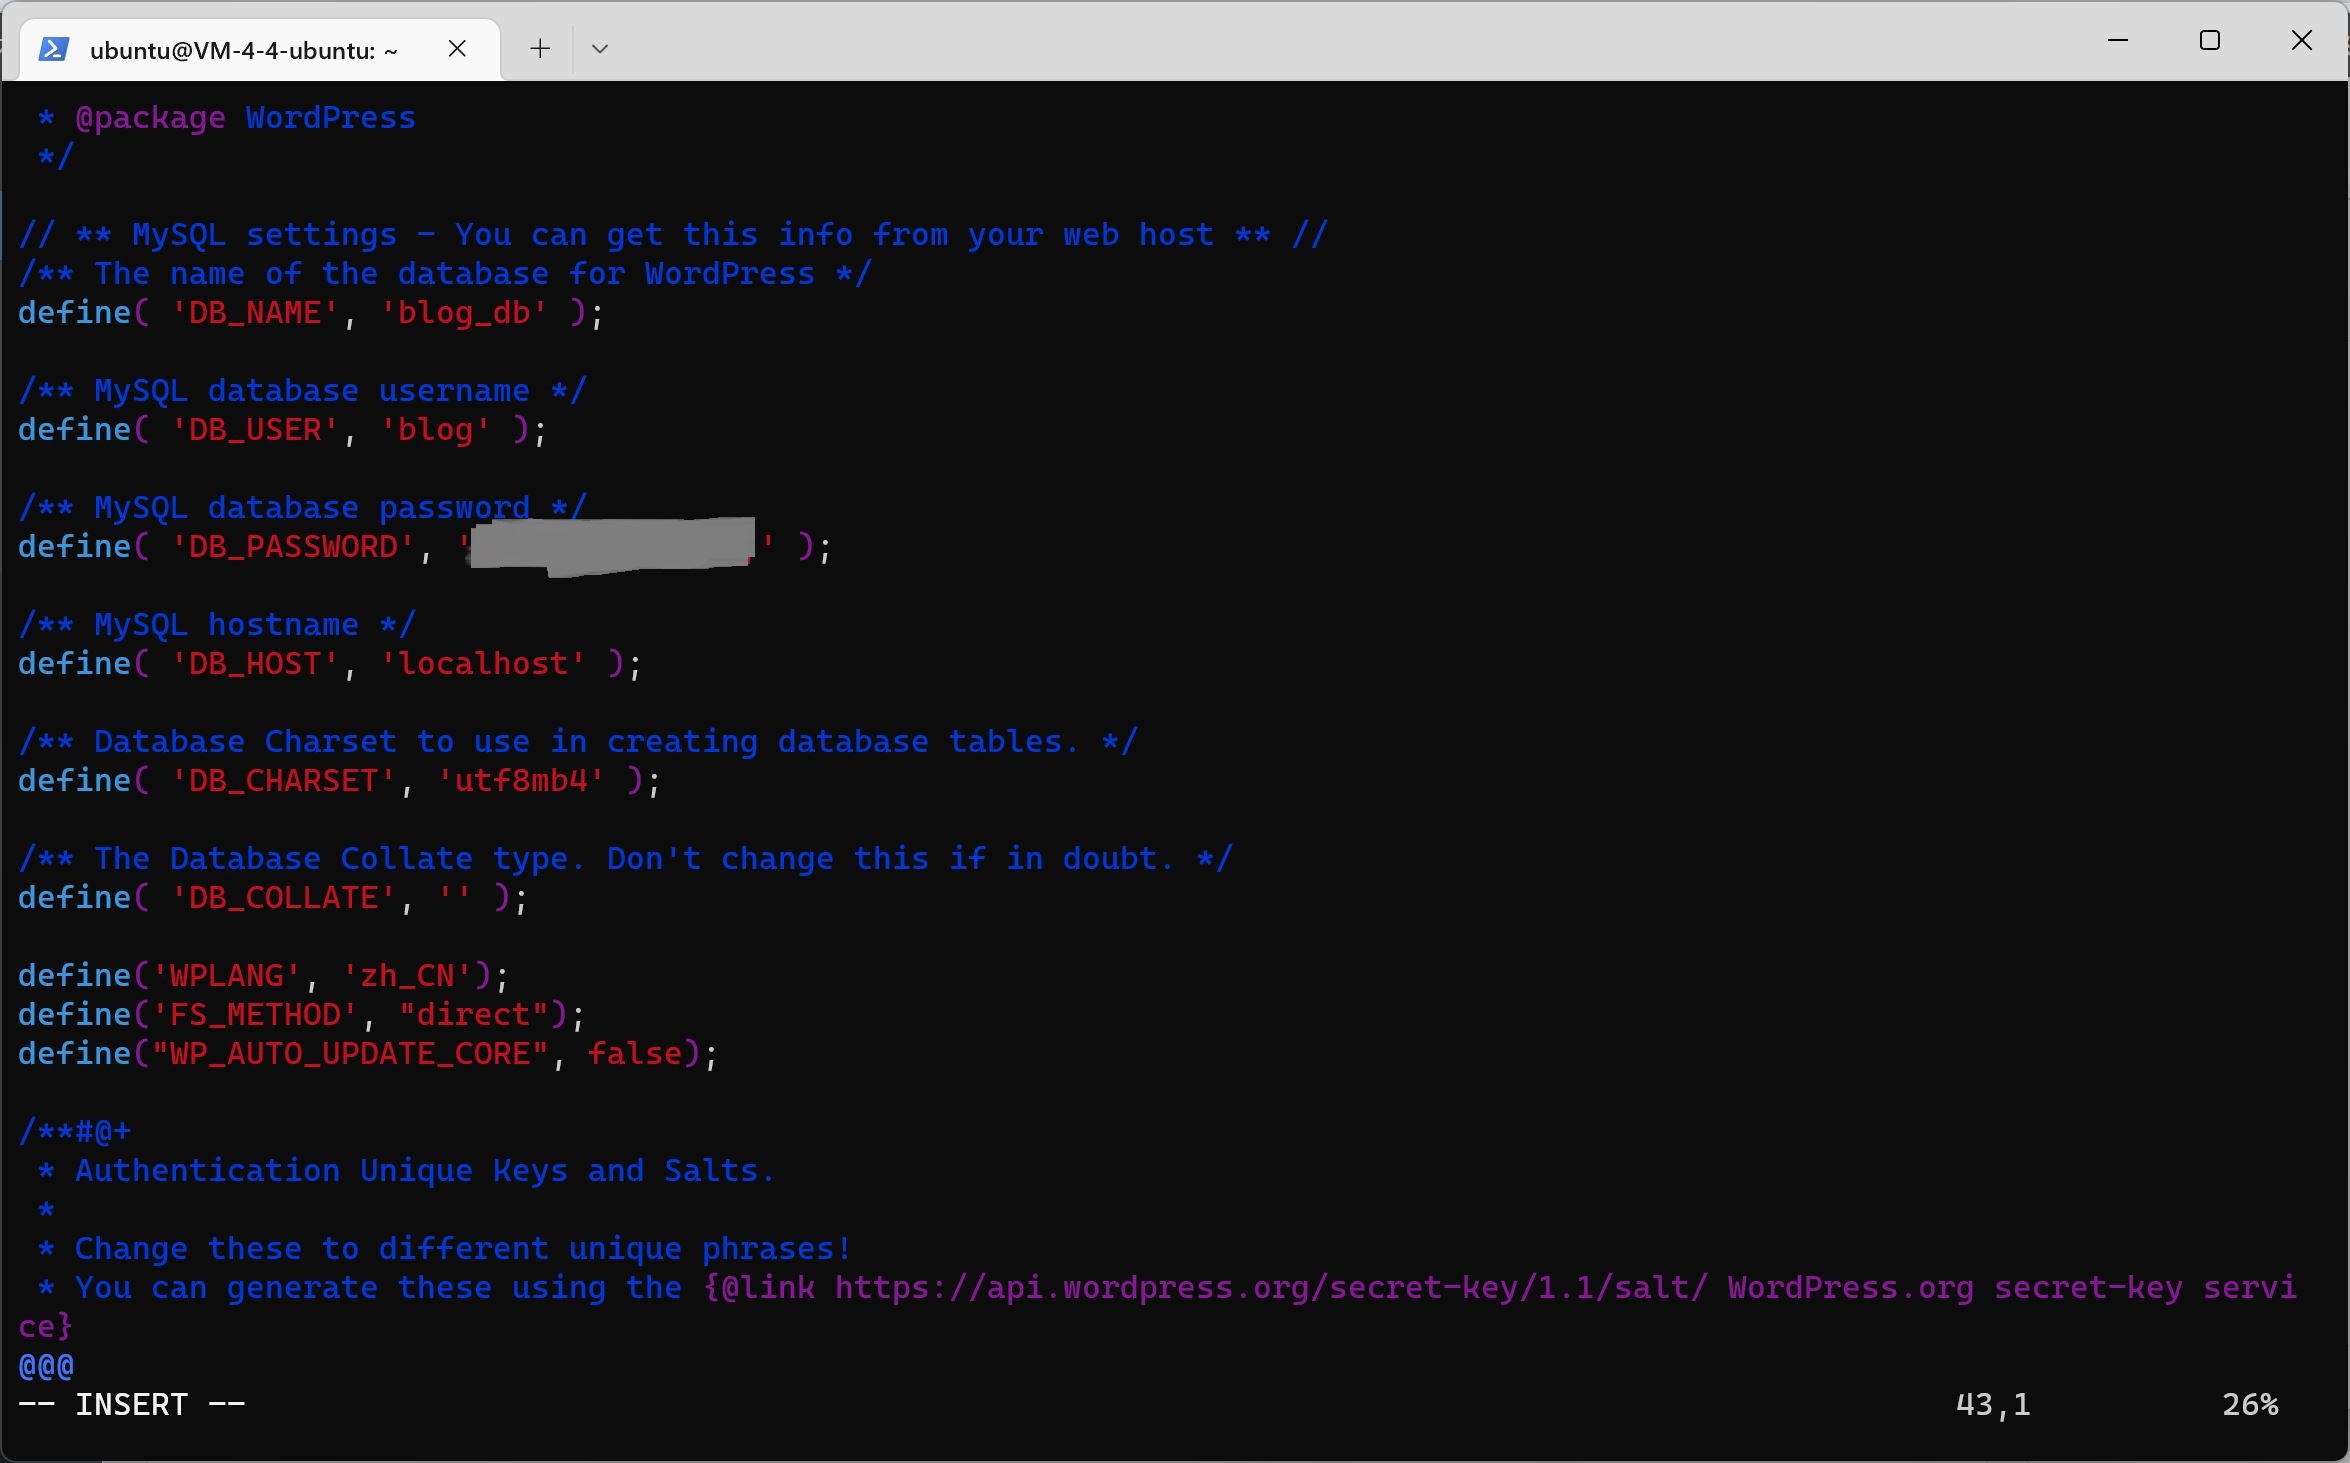
stay WordPress Found in the directory wp-config.php File and edit, add:
define ( ' FS_METHOD ' , " direct " );
The command line is as follows:
sudo vi /var/www/html/wordpress/wp-config.php
Click the keyboard letter i to enter vim editing mode, and add a sentence define('FS_METHOD', "direct"); As shown in the figure
#The original English version can be updated to the Chinese version by adding this sentence define('WPLANG', 'zh_CN'); #Add this sentence define('FS_METHOD', "direct");
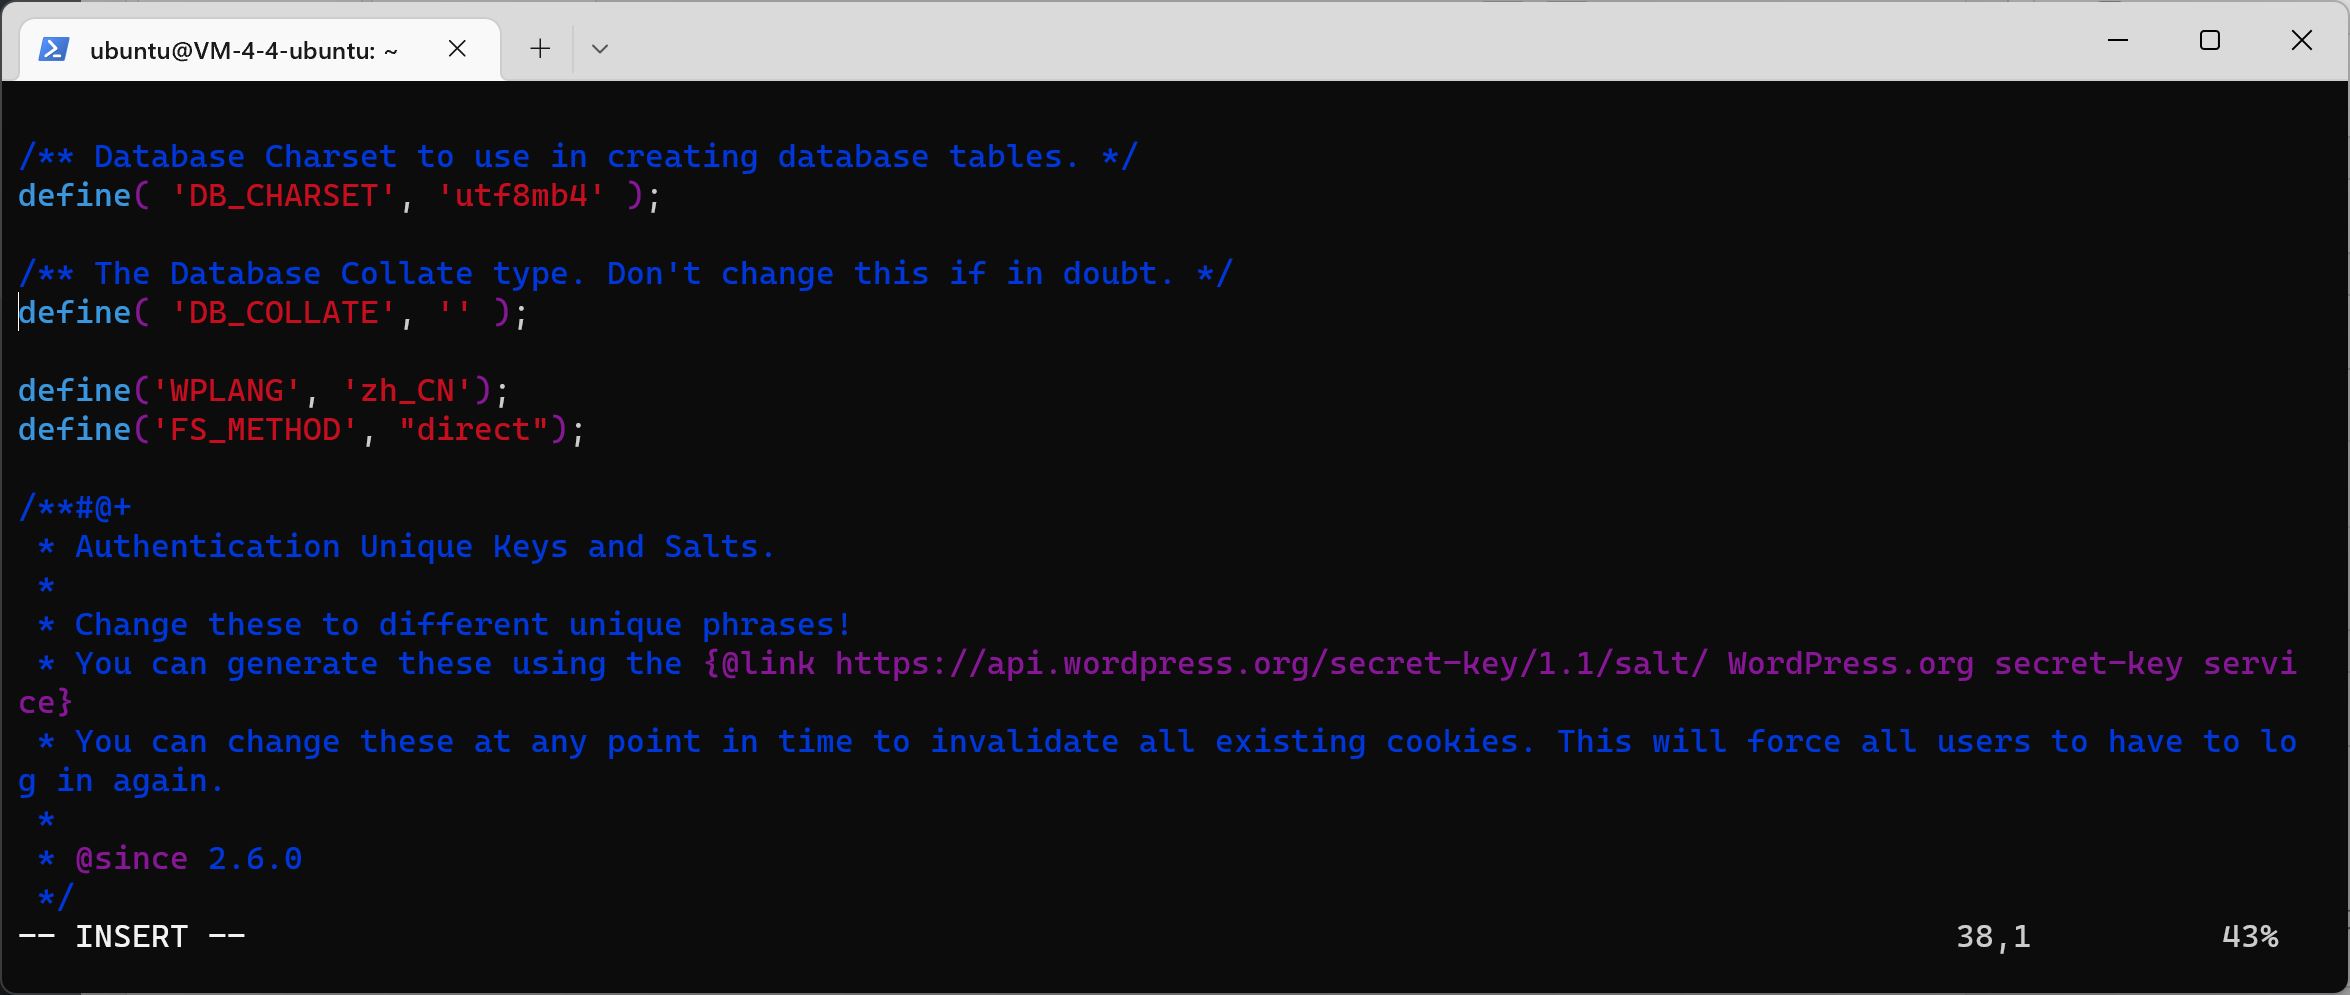
Click esc to exit editing mode, and finally type: wq to save and exit
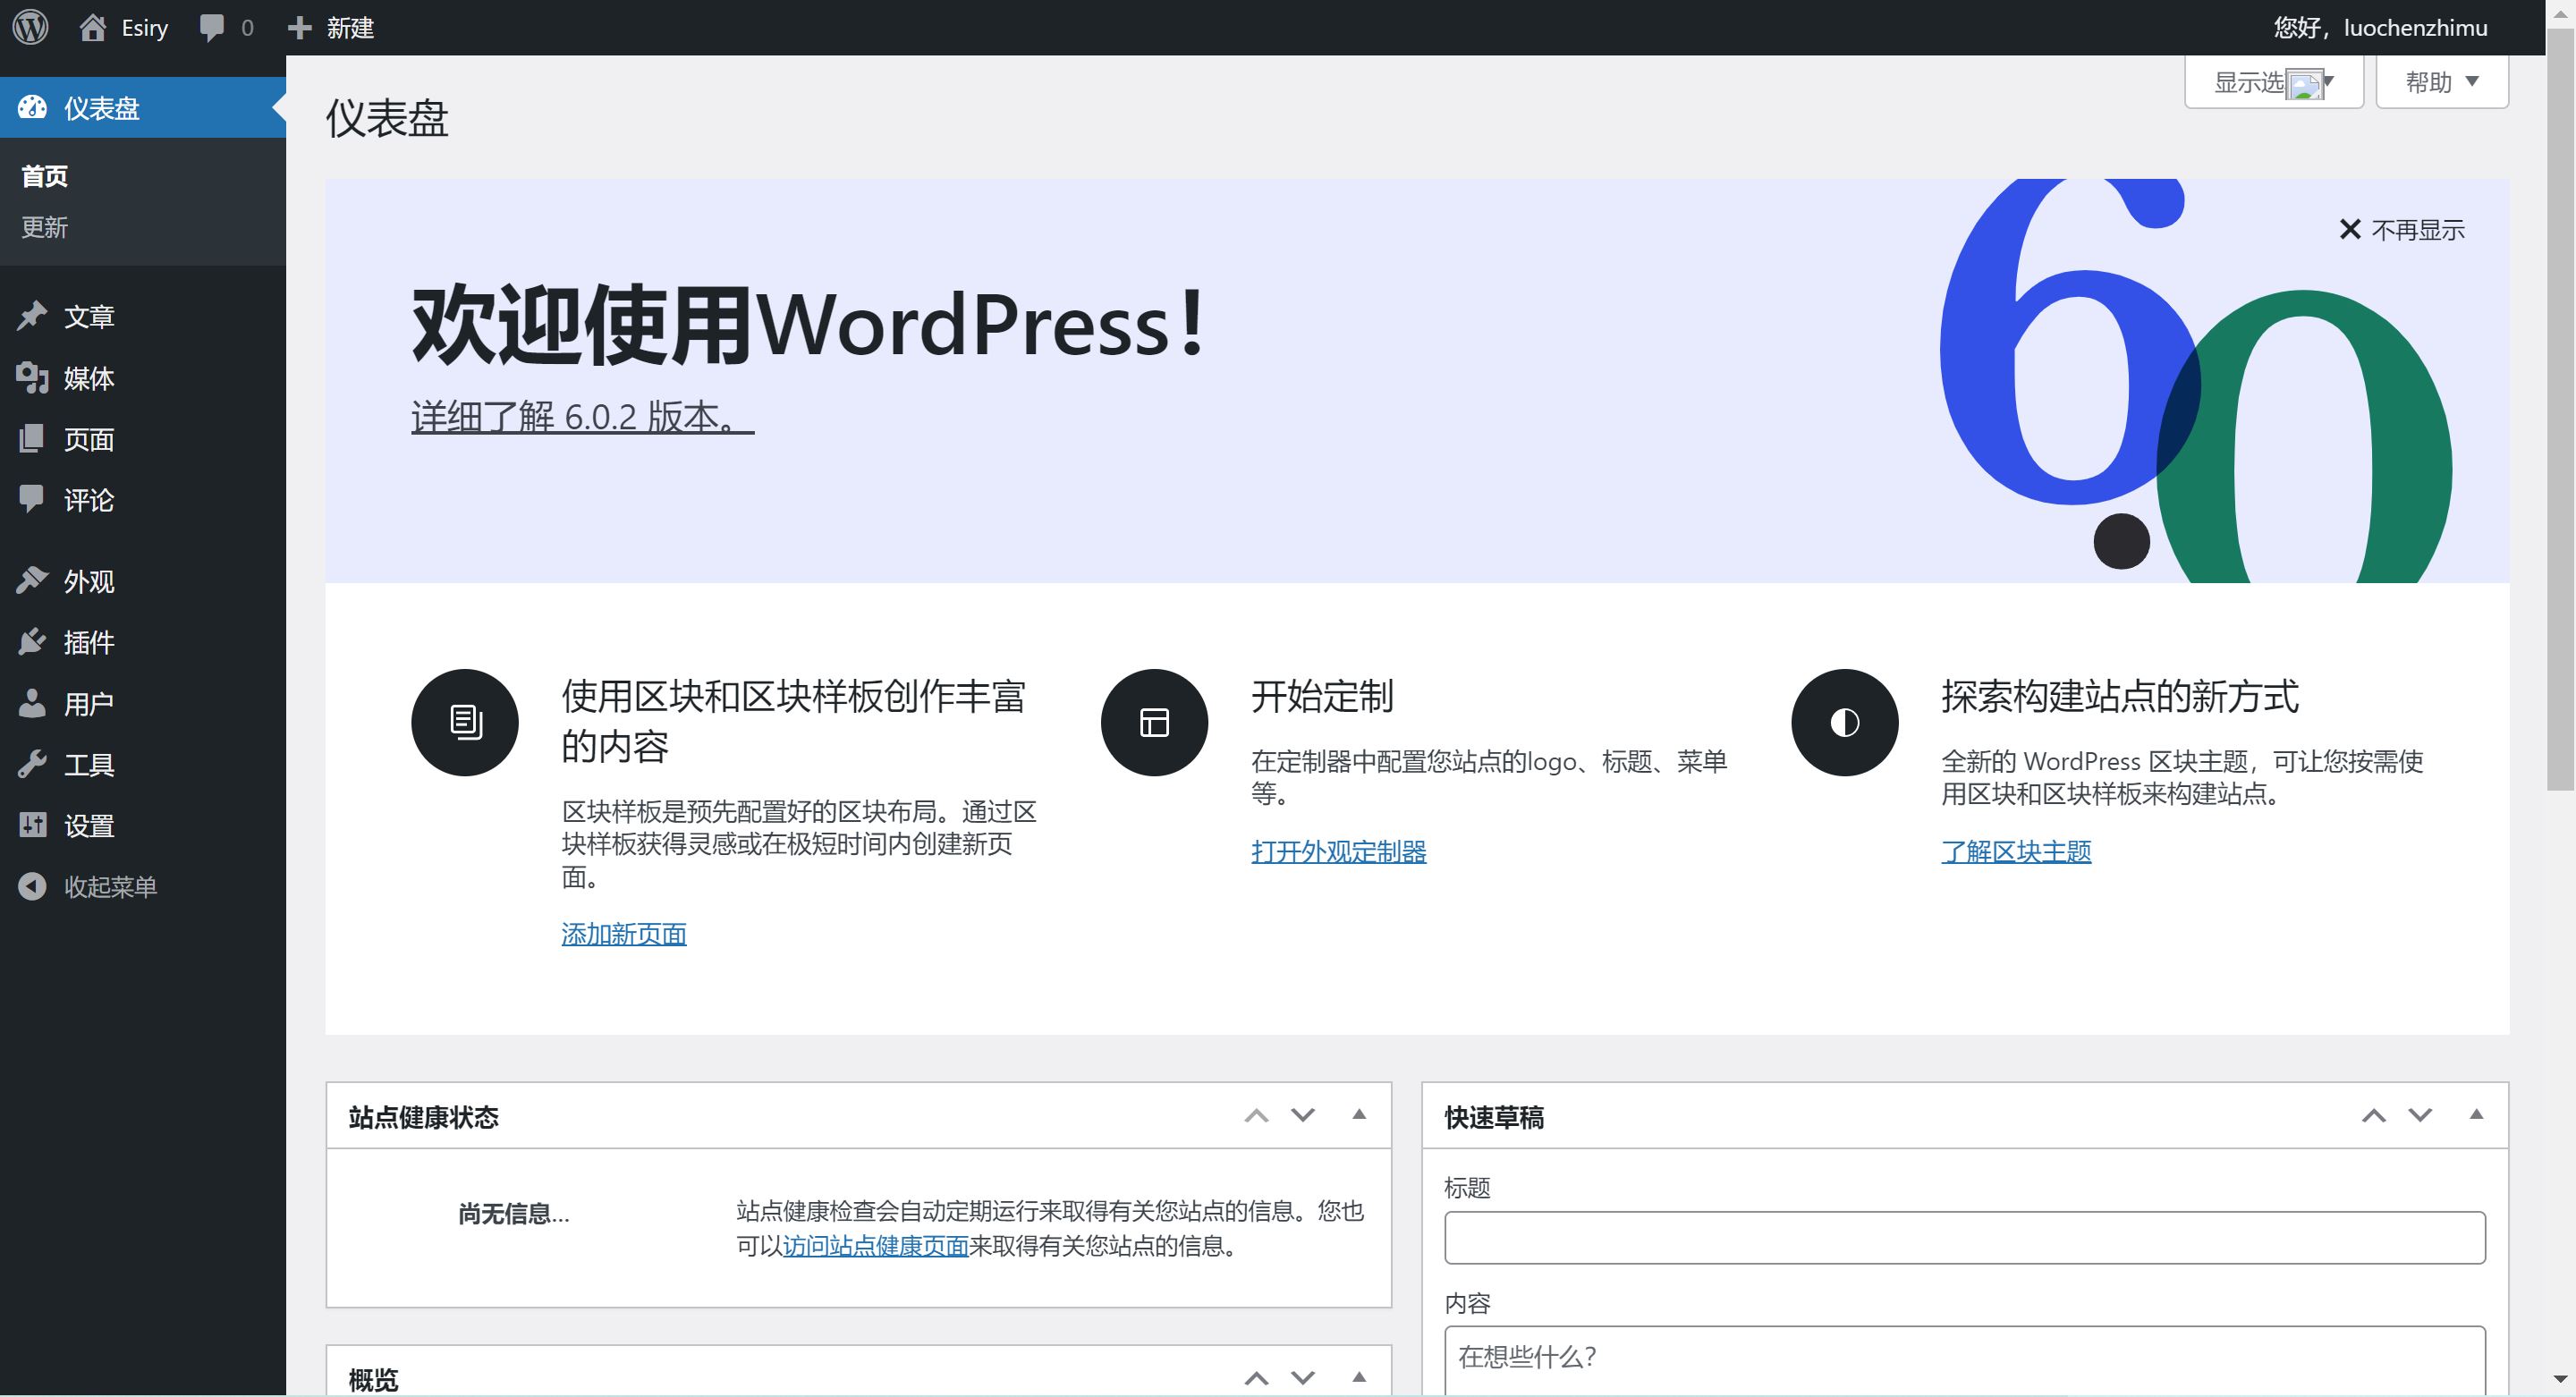
WordPress background interface:
Configure domain name https encryption access
Domain name resolution:
Log in to the DNSPod console: https://console.dnspod.cn/dns/ ,
Add your domain name, click the domain name to add the resolution of two A records to the server IP xx.xx.xx.xx
| Host record |
Record Type |
line |
Record value |
| @ |
A |
default |
xx.xx.xx.xx |
| www |
A |
default |
xx.xx.xx.xx |
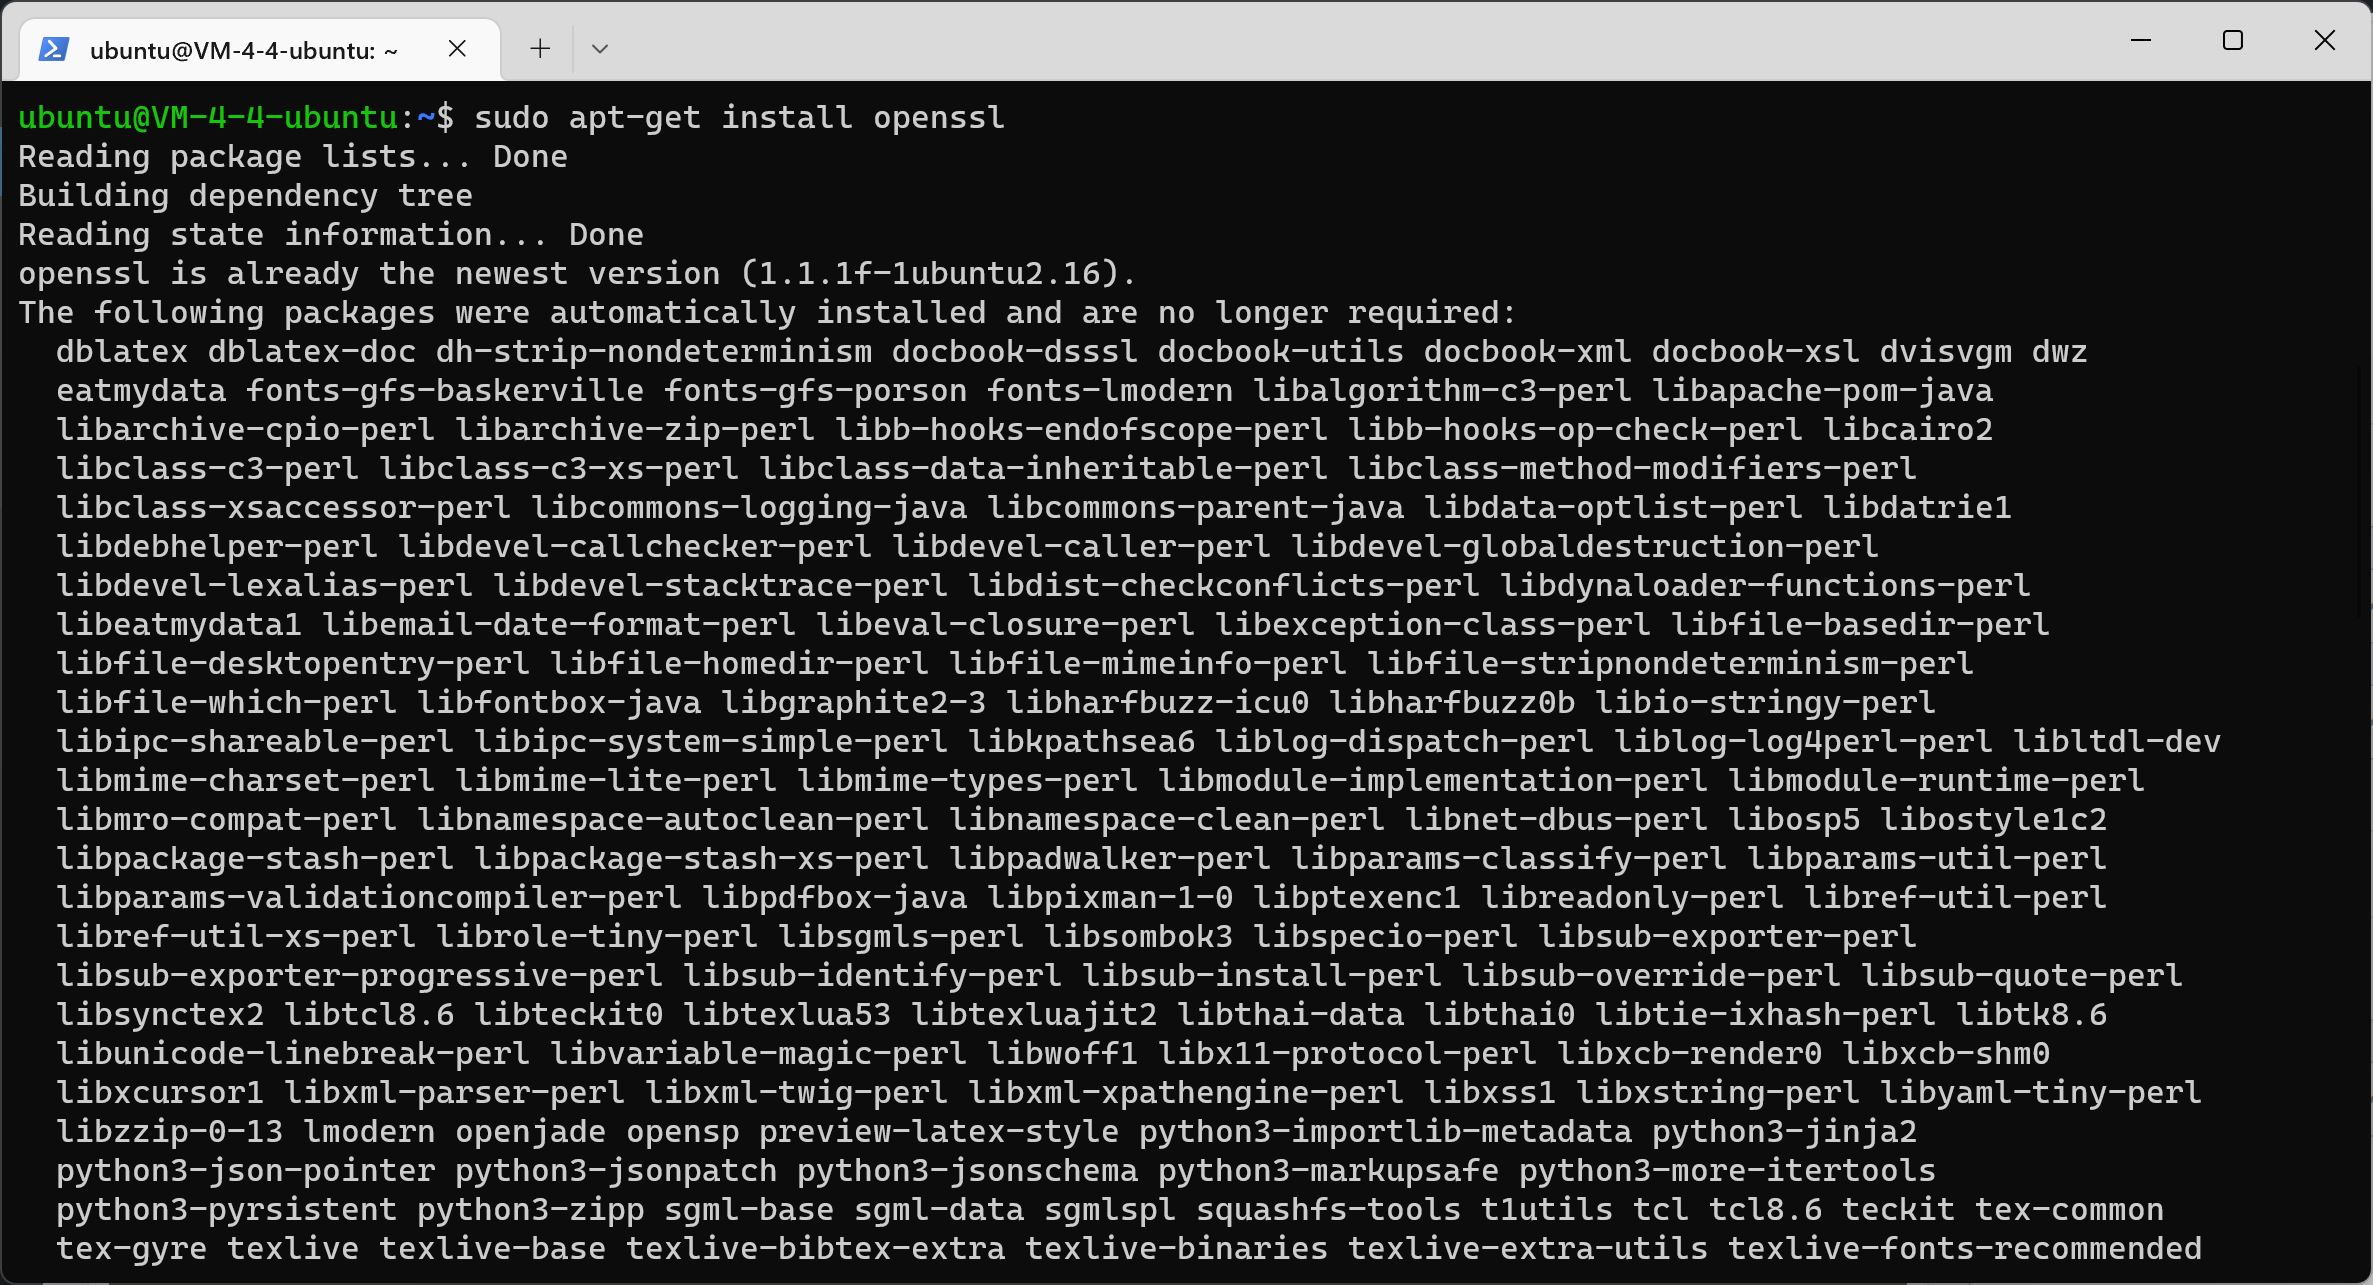
Install Dependent Packages
It is not safe to use IP address or http access. Now let's configure https encrypted access.
Enter the following commands to install dependencies:
sudo apt-get install openssl sudo a2enmod ssl sudo apt-get install socat sudo service apache2 restart
Install acme.sh script
GitHub project address: https://github.com/Neilpang/acme.sh
Enter administrator mode:
sudo su
Install acme.sh and change the email to your own:
curl https://get.acme.sh | sh -s email= admin@email.com
Alternate address: https://dl.luochenzhimu.com/software/acme/acme.sh
curl https://dl.luochenzhimu.com/software/acme/acme.sh | sh -s email= admin@email.com

After the installation is completed, the PowerShell terminal must be closed, or it will not take effect. Reopen the administrator root terminal command to see if the installation is successful:
sudo su acme.sh -h

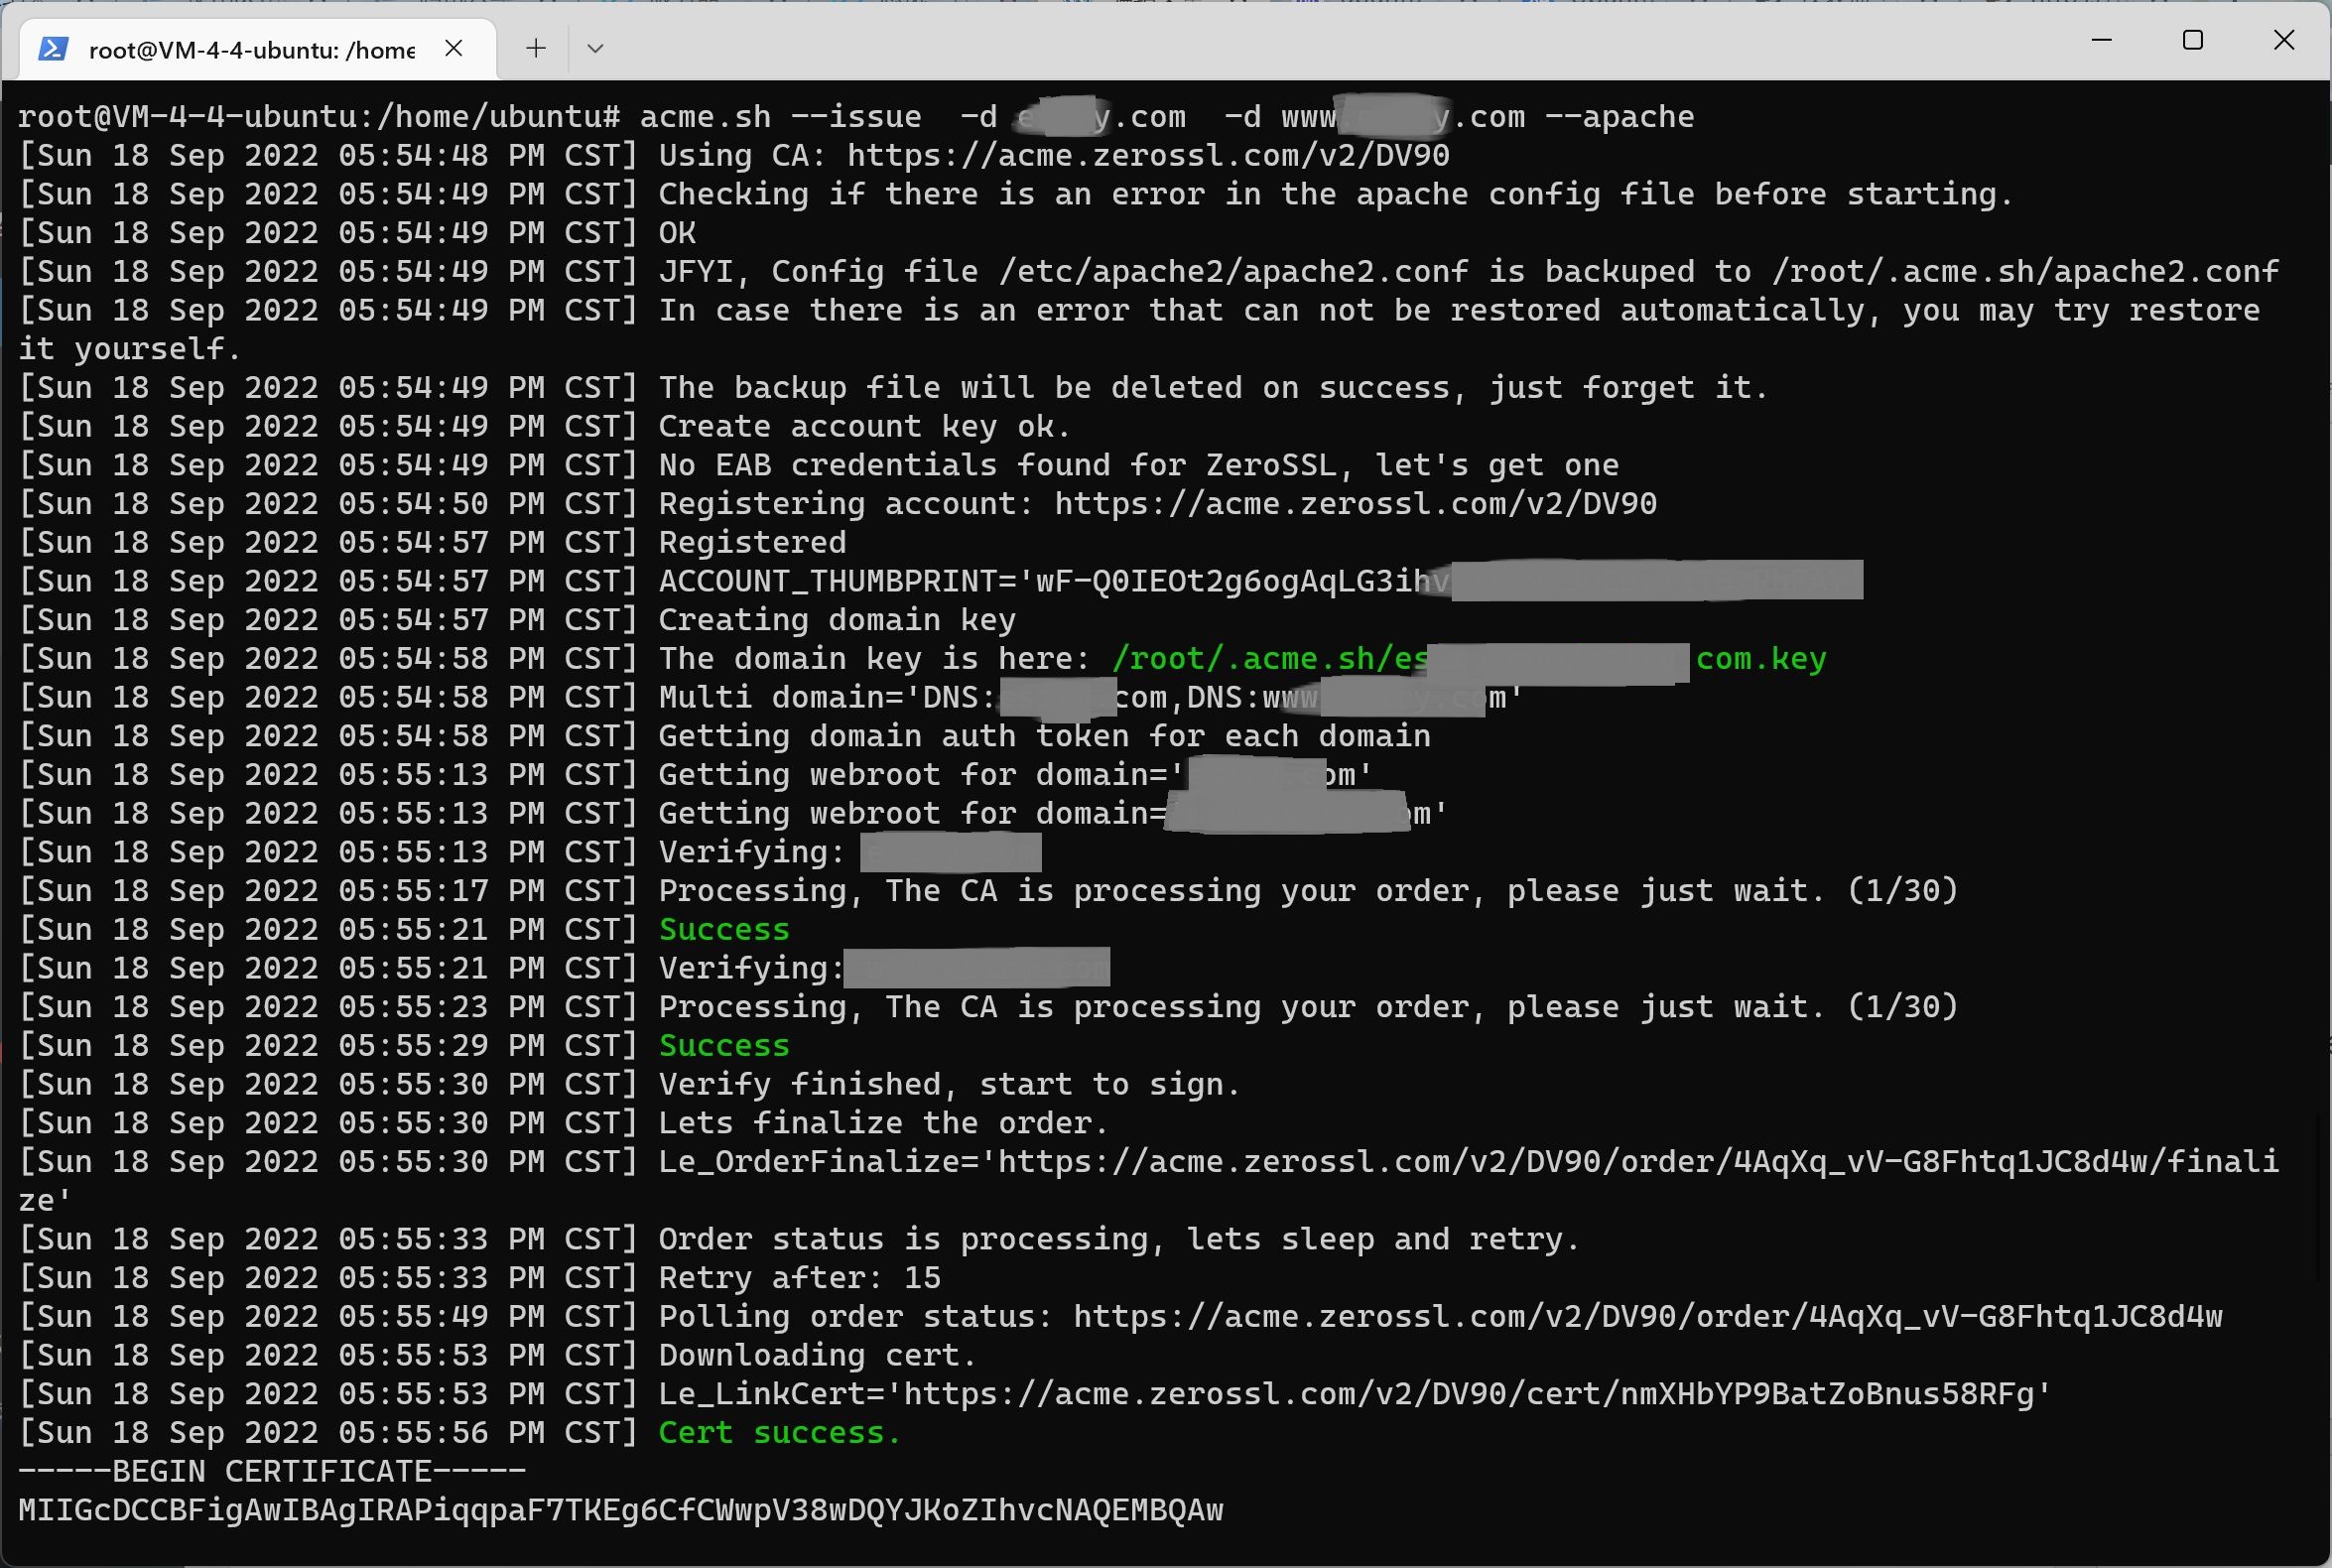
Let's generate a certificate (- d domain.com - d www.domain.com to change to your own domain name):
acme.sh --issue -d domain.com -d www.domain.com --apache
Generate https certificate location:

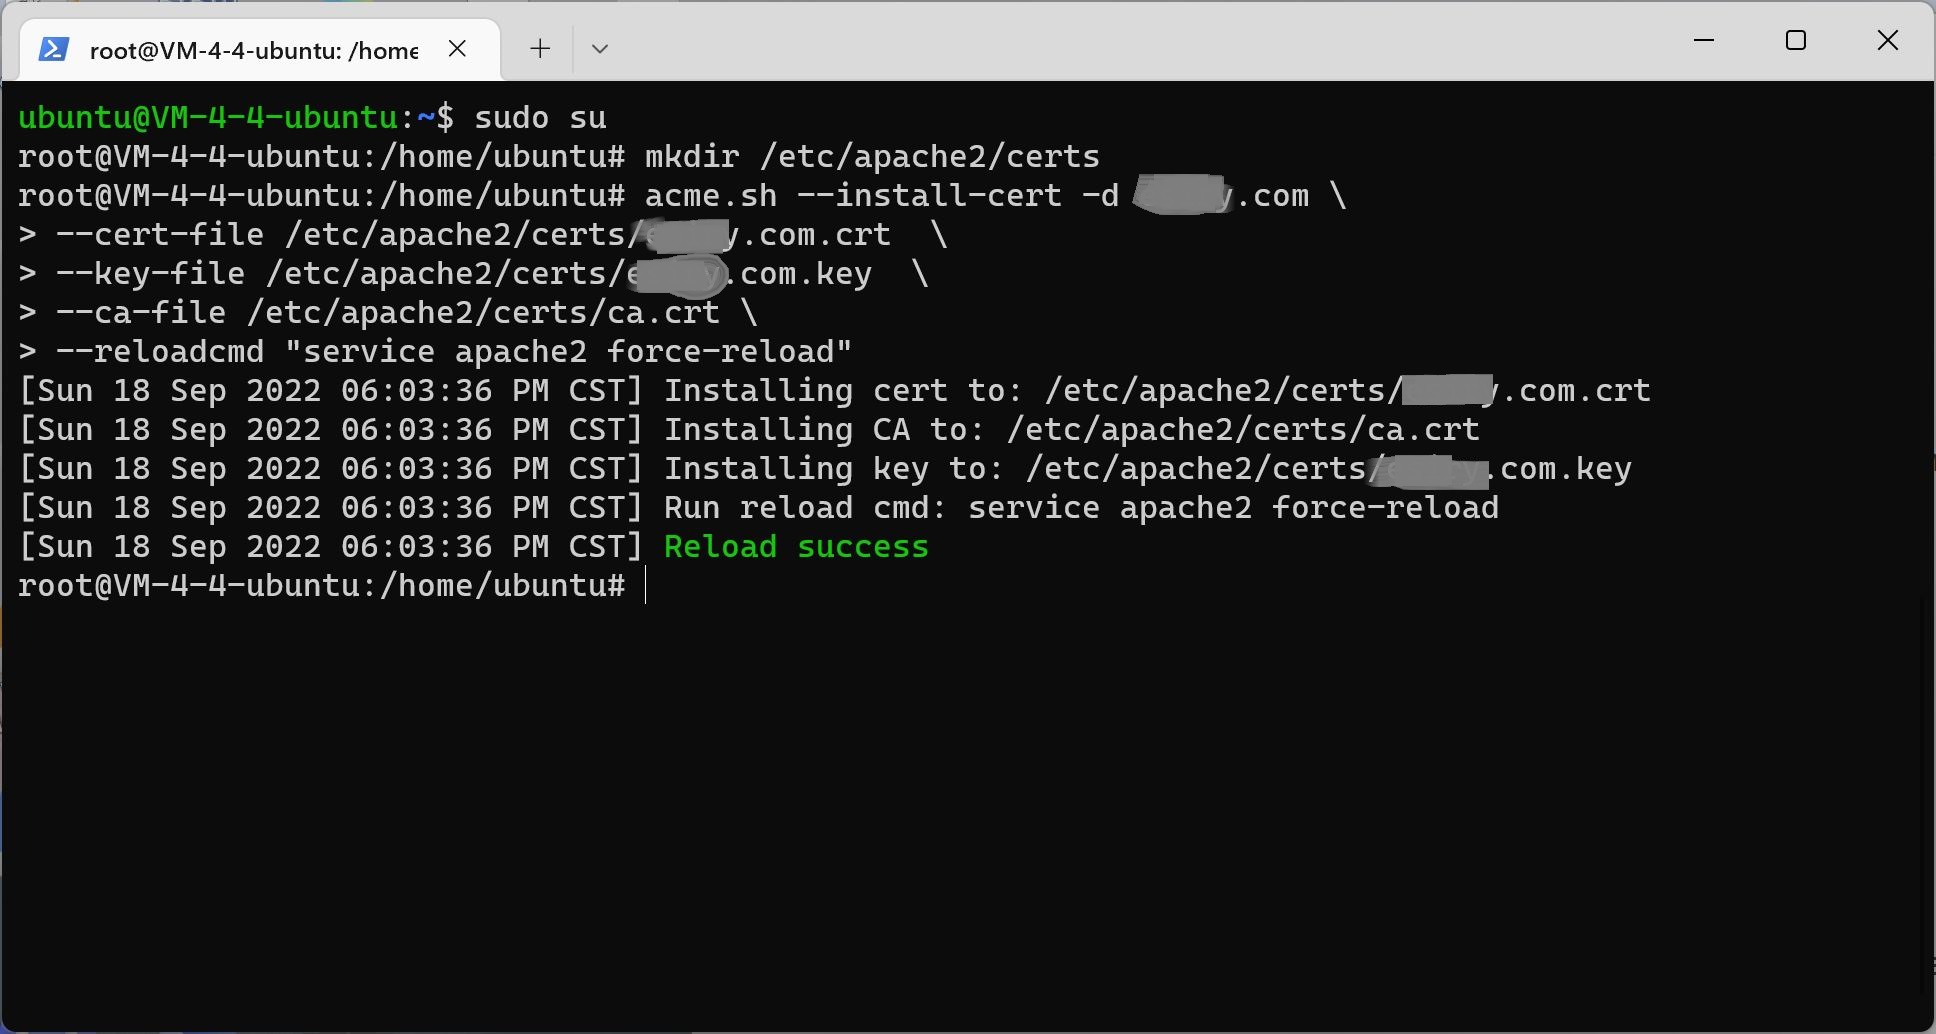
Create a new folder to save the certificate:
mkdir /etc/apache2/certs
Install the certificate to the directory (this is a conversion command, domain.com is edited as its own domain name and pasted directly into the command window):
acme.sh --install-cert -d domain.com \ --cert-file /etc/apache2/certs/domain.com.crt \ --key-file /etc/apache2/certs/domain.com.key \ --ca-file /etc/apache2/certs/ca.crt \ --reloadcmd "service apache2 force-reload"
Configure https certificate
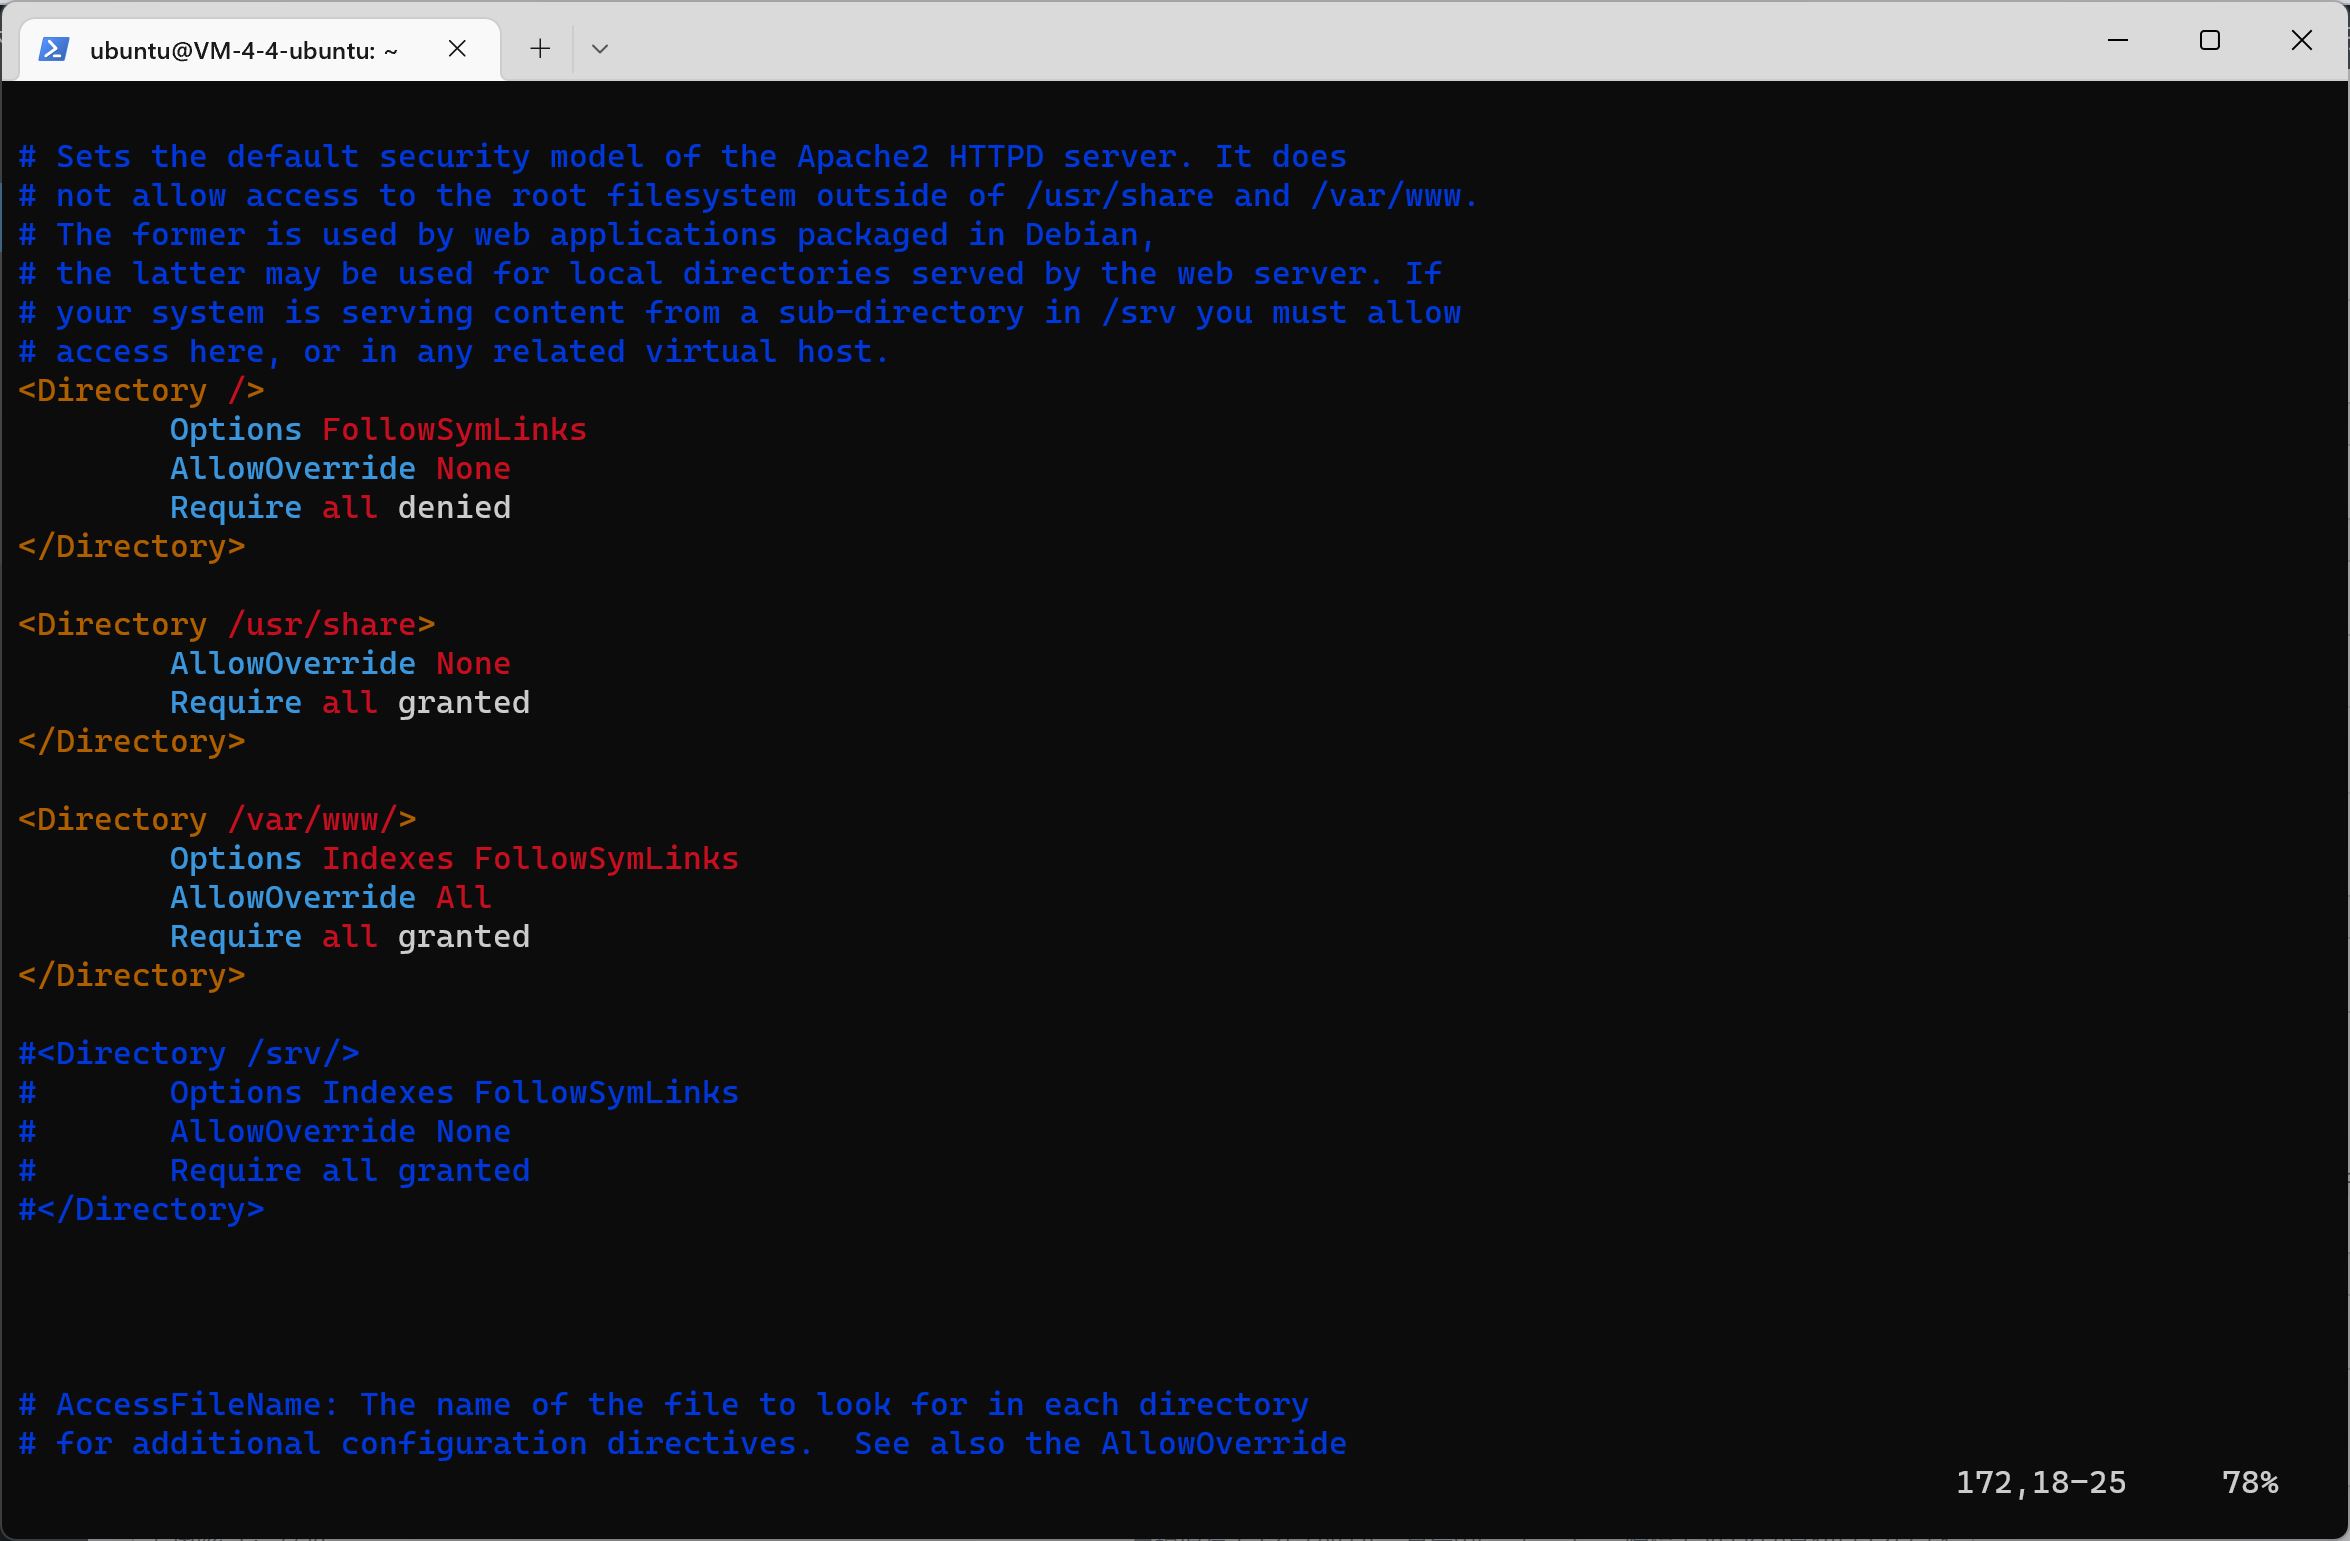
After installation, a default default-ssl.conf file will be generated in the/etc/apache2/sites available/directory. The default web page directory is still/var/www/. We can create a link to the site enabled directory.
Exit administrator root
exit
Mode 1: Generate Soft Links
sudo ln - s / etc / apache2 / sites - available / default - ssl . conf / etc / apache2 / sites - enabled / enables - ssl

Edit configuration:
sudo vi /etc/apache2/sites-available/default-ssl.conf
Mode 2: If you do not want to use soft links, you can copy default-ssl.conf from sites available to the sites enabled folder (representing the enabled configuration)
sudo cp /etc/apache2/sites-available/default-ssl.conf /etc/apache2/sites-enabled
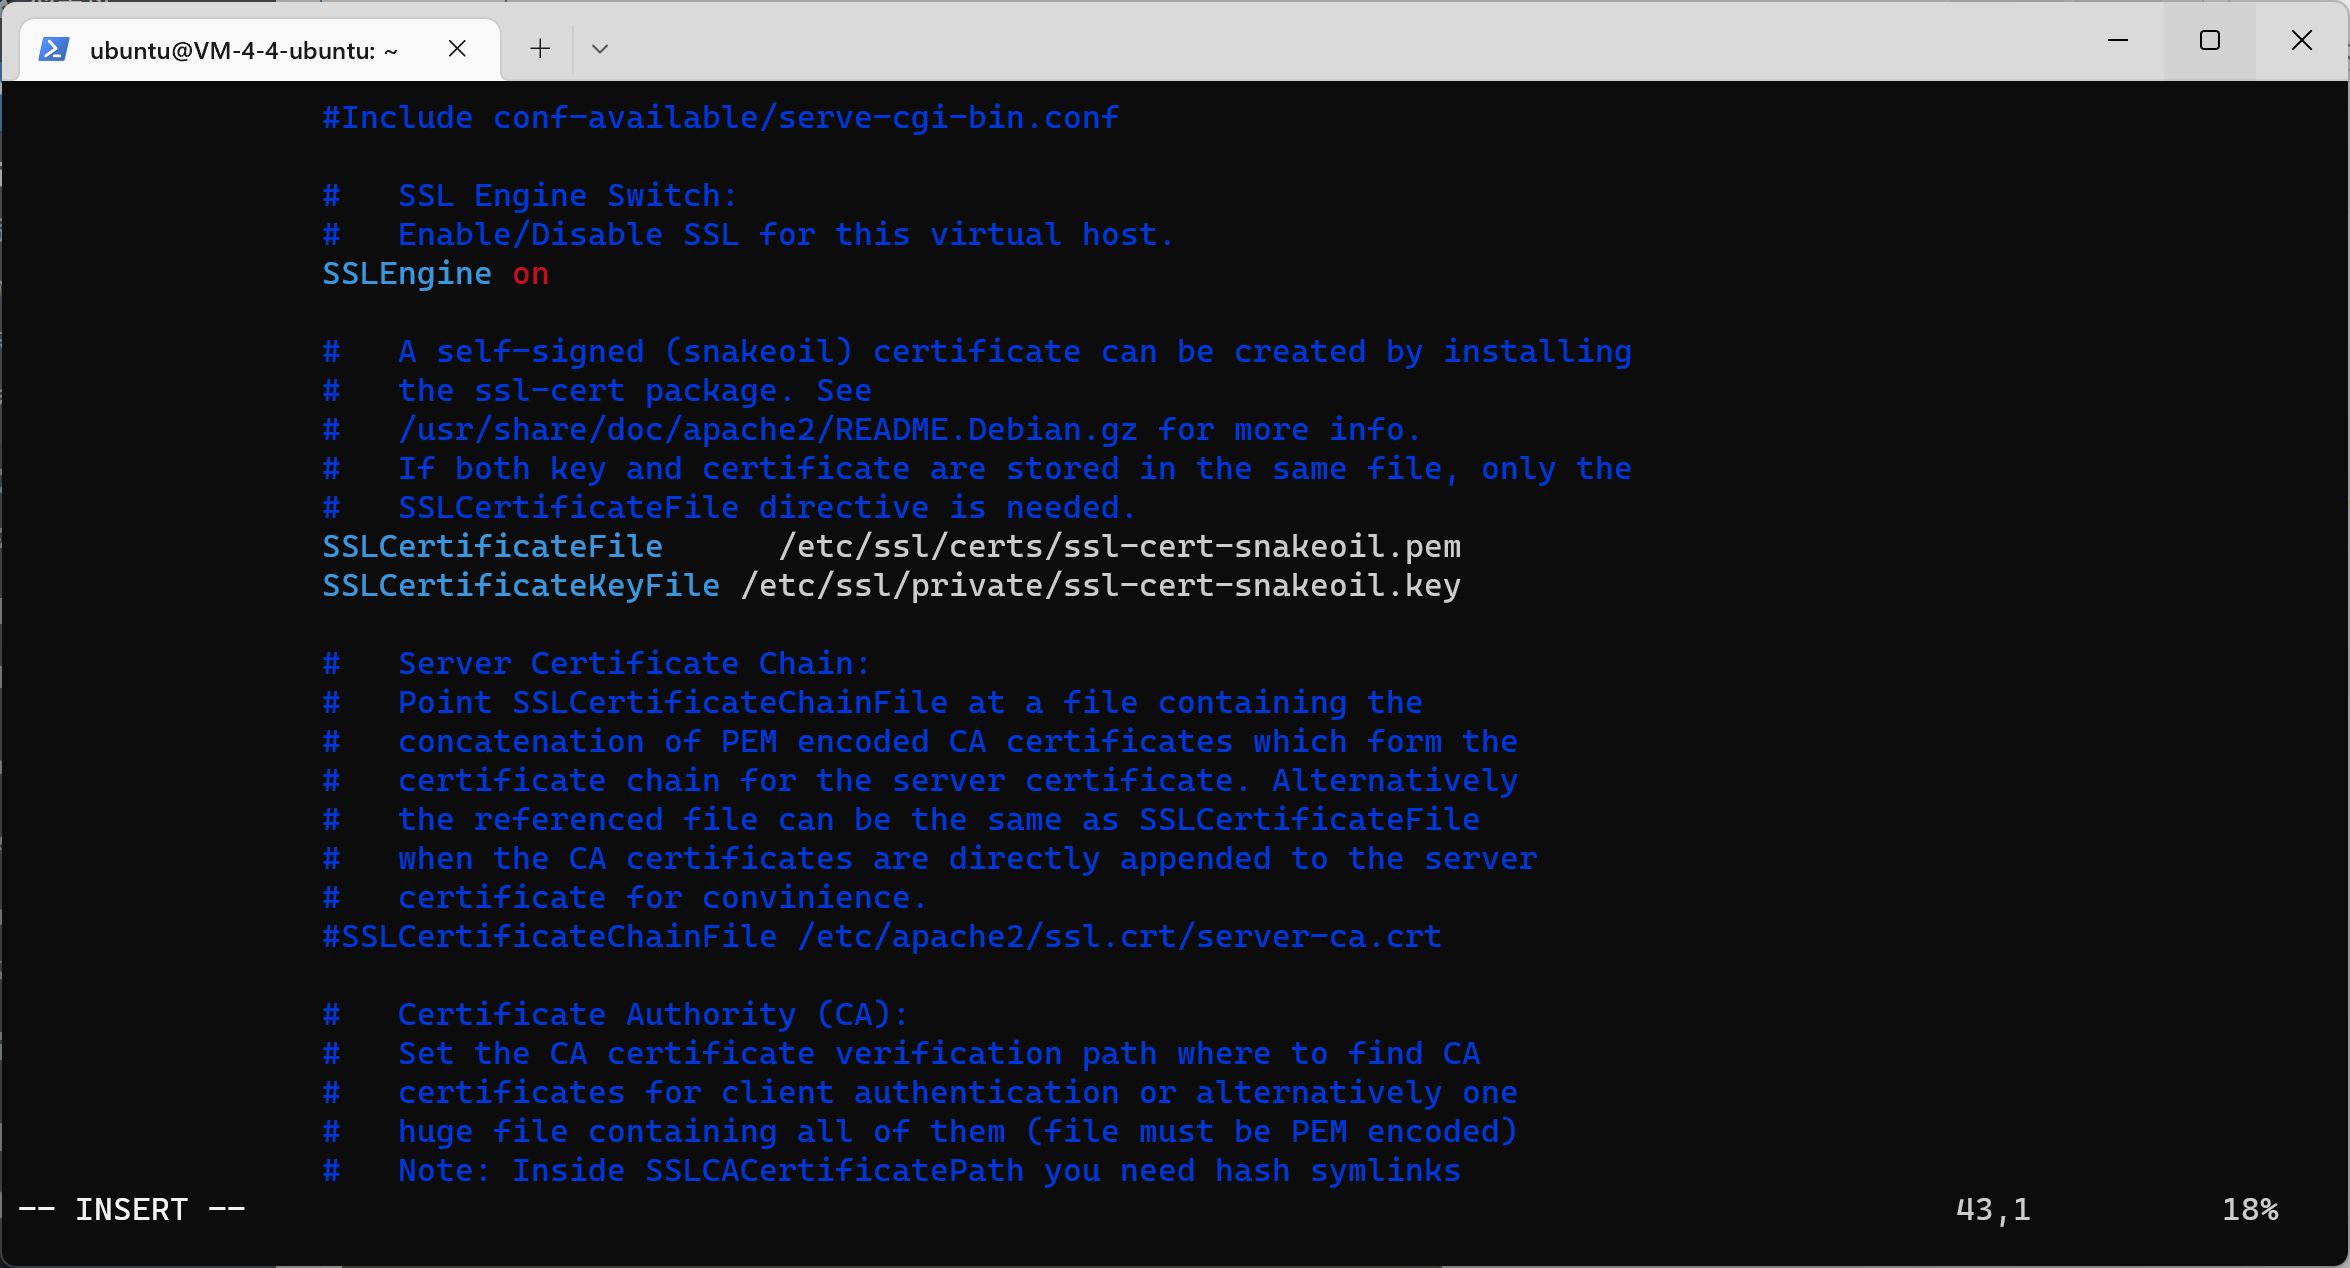
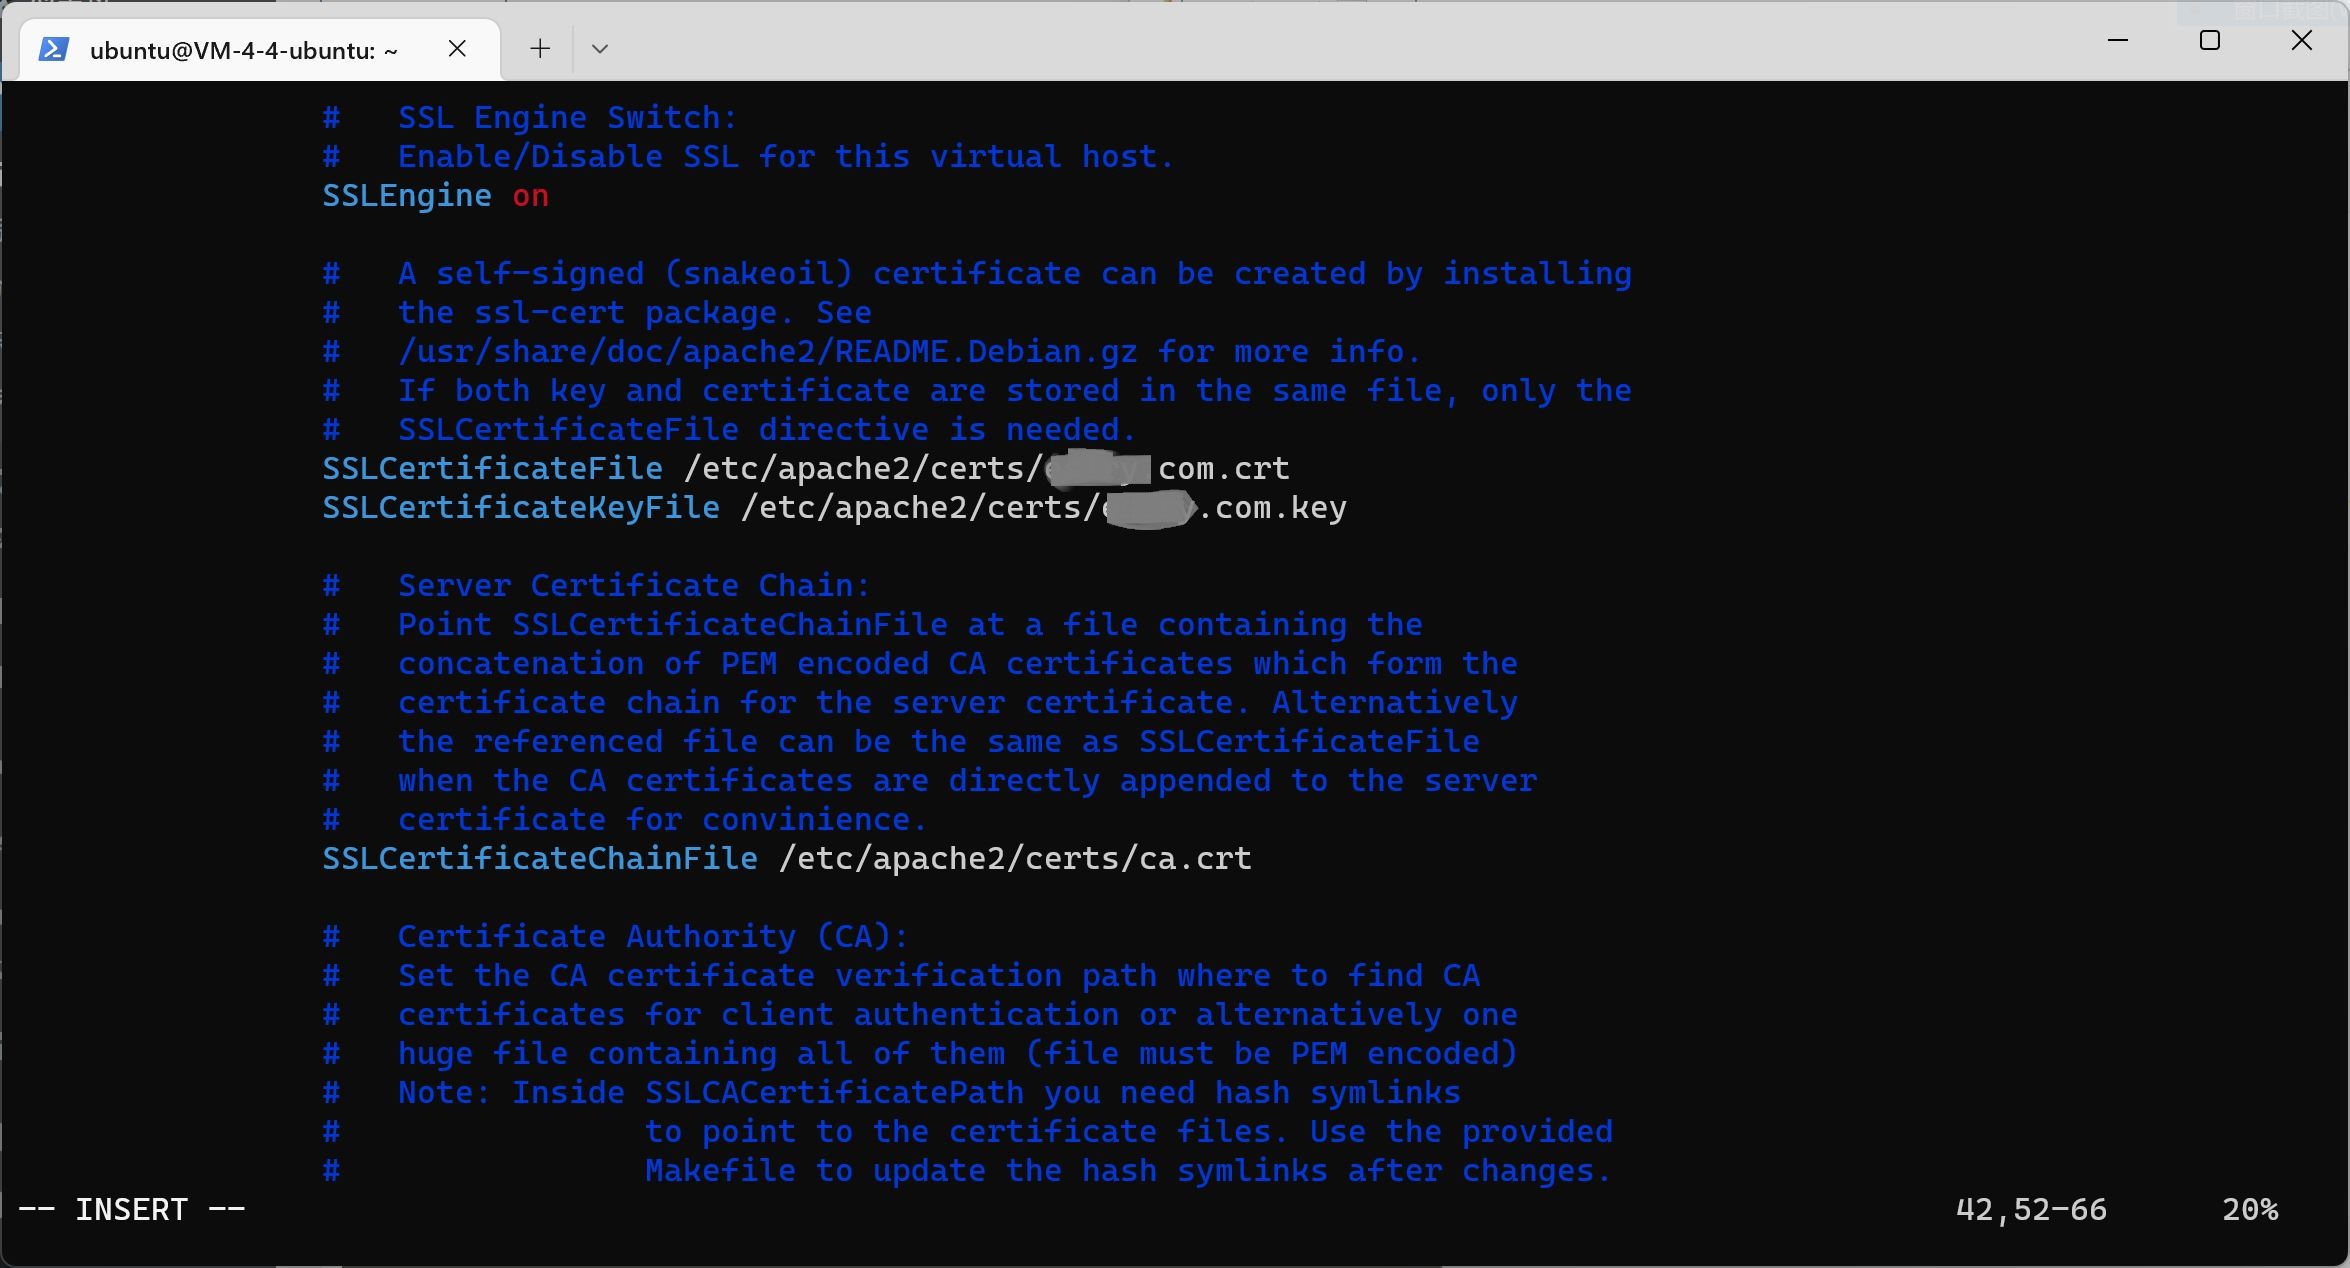
Then modify default-ssl.conf and find Modify the configuration of SSLCertificateFile, SSLCertificateKeyFile, SSLCertificateChainFile
(Click the keyboard letter i to enter the vim editing mode, click esc to exit the editing mode, and finally type: wq to save and exit)
sudo vi /etc/apache2/sites-enabled/default-ssl.conf
Modify the parameter to
SSLCertificateFile /etc/apache2/certs /domain . crt SSLCertificateKeyFile /etc/apache2/certs /domain . key SSLCertificateChainFile /etc/apache2/certs /ca . crt
Restarting Apache 2 takes effect:
sudo service apache2 restart
Log in to the WordPress website to configure the domain name:
Address: http://xx.xx.xx.xx/wordpress/wp-admin/options-general.php
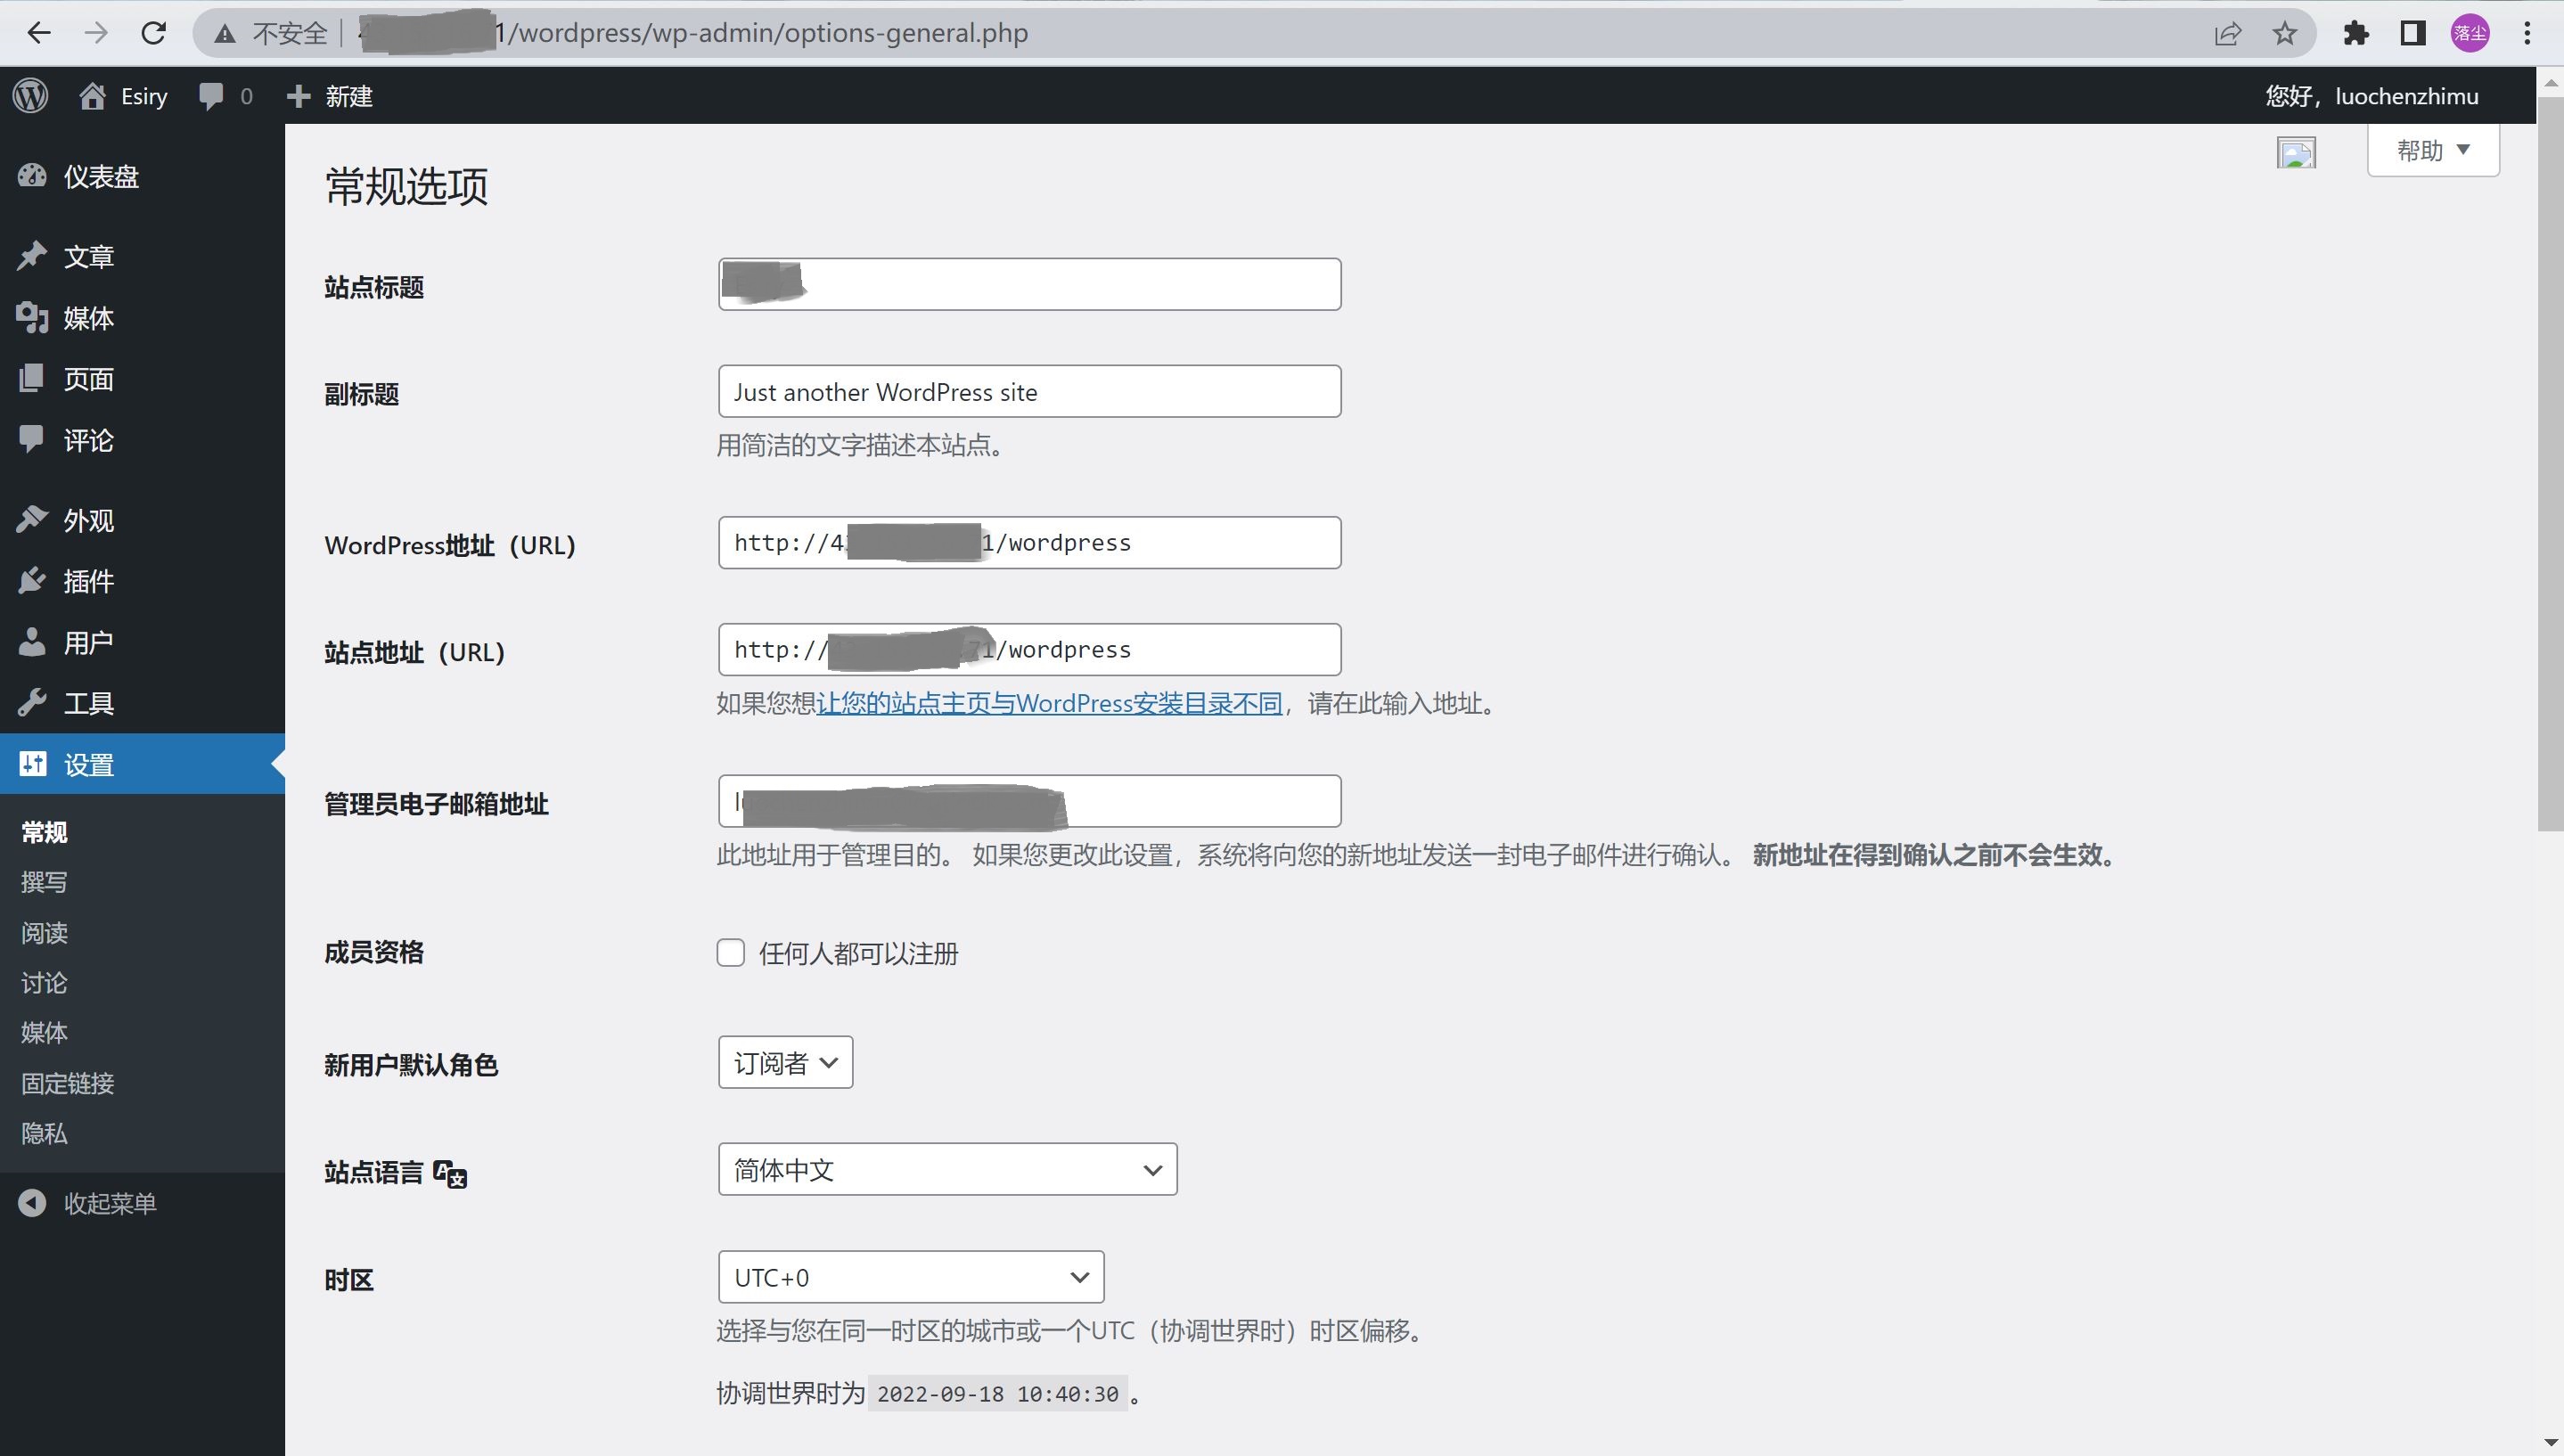
Configured as:
WordPress address (URL): https://www.domain.com/wordpress
Site address (URL): https://www.domain.com/

Now you can access it through the https encrypted domain name:
WordPress background management: https://www.domain.com/wordpress/wp-admin/
Website home page: https://www.domain.com/
Acme.sh View domain name certificate information:
sudo su acme.sh --info -d domain.com
Update digital certificate
sudo su acme.sh --renew -d domain.com --force
Later update acme.sh method
sudo su acme . sh -- upgrade
Set http redirection to https
1. Start redirection
Start rewrite mod
sudo a2enmod rewrite perhaps sudo ln - s / etc / apache2 / mods - available / rewrite . load / etc / apache2 / mods - enabled / rewrite . load
2. Set http port redirection
Method 1 (recommended):
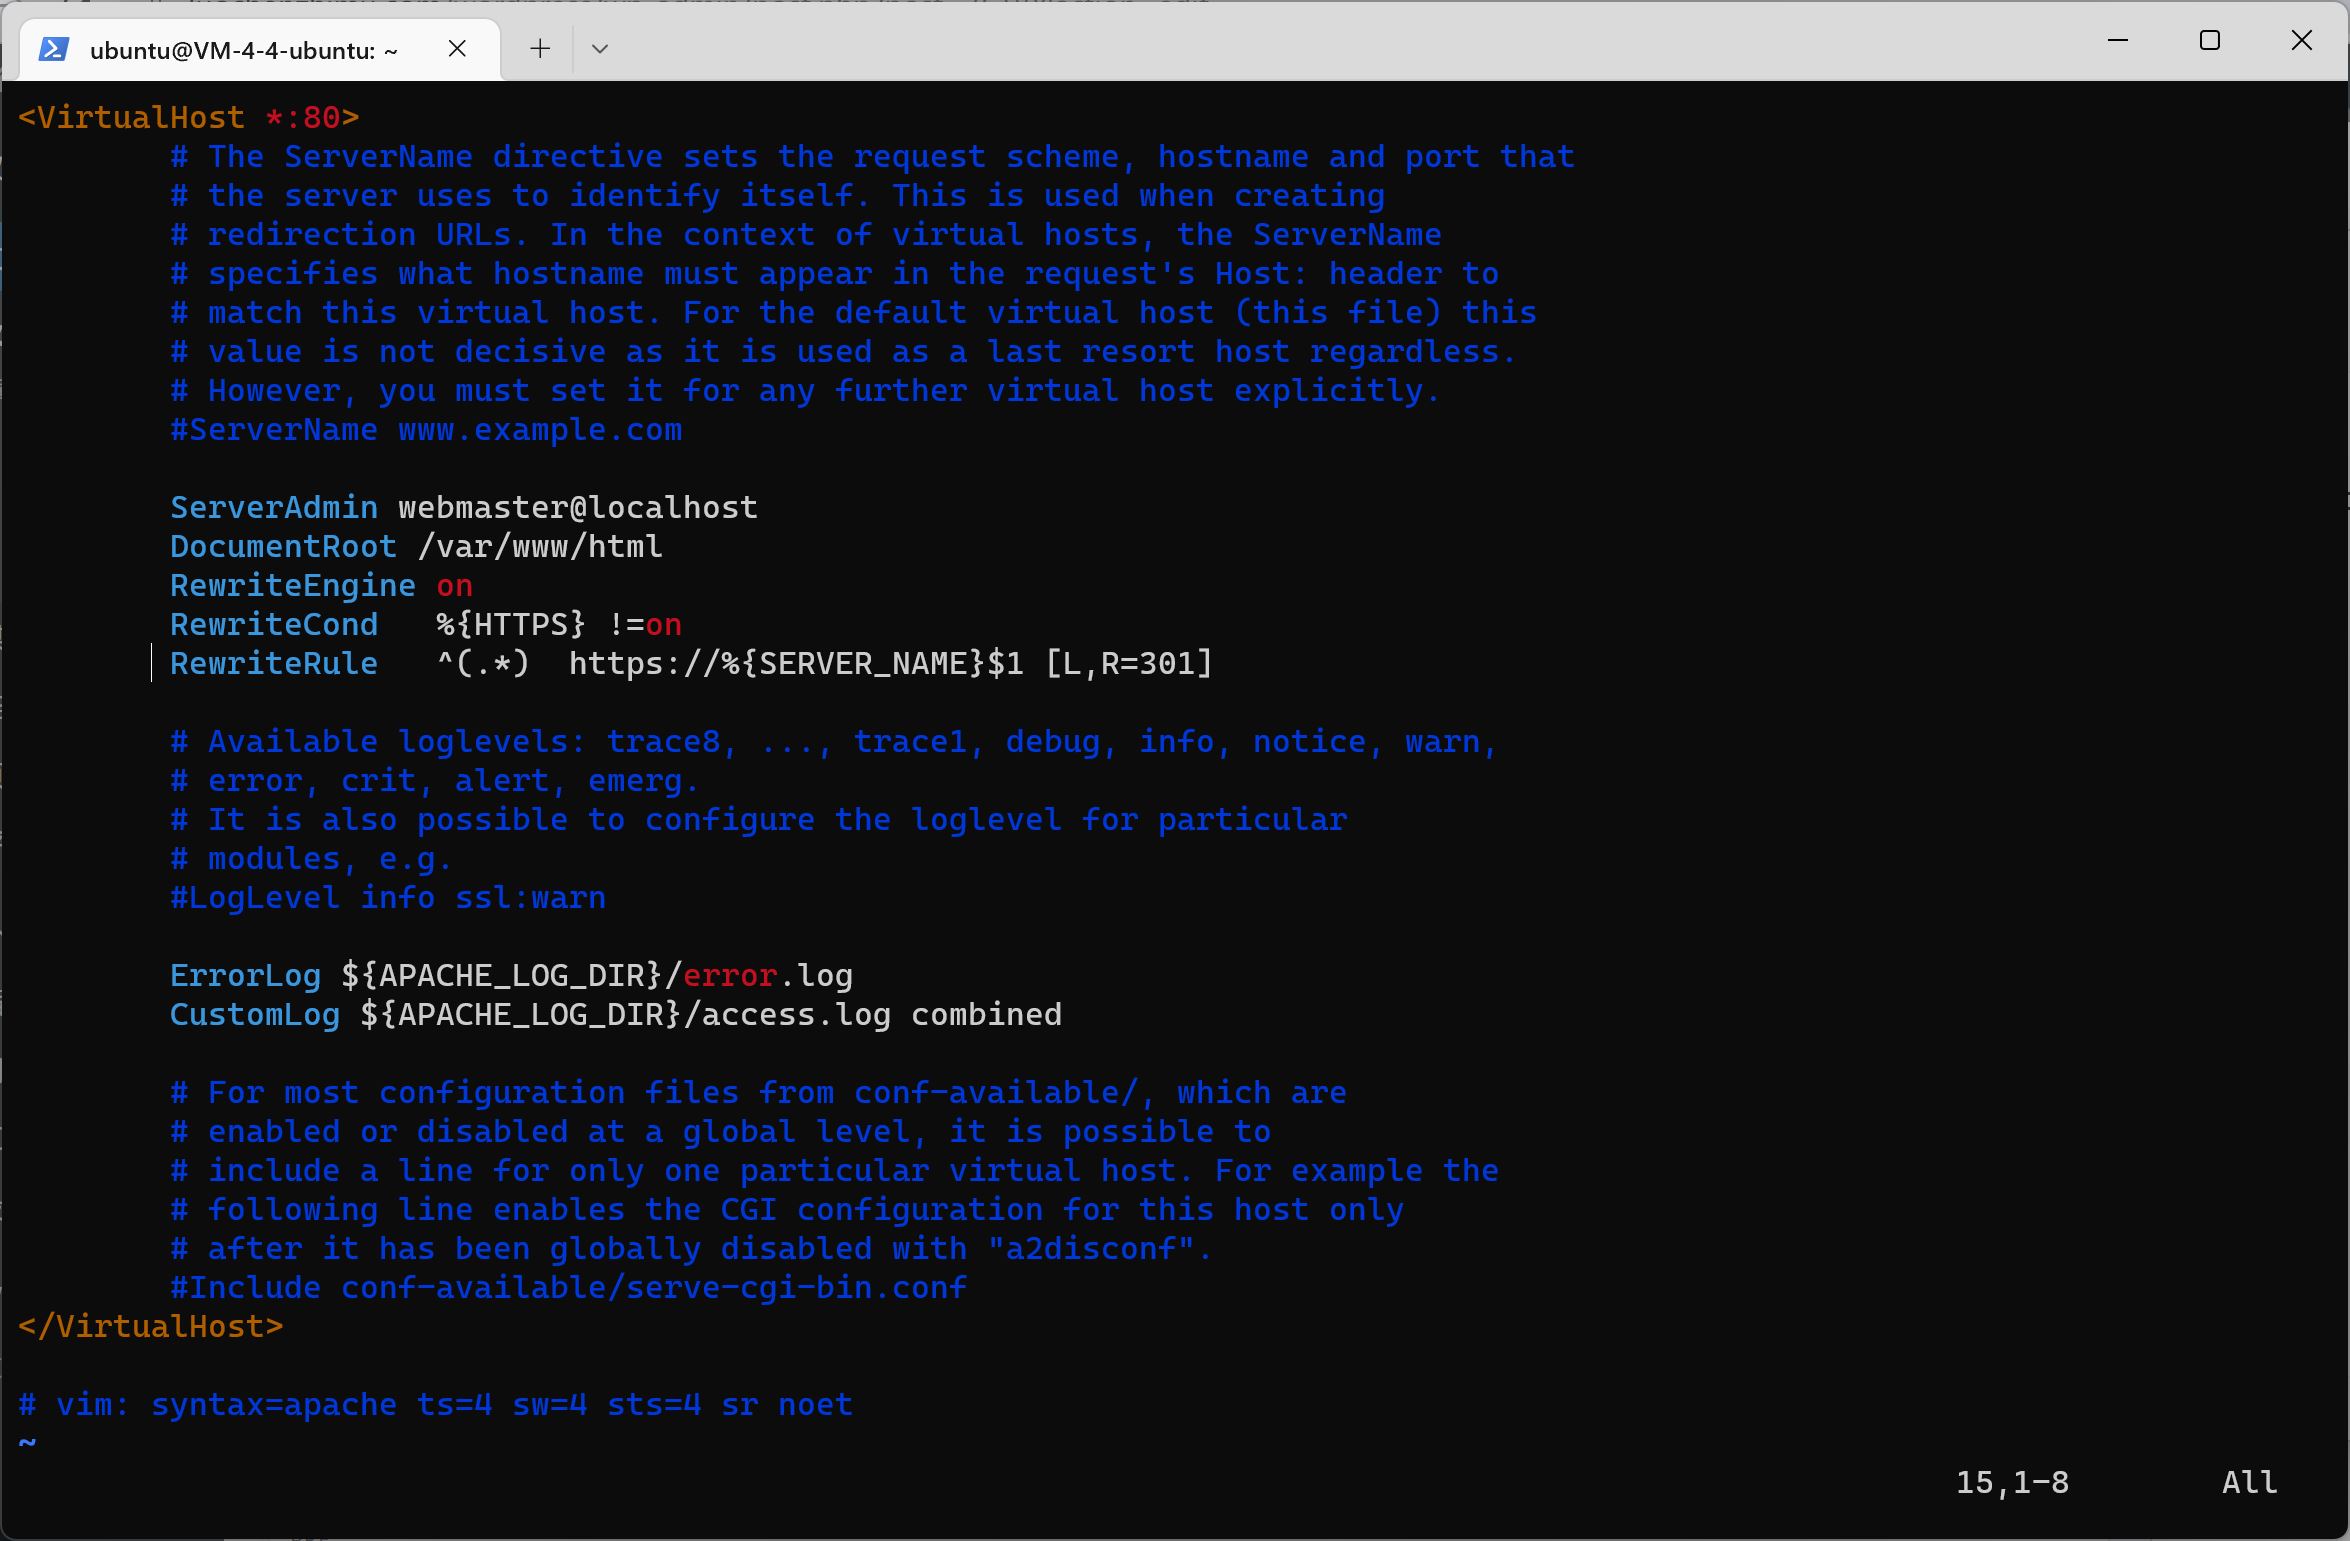
Open/etc/apache2/sites available/000-default.conf,
(Click the keyboard letter i to enter the vim editing mode, click esc to exit the editing mode, and finally type: wq to save and exit)
sudo vi /etc/apache2/sites-available/000-default.conf
Add the following three lines at any place in the< VirtualHost *: 80>< VirtualHost>tag
RewriteEngine on RewriteCond %{HTTPS} != on RewriteRule ^(.*) https://%{SERVER_NAME}$1 [L,R=301]
Mode 2:
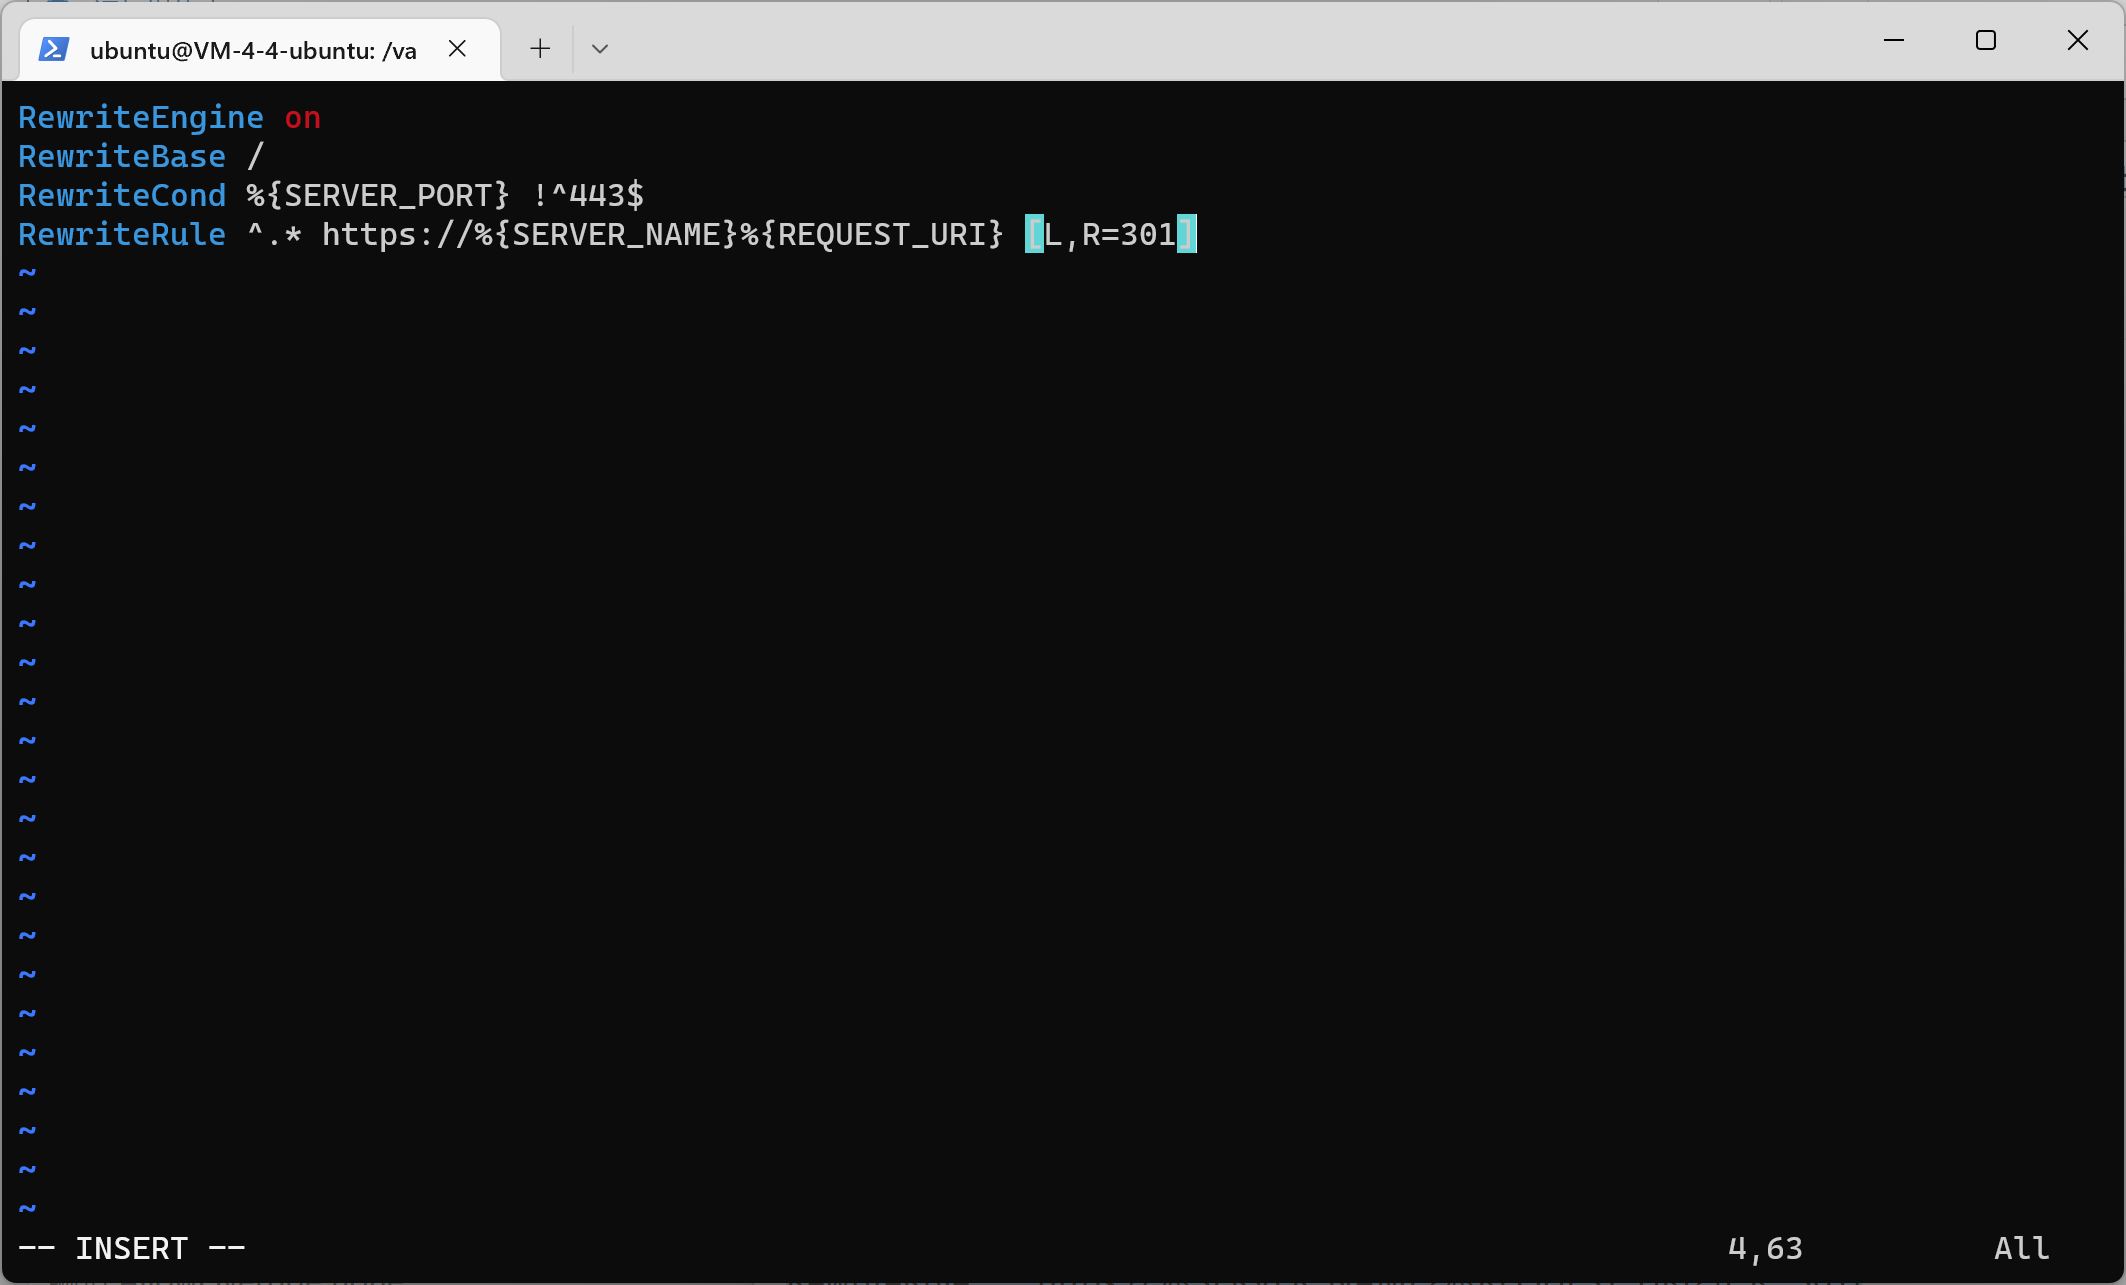
Or, create a new. htaccess in the website directory, and enter three commands in sequence:
cd /var/www/html ll sudo vi .htaccess
New. htaccess Edit content:
(Click the keyboard letter i to enter the vim editing mode, click esc to exit the editing mode, and finally type: wq to save and exit)
 RewriteEngine on RewriteBase  /
 RewriteCond  %{ SERVER_PORT }  !^ four hundred and forty-three $ RewriteRule  ^.* https : //%{SERVER_NAME}%{REQUEST_URI} [L,R=301]

3. Modify the Apache 2 configuration
Modify the Apache 2 configuration file Apache2.conf
sudo vi /etc/apache2/apache2.conf
Edit AllowOverride none
Change to AllowOverride All
 4. Finally restart Apache 2
sudo service apache2 restart
To prevent WordPress from automatically updating, edit/var/www/html/wordpress/wp-config.php
sudo vi /var/www/html/wordpress/wp-config.php
Add this sentence:
define("WP_AUTO_UPDATE_CORE", false);
After installing the blog system, restart the server:
sudo reboot
Configure Mail System
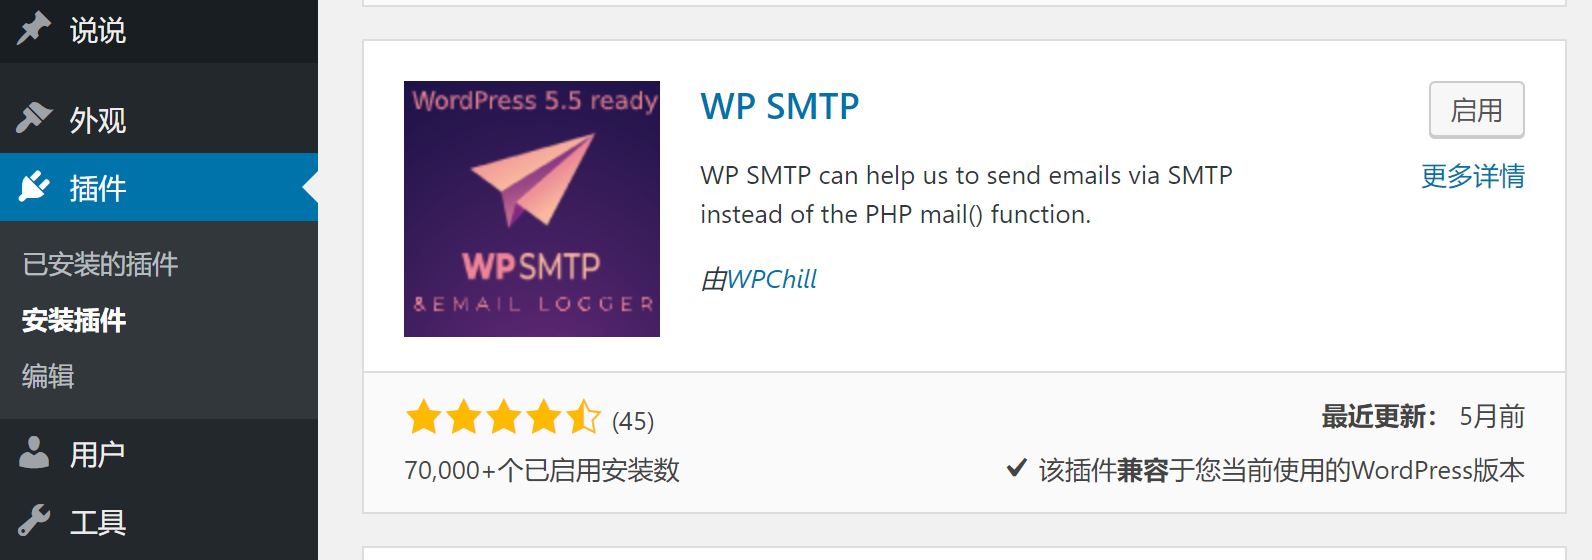
WordPress background plug-in system search: SMTP, select WP SMTP installation
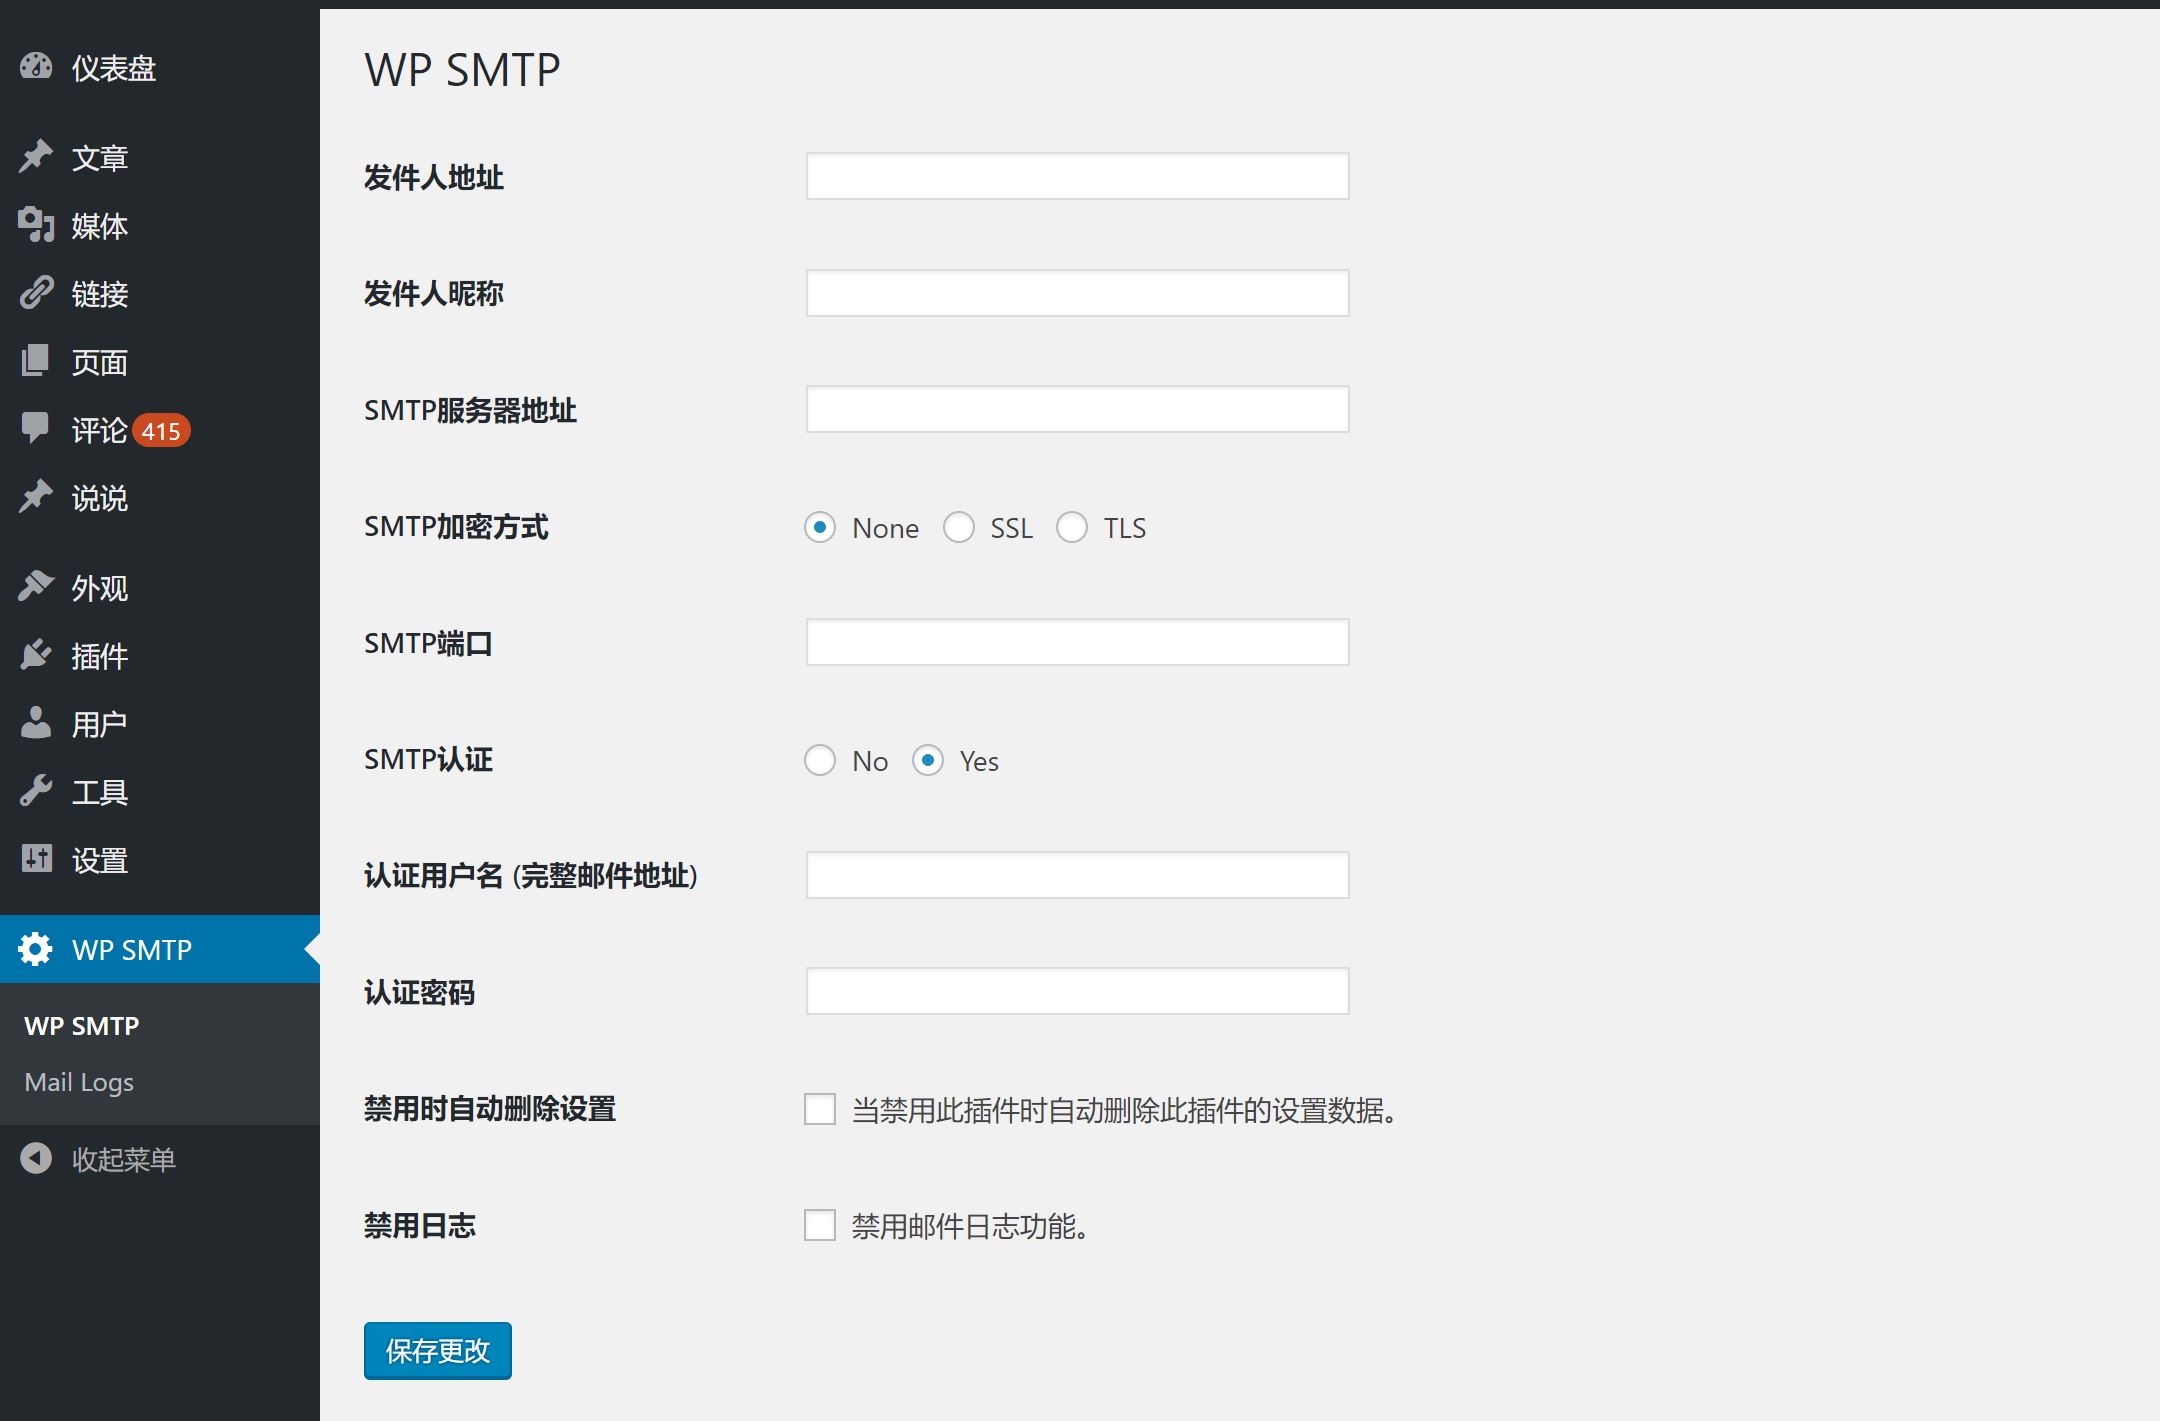
Enable the plug-in and open it to set the mailbox:
Obtain SMTP authorization code:
Log in to QQ email: https://mail.qq.com/
Tencent email (free domain name customization): https://exmail.qq.com/login
The main parameter information is as follows. Please keep other configurations as default.
- SMTP host : Fill in
smtp.qq.com 。
- encryption : Select SSL.
- SMTP Port : Fill in
four hundred and sixty-five 。
- SMTP User Name : Fill in your email address.
- SMTP Password : Fill in the authorization code, not the password of QQ mailbox.
- Sender Name : You can fill in the name of your blog.
- From : You can fill in the administrator's email address. It must be a valid email address, otherwise an error will be reported.
Obtain the authorization code: click Settings - Account - POP3/IMAP/SMTP/Exchange/CardDAV/CalDAV Service - Generate the authorization code

Server data migration (optional):
Take Tencent Cloud as an example, make a server image, copy the image across regions, and then use the image to restore to the new server.
User root login Old server , export wordpress_db (required database) from the cloud database xxx. xx. xx. x (intranet IP). If it is a local database, use localhost.
mysqldump -h xxx.xx.xx.x -uroot -p blog_db --set-gtid-purged=off > blog_db.sql
Download the database from the user directory/root and upload it to the new server user directory/root
User root login New Server , delete New cloud database Blog_db in (if any):
mysql -h xxx.xx.xx.x -u root -p drop database blog_db;
Create database:
create database blog_db;
Database import
mysql -h xxx.xx.xx.x -u root -p blog_db< blog_db.sql
Local database:
mysql -h localhost -u root -p blog_db< blog_db.sql
Modify/* * MySQL hostname in the WordPress configuration file wp-config.php*/
After that, modify all the resolution addresses of the domain name, wait for the resolution to be updated gradually, and the migration operation is completed.
Small Tips:
PowerShell will record the key when logging in to the same server IP address. If the key is not matched when the server changes, you cannot log in
step1: Enter in PowerShell cd ~/.ssh/ , enter .ssh folder
step2: implement start ./know* , open the file that stores the host information, find the line of sample.xxx.xxx.xxx corresponding to the ip, delete this line, and then save the file


![[Windows Tutorial] Operation method of transferring C disk software to other drive letter mapping - Wood of Falling Dust](https://img.luochenzhimu.com/public/2021/10/2021100515.jpg)
![[Tutorial] Windows 11 Remove the TPM 2.0 Restrictions of the Upgrade Image Installation Package - Wood of Dust](https://img.luochenzhimu.com/public/2023/03/2023032529.jpg)
![[Tutorial] Repair Windows Right click to create a new text document - Wood of Dust](https://img.luochenzhimu.com/public/2022/03/2022030702.jpg)


![[Download worry free] Baidu online disk SVIP annual card 188 yuan super member exclusive coupon super low price wood of dust](https://img.luochenzhimu.com/public/2022/06/2022061110.jpg)