Zoho is a globally popular integrated CRM, including Zoho corporate mailbox, which is needed by our foreign traders. Today Hunk will introduce how to register, purchase and use zoho email. This article contains a 100USD discount link
preparation
A domain name. If there is no domain name, you can go here Purchase on namesilo (including discount code
A cloudflare account, register cloudflare reference Register to use Cloudflare And put the DNS of the domain name on the cloudflare platform. Because the DNS resolution of cloudflare takes effect very quickly, it can take effect in one minute, so as to avoid waiting too long.
A common mailbox, preferably a public mailbox.
A credit card with visa or mastercard, or an available paypal account, Zoho's corporate email only supports these two payment methods.
Open a txt document to save data.
be careful
Zoho has branches in many parts of the world, including China, but the Chinese branch is mainly for domestic business, because their mailbox servers are located in China. If you are doing foreign trade business, it is recommended to use a foreign email server, which can improve the arrival rate. This article talks about the method of registering and using the US ZOHO domain name email.
1. Register zoho corporate email account
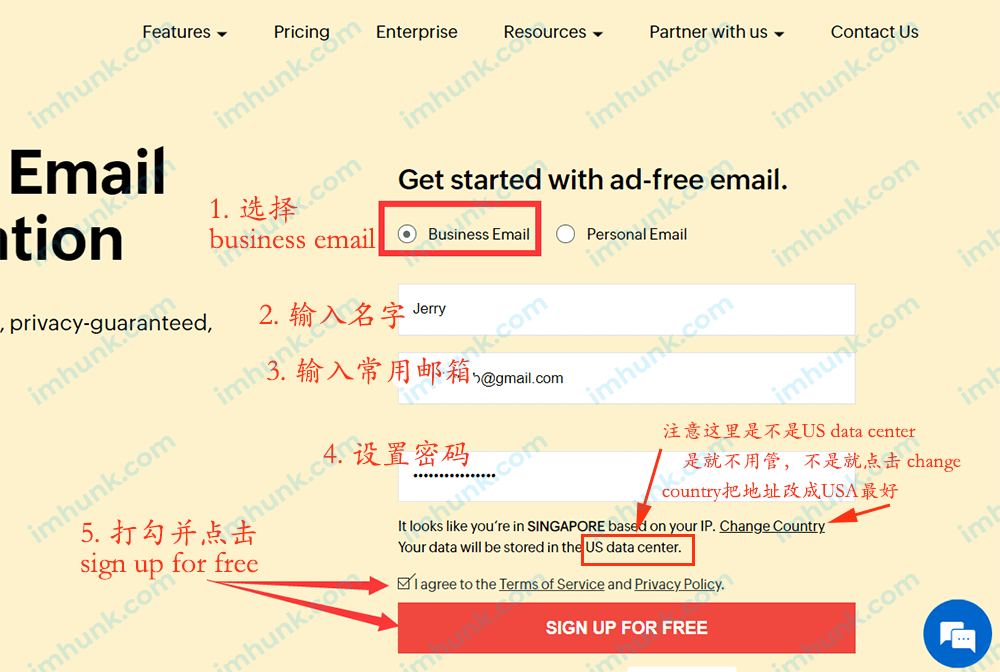
First click Exclusive link for 100USD discount , you can enter the zoho official website, select business email, enter the name, email address, and set the password.
Note that the following data is recommended to be placed in the us data center. If it is displayed in other places, click change country to switch to Hong Kong, the mainland, or the United States. In this case, the data center will be placed in the United States.
Then check the front of I agree to the tens of service and privacy policy.
Finally, click sign up for Free.
Next, your email will receive a verification code, fill it in, and click verify

Next, you will go to the setting step of the enterprise mailbox.
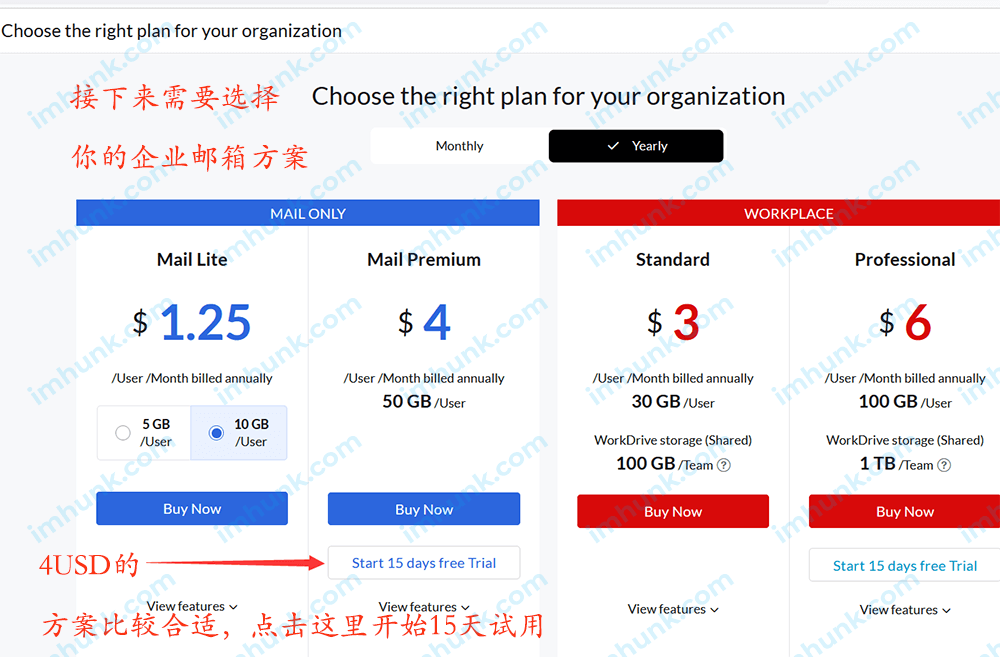
First, you need to select your mailbox scheme
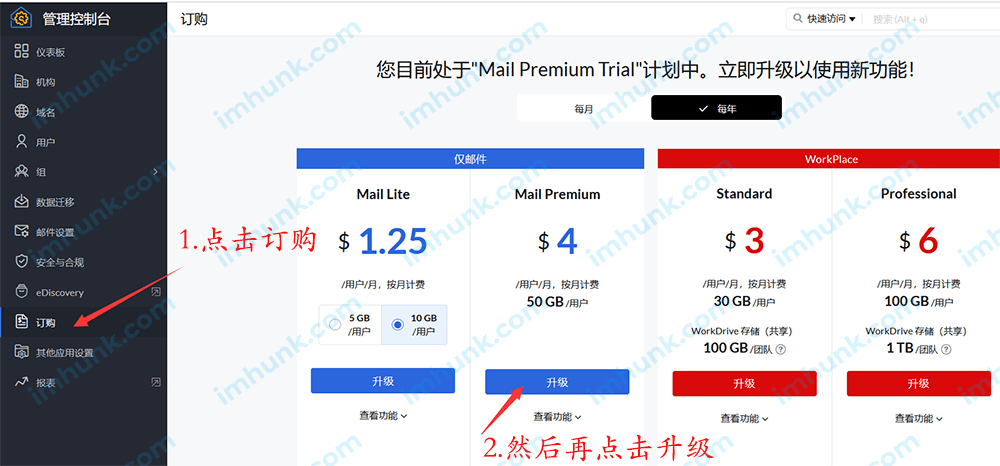
There will be several options. On the whole, we recommend the 4USD/month one, which has 50G of space and can store mails for a long time without cleaning.
Of course, if your budget is limited, you can also choose the one of 1 USD/month or 1.25 USD/month, but his mailbox space is smaller, only 5 GB or 10 GB, attachments also have size limits, and you can only buy them directly without trial.
If you want to choose this option, you can directly click Purchase, and then enter the dual currency credit card or paypal payment.
We can try the 4USD/month scheme first, and click start 15 days Free trial.
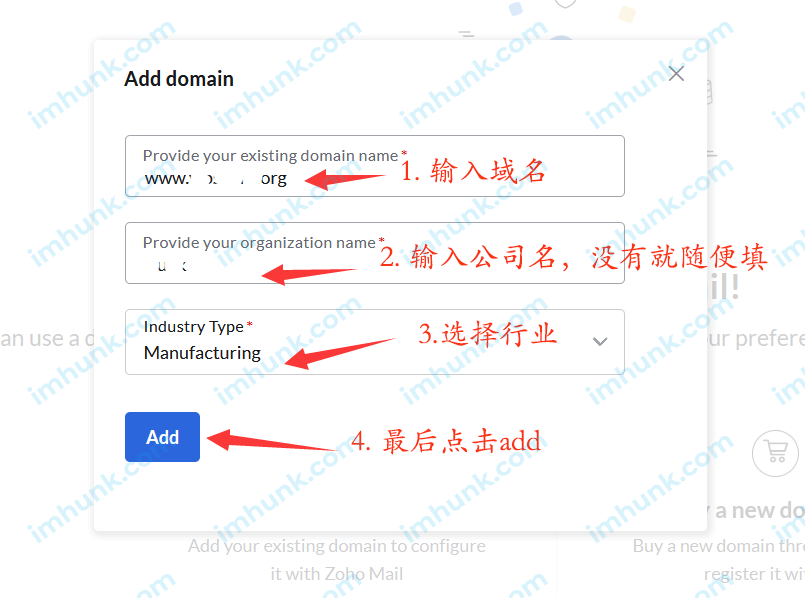
Then you need to add your corporate email domain name, click add now, enter your domain name, enter your company name, if there is no company, write one at random, select your industry, click add, and then click proceed to domain verification.

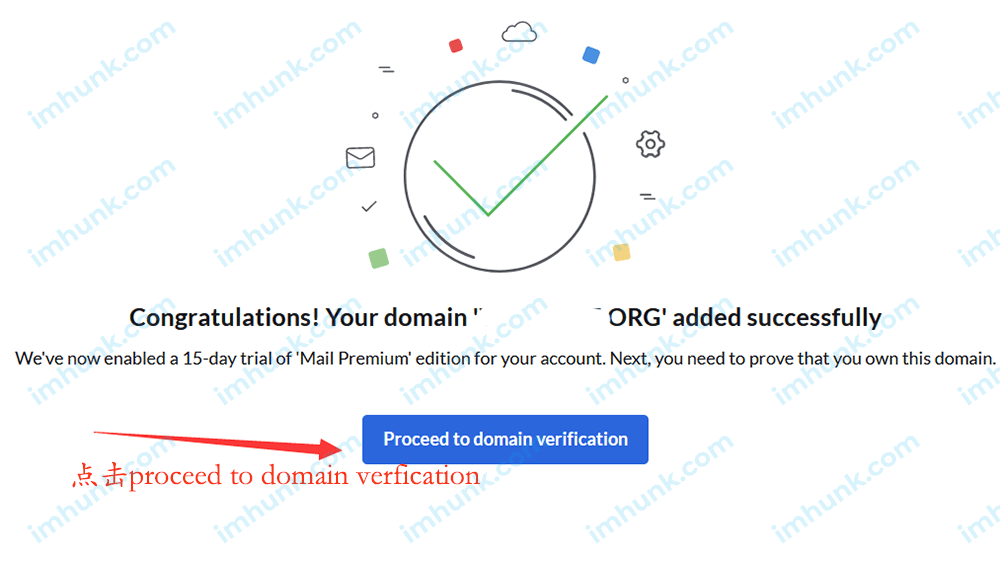
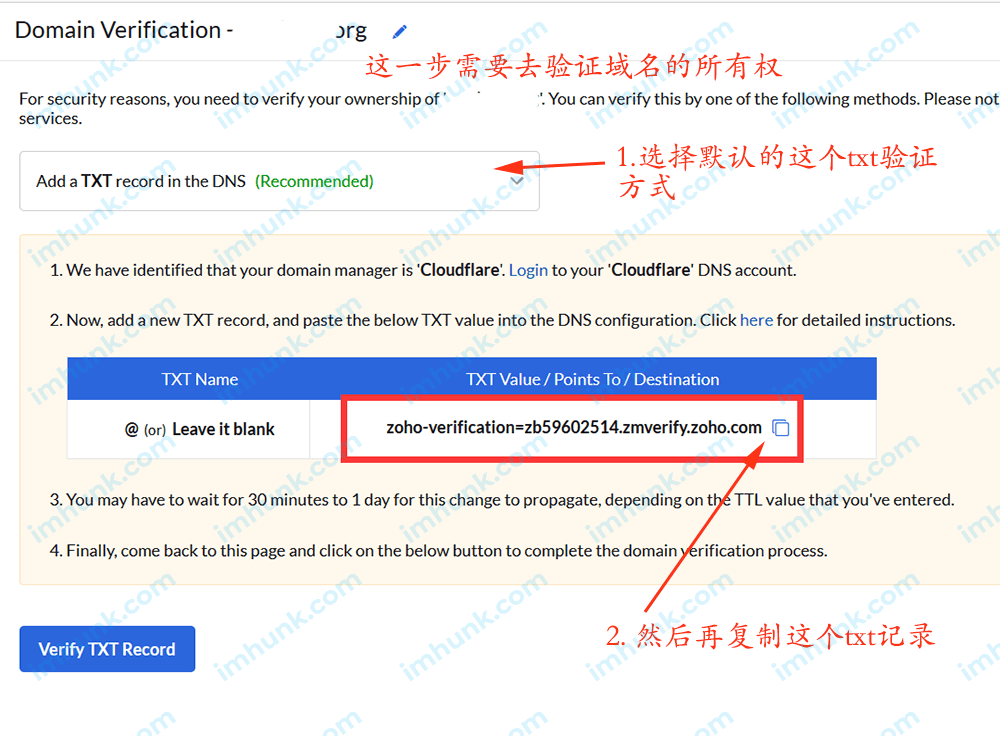
Next, you need to verify that the ownership of the domain name belongs to you.
Follow its prompts to add a txt code to the background of your domain name. Because I have put the DNS of the domain name in cloudflare in advance, it prompts me to go to the background of cloudflare and add a txt resolution.
Copy this txt record
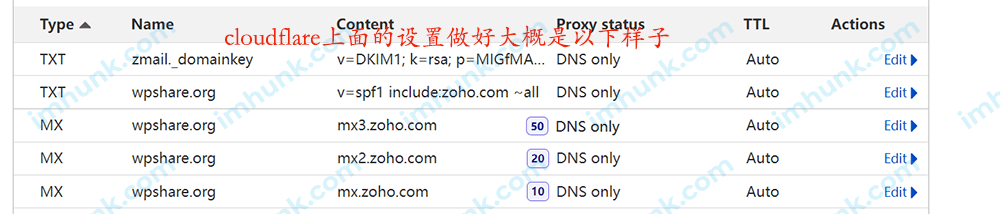
Then go to the Cloudflare background to add txt parsing, just like this.
Click Add record, select txt for type, fill in @ for name, paste the content of the txt just copied into content, and then click save to add successfully.
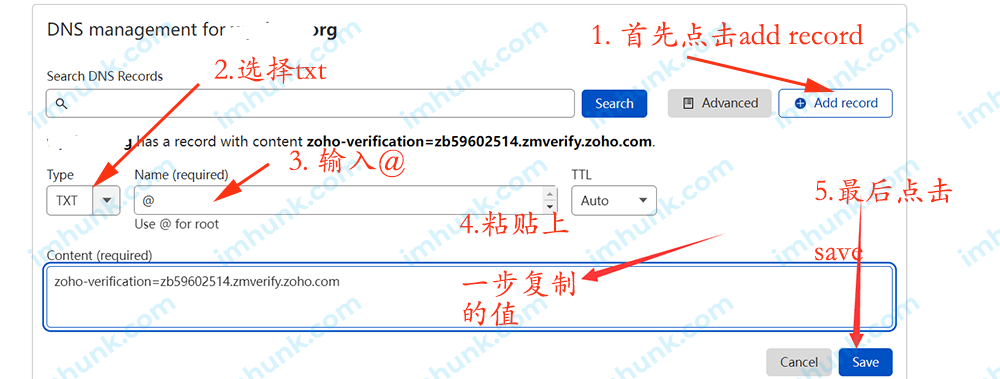
After the success, the screenshot looks like this. You must fill in according to the value provided by your page, not my value.

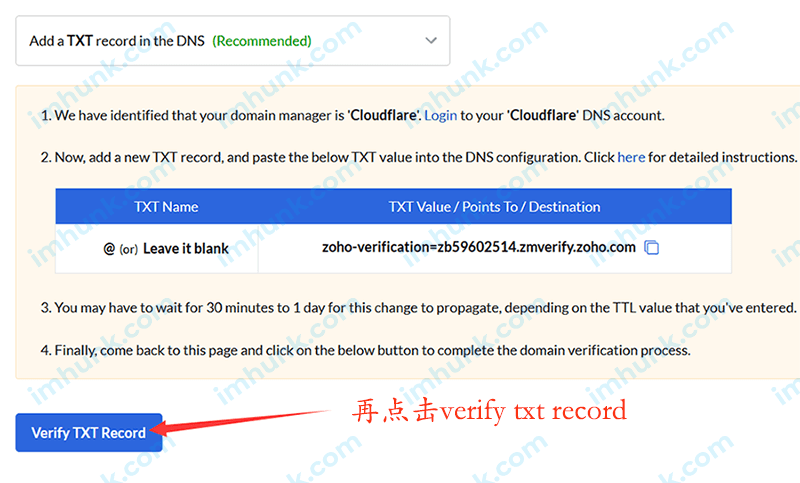
Wait one minute after filling in, and then click verify txt record.
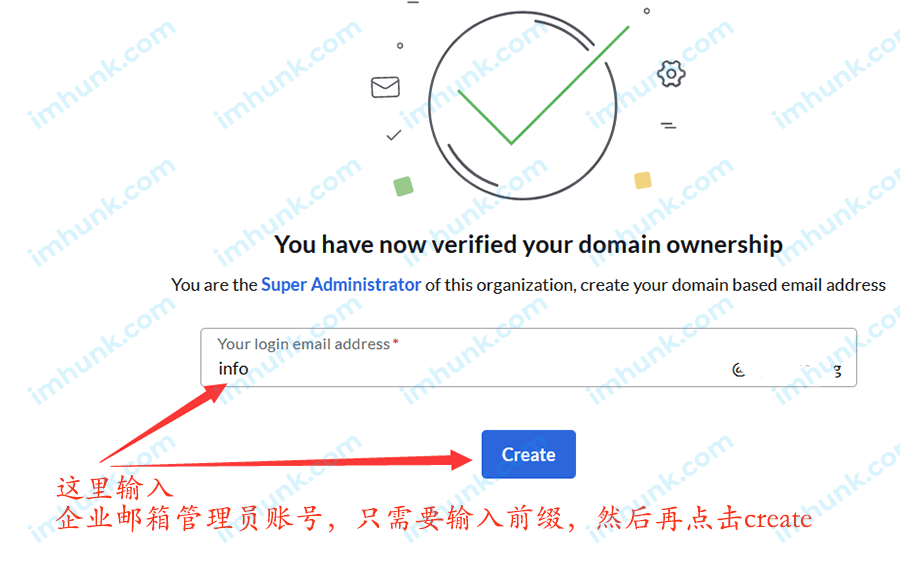
Then the verification is successful. Next, we add an administrator enterprise account, as long as you enter Info or Sales or your own name here, without filling in the suffix, and then click Create.
Then you can see that the administrator account has been successfully added, and its password is the password you entered when you registered Zoho by default. You can continue to click Add to add more mailboxes.

After clicking Add, enter your name and the prefix of your email address, and then set your account and password. Note that the force user to change password on first log in should not be checked. Finally, click ADD to add successfully.
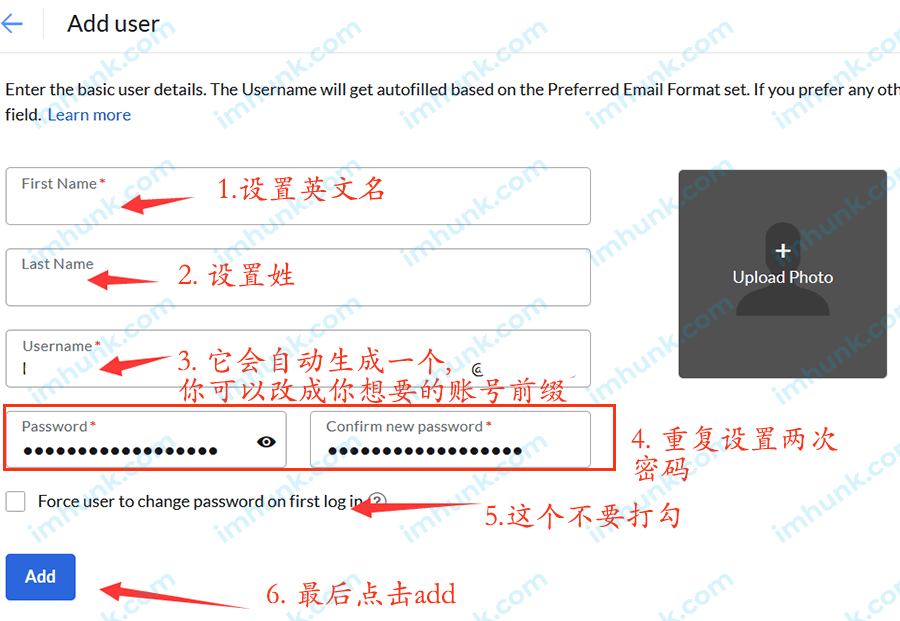
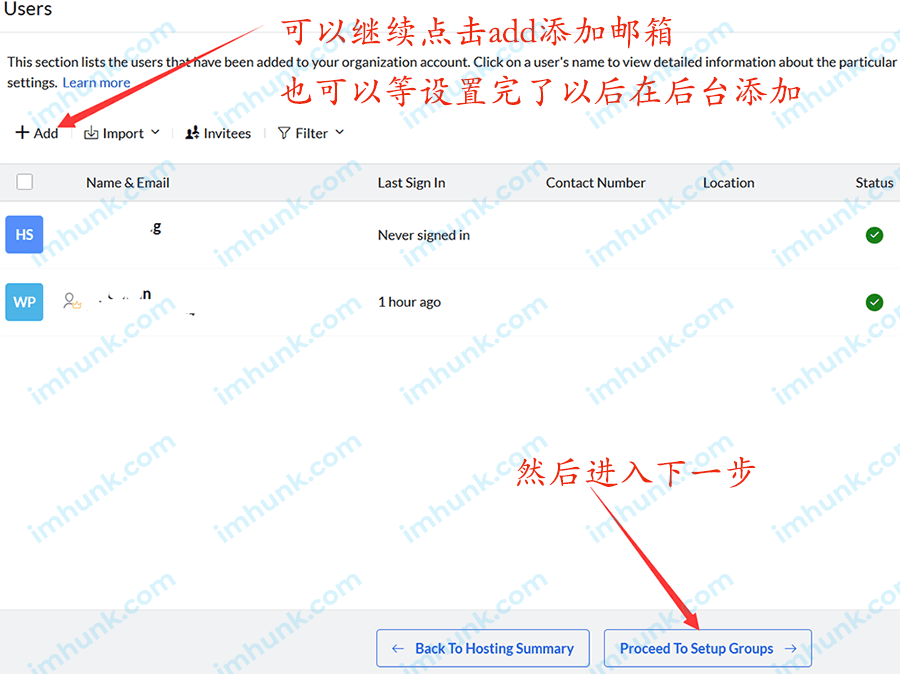
After success, you can continue to add more mailboxes by clicking Add.
Let's go directly to the next step and click proceed to set up groups.
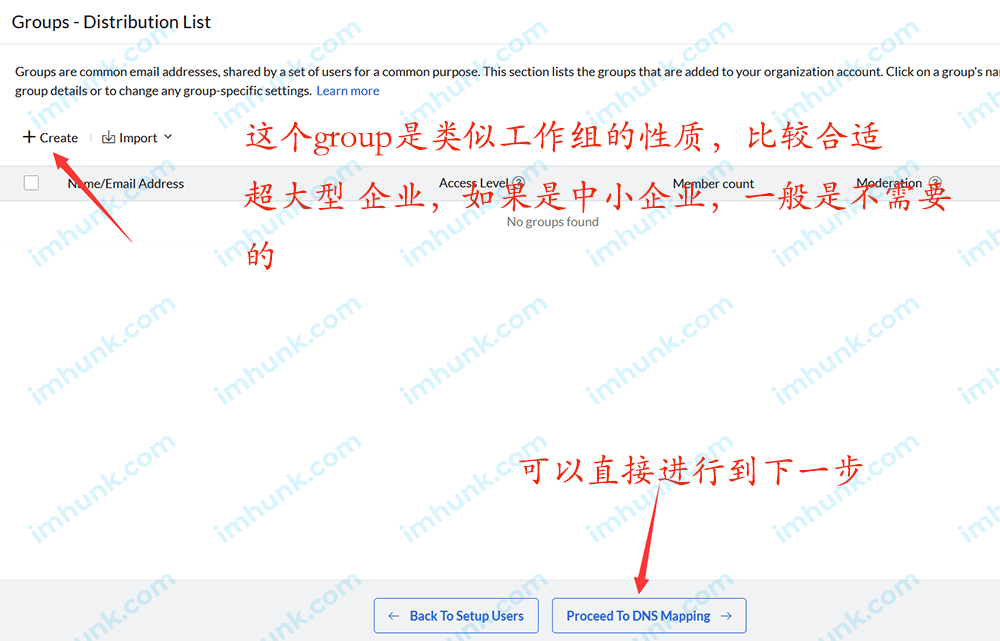
This group is equivalent to a working group, which can facilitate some communication, especially when the platform needs to share an external mailbox internally, which can be used by everyone. If you need to, you can directly click Add Create to create a new one. Personally, most of them can't be used, so you just skip it. Click proceed to DNS mapping.
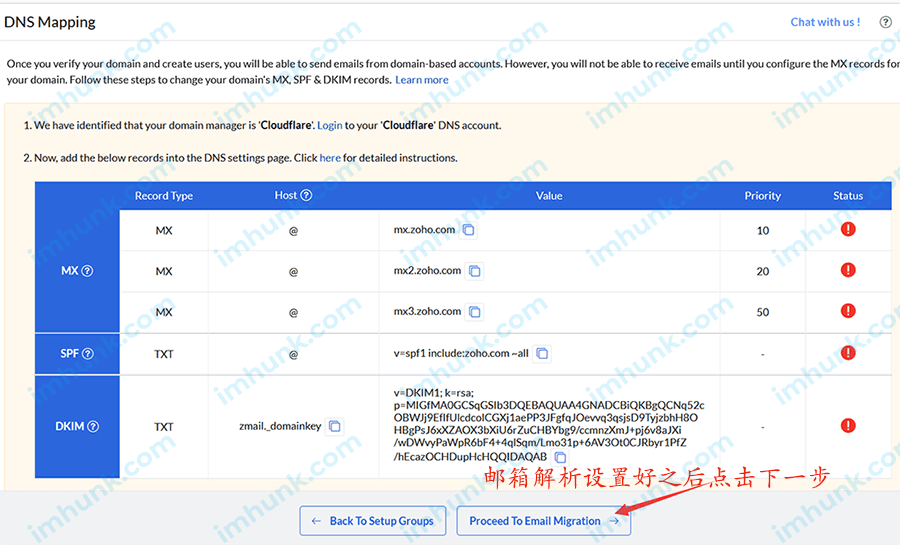
Next, you need to add the mailbox resolution. There are three mx records, one SPF record, and one dkim record.
Copy these values, paste them into your notepad, and then go to the DNS background of your domain name to add these records.
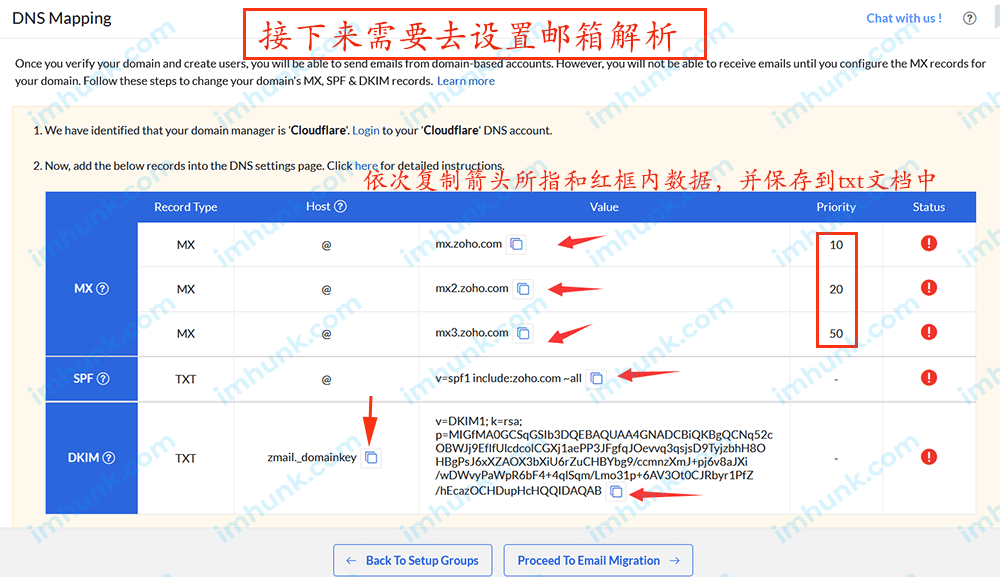
If the DNS domain name is placed in cloud flare, please refer to this article https://www.imhunk.com/cloudflare-tutorials/
After the five records are added, it looks like this, Note that your other MX and other records related to email should be deleted, Because only one corporate mailbox can be used at a time, if you keep records of both corporate mailboxes, there will be conflicts, resulting in no mail.
After adding successfully, click processed to Email migration.
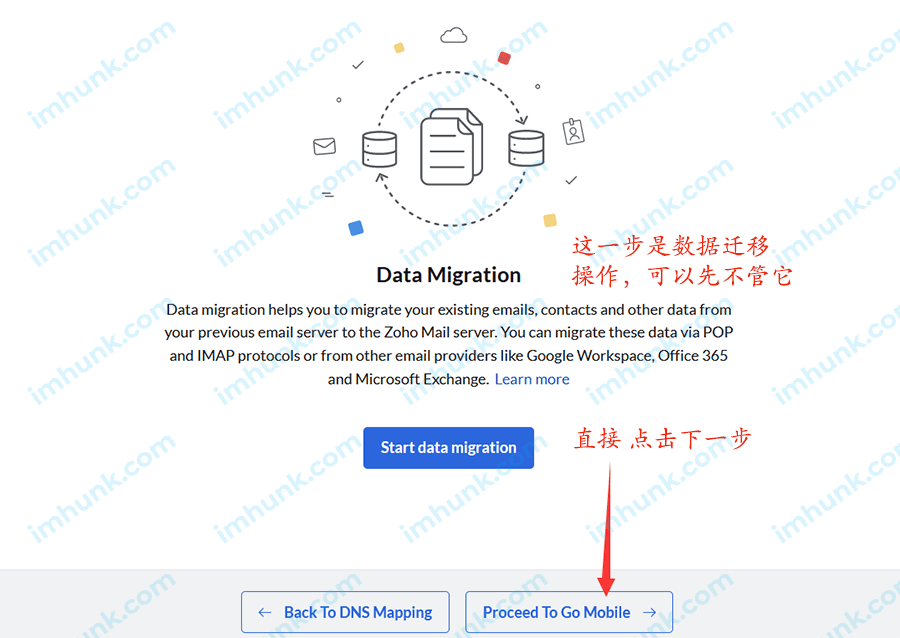
Here you can import the mail from the previous mailbox.
If you have such requirements, you can click Start Data Migration to set the next step and send an email.
Personally, I suggest downloading your email to your Foxmail for backup. Without data transfer here, it is easy to miss.
Directly click processed to Go mobile.
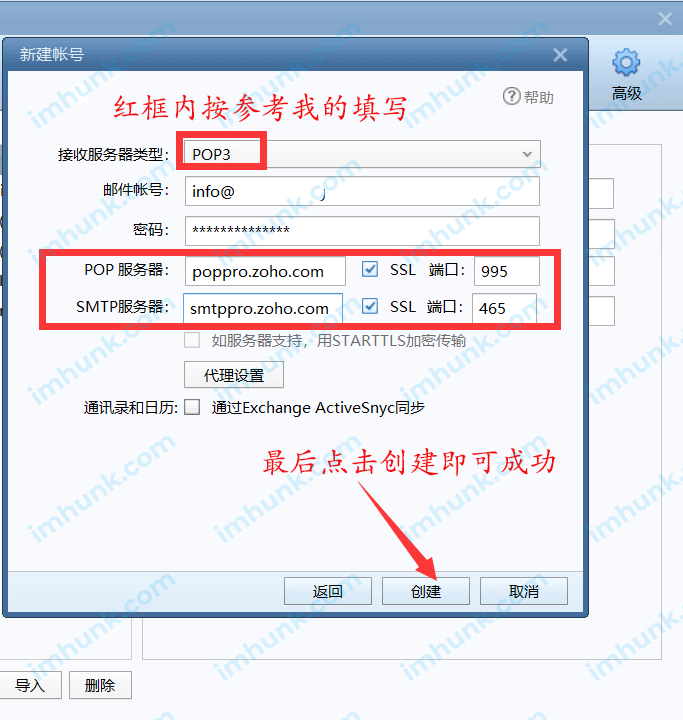
This page will show some data that you need to fill in when the client binds the mailbox

This information should be universal. I put it below and can use it directly.
|
user name |
The server |
With SSL port |
| IMAP |
Your email |
imappro.zoho.com |
nine hundred and ninety-three |
| POP |
poppro.zoho.com |
nine hundred and ninety-five |
| SMTP |
smtppro.zoho.com |
four hundred and sixty-five |
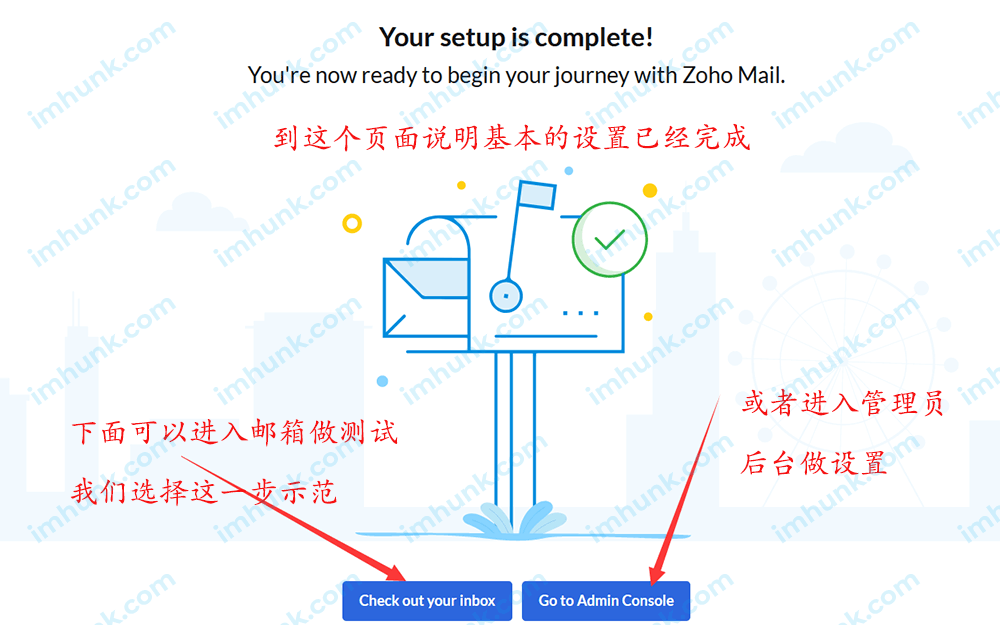
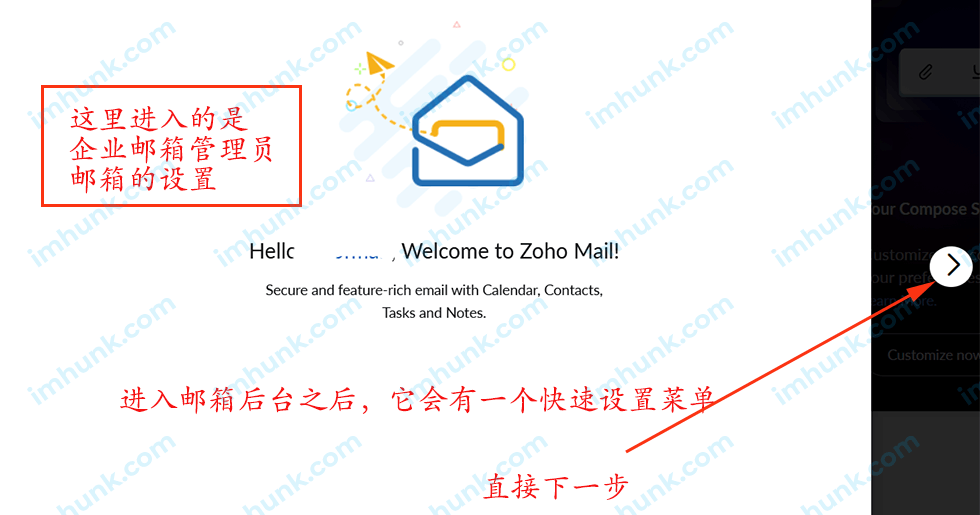
Next, you will be prompted that the settings have been completed. Then there are two buttons. One is to view your inbox, and the other is to view your management background. First, click check out your inbox to view your administrator's mailbox.
2. Basic Settings of Zoho E-mail
Before entering the mailbox background, he will prompt you to make some settings. Click the arrow on the right to go to the next step
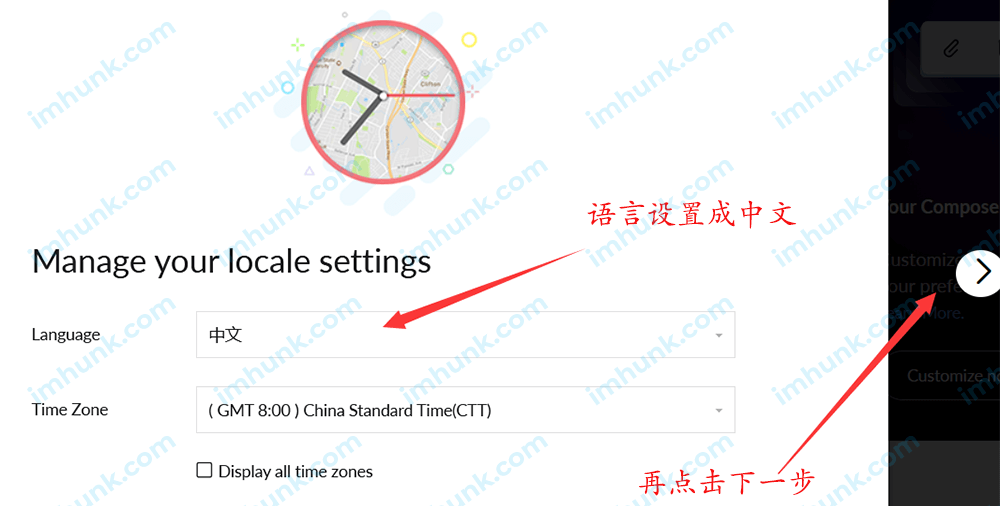
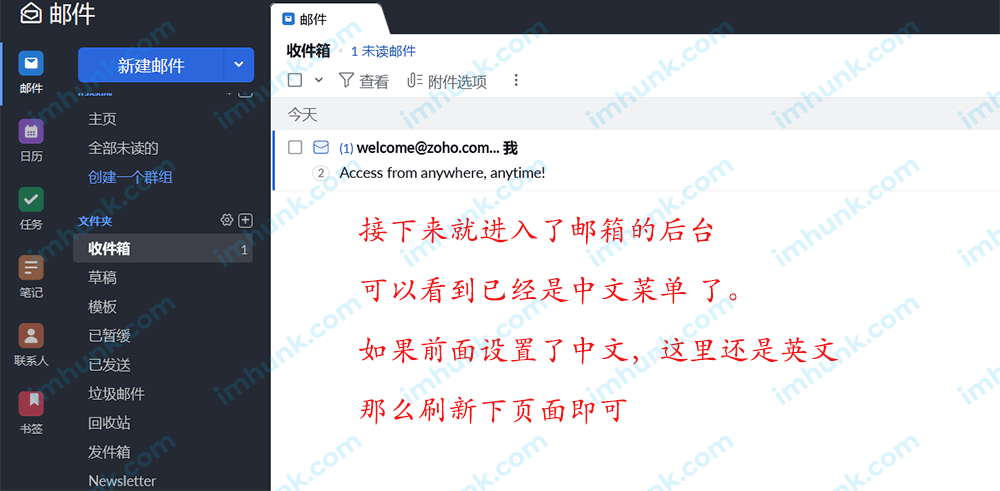
The interface language can be set in Chinese here, and click Next
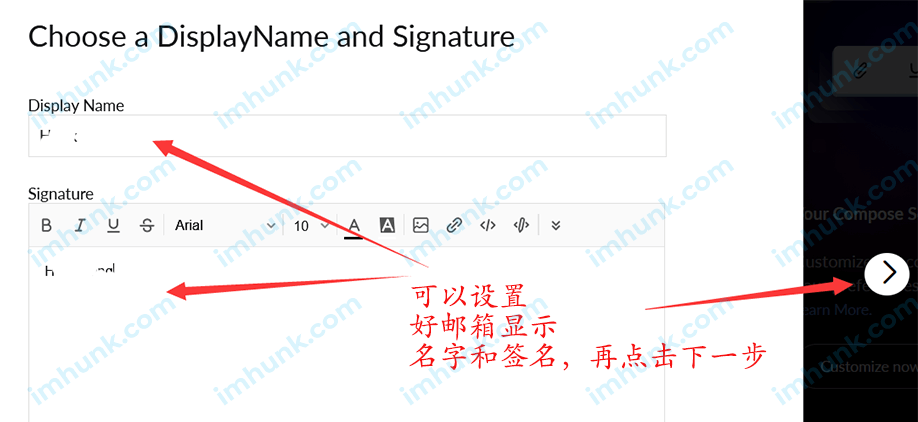
The next step is to set the display name and the signature name. After entering, click the arrow to go to the next step.
Then select your favorite backstage style, and click the arrow to go to the next step,
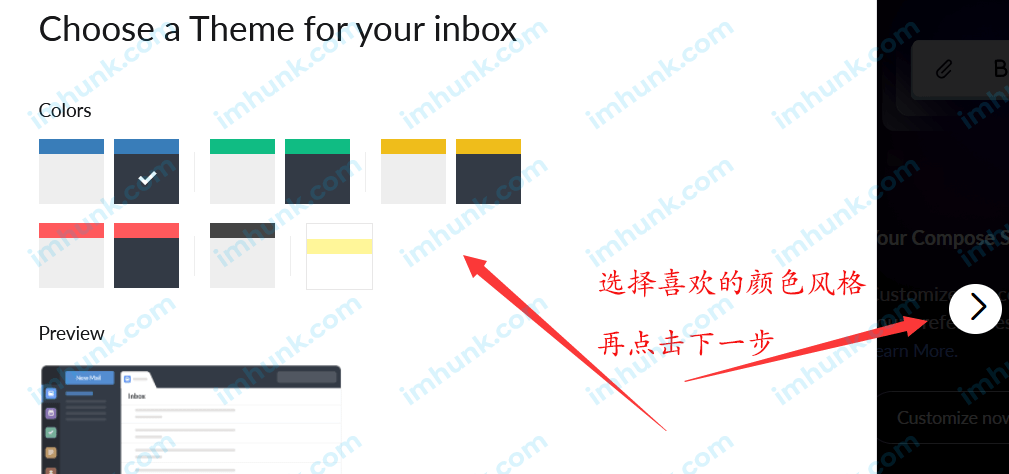
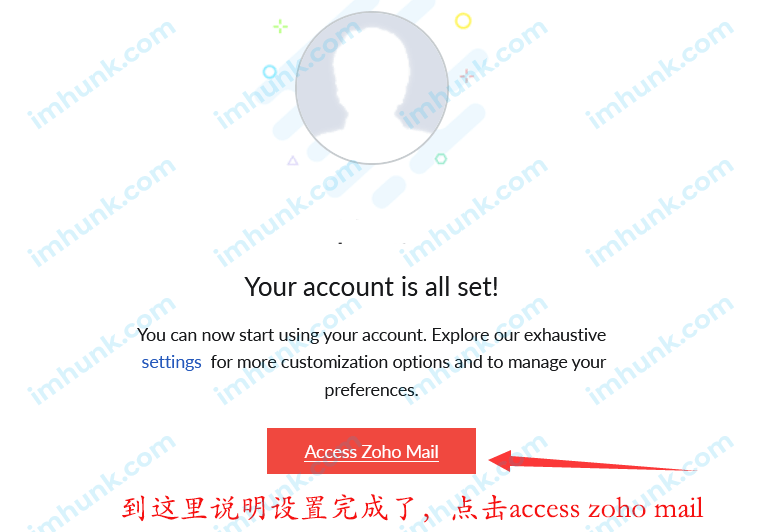
Then click Access zoho mail
Then we can enter the mailbox background. Next, we will do a simple test and send it to Gmail, 126, and QQ mailbox to see if it can be received.
It can be received after testing. After receiving them, they replied respectively, and they also received replies very quickly.
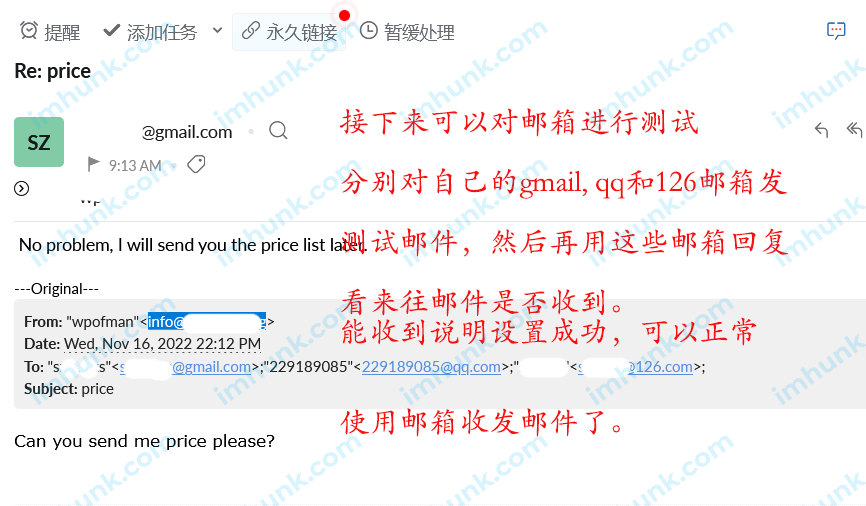
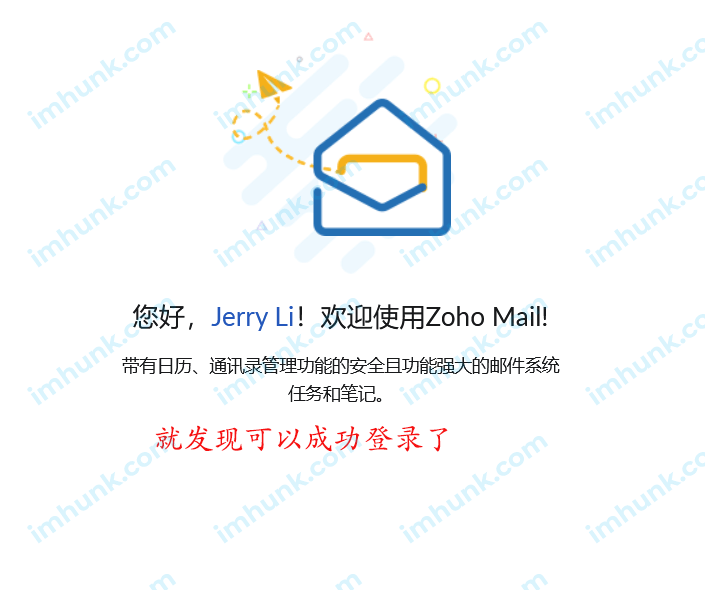
It indicates that the enterprise mailbox has been set successfully.
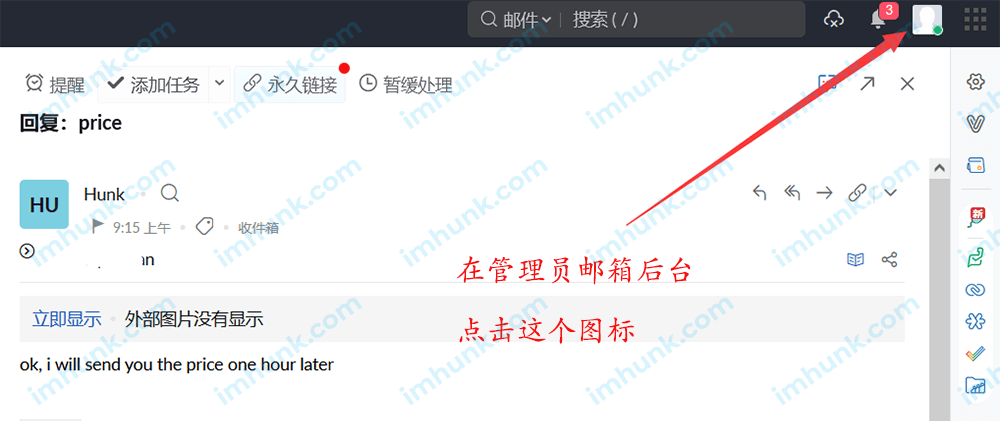
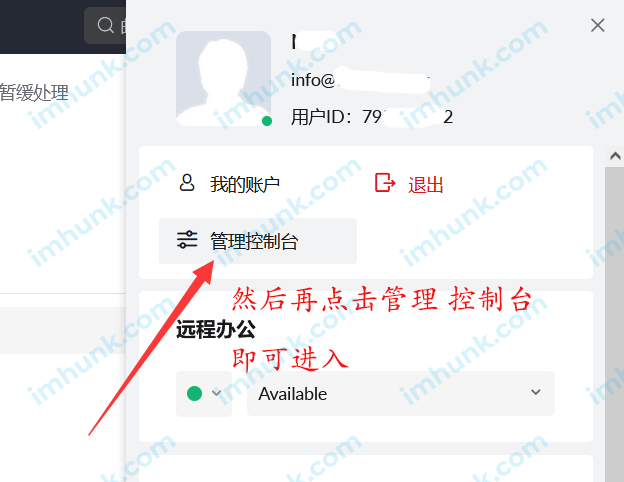
Next, we can go to the management background, click the icon in the upper right corner, and then click the management console. You can go to the management console, where you can set the mailbox.
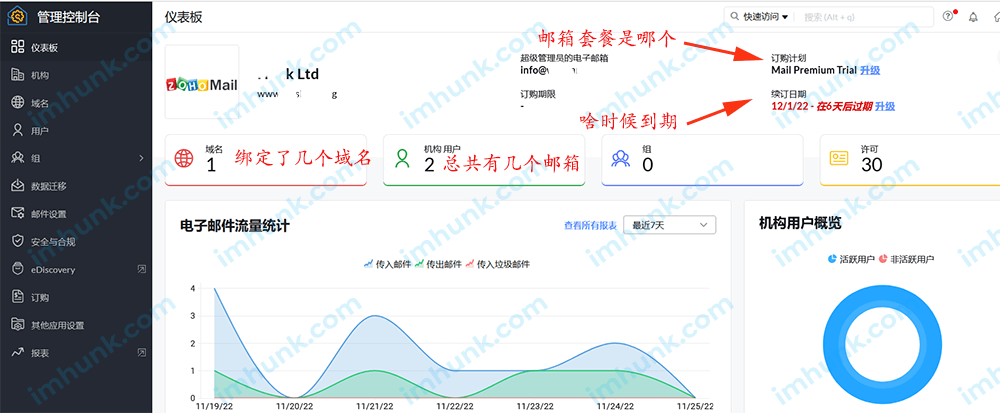
After entering the management console, you can see on the home page which package you are using, when it expires, how many domain names you have tied, and how many corporate email accounts you have.
The left menu allows you to set various mailboxes, some of which are highlighted below.
3. Zoho mailbox trial and deduction rules
The trial period of zoho corporate mailbox is 15 days, and it can be tried within 15 days, but some functions are limited, such as adding multiple domain names, contacting online customer service, loading into the mail client, and customizing the personalized login page. They can only be used after the credit card is upgraded and bound for deduction.
In addition, there are two types of Zoho mailbox: monthly payment and annual payment. The monthly payment package is a little different, and it will be more expensive. In general, the annual payment will be more cost-effective, so it is recommended to pay annually.
If you need to end the probation period in advance and transfer to the official corporate mailbox, you can pay by binding a credit card or paypal. The method is as follows
Click the Order menu, and then click Upgrade.
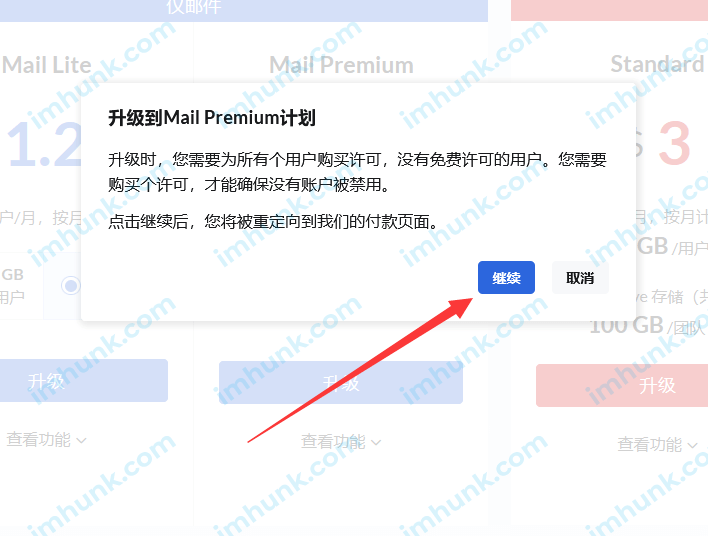
He will pop up a prompt and click Continue.
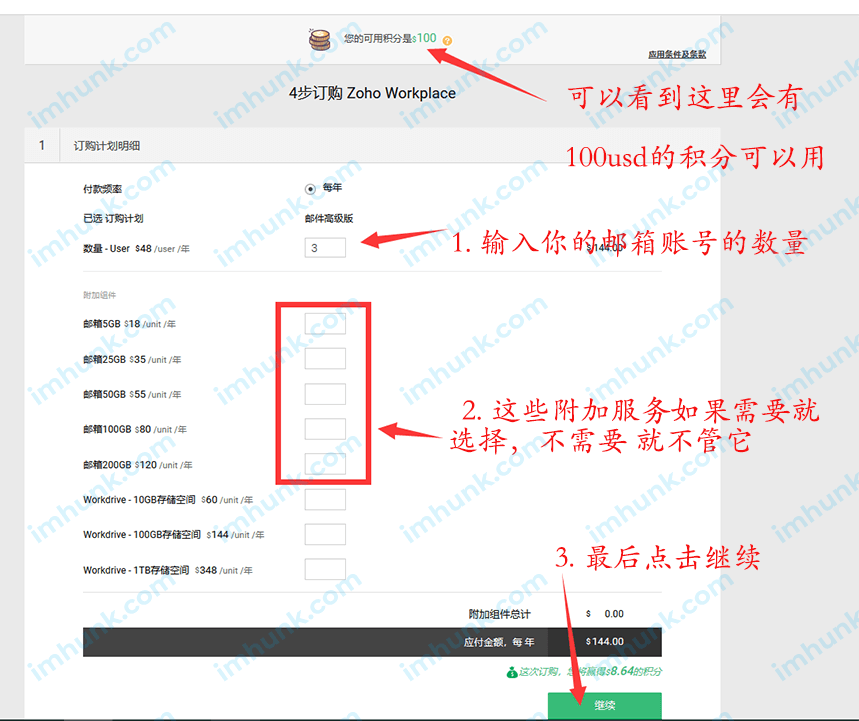
Next, you will enter the payment page, and you can see that there are already 100 USD points on the page. This point is not deducted completely, but it has a certain proportion.
First, enter the number of your email accounts
Here are the red boxes to see if you need some value-added services. If you don't need them, don't worry about them.
Then click Continue.
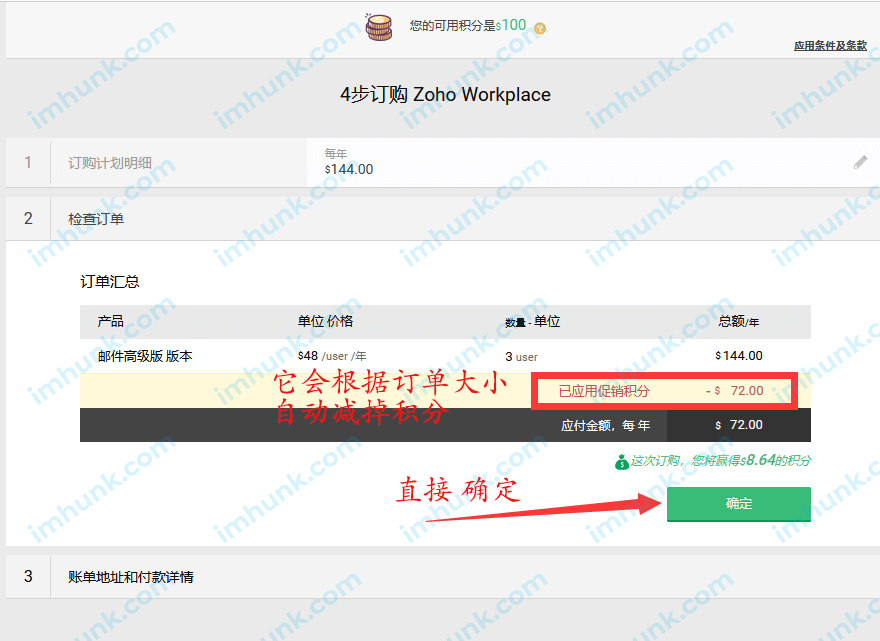
You can see that he automatically subtracts this integral, and then click OK.
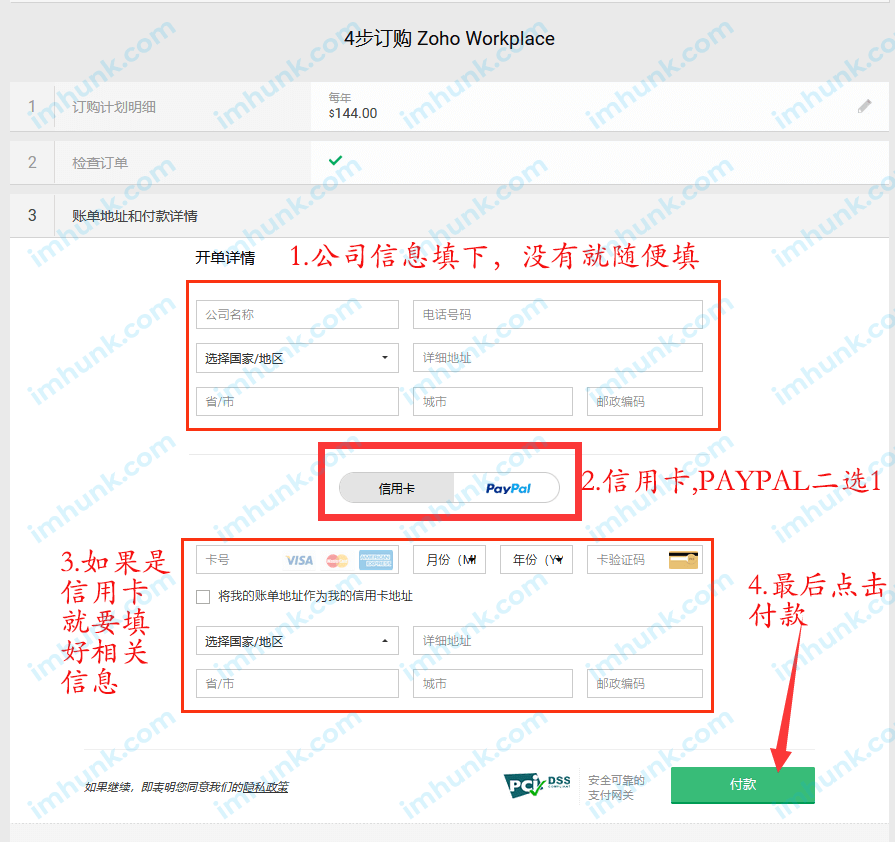
Then fill in the company information here.
Then select credit card or payPAL payment.
The credit card needs to fill in the corresponding information, and then click Payment to complete the payment.
After the 15 day trial period, if the credit card account is not bound and the fee is deducted, it will be automatically downgraded to a free mailbox. Each mailbox account has only 5G of space, and many paid mailbox functions can no longer be used.
4. How to log in to the zoho mailbox and management console?
The login address of ZOHO corporate email is Zoho Email Login Link
The login address of zoho email administrator is Zoho Email Management Background Login Link
be careful The login administrator background is to log in with your corporate email administrator's email account, not with the public email you filled in when you registered.
5. How to add and delete an email account in the background for zoho corporate email?
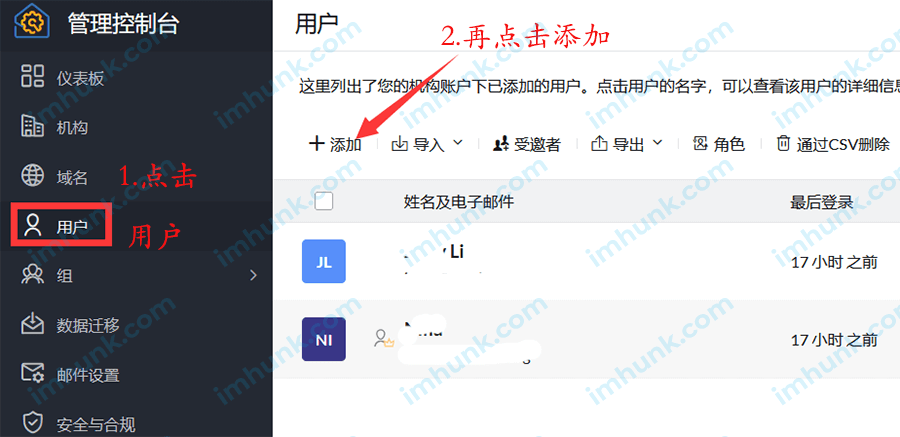
Adding an account is very simple. Click User, click Add, enter the account password, name and other data, and then click Add.

Deleting a mailbox is also very simple. Click the delete flag directly behind the mailbox to delete it. Be sure to back it up before deleting it. Because once the mailbox is deleted, all messages will be deleted at the same time.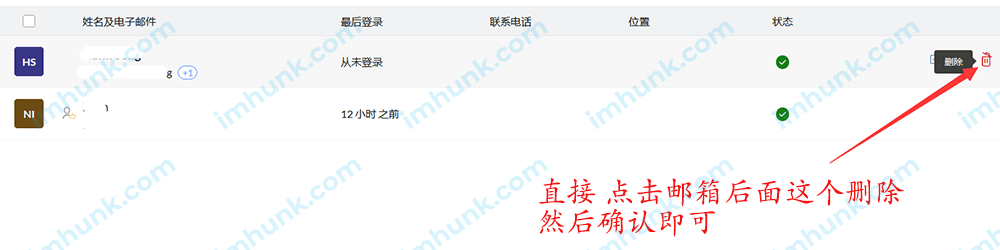
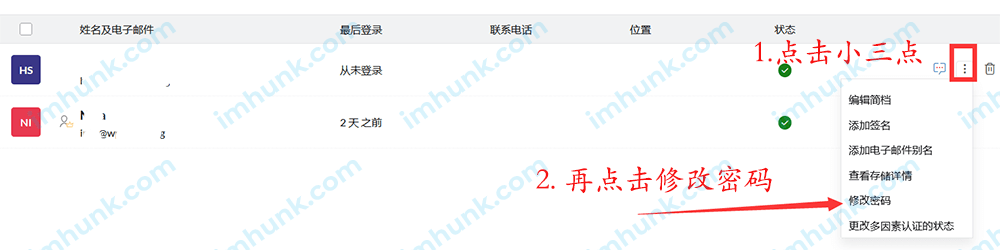
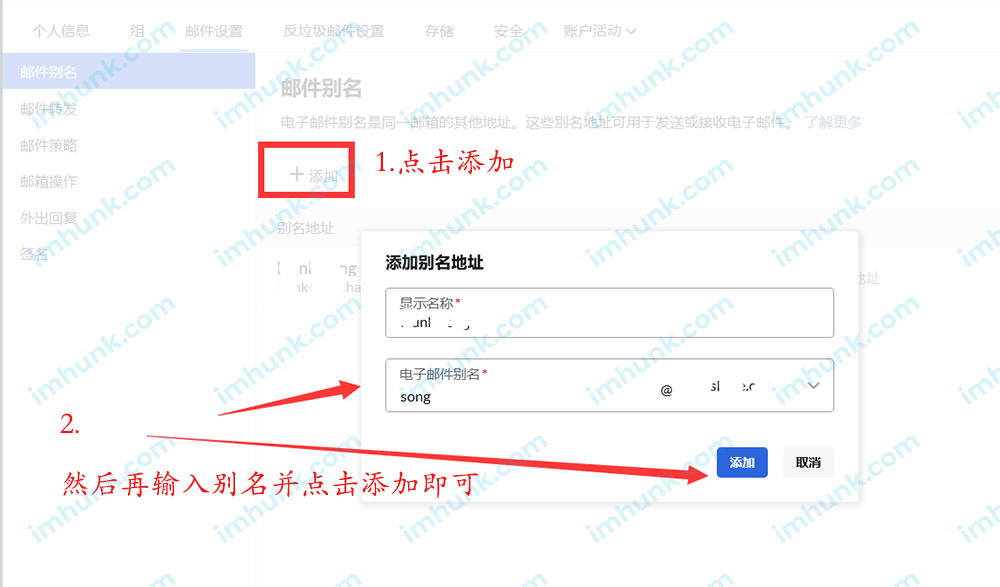
6. How to modify passwords and add aliases for zoho corporate email?
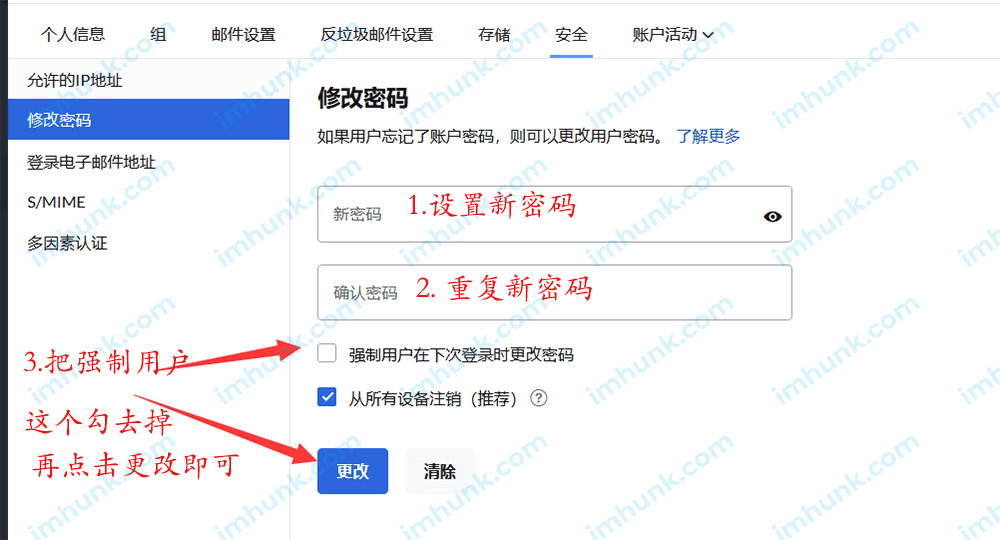
It is very simple to change the password. Click the three points behind this email. Then click Modify Password and enter the new password twice.
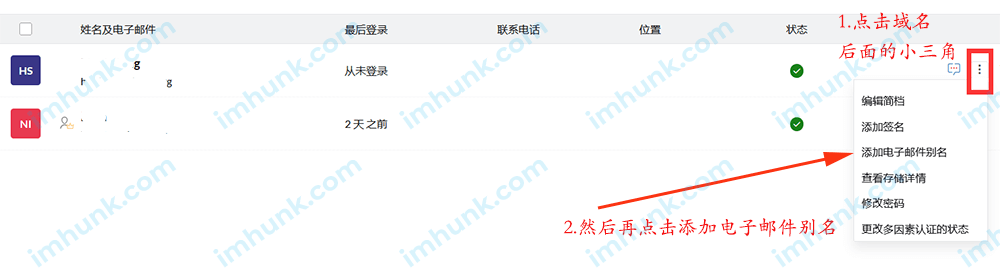
The mailbox alias of Zoho can be used for login and configured to the inbox.
Similarly, click Add Alias in the three points, then click Add, enter the prefix of the alias, and then click Add.
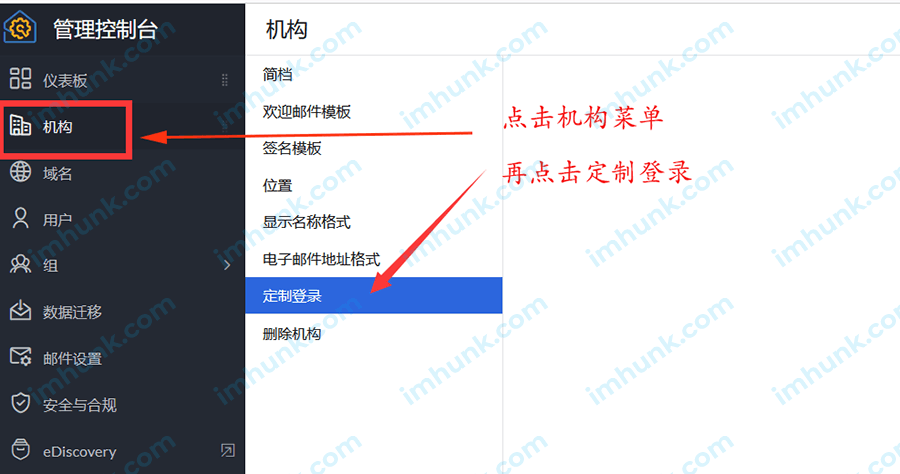
7. How to customize personalized login links for zoho corporate email?
This function can only be used after you upgrade to the paid scheme. The trial status or free version cannot be used.
Directly click the machine, then find the customized login, click, and then set your personalized login link, such as mail. domain name. com, and then go to the background of your domain name to do a resolution to the address given by it. I won't demonstrate the rest.
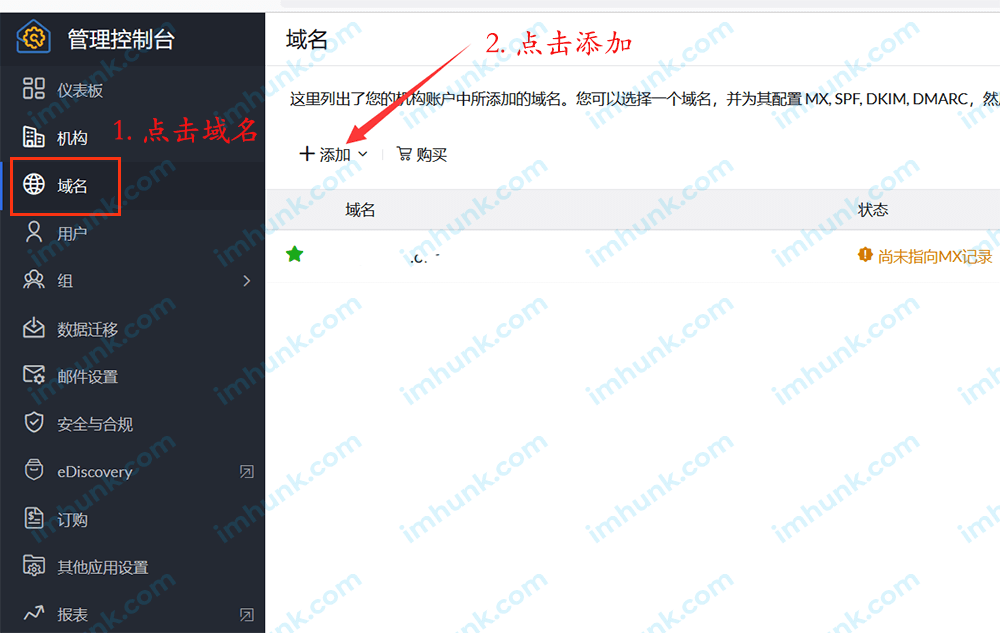
8. How to add or delete domain names for zoho mailbox
This function can only be used after you upgrade to the paid scheme. The trial status or free version cannot be used.
Click the domain name, then click Add, enter your domain name, and verify it.
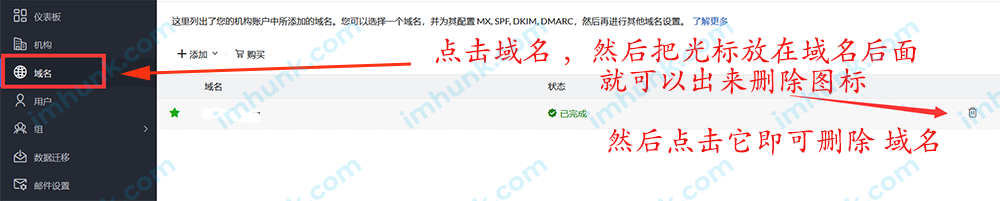
Deleting a domain name is also very simple. Place the cursor behind the domain name and a deletion icon will appear. Click it to delete the domain name.
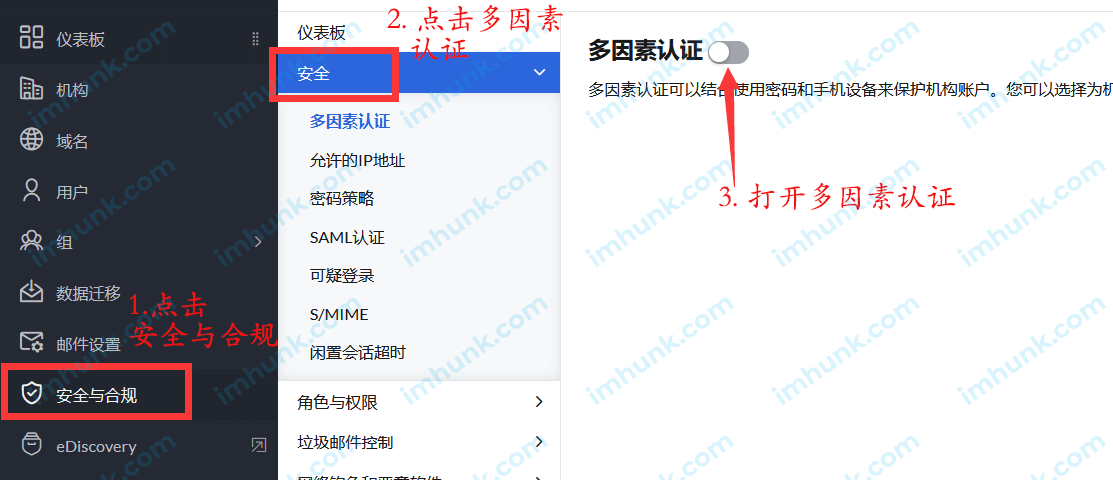
9. How to set up multifactor authentication for zoho mailbox?
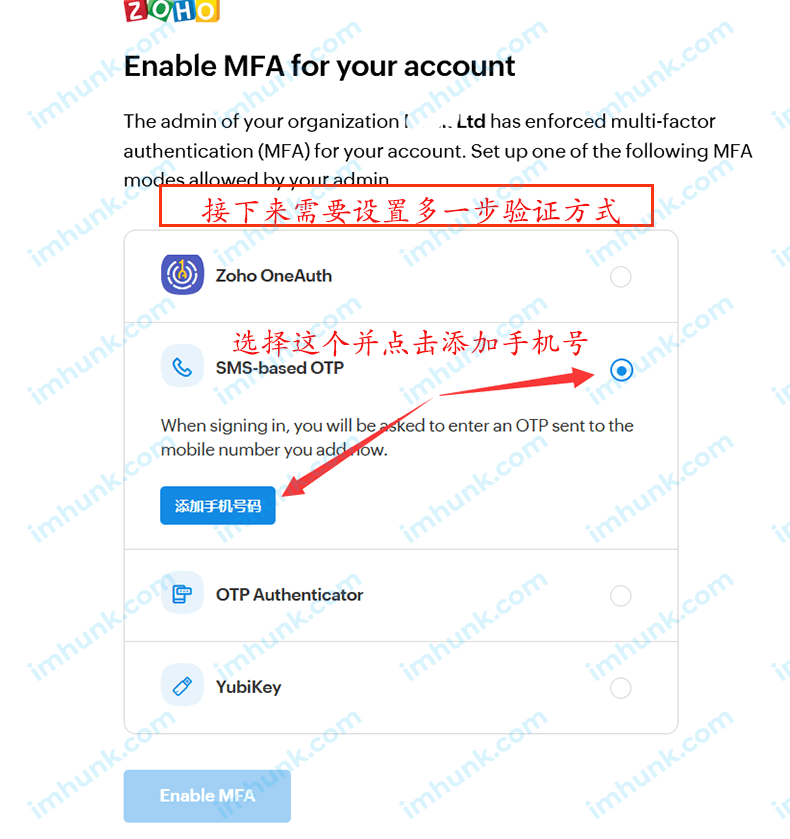
Multi factor authentication login means that when you log in, you need to enter the password and other authentication methods such as SMS, which will be more secure and prevent password theft.
Click Security and Compliance, and then click Multi factor Authentication under Security to open this multi factor authentication directly.
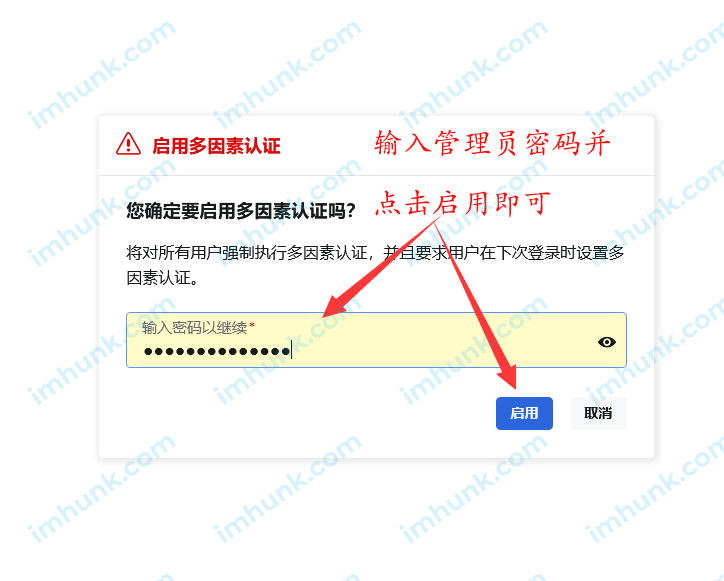
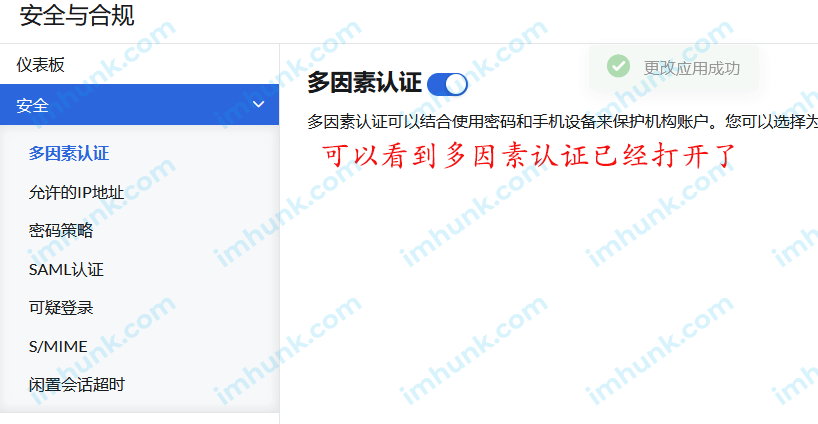
He needs you to enter the administrator password, and then click Enable. You can see that the multi factor authentication has been opened.
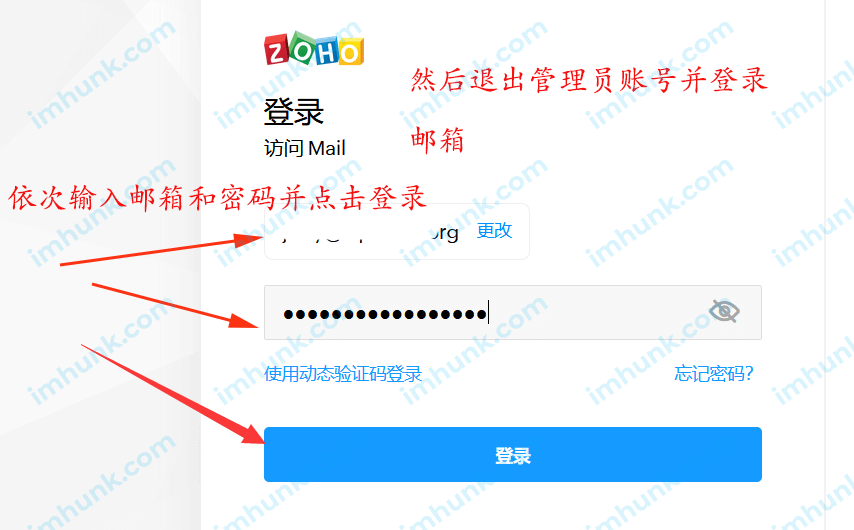
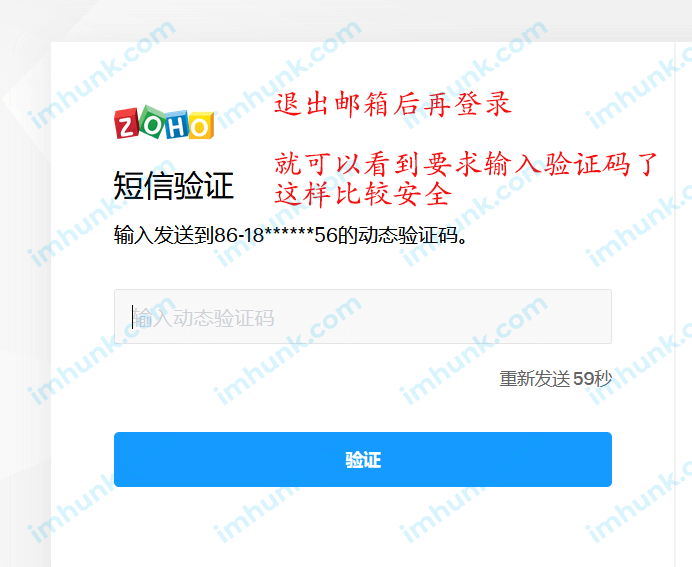
Next, log out of the administrator account and log in to the email account. Enter the email and password in sequence and click Login.
Next, we need to select a verification method, SMS, that is, SMS verification. Click Add Mobile Number after selecting.
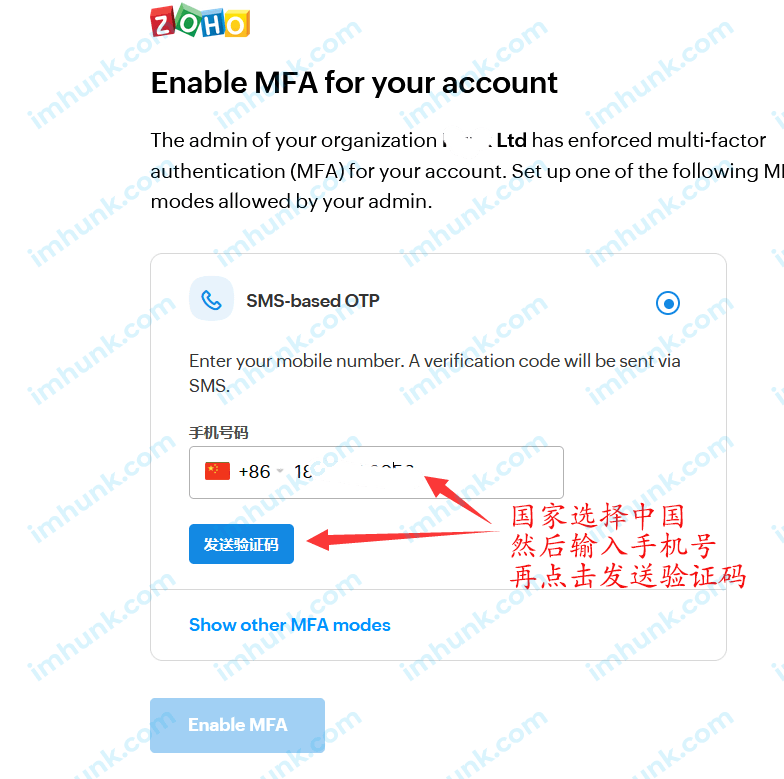
Then select China as the country, enter your mobile number and click Send Verification Code.
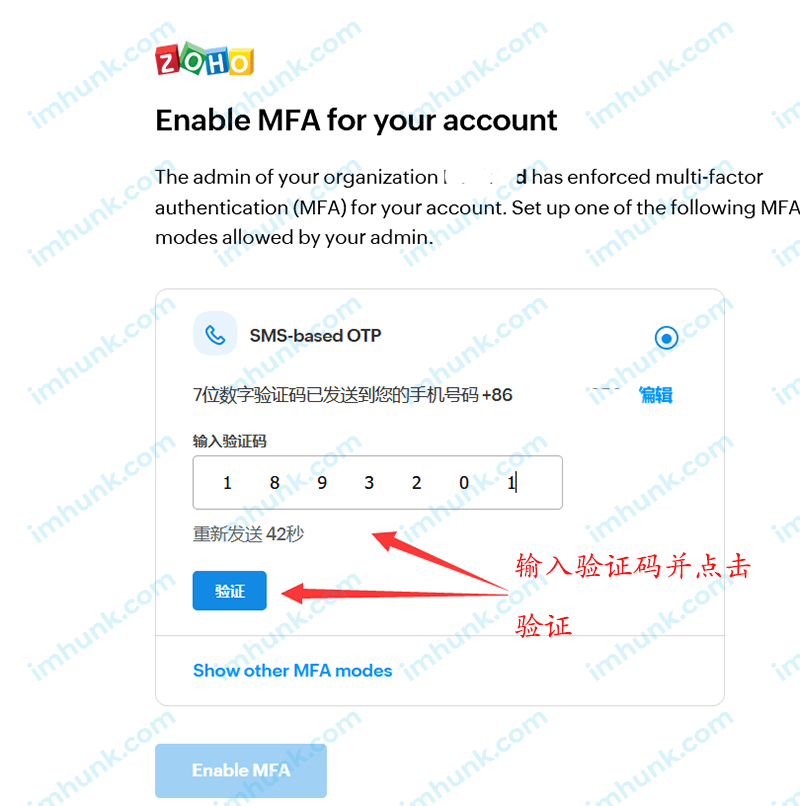
Next, enter the verification code and click Validate.
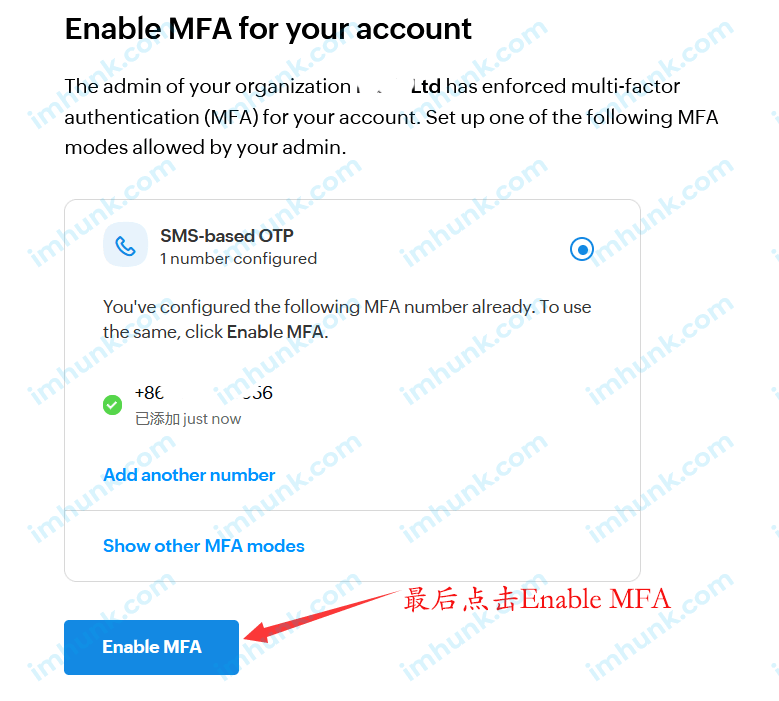
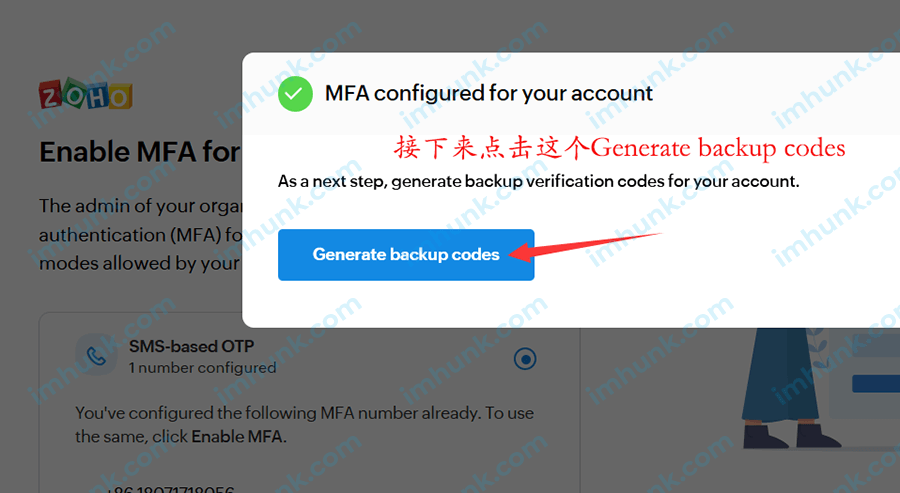
Finally, click Enable MFA
Next, click generate backup codes
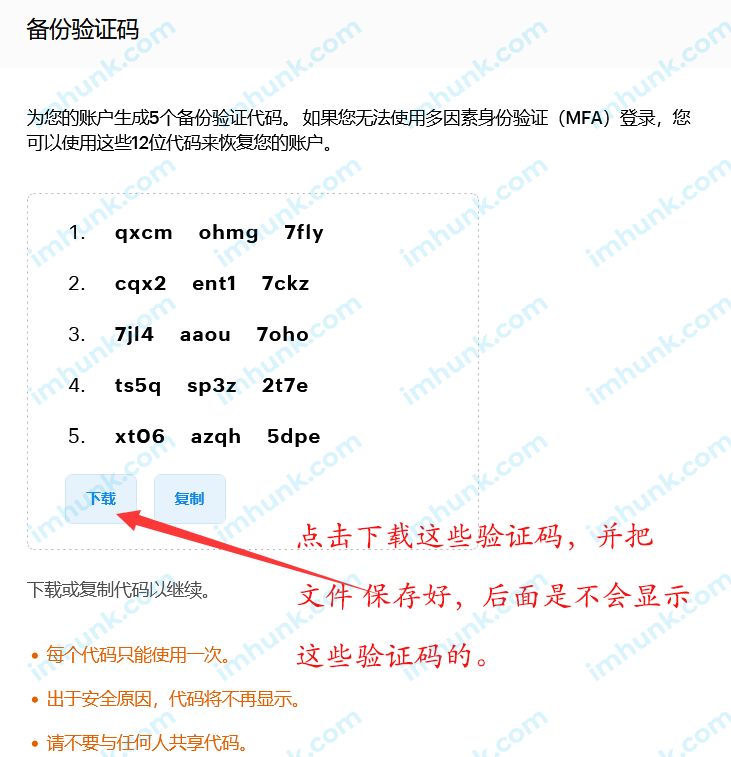
Next, some backup verification codes will appear. We can directly click Download and save the verification code file.
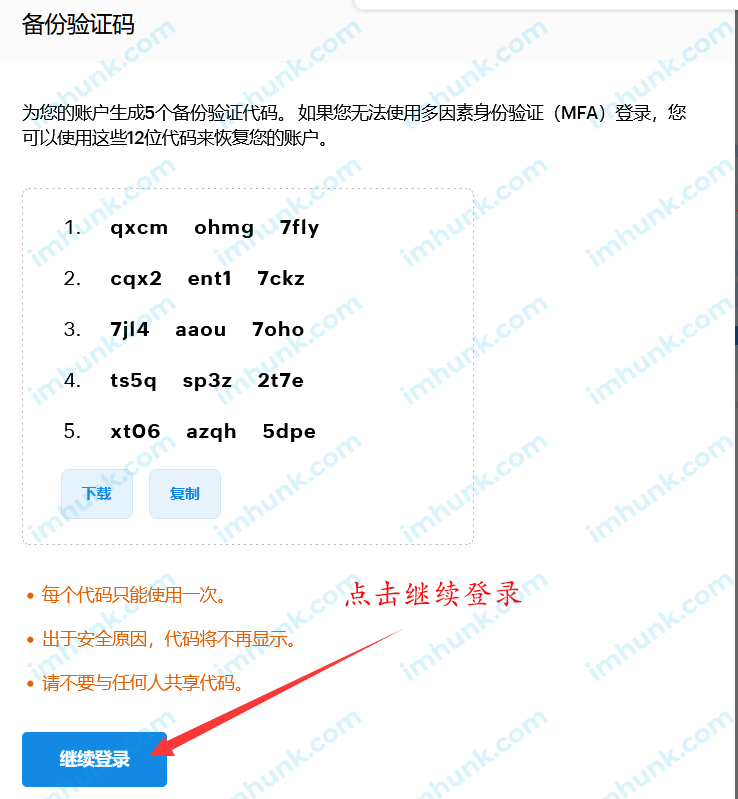
Click again to continue logging in.
The following prompts can be skipped.
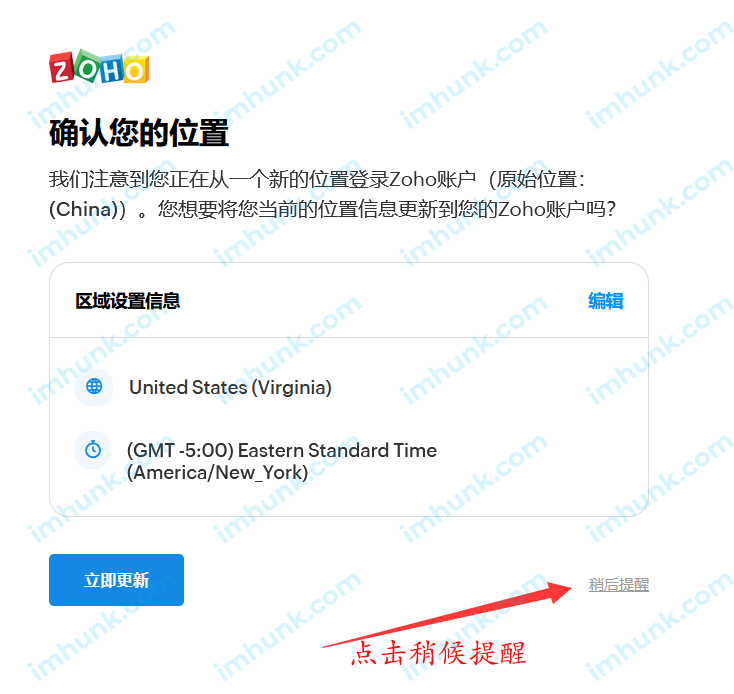
You can log in successfully.
Then we log out and log in to the mailbox, and we can see that he has taken one more step to verify the SMS verification code.
10. How does zoho corporate email bind to Foxmail?
This can only be bound to the client after you upgrade to the payment scheme. If it is a free account or a trial account, you can only receive mail online.
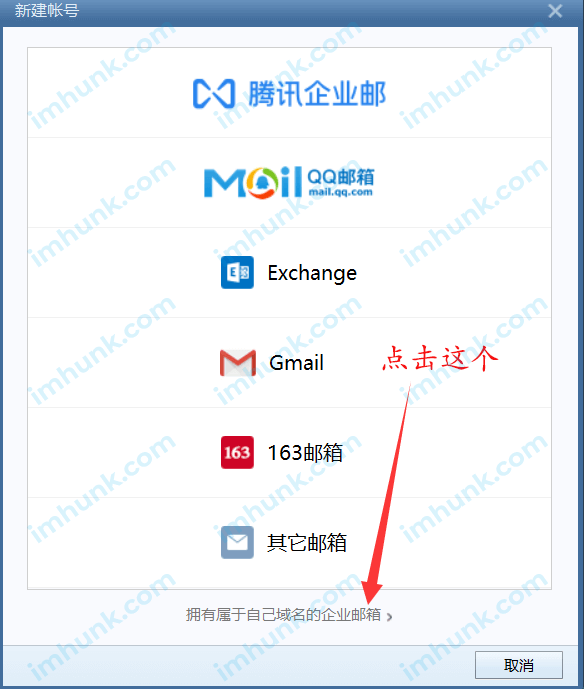
Click foxmail menu - Account management - New

Click the bottom corporate email
Then enter the account and password of the email and click Create
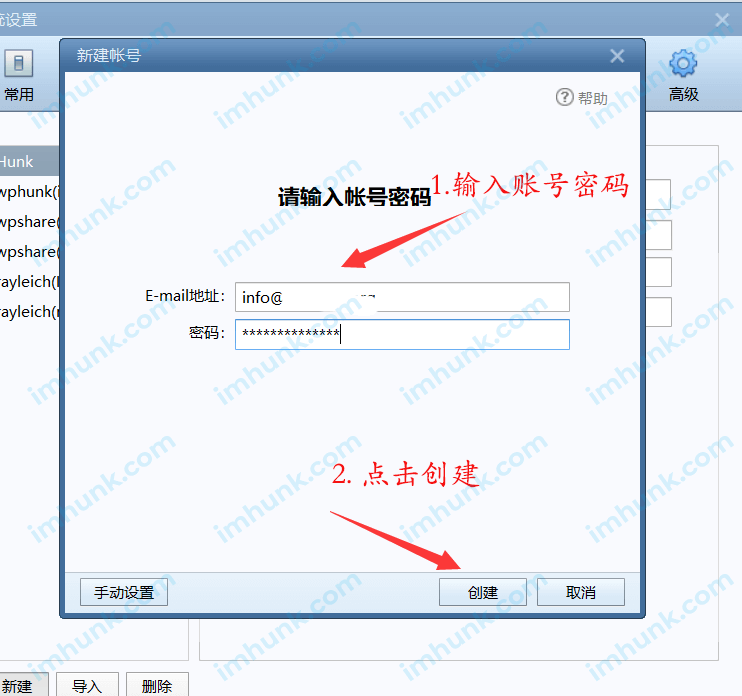
Finally, fill in as shown in my screenshot, and click Create.
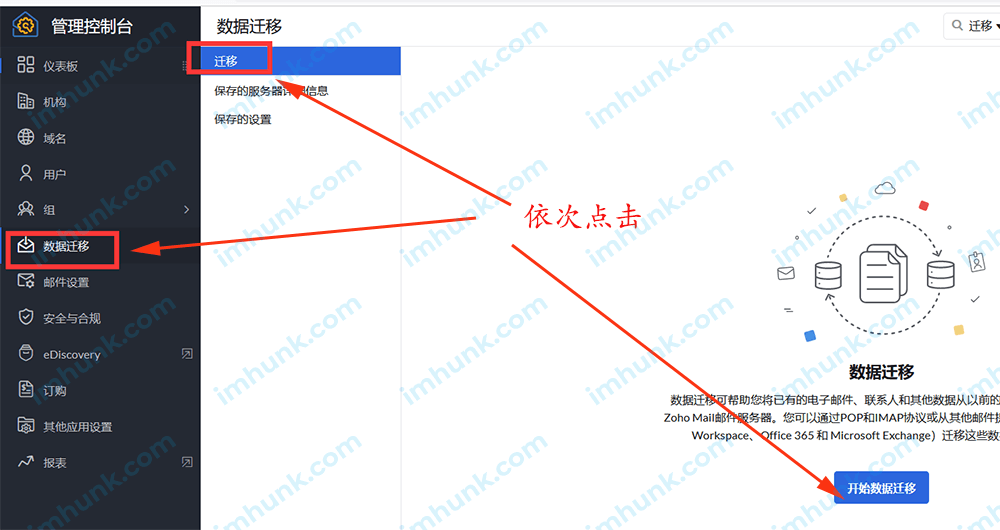
11 How to transfer emails from the corporate mailbox to the zoho corporate mailbox?
Click the Data Migration menu – then click Start Data Migration, and then follow the prompts step by step. I will not demonstrate the details.
Hunk still recommends downloading the email to the local client before using it, so that online migration is not necessary.
After all, online migration is affected by many factors, such as the network, and it is easy to get stuck or miss emails.
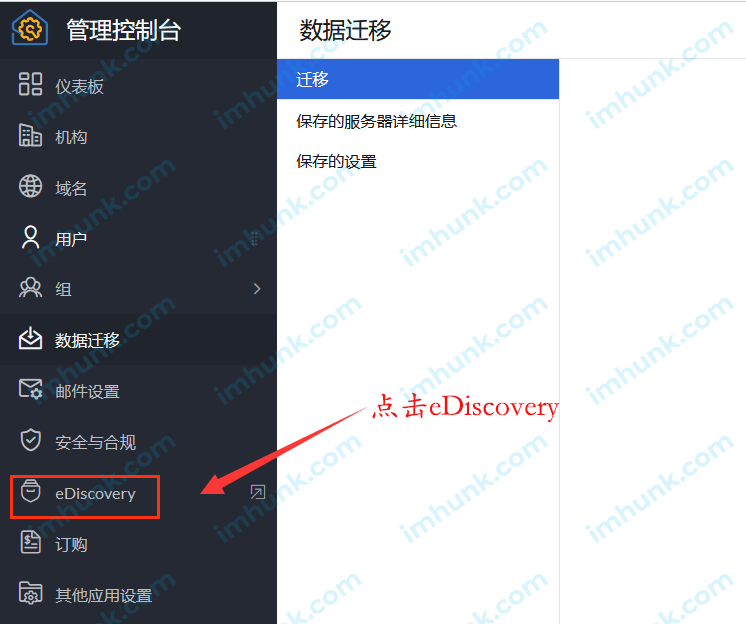
12. How does Zoho Enterprise Mailbox view team members' emails, back up emails, and restore deleted emails?
Zoho corporate mailbox does not have the function of directly accessing the mailbox to view emails, but you can view emails under the company account through the side. Here are the methods.
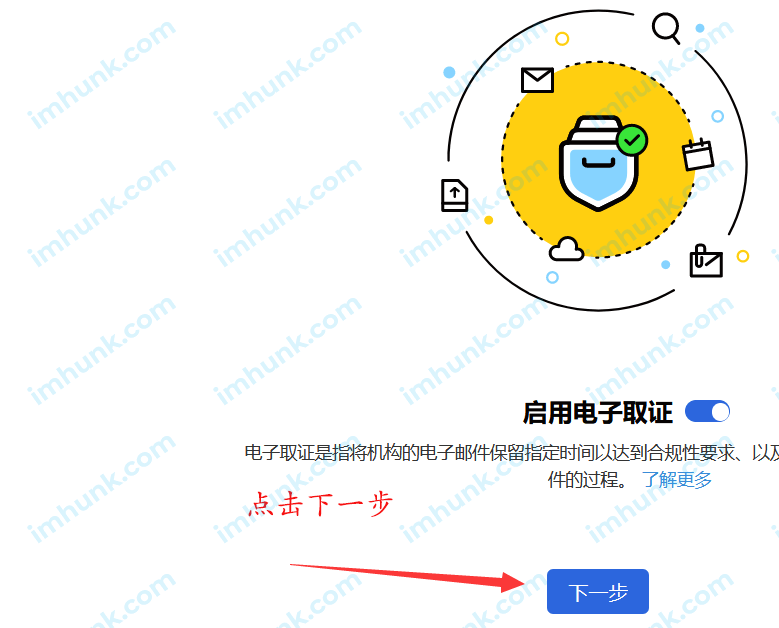
12.1 Enabling eDiscovery
First click eDiscovery to enter this page
Then turn on the switch to enable electronic forensics
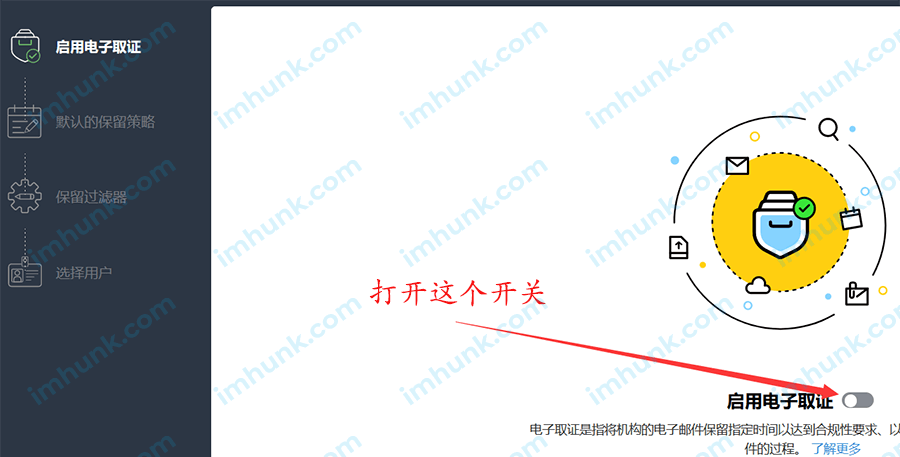
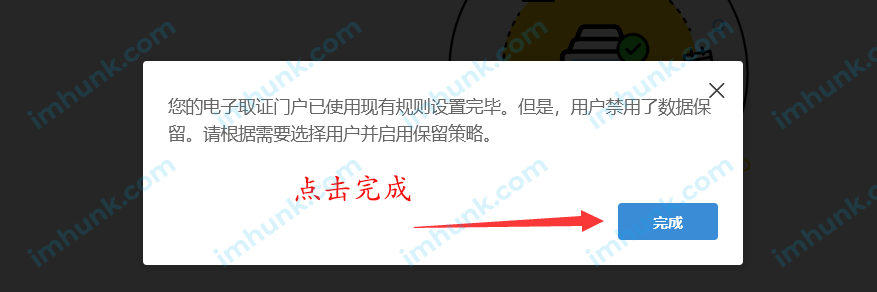
Then click Next
Then click Finish.
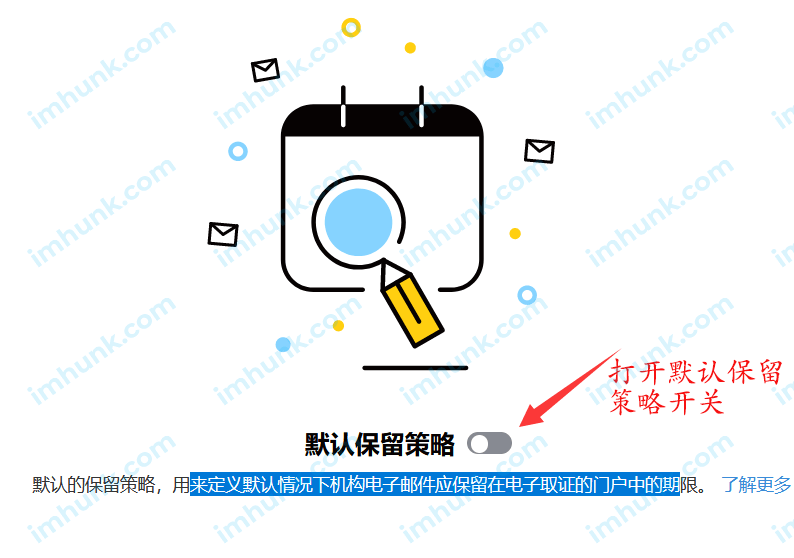
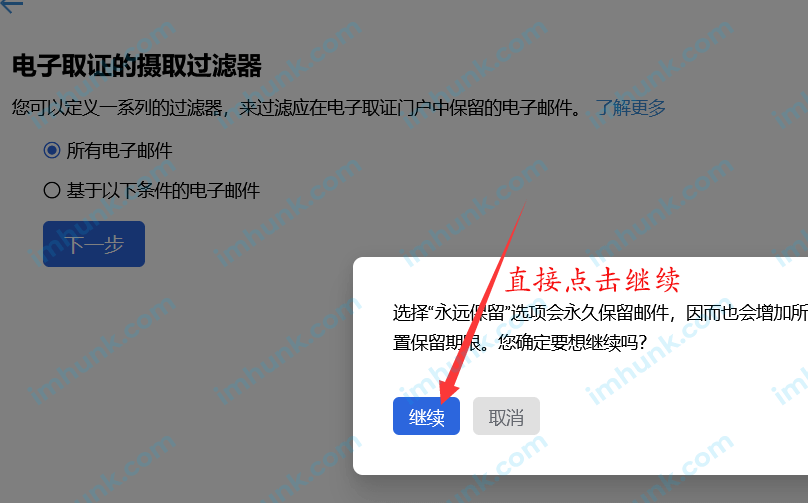
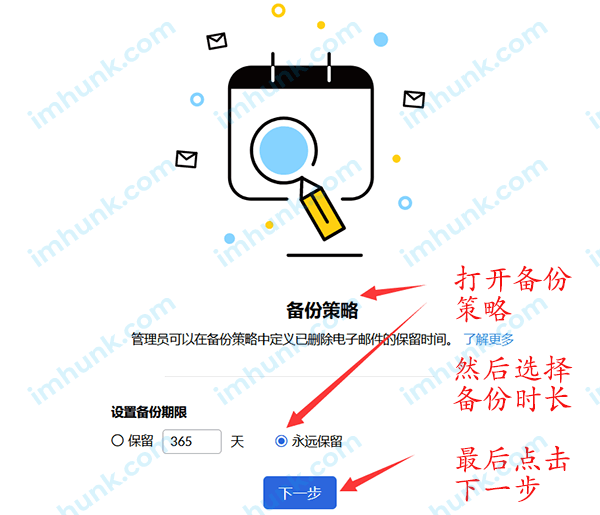
Next, turn on the default retention policy switch,
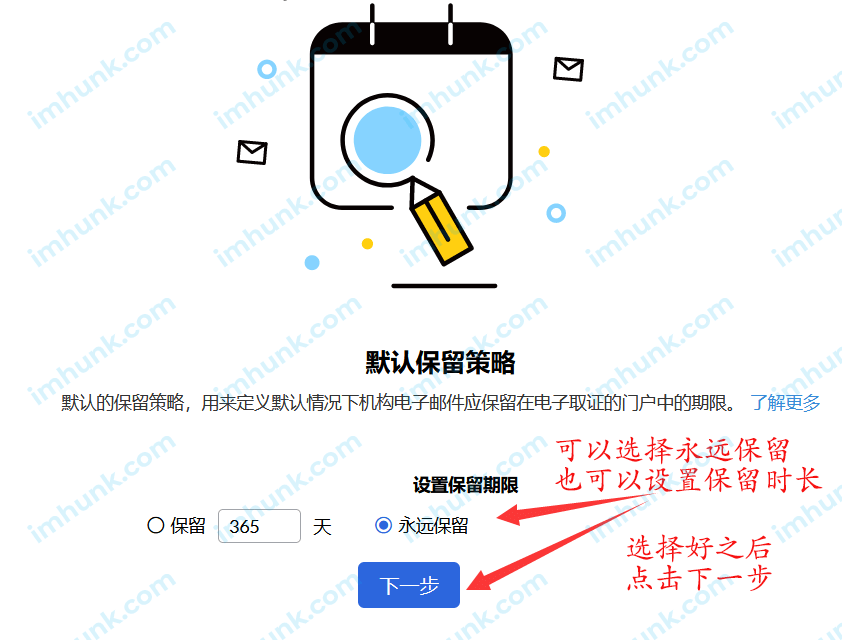
Then set the retention period to 365 days by default. You can also set a permanent retention period. Click Next after setting.
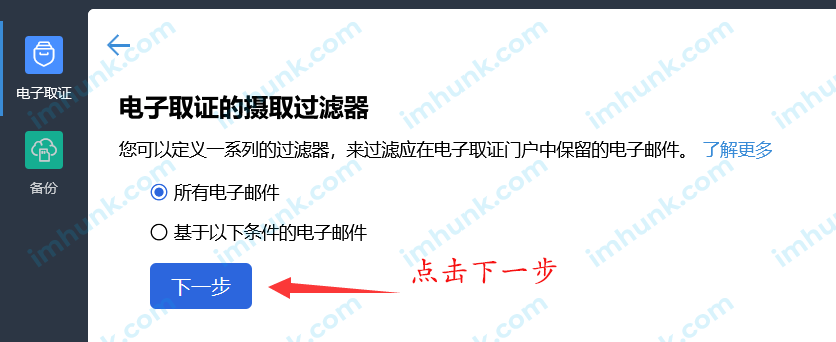
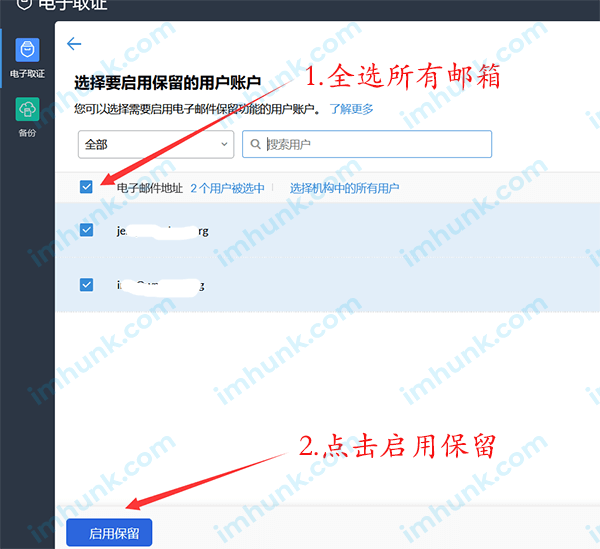
Then click Continue, click Next, select all mailboxes, and then click Enable Retention.
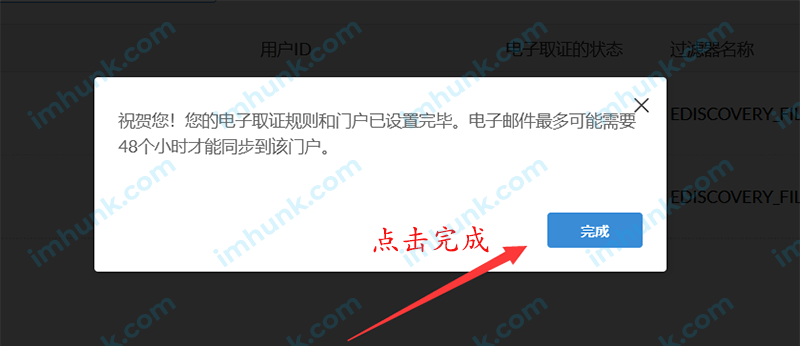
Then click Finish.
12.2 Set up survey and search functions
Through this function, you can view the mail of the team account. The specific operations are as follows
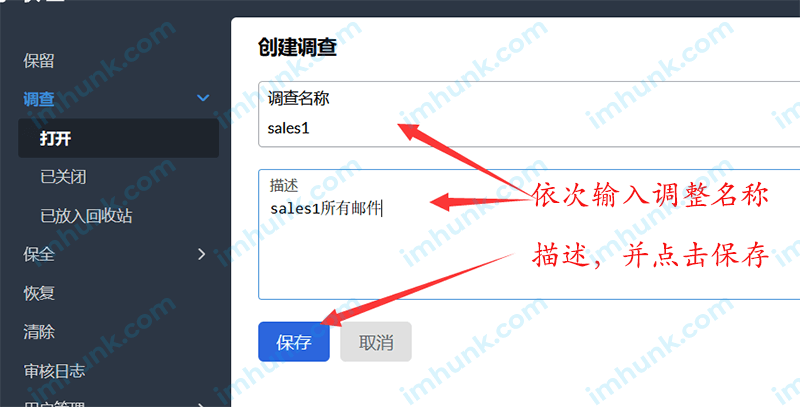
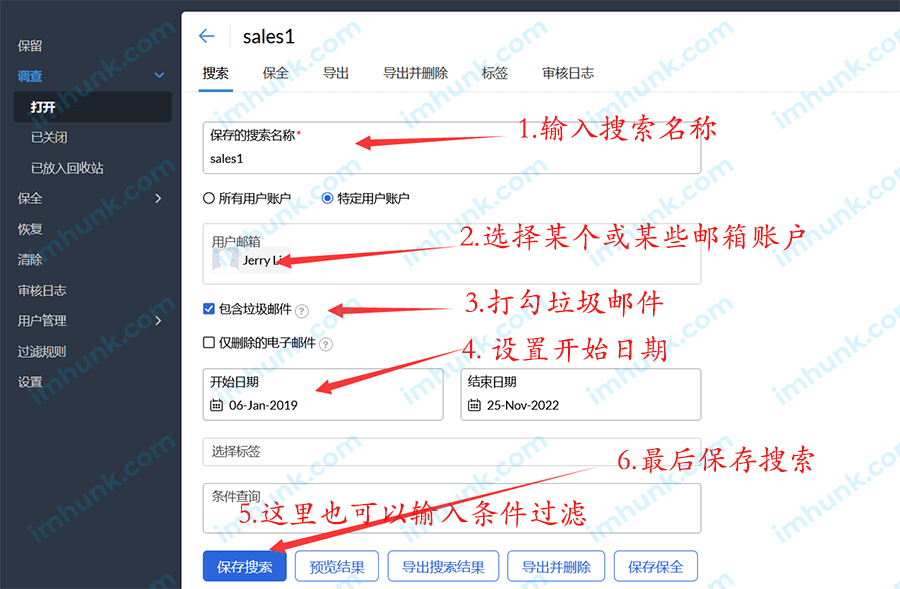
Next, we enable the Survey menu, click Survey, and then click Create Survey. Then enter the survey name and description, and click Save.
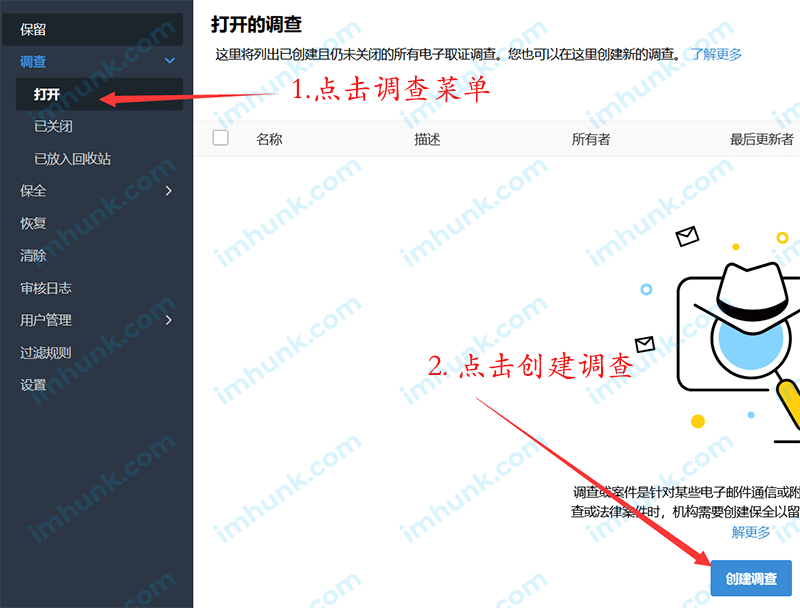
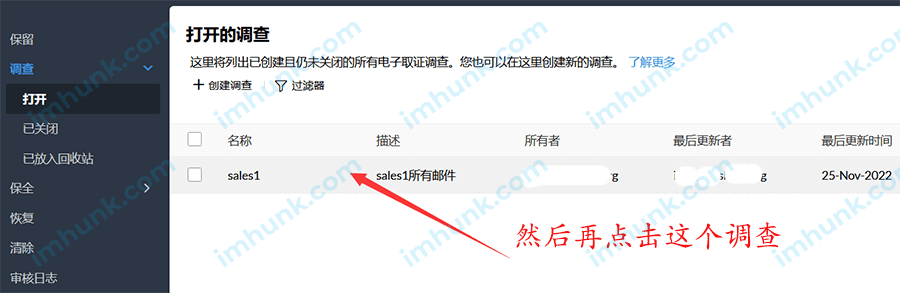
Then click this survey, and then click New Search.
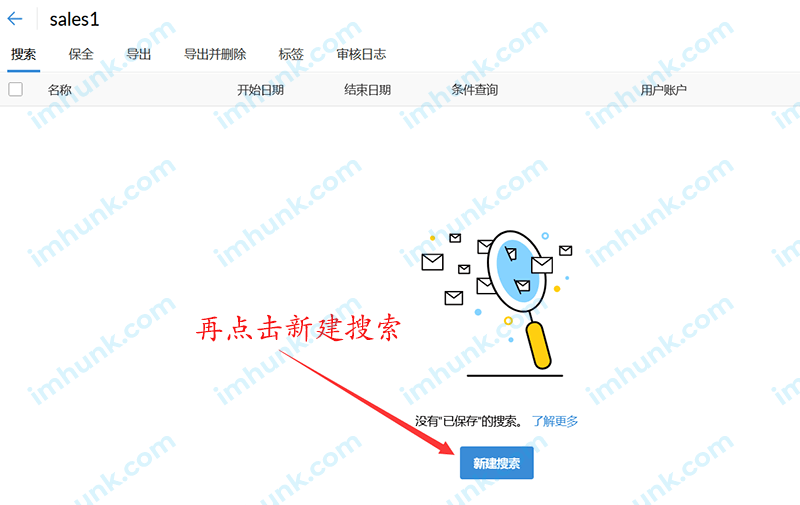
Enter the search name in turn, and select the email account to search, including spam. Check here, and then set the start time of the email.
You can also enter a condition here for condition query
Finally, save the search.
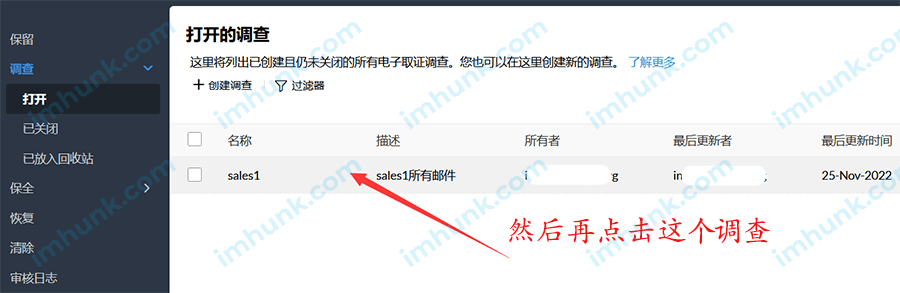
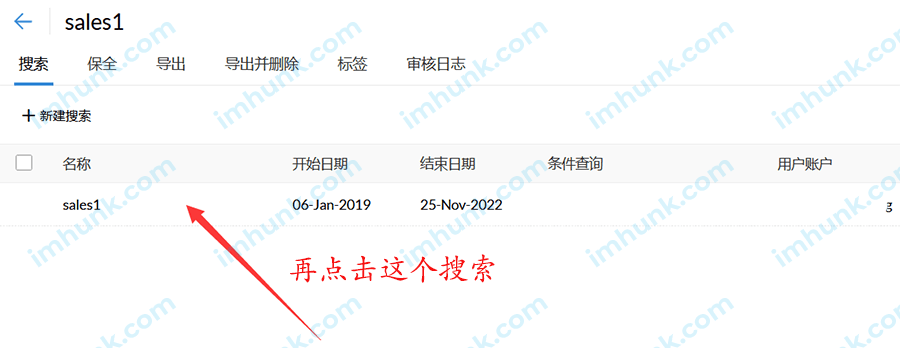
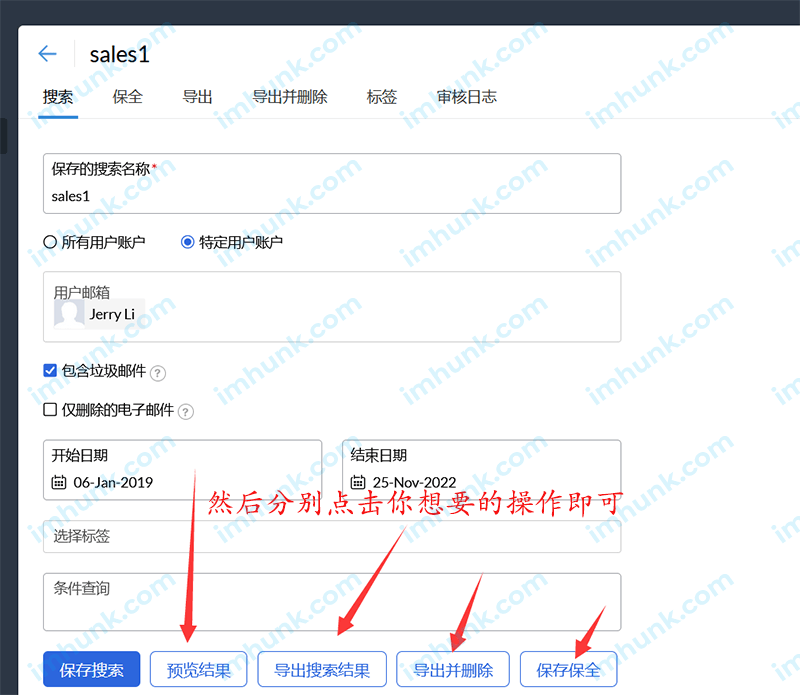
Then click this survey, click the search you just set, and then select what you want from the following operations.
Preview Results It is to view the email below this search.
Export Search Results If so, it is to export the search results.
Export and delete , that is, delete the searched email after exporting.
Preservation In this case, it is to save the search results.
12.3 How to restore deleted messages
If someone in the team has deleted the email of the account, how to find it through the recovery function. The specific operations are as follows
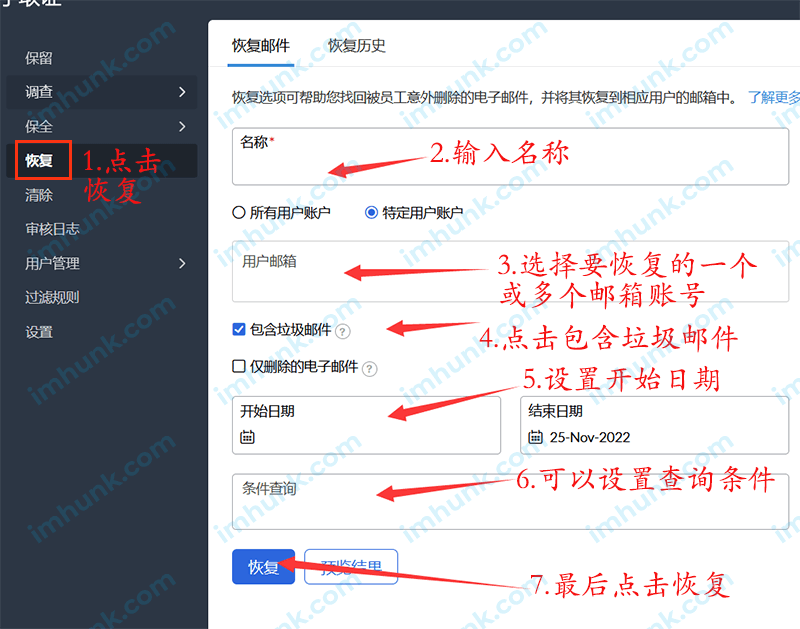
The specific operation method is to click the Restore menu, enter the name, select the mailbox account to be restored, set the start date, set the query conditions, and finally click Restore to restore the mail to the mailbox.
12.4 How to clear messages?
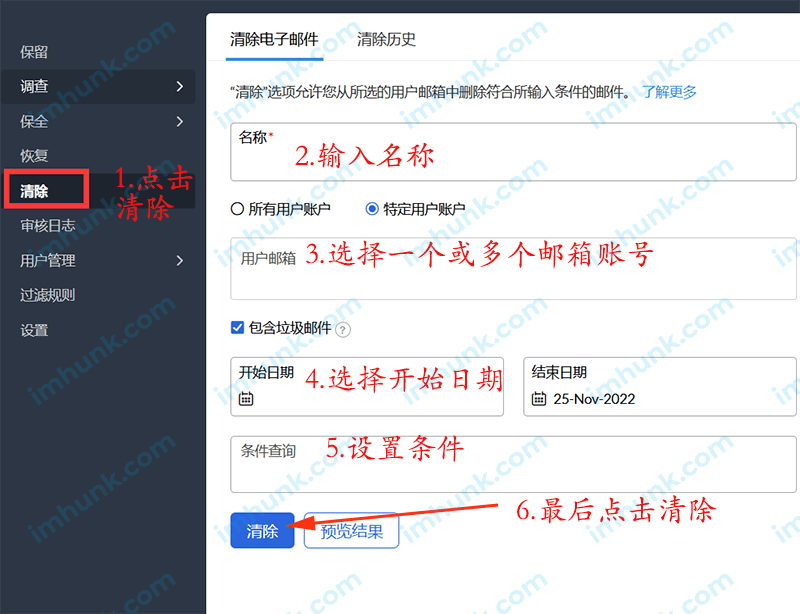
Click the Clear menu, enter the name, select one or more email accounts, set the start date setting conditions, and then click Clear.
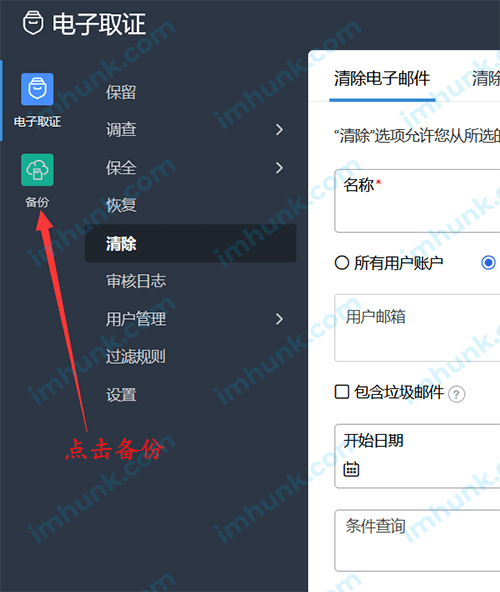
12.5 How to back up all messages
Set up the backup of messages.
You can save the email of all account mailboxes, even if the user deletes it, it will not be lost.
Click the Backup menu.
Then click Enable Backup, and then click Next.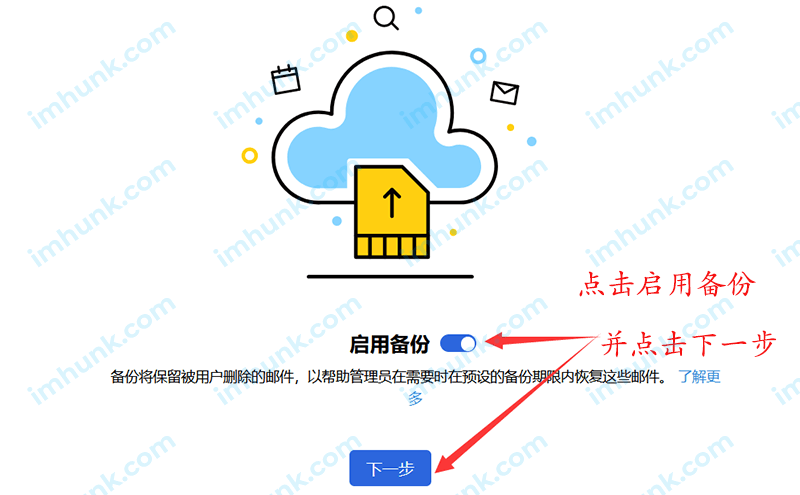
Open the backup policy and select the duration of the backup. The default is 365 days, which can be set longer or kept forever.
Then click Next. Open Backup Spam and click Next.
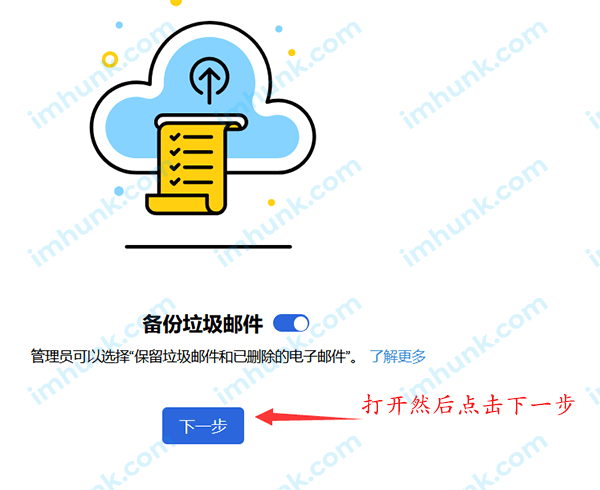
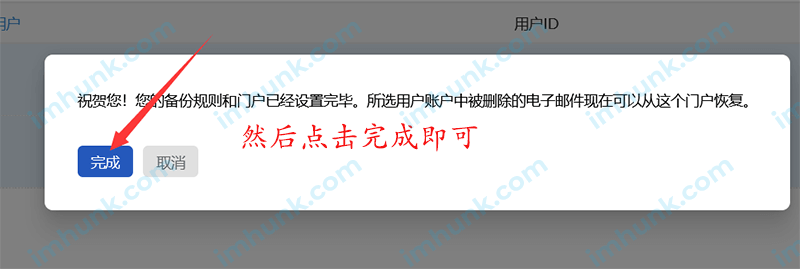
Then select all email accounts and click Enable Backup. Next, click Finish.

13. How to contact the online customer service of Zoho's corporate email?
Online customer service can only be used for paying accounts. Free and trial accounts cannot be used.
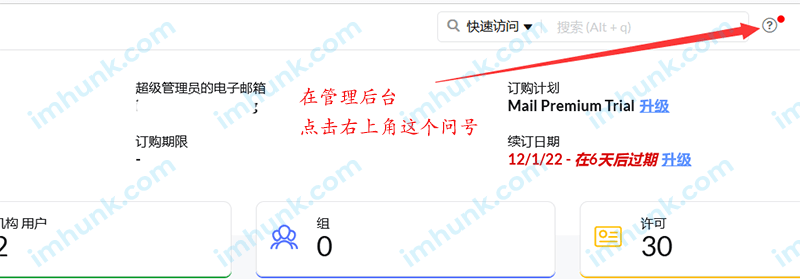
On the administrator console, click the question mark in the upper right corner, and then look for online customer service.
If it is a free account or trial account, it is only supported by email.
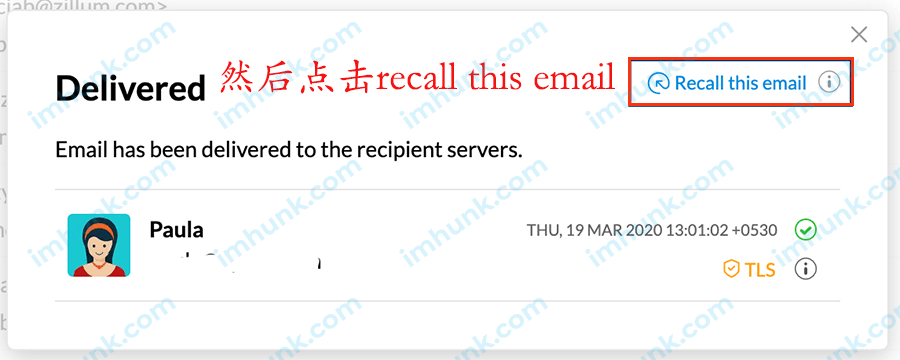
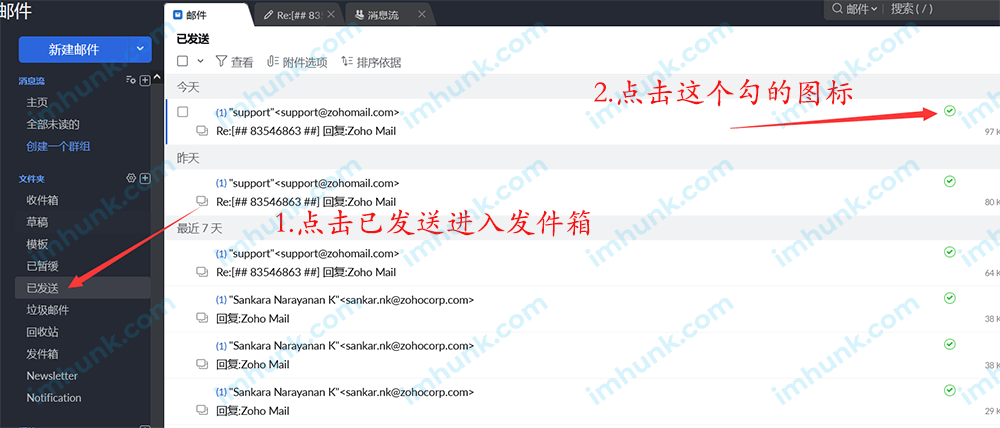
14. How does zoho Cmail withdraw an email?
Sometimes the email is sent wrongly or the price is quoted wrongly. The function of withdrawing email is very useful.
This function can only be used under the paid package. The free package or trial package cannot be used. The usage method is as follows.
First, enter the account's outbox, that is, the sent menu.
Then click on the green tick for the email that needs to be recalled.
At this time, a window will pop up and click recall this Email in the upper right corner to recall. The recalled email will prompt the recalled status.