Hunk /25,981 views/Updated on October 15, 2019/18 comments
Avada has powerful functions. Today, let's introduce how to use the Avada mega menu to implement the AVADA theme and how to implement the picture menu navigation bar (navigation picture)
Note:This article is based on Avada 6.02. If you are still a 4-series or 5-series version, it is recommended to upgrade, because if you do not upgrade, many bugs will appear later. The avada theme upgrade referenceAVADA theme update method
Preparation content:Each level 1 classification corresponds to a picture with a width of 100~500px, and the height is adjusted proportionally. Generally, the width height ratio is 1.1 or 1.3:1. The specific width is adjusted according to the actual situation. The size of the picture demonstrated in this paper is 500 × 500.It is better if it is a hollow png format picture.
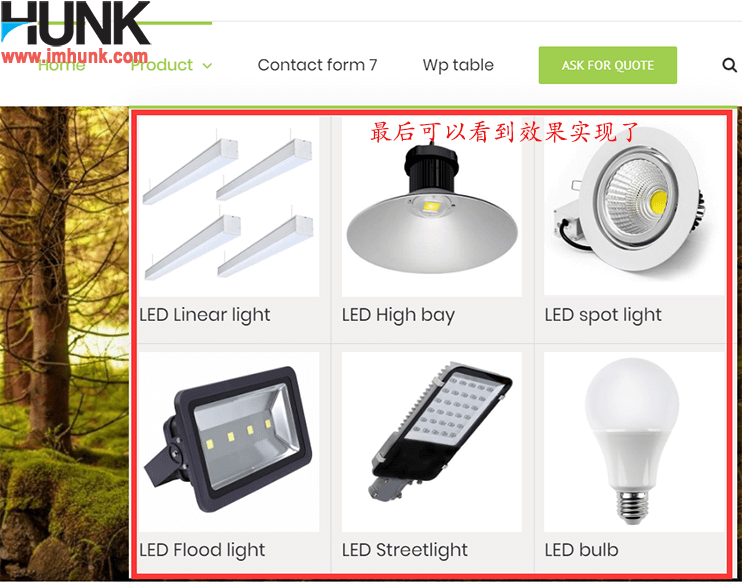
Today, I demonstrated six classifications, only one level classification, as shown below.If you have 8, 10 or 12 categories, it's OK, but it's better to have an even number for easy typesetting.
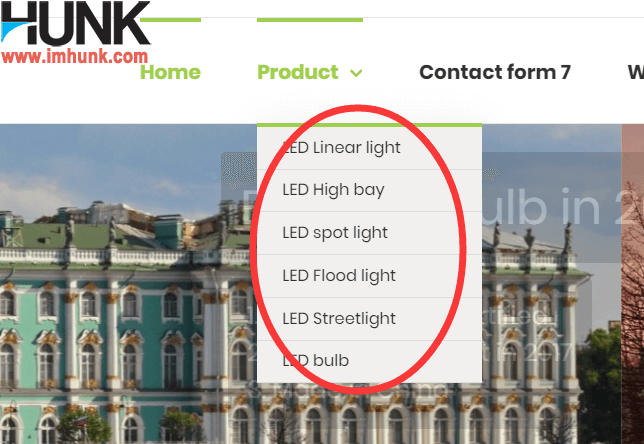
LED bulb LED Streetlight LED Flood light LED spot light LED High bay LED Linear light
Generally, after we set the menu, we will achieve the following effect. Next, we will implement the image navigation effect step by step.
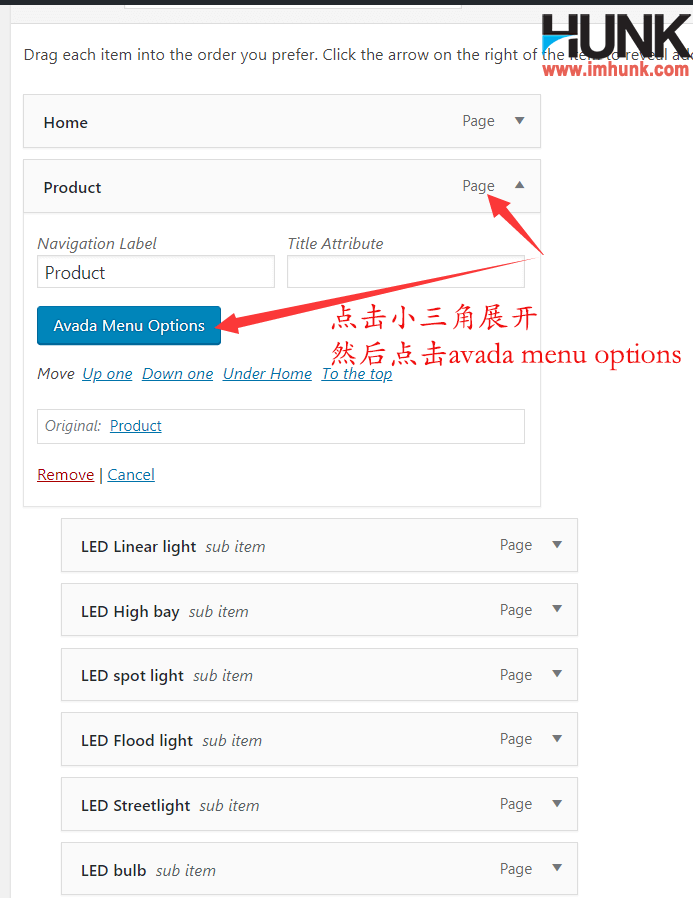
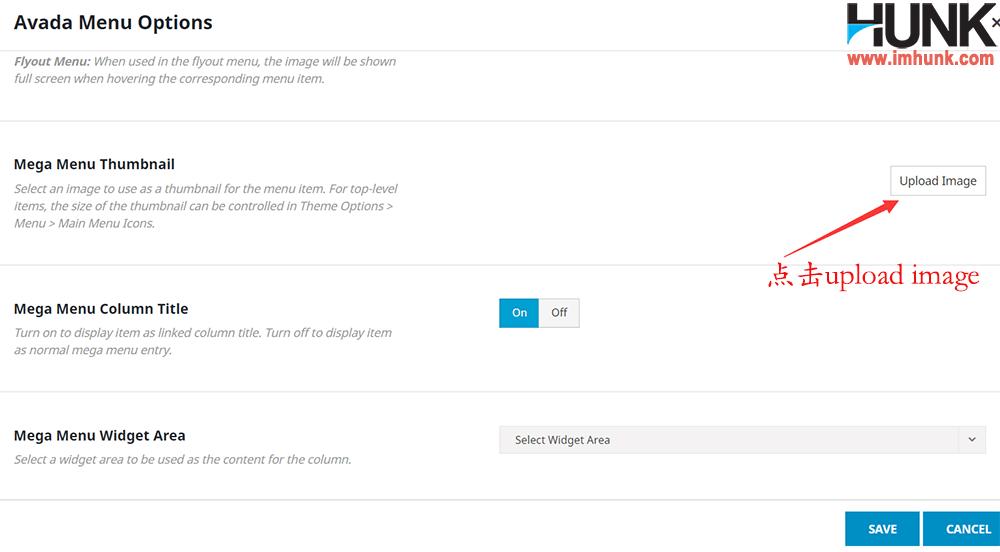
Enter the appearance menu, click the next level of image navigation you want to set, that is, the product I demonstrated, and then click avada menu options to set.
Fusion Mega Menuopen
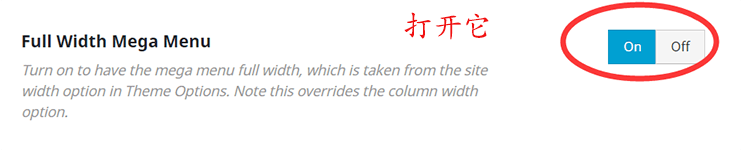
Full Width Mega Menuopen
Mega Menu Number of ColumnsSelect the appropriate number of columns. For example, if I have six classifications, you can select two rows and three columns, or six columns in a row. You can set it according to your actual situation.
Click Save to save the above three settings.
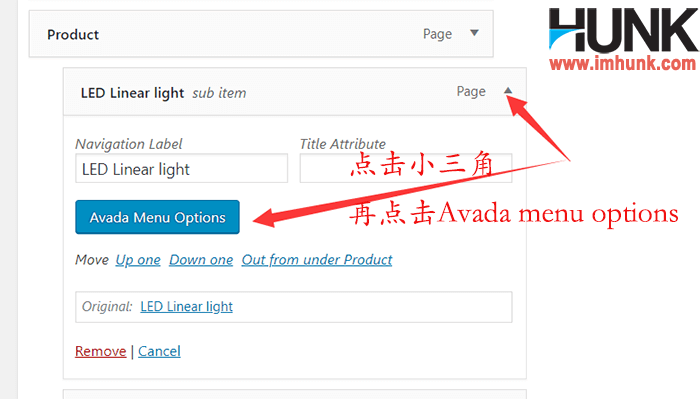
Next, we enter the first category to upload navigation pictures, click the small triangle on the LED Linear light menu to expand, click Avada menu options, click Upload image behind Mega menu thumbnail, and then upload the previously prepared category pictures.
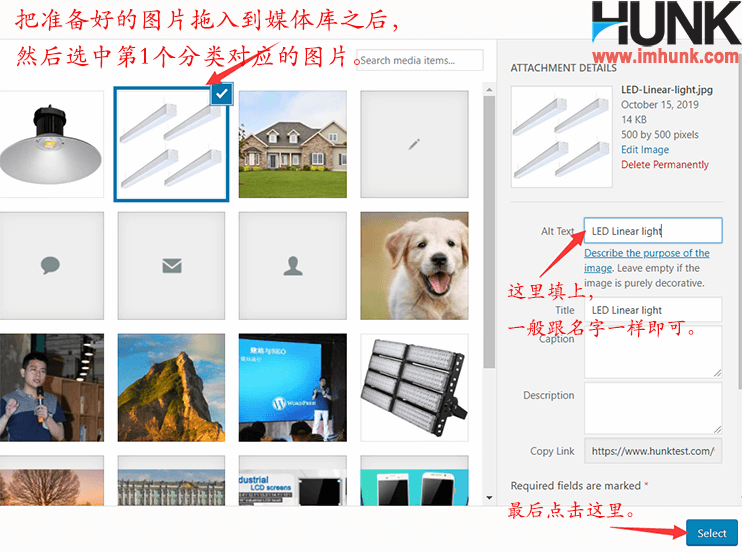
Just drag it in.Then select the image corresponding to the LED the near light, fill in the alt tag, and click select.
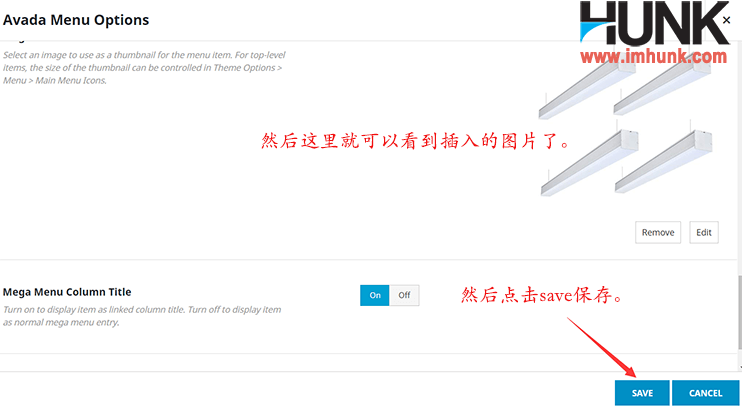
You can see that the image has been inserted successfully.Then click save to save.
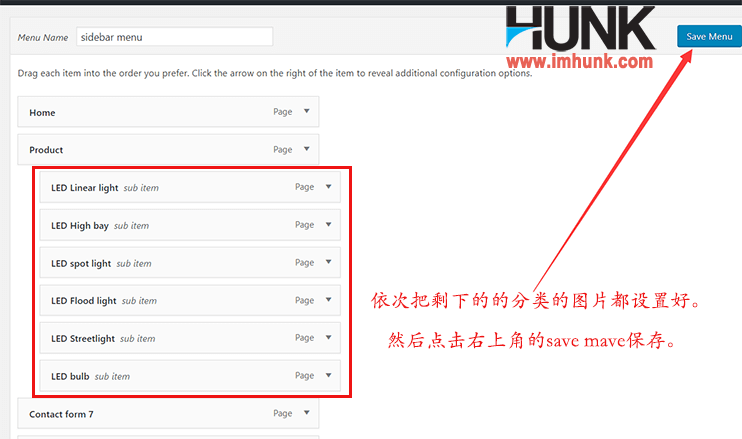
Next, use the same method to insert pictures for the remaining five categories, and then click Save on the menu to save.
2. Adjust the size and Hover effect of the picture
2.1 Adjust the display size of the picture
The image has been added, but the size must be displayed incorrectly and needs to be readjusted. The size display is better. It is flexible and there is no fixed standard.
We usually use a layout with pictures on the top and text below.So the width of the picture should exceed the width of the text.The longest width of the six categories I demonstrated is about 180px, so let's tentatively determine that the width of this picture is 180px.
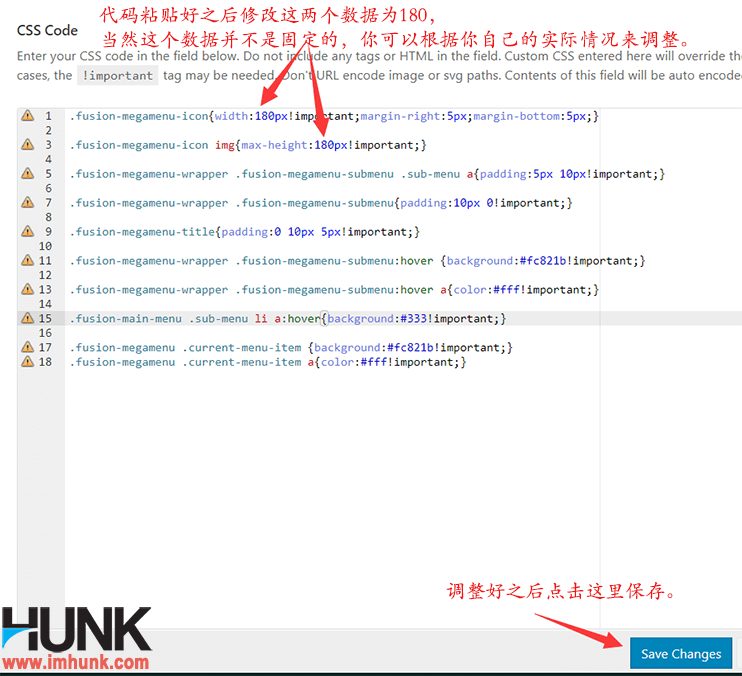
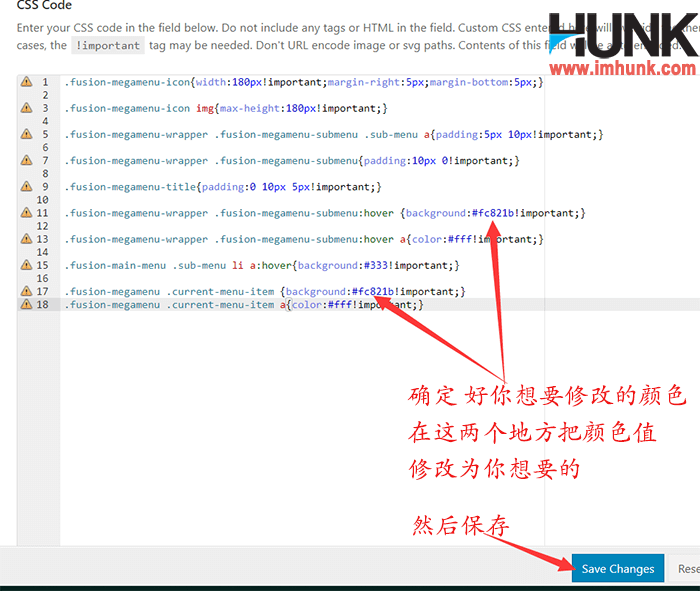
We use the following CSS code to adjust the display width and height of the image.Copy the following code to avada – theme options - Custom Css.
The display effect is as follows. Then change the values of width and max height to 180 (if your picture is not 1:1, the height will be changed to the corresponding value proportionally), and click Save in the lower right corner
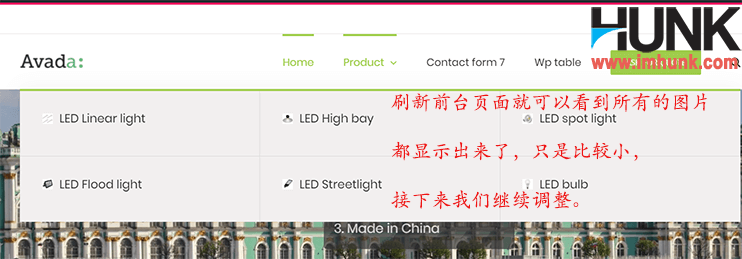
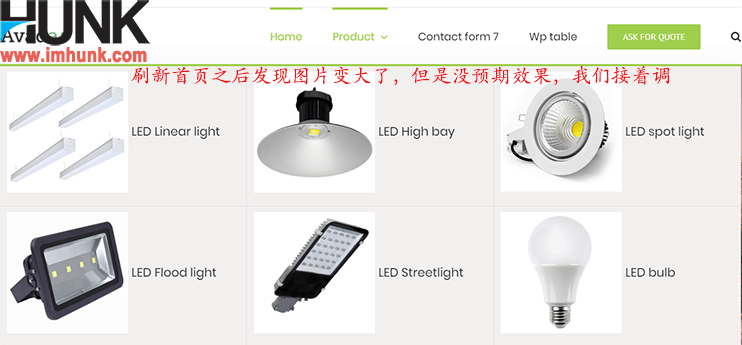
Refresh the foreground again, and we can see that the picture has been enlarged.But this is not very nice. We usually put the text below the image, so we need to adjust the width of the image navigation at this time.
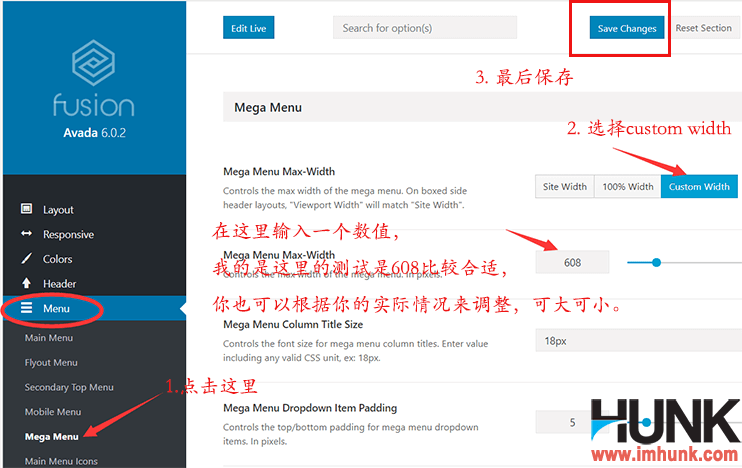
Let's go to avada – theme options – menu – mega menu, select custom width after Mega Menu Max Width, and then enter 608 in the box below.Note that this number is not fixed and needs to be adjusted according to your own actual situation.
After confirmation, click save change to save, and then refresh the foreground page.You can see that we have achieved the desired effect, the effect of the upper picture and the lower text.
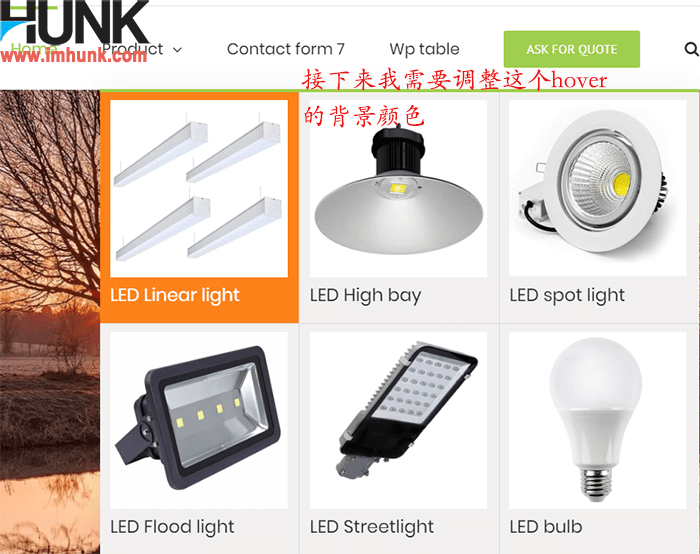
2.2 Set the hover color
Next, let's adjust the hover and active colors of the image.My default color is orange. If you don't like this color or it doesn't match your website, you can enter a new color yourself.
The method is in the newly added css code.Change the color values of these two places to the color values you need, and then save and refresh to achieve the effect
2.3 Adjustment of other effects
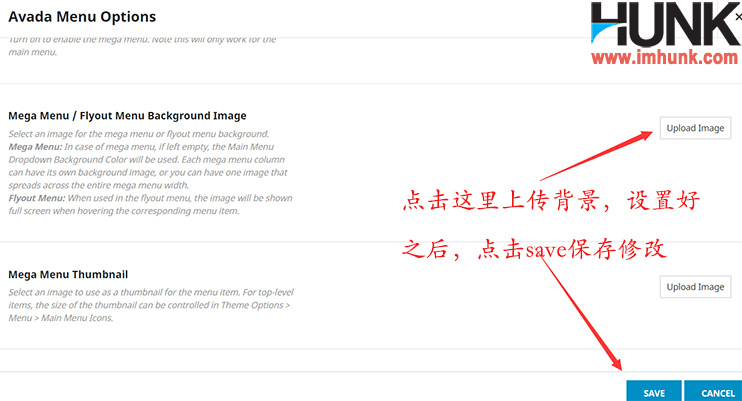
The above method has basically made the effect of image navigation. I think it is enough, but if you want to do something else, you can also do it.For example, you can add a background to the whole picture navigation. The location is here.
I won't demonstrate it. You can study it yourself. It's not very difficult.
3. FAQ
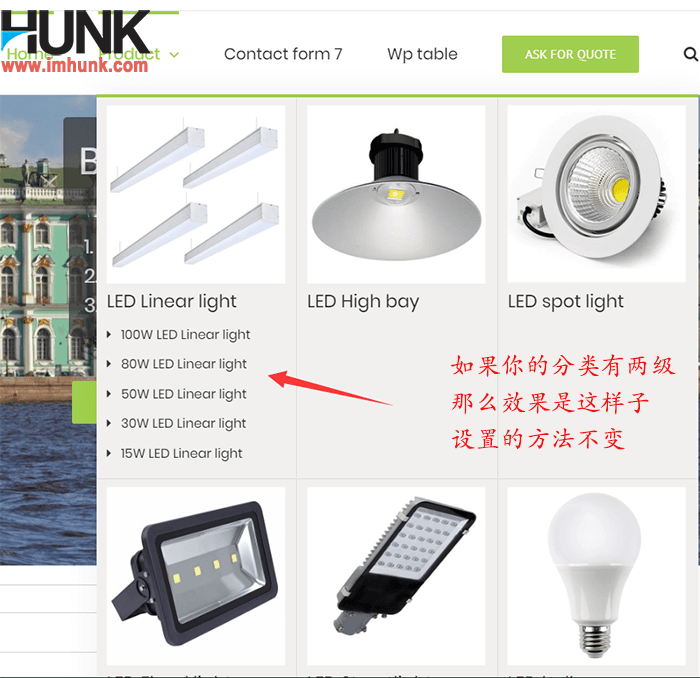
3.1 How to set secondary classification?
The method is similar to that above. It still uploads images in the first level classification.Level 2 classification does not need to upload pictures.The effect is as follows.
3.2 Are you sure to set according to the data above?
What I don't need is the method. As long as you learn the method, you can set it according to your own actual situation.
3.3 Can the width of featured navigation be wider than the site width?
Yes, for example, my site width is 1100, and you can set it to 1200, 1300 until it reaches its maximum value.You only need to set the number in the custom width.
Scan and share the circle of friends
Follow Hunk WeChat official account
Hunk has entered the foreign trade industry for 10 years, engaged in foreign trade business, and transformed technology for 12 years, engaged in foreign trade station building marketing.If you are going to build an independent foreign trade station, we have many professional technical articles for your reference.Hunk recommendsPurchase domain name on namesilo, onsitegroundorcloudwaysBuy space on and use Google email.Of course, if you are not good at technology and have no time to study, you can findHunk outsource to build a website or pay for solving problems。
Others have seen:
How to solve the problem of new bugs in AVADA caused by WordPress 4.9
Method of font setting for AVADA website
How to set the sidebar and footer of AVADA website?
The method of realizing SNS one click sharing on AVADA website
[Video] How to use Layerslider plug-in to create a website banner?
How to install Avada themes and subthemes?
18 replies on "How to realize picture menu navigation with AVADA theme"
Hello, Hunk, I have three primary categories in total. I used the method described in the article to set up image navigation, and three columns of images appear in vertical rows. In this case, the line of sight is blocked. How can I view three columns horizontally?
How can I set Hunk's dropdown menu to 100% width?
no way out
Hunk, Hello!You set the mega menu in the way you shared, but now there is a problem that there is no space between the pictures and the text in the drop-down menu. How do you adjust this?
Generally, css is required. Try margin
Hunk,Hello, I saw that your operation is to classify products under the first level menu, and then add product pictures as small icons.Is there a way to classify it into multiple columns under the secondary menu, and then make small icons for the product series under the secondary menu?It seems that this reply function cannot upload photo screenshots.
I have written the method. You can study it yourself. It's not difficult
excellent work
Hello Hunk, the CSS on Avada6 doesn't seem to work anymore.The size of Mega Manu's image cannot be modified. Do you have a new one?
When did AVADA 6 come out?I don't know
Wrong, 5.16, css seems not to work
Hunk,The pull-down box of the secondary menu is horizontal, and some are vertical. How do you set it?
Read the blog carefully
hunk, Is there any way to make the background color of the submenu transparent, so that you can see the banner.
It can be realized with CSS, but it is meaningless.
fantastic.
This function is just needed. It will be better to change the product image to a transparent background or a transparent sketch background. Thanks for sharing~