Amazon is also a big company, and the server must also be very good. Today, I will teach you how to apply for Amazon's aws server for free. The tutorial is very careful, and you can apply successfully by following the tutorial!
Amazon AWS free package description
Amazon AWS's free packages are divided into three categories: permanent free, 12 month free and trial. See the details of AWS free package on the official website for details of the package. This is a 12 month free ECS service package.
Free ECS package
Amazon EC2: 750 hours of Linux, RHEL, SLES, window t2. micro ECS instances (virtual machines)
Amazon S3: 5GB standard storage capacity (storage space)
Amazon RDS: 750 hours of db.t2.micro relational database (database)
…
30G traffic: 15G for uplink and downlink respectively
Note: If the above package is over used, extra money will be deducted, which will be deducted according to the original price of the package
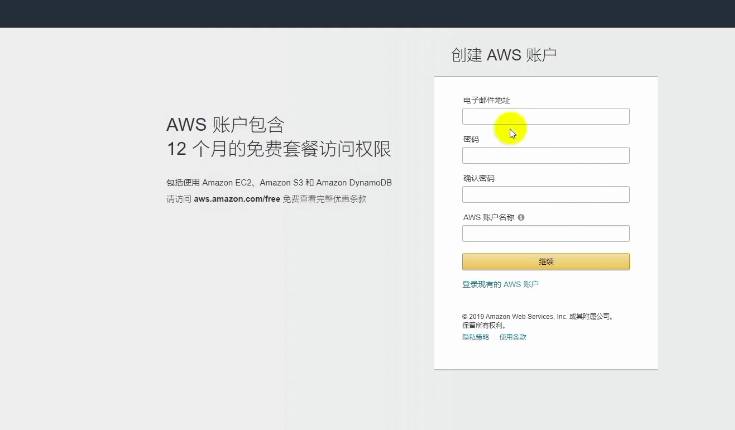
Register new AWS users
Registration link
Go to the next step and select an individual; Next, bind the savings card or credit card. A $1 advance payment will be deducted after the card is bound, and it will be returned later.
Log in to the ECS control panel of AWS and create an instance
As shown in the following figure, first select the Asia Pacific region in the upper right corner: Tokyo (Tokyo is a faster node for China), and then select Start Instance.
Ec2 control panel
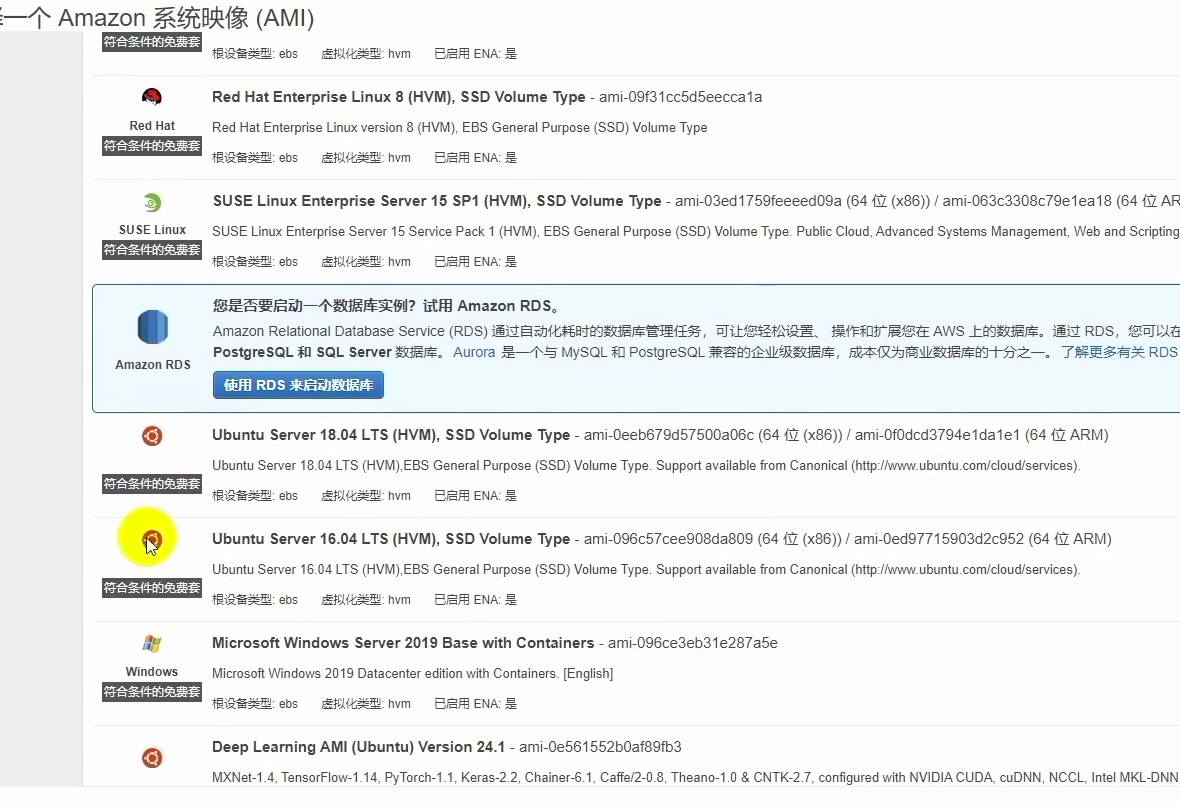
1. Select Server System
As shown in the figure below, check the free package only in the left column to filter out the available server systems for the free package. Here we select Ubuntu Server 16.04 LTS (HVM), SSD Volume Type, and Ubuntu system version 16.04.
2. Select the virtual hardware of the instance
As shown in the figure below, select the second t2. micro type. It is selected by default, and does not need to be changed. Next step: Configure instance details.

3. Configure Instance Details
Select Enable in the Auto Assign Public IP option. Independent public IP must be available. Select Next: Add Storage.
4. Add Storage
Fill in the size with 30. The 30G storage volume is permanently free of charge for AWS. Select Next: Add a label.
5. Add Host Label
Adding a label is used to mark the host name. I skip this step and do not add a label. Select Next: Configure the security group.
6. Add Security Group
By default, you choose to create a new security group, and ssh rules have been added by default. (SSH is used by the computer to remotely log in to the server.) This step does not need to be set, but remains the default. Select Approve and Start.
7. Check the instance configuration and start
Check whether the previous instance configuration is appropriate. In the lower right corner, click Start. In the pop-up box, select Create a new key pair, enter the name of the key pair (to be named in English), click Download Key Pair, and download the key to the local computer to save it. Here, assume that the key name is example.pem and saved in the local directory/home/users, which will be used in the following tutorial.
SSH logs in to ECS remotely and resets the SSH configuration on the server to facilitate future login
After the instance is started, the instance panel is shown in the following figure. Record the independent public IP address of the instance, which is required for ssh login.
Panel after instance startup
SSH login of the mac system
The mac system comes with the ssh tool. Open the terminal and enter the following command
Ssh - i/home/users/example.pem ubuntu @ Independent public IP
Then the terminal will prompt whether to create an ssh connection. Enter yes and press Enter.
You have sshed in to the server.
Win system ssh login
For the window system, you need to use ssh software for remote login. It is recommended to use xshell or putty. This is explained by xshell.
Open xshell, create a new session, write the name casually, fill in the public IP address of the instance for the host, and fill in 22 for the port.
New Session
Click User Authentication, select Public key as the method, fill in ubuntu as the user name, browse the user key, select the key pair saved locally to import, and click OK.
User authentication
After logging in to the server, modify the ssh configuration and set the user password
Set the root administrator user password: sudo passwd root prompts to enter the password twice, and uses Enter to confirm each entry.
Switch to the root account: su root enters the password you just set, and then press Enter to confirm.
Set the password of the ubuntu user: passwd ubuntu prompts you to enter the password twice, and uses Enter to confirm each entry.
Edit the server's ssh configuration file sshd_config: vi/etc/ssh/sshd_config (there is a space after vi), and enter the vi editing interface, as shown in the following figure. In the input method English status, press the i key to enter the editing mode. Find PasswordAuthentication no and change no to yes. Press Esc to exit editing mode. Then enter: wq Enter to exit the vi editing interface.
Edit the sshd_config file
Restart the instance system: reboot and press Enter to restart the server system immediately.
After reboot, you can use the user password to ssh in to the server
Mac system login
Enter the ssh ubuntu @ independent public IP, enter the user password of ubuntu set in the previous step, and then enter Enter to log in to the server instance.
Win system login
Use xshell. In user authentication, select Password, fill in ubuntu for the user name, and fill in the password of the user set in the previous step. Click OK to log in to the server instance.
matters needing attention
In the future, the ssh login server can only be logged in as the ubuntu user, not as the root user. If you need to operate with root permission, switch from ubuntu user to root user. su , Then enter the root password and enter to log in.