In Linux operating system, file compression and decompression is an indispensable part of daily work.As one of the popular Linux distributions, Ubuntu's powerful command line tools provide users with efficient file compression and decompression functions.This article will introduce in detail how to compress and decompress files through the command line in Ubuntu to help users easily master this practical skill.
1、 Operation method of compressed file
In Ubuntu, there are many commands available for file compression, among which gzip, bzip2, tar, etc. are the most commonly used.These commands are powerful and can meet the compression requirements in different scenarios.
Compress files using gzip
The gzip command is used to compress a single file, retain the extension of the original file, and add the. gz suffix.For example, to compress the file example.txt into example.txt.gz, you can enter the following command in the terminal:
gzip example.txt
After executing this command, the system will generate a compressed file named example.txt.gz in the current directory.
Use bzip2 to compress files
The bzip2 command is similar to gzip, but has a higher compression ratio.Similarly, it compresses the original file into a compressed file with the suffix. bz2.For example, to compress the file example.txt into example.txt.bz2, you can execute the following command:
bzip2 example.txt
After execution, the example.txt.bz2 compressed file will be generated.
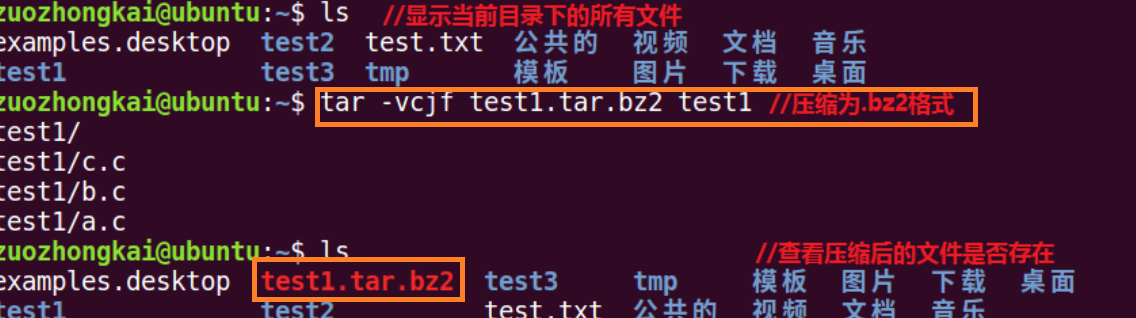
Use the tar command to package and compress files
The tar command can package multiple files or directories into an archive file, and supports multiple compression formats.For example, to package the directory mydir and compress it into a mydir.tar.gz file, you can execute the following command:
tar -czvf mydir.tar.gz mydir/
Where, - c means to create an archive file, - z means to use gzip compression, - v means to display details, and - f means to specify the archive file name.
2、 Operation method of decompressing files
Similar to compressed files, Ubuntu also provides a variety of commands for decompressing files.The following are some common decompression commands.
Unzip the gzip zip file using gunzip
The gunzip command is used to extract the. gz file generated by the gzip command.For example, to extract the example.txt.gz file, you can execute the following command:
gunzip example.txt.gz
After decompression, the original file example.txt will be generated.
Unzip the bzip2 compressed file using bunzip2
The bunzip2 command is used to extract the. bz2 file generated by the bzip2 command.The decompression method is similar to gunzip, just replace the file name with the corresponding. bz2 file.
Extract the archive file with the tar command
For the archive file packaged by the tar command, you can use the tar command to decompress it.The decompression command varies according to the compression format.For example, to extract the mydir.tar.gz file to the current directory, you can execute the following command:
tar -xzvf mydir.tar.gz
Where, - x refers to extracting the contents of the archive file, - z refers to using gzip to decompress, - v refers to displaying details, and - f refers to specifying the archive file name.
This article introduces how to compress and decompress files through the command line in Ubuntu.After mastering these commands, users will be able to manage file storage space more efficiently and easily obtain file content when needed.At the same time, these commands are also applicable to other Linux based operating systems, providing users with more flexible file management solutions.
This article is written byxiaowanPublished on May 20, 202416:47:30
This article is collected and sorted by the website of Mutual Benefit, and the email address for problem feedback is:wosnnet@foxmail.com, please keep the link of this article for reprinting:https://wosn.net/32821.html