
Description
Displays a user-friendly contact form that your visitors will love.
-
Easy to use -
Simple and secure -
ADA and WCAG compliant -
Lightweight and super fast -
Provides multiple form styles -
Customize just about everything -
Display the contact form anywhere -
Change the order of the form fields -
Send email to multiple recipients -
Complete documentation via Help tab -
Excellent free plugin support
“The famous spam filter SpamAssassin” scores CFX = zero spam!
-
Name -
Website -
Email -
Subject -
Custom Field -
Challenge Question -
Message -
Google reCaptcha (v2 or v3 Invisible) -
Carbon Copy -
Agree to Terms
-
Built with the WordPress API -
Ajax-powered form submission -
Remembers form data on error -
Google reCaptcha version 2 -
NEW: Google reCaptcha version 3 (invisible) -
NEW: Drag/drop ordering of the form fields -
View your email messages on the WP Dashboard -
Option to enable/disable storing of email data in database -
Display form via widget, shortcode, or template tag -
Five CSS themes: Default, Classic, Micro, Synthetic, Dark -
Optionally collect user data like IP, host, and referrer -
Works perfectly with or without Gutenberg Block Editor -
Focused on performance, security, and usability -
Include extra form and user info with each message -
Customize the form’s success and error messages -
Provides plenty of useful hooks for developers -
Targeted loading of CSS and JavaScript assets -
One-click remove email data from database -
One-click restore default options -
Translation ready
-
Agree to terms checkbox, customizable -
Choose which fields to include with the form -
Option to disable collection of user IP address and other data -
Note: this plugin uses cookies to enhance form functionality
-
The Tao of WordPress -
Digging into WordPress -
.htaccess made easy -
WordPress Themes In Depth -
Wizard’s SQL Recipes for WordPress
-
BBQ Pro – Super fast WordPress firewall -
Blackhole Pro – Automatically block bad bots -
Banhammer Pro – Monitor traffic and ban the bad guys -
GA Google Analytics Pro – Connect WordPress to Google Analytics -
Simple Ajax Chat Pro – Unlimited chat rooms -
USP Pro – Unlimited front-end forms
Screenshots

Plugin Settings/tab: Email Settings 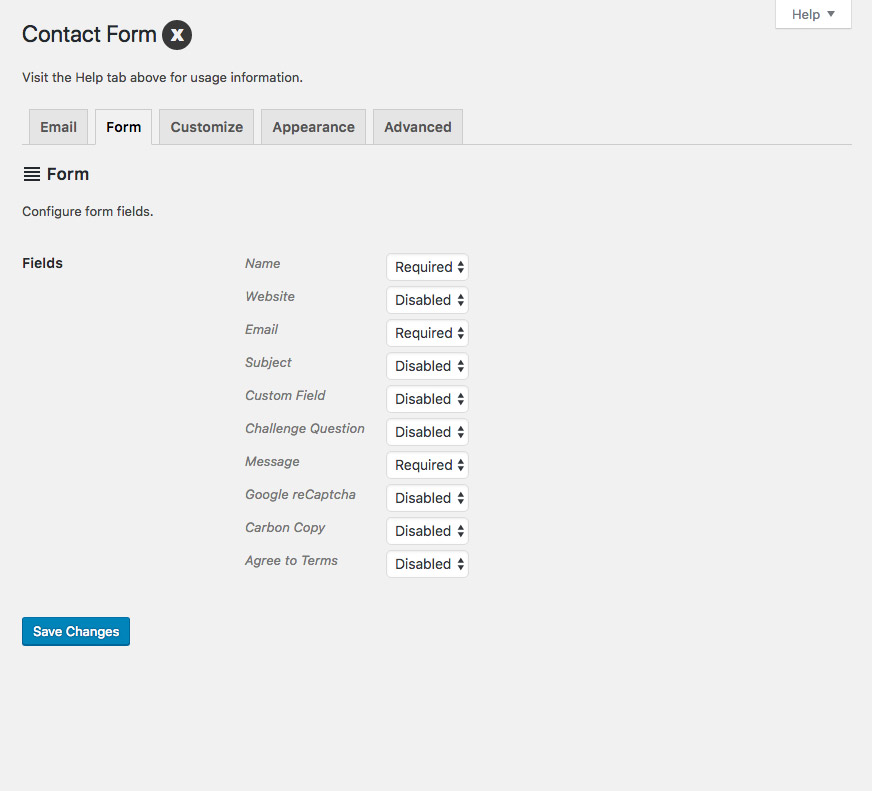
Plugin Settings/tab: Form Settings 
Plugin Settings/tab: Customize 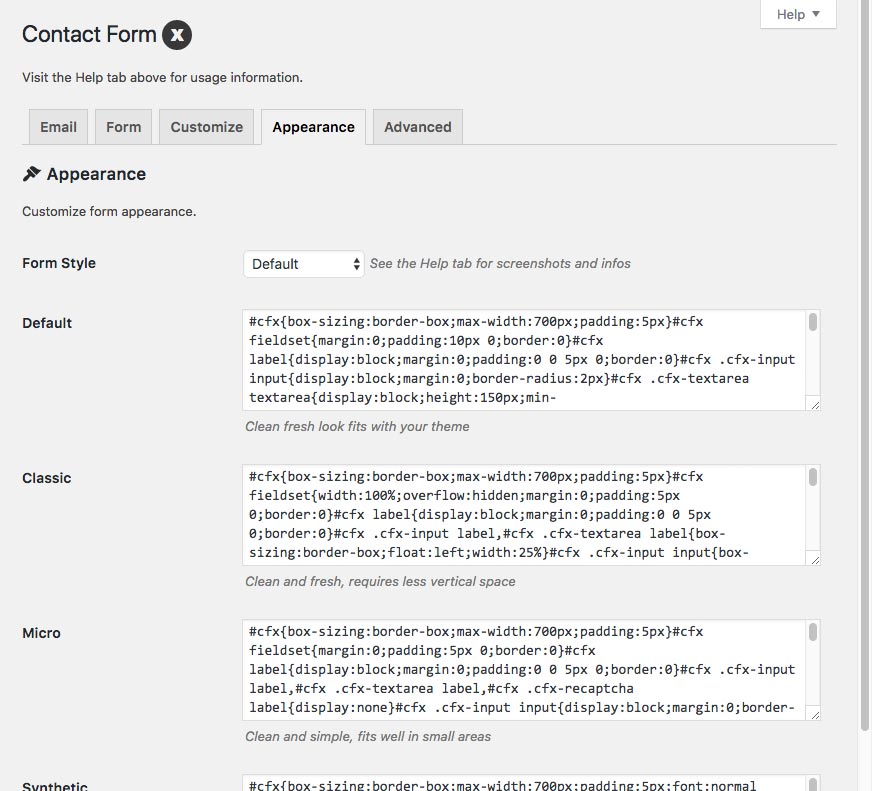
Plugin Settings/tab: Appearance 
Plugin Settings/tab: Advanced 
Documentation at your fingertips via the Help tab 
Theme Style: Default 
Theme Style: Classic 
Theme Style: Micro 
Theme Style: Synthetic 
Theme Style: Dark 
Success Message Options (customizable) 
Showing some error messages (customizable) 
Dashboard Widget (click toggles email message) 
Email with optional extra info included
Installation
-
Upload the plugin to your blog and activate -
Configure the plugin settings as desired -
Display the form on any post or page via shortcode: [contactformx]
FAQ
-
What about the styles? -
The plugin provides five form styles (themes): Default, Classic, Micro, Synthetic, and Dark. The first three themes (Default, Classic, Micro) employ minimal, mostly structural styles. One of the benefits of using the minimal styles is that they allow your WordPress theme to set the form’s appearance. And that’s good because it helps keep your pages looking visually consistent across your site. The last two themes (Synthetic, Dark) go much further with the stylings. The Synthetic and Dark styles will override any/most CSS applied via your WordPress theme. So if the contact form looks weird or whatever when trying Default, Classic, or Micro, try either Synthetic or Dark should do the trick. -
What about targeted loading of assets? -
By default, Contact Form X loads its assets (CSS and JavaScript) on every front-end page. So if you display a contact form in your sidebar, it will work on all pages. Some sites prefer to have a “Contact” page, and then just display the contact form in one location. In this scenario, it doesn’t make sense to include plugin assets on every front-end page. So CFX provides a setting called “Targeted Loading” (under the Advanced tab). There you can enter the URL of the page that displays the contact form. That way, the plugin will know to load assets only on that page. This is an excellent way to help keep things optimized for performance and so forth. -
In the plugin settings, visit the “Appearance” tab. There you will see the first option, “Form Style”. That tells you which styles are used for the form. So to change the button color, scroll down to locate the styles that you are using (e.g., Default, Classic, Micro, et al). To change the color of the submit button, add the following line to whichever styles you are using: #cfx .cfx-button { background: red !important; } Change the red to whatever color you want. Can use hex values, rgba, or any valid CSS properties. Save changes and done. -
How to include extra form data with email messages? -
Visit the Advanced tab and enable “Extra Email Info” option. Save changes and done. -
How to defer or async loading of JavaScript? -
The recommended way to defer or async load JavaScript is to use a trusted plugin, such as this one . -
How to set maxlength on the Message textarea? -
It is possible to set a maxlength attribute on the Message field, a textarea. To do so, add the following code via (child) theme or custom plugin : function contactformx_textarea_maxlength($chars) { return 500; } add_filter('contactformx_textarea_maxlength', 'contactformx_textarea_maxlength'); You can adjust the number of characters by changing five hundred to any number. -
How to display the form shortcode inside a widget? -
Enable the Advanced option, “Widget Shortcodes”. Save changes and done. -
How to change the language for Google reCaptcha? -
By default, the Google reCaptcha field is displayed in English. To change that to some other language, first locate the two-digit abbreviation for your language here . Then add the following code to your theme (or child theme) functions.php, or add via simple custom plugin : function contactformx_recaptcha_querystring($query) { return 'en'; } add_filter('contactformx_recaptcha_querystring', 'contactformx_recaptcha_querystring'); Notice where it says en , that is the two-character language code you want to replace with your own. Then save changes and done. -
How to remove or empty the old database table? -
In CFX v1.9, sent emails optionally may be stored in the database as custom post types. Before CFX v1.9, email data was stored in its own/separate database table. So that means users who are upgrading from previous versions to 1.9 or better will have an unused email table in their database. It won’t hurt or affect anything, but you may want to empty or remove it to help save space. Important: the following steps are for users of CFX v1.9+ who have upgraded from a previous version. Do NOT follow these steps if using CFX versions less than 1.9, OR if you never have used any version of CFX less than 1.9. To empty the old/unused CFX database table: -
Log in to WordPress as admin-level user -
Create a new page and leave in Draft status -
Add [contactformx_legacy_empty_table] to the page -
Preview the page on the frontend -
Click the link to Empty the CFX database table -
After seeing the success message, delete the draft page and shortcode
To remove the old/unused CFX database table: -
Log in to WordPress as admin-level user -
Create a new page and leave in Draft status -
Add [contactformx_legacy_drop_table] to the page -
Preview the page on the frontend -
Click the link to Empty the CFX database table -
After seeing the success message, delete the draft page and shortcode
Using a temporary/draft page for the shortcode and then deleting it afterwards ensures that only YOU are making changes to the database. It is important to not display either of the above shortcodes publicly. -
-
How to hide the Google reCaptcha badge? -
According to Google docs, it’s fine to hide the reCaptcha badge (the little blue badge that displays in the corner of the page), as long as the official requirements are met. So if you’ve got the requirements covered, it’s fine to add the following CSS to hide the reCaptcha badge: .grecaptcha-badge { visibility: hidden; } You can append that bit of CSS to your chosen form styles under the Appearance tab, in the CFX settings. Save changes and done. Or alternately, you can add the CSS using a custom plugin, or via any other method. -
Compatibility with SMTP plugins? -
Contact Form X (CFX) should be compatible with any SMTP plugin that uses WP APIs and standards, etc. For example, from user reports we know that: -
CFX is compatible with Easy WP SMTP out of the box -
CFX is compatible with SMTP Mailer when the setting “Email Address From” is the same as the email set up in SMTP Mailer settings
Thanks to @sixaxis for this information. Please let us know if you have any information about CFX compatibility with SMTP plugins, thank you. -
-
How to set the default Subject field? -
There are two ways to customize/set the Subject line: First way is to simply disable the “Subject” field (under the “Form” tab), and then set the option “Default Subject” (under the “Customize” tab) to whatever you want. Second way is to add this snippet of jQuery to your site: <script> jQuery(document).ready(function($) { $('.cfx-subject').hide(); $('.cfx-submit').click(function() { $('#cfx-subject').val('Whatever you want'); }); }); </script> Make sure to change the “Whatever you want” to.. well, whatever you want to use for the Subject field in all sent messages. No other changes need made, save changes and done. -
How to customize the Carbon Copy message? -
To change the message that is displayed at the beginning of all carbon copy emails, add the following slice of code to your WordPress site: function contactformx_send_carbon_message($message) { return 'This message is displayed at the beginning of the carbon copy email.'. "\n\n"; } add_filter('contactformx_send_carbon_message', 'contactformx_send_carbon_message'); Make sure to change the return message to whatever you would like. No other changes need made, save changes and done. Just fyi, here is a guide that explains some ways to add custom code to WordPress . -
Got a question? -
Send any questions or feedback via my contact form
Reviews
Contributors & Developers
Interested in development?
Changelog
-
Updates plugin settings page -
Updates default translation template -
Improves plugin docs/readme.txt -
Tests on WordPress 6.5 (beta)