Users can quickly design Spread controls through the Spread Designer. Whether the user is doing a prototype research on the features of the Spread control or further customizing an existing Spread control in some aspects, the exclusive graphical interface of the Spread designer can save a lot of time and effort. The Spread Designer allows users to add data and set control properties at the same time, including those that cannot be set in Visual Studio. Users can set run-time and design time properties at the same time. In most cases, users can preview the effect before applying the settings. After setting, all settings can be applied to the Spread control. Using the Spread designer, control customization will become very simple and fast.
The Spread Designer allows users to save the design results as files and share them with others. After saving the design as a file, you can open it for further modification next time, or you can open the design files of other team members.
Open the Spread Designer
You can use the following steps in Visual Studio NET:
1. Right click the Spread control and select the Spread designer in the pop-up menu.
2. Select the Spread control on the design form, and press F4 to display the attribute window. Click the Spread Designer command at the bottom of the property window.
Users can also use Visual Studio NET. Under the Bin folder after installing the product, run FarPoint SpreadDesigner.EXE application.
When the Spread designer runs independently, some functions will not be available. These functions are integrated with Visual Studio and can read or apply some settings to the development environment. They are only provided when the designer is not running as an independent application.
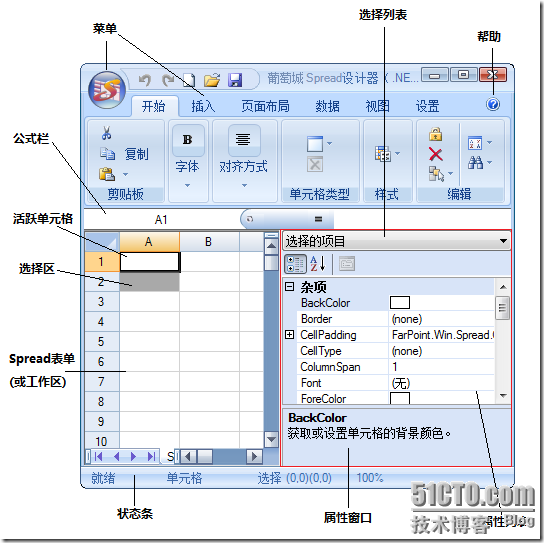
The user interface of the Spread Designer is shown below:

The properties of the currently selected object are listed in the designer properties window. You can use the object list to select a specified object, or click a form, cell row, cell column, or cell to select a specified object. Next, you can edit the attributes of the selected object in the attribute window.
To help users better use the Spread Designer, the Spread Designer does not apply some properties in design mode. For example, if the user sets the form not to display the head area of the cell column, the head area of the cell in the designer will still remain visible to assist the user in the next design step. The following attribute list is all of these attributes. In order to better assist user design, these attributes will not take effect in design mode.
ColumnHeaderVisible
EditModePermanent
HorizontalScrollBarPolicy
RowHeaderVisible
TabStripPolicy
VerticalScrollBarPolicy
Simple example
The current example demonstrates how to create a Spread form in the Spread Designer. It creates a Spread form to track which products sell well in the warehouse. This example can be used whether the Spread control designer is run as a separate application or launched from within a development environment such as Visual Studio.
First, we need to start the Spread control designer
1. Start the Spread control designer.
2. Then, we need to configure the Spread form.
3. Set the size of the Spread form. Click the corner area of the entire Spread form to select the Spread form. By dragging the scroll bar in the attribute window, the user can see that the number of rows and columns of the Spread form is 500. Click and edit these two attributes to change them to 10.
4. Add meaningful text in the cell row and column header area. Select the cell row by clicking the head area of the cell row. Right click the line and select Header in the pop-up menu. The header editor will be opened, change its width to 60, and then click the "Apply" button. At this time, the application will pop up a prompt box asking whether to apply this setting to the entire header area, and click "Yes".
5. Right click the label "A" of cell column A, select "Header" in the pop-up menu, and then change the text attribute to "Product" in the attribute window.
6. Next, continue to change the background color of the cell column to yellow in the attribute window, click "Apply", and then click "Confirm" to close the editing window. Right click the head area of the current cell column again, change the column height to 75 in the editing window, and click "Apply". Click the label "B" of cell column B, use the above steps to change its label to "# Produced", right-click the selected column, select the cell type in the pop-up menu, then select the number type, and adjust its column width to 75. Click the label "C" of cell column C, and follow the same steps to change its label to "# Sold.", change the cell type to number, and adjust the column width to 75.
7. Click the label "D" of cell column D, and follow the same steps to change its label to "Price.", change the cell type to digital currency, and adjust the column width to 75.
8. Click the label "E" of cell column E, and follow the same steps to change its label to "Income.", change the cell type to digital currency, and adjust the foreground color to blue. Select cells E1 to E4 in turn, enter "=" in the formula edit box, and then enter "Cn * Dn" (where "n" is the row index of cells E1 to E4). Then click "Cell Head Area Setting" in the right-click menu, set the "locked" attribute of the head area to true, and finally set the column width to 85.
9. Click the label "F" of cell column F, and follow the same steps to change its label to "Product Status." and change the cell type to a drop-down selection box. (Right click the selected column, select the CellTypes menu, drop down the selection box cells, and then click the item label).
10. In the item label bar, enter "Continue production" in the first line and "Stop production" in the second line, and click the "Apply" button to adjust the column width to 85. Click the label "5" of cell row 5, and change its label to "Total". Similarly, change the label of cell row 6 to "Average.".
11. Enter the formula "SUM (B1: B4)" in the intersection cell of the "# Produced" cell column and the "Total" cell row, and enter the formula "SUM (C1: C4)" in the intersection cell of the "# Sold" cell column and the "Total" cell row. At this time, "0" will appear in these two cells. Enter the formula "SUM (E1: E4)" on the intersection cell of the "Revenue" cell column and the "Total" cell row.
12. Enter the formula "Average (E1: E4)" in the intersecting cell of the "Revenue" cell column and the "Average" cell row, which will give an average revenue. Any change in revenue will affect the average revenue. If you do not use the Spread Designer, users may ignore this.
13. Apply the design to the Spread form.
14. Exit the Spread Designer directly, and you can apply the design to the Spread control. At this time, the Spread control in the development environment is exactly the same as that in the designer just now.
15. Now if you enter data in the cells of the "# Sold" and "# Produced" columns, you will find that the total cell of the "Revenue" column will change. You can also change the "Price" column to observe the change of the "Revenue" column.
16. The next step is to compile the user's application.
17. To compile the application, click "Compile" on the main menu, and then move to "Compile File Name".
18. After successful compilation, Visual Studio will create an executable file and place it in the project folder of Visual Studio.
19. Next, we need to save the file and exit.
Click Save in the File menu on the main toolbar to save the project.
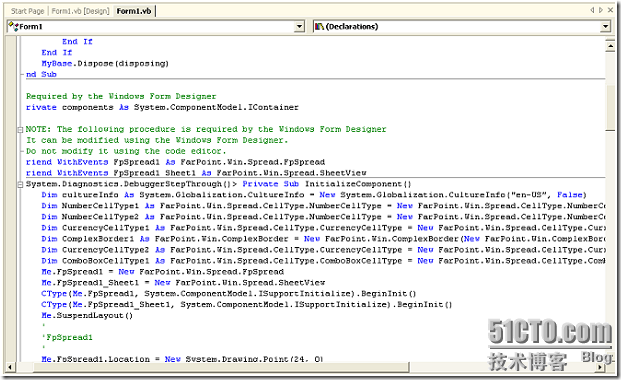
After applying the design result to the Spread control from the Spread designer, some code will be generated in the development environment, as shown in the following figure:

Run the Spread Designer independently
Users can run the Spread control designer as a separate application independent of Visual Studio. For most developers who want to share designs, it is very convenient and fast to run a separate designer program and save the design results in an XML or Excel compatible file format. When the Spread Designer runs as a separate application, some functions cannot be used, because these functions will be integrated with Visual Studio, and some settings will be read or applied to Visual Studio.
The easiest way to run the Spread Designer independently is to run the executable file of the Spread Designer in the Bin folder under the installation directory.
Users can also create a shortcut for the Spread Designer executable, or work with the Windows operating system and other applications.
Appendix: Spread for Windows Forms Quick Start Series
Spread for Windows Forms Quick Start (1) --- Start using Spread
Quick Start of Spread for Windows Forms (2) --- Set Spread Forms
Spread for Windows Forms Quick Start (3) --- Row and Column Operation
Spread for Windows Forms Quick Start (4) - Common Cell Types (I)
Spread for Windows Forms Quick Start (5) - Common Cell Types (Part 2)
Spread for Windows Forms Quick Start (6) --- Define the appearance of cells
Spread for Windows Forms Quick Start (7) --- Cell Interaction
Spread for Windows Forms Quick Start (8) --- Event of user action starting in cell
Spread for Windows Forms Quick Start (9) --- Using Formulas
Spread for Windows Forms Quick Start (10) --- Bind to Database
Spread for Windows Forms Quick Start (11) --- Data Filtering
Spread for Windows Forms Quick Start (12) --- Data Grouping (Outlook Style)
Spread for Windows Forms Quick Start (13) --- Data Sorting
Spread for Windows Forms Quick Start (14) --- File Operation
This article is from“ Grapevine Control Blog ”Blog, please keep this source http://powertoolsteam.blog.51cto.com/2369428/639309

