Cell editing mode
Normally, when the end user double clicks a cell, the edit control will allow the user to enter content in the cell. The ability to edit in a cell is called edit mode. Some properties and methods can be used to customize the use of editing modes.
When a cell is in edit mode, the active cell will display an I-shaped cursor, as shown in the following figure. When the cell is not in edit mode, the active cell will display a focus rectangle, as shown in the following figure.
| 
|

|
| Cells in edit mode |
Cells selected but not in edit mode |
A cell will enter edit mode (open edit mode) when:
User enters content in the cell
User double click cell
EditMode property is set to true
When a cell leaves edit mode (close edit mode)
The user presses the Enter key
User activated another cell
Application lost focus
The EditMode property is set to false
When a cell enters edit mode, the cursor is at the end of the text in the cell by default. You can set EditModeReplace Property to change the cursor to select the text that exists in the cell.
If you want, you can use EditModePermanent Property specifies a cell that remains in edit mode when it becomes the active cell.
You can use the StartCellEditing and StopCellEditing methods to start and end editing mode.
lock cell
You can lock a cell or a cell within a range so that it cannot be edited by the end user. You can also set the appearance of locked cells to other styles for users to distinguish.
You can use the Locked attribute in the cell object, column object, row object, or alternate row object to lock the cell. You can also set the Locked property for the StyleInfo object and apply the style to the cells you want to lock. You also need to set the Protect property of the SheetView object to lock cells. The Locked attribute identifies the locked cells. Setting the Protect attribute can determine whether to lock these cells. For cells marked as locked, to lock user input, the Protect attribute of the form must be set to True (True by default), otherwise users can still interact with the cell.
Another way to lock a cell is to set the cell type to text cell (using TextCellType) and set the property to read-only (ReadOnly). In this way, the cell cannot be edited.
After confirming that the Protect property of the form is set to True, you can lock some columns of cells and unlock them in a row. The example code is as follows:
| fpSpread1.ActiveSheet.Protect = true; fpSpread1.ActiveSheet.LockBackColor = Color.LightCyan; fpSpread1.ActiveSheet.LockForeColor = Color.Green; fpSpread1.ActiveSheet.Columns[0, 3].Locked = true; fpSpread1.ActiveSheet.Cells[1,1,1,2].Locked = false; |
Merging Cells
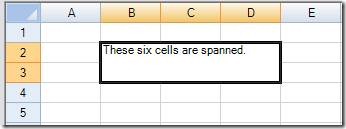
You can combine several cells to create a merge area, as shown in the following figure. Merging cells is used to create a large cell, which is located above the previous cells with columns. For example, if you create a merged range of cells from B2 to D3, large cells occupy the space of cells B2 to D3.

The control is divided into four parts: table corner, column title, row title, and data area. You can create several merge regions in one part, but you cannot create regions that span several parts. For example, you cannot merge cells in the data range with cells in the row header, and you cannot merge cells in the column header with cells in the corner of the table. This section mainly introduces how to merge cells in the data area.
When you create a merged range of cells. The data of the first cell of the merged region (often referred to as the anchor cell) occupies all the blank areas of the merged region. When you create a merged region, the original data in each cell is still in each cell of the merged region, but will not be displayed. Merging regions simply hides data. If you remove the merged area of this group of cells, the contents of the merged area cells, previously hidden contents, will be displayed normally. By calling the AddSpanCell method, you can create a merged range of cells. The type of cells in the merged region does not change. The merged cells adopt the leftmost cell type in the merged region.
Call the GetCellSpan method to return the determination value of whether a cell is in the merged region. If the cell is in the merge area, the method will return the CellRange object, which contains the number of rows and columns of the anchor cell, as well as the number of rows and columns in the merge area.
You can remove the merged range from a group of cell ranges by calling the RemoveSpanCell method. You can remove the cell merge area by this method, and specify the anchor cell of the merge area to remove the merge area. When you want to remove a merged region, the data previously displayed in each cell will reappear in front of you. The cell data has never been removed, but is hidden by the merged region.
The following example code defines some content and then merges six connected cells.
| // Create some content in two cells. fpSpread1.ActiveSheet.Cells[1,1].Text = "These six cells are spanned."; fpSpread1.ActiveSheet.Cells[2,2].Text = "This is text in 2,2."; // Span six cells including the ones with different content. fpSpread1.ActiveSheet.AddSpanCell(1, 1, 2, 3); |
Fill cells with drag and drop operations
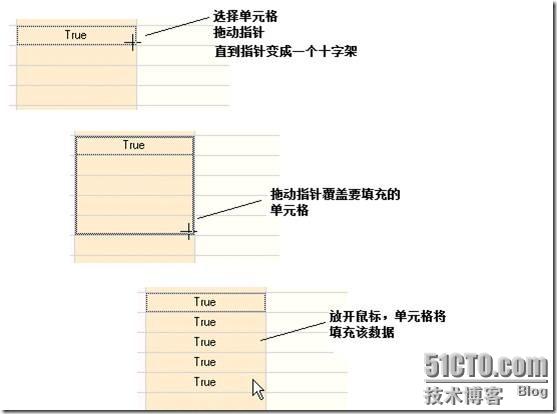
When using Spread for application development, you can allow end users to drag data from one or more cell areas to another cell or another group of cells. For the selected cell or group of cells, you can also fill other cells into one row (or several rows if more than one column is selected) or one column (or several columns if more than one row is selected).
The example shown here fills a column with several cells from the original selected cells.

Using the FillDirection enumeration type, you can customize the direction of filling.
The following example code sets the control to allow the drag fill feature.
| fpSpread1.AllowDragFill = true; |
Appendix: Spread for Windows Forms Quick Start Series
Spread for Windows Forms Quick Start (1) --- Start using Spread
Quick Start of Spread for Windows Forms (2) --- Set Spread Forms
Spread for Windows Forms Quick Start (3) --- Row and Column Operation
Spread for Windows Forms Quick Start (4) - Common Cell Types (I)
Spread for Windows Forms Quick Start (5) - Common Cell Types (Part 2)
Spread for Windows Forms Quick Start (6) --- Define the appearance of cells
This article is from“ Grapevine Control Blog ”Blog, please keep this source http://powertoolsteam.blog.51cto.com/2369428/634366

