Manage dependencies based on Go Module and adjust the registry to Etcd
preface
Because the Go Micro framework adjusted Consul from the default supported registry to the plug-in mechanism at the end of last year, many students reported that Build a simple microservice interface based on Go Micro framework This tutorial encountered many pitfalls. In addition, the previous tutorial managed project dependencies in the GOPATH way, and many people were unable to download dependency packages due to network problems. Especially for beginners, they are a bit at a loss. Their mentality has changed from entry to giving up.
Therefore, you will update a tutorial to manage dependencies based on the new Go Module. The advantage of using Go Module is that you can configure the proxy to accelerate the download of domestic Go dependency packages. In addition, you will also use the latest version of Go Micro and use Etcd as the registry to demonstrate how to build the first microservice interface.
Note: This tutorial is applicable to Go 1.11+, because Go 1.11 has officially introduced Go Module as the package manager.
Create a new project
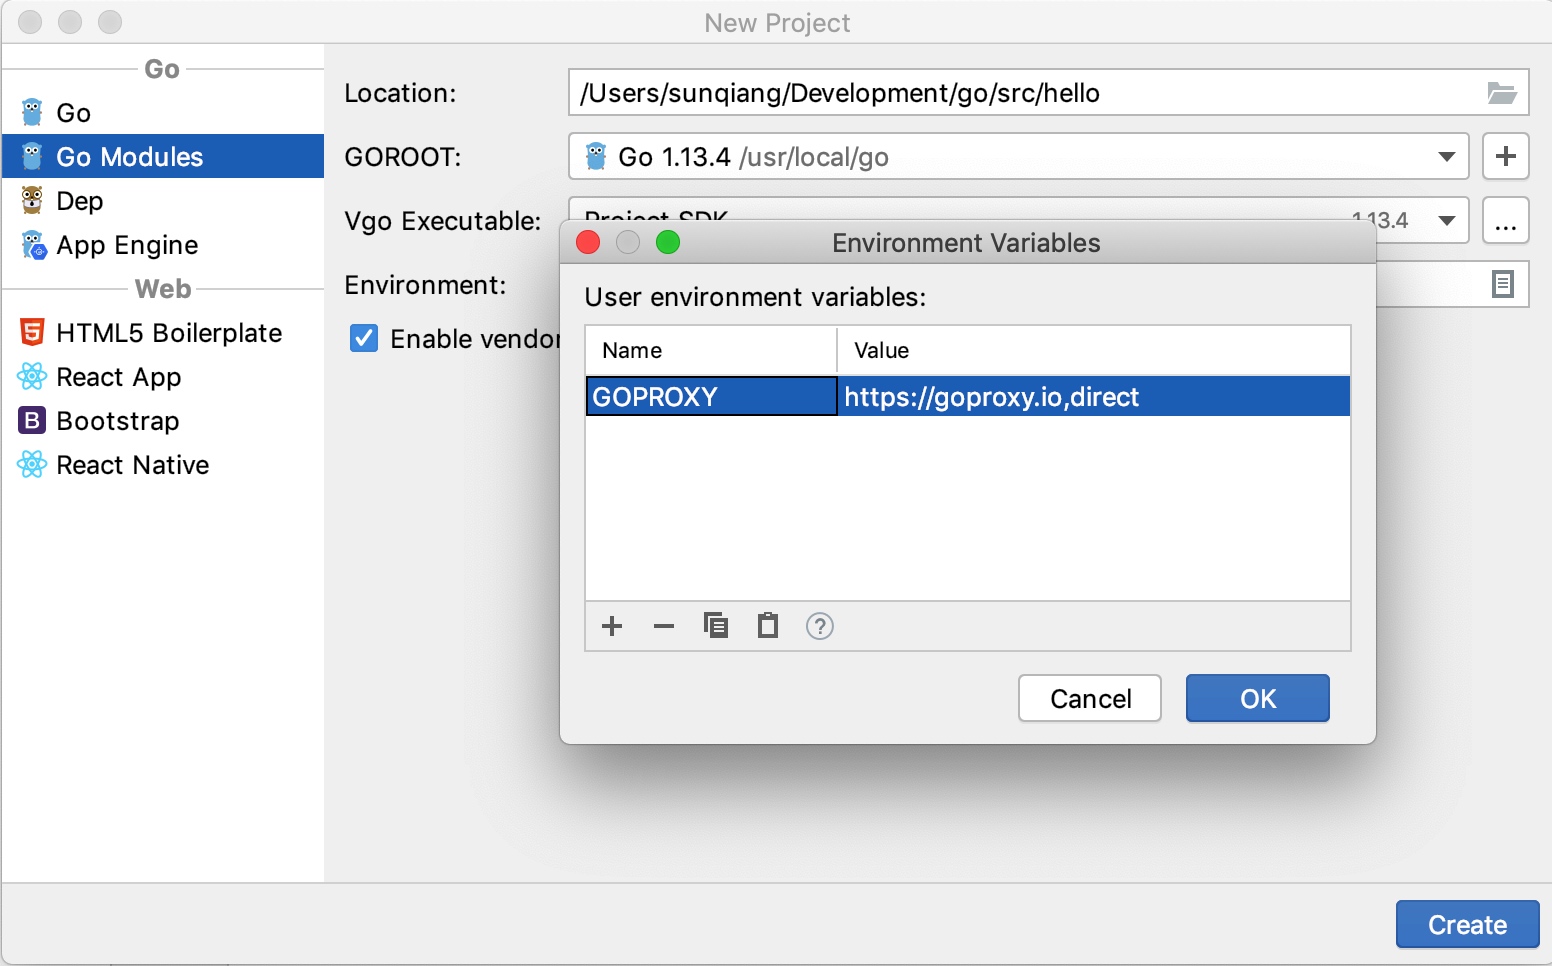
First, we open GoLand and create a new project based on Go Modules hello , here I saved the project to ~/Development/go/src/hello This path, and set the proxy address in the environment variable to https://goproxy.io So that you can speed up dependent package download through this address:
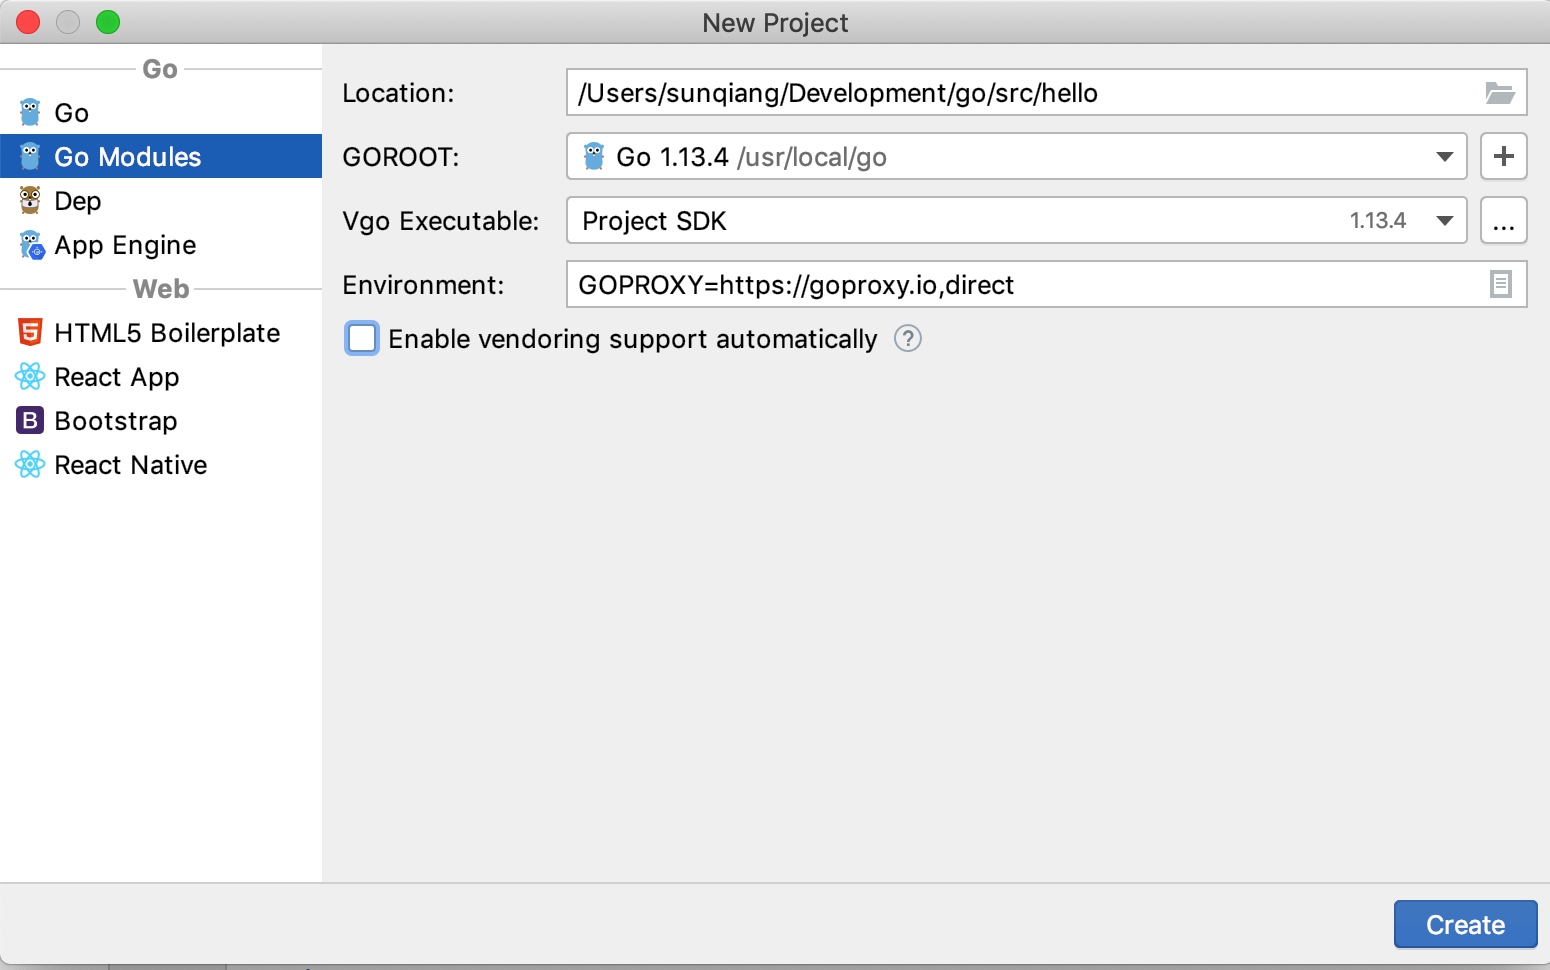
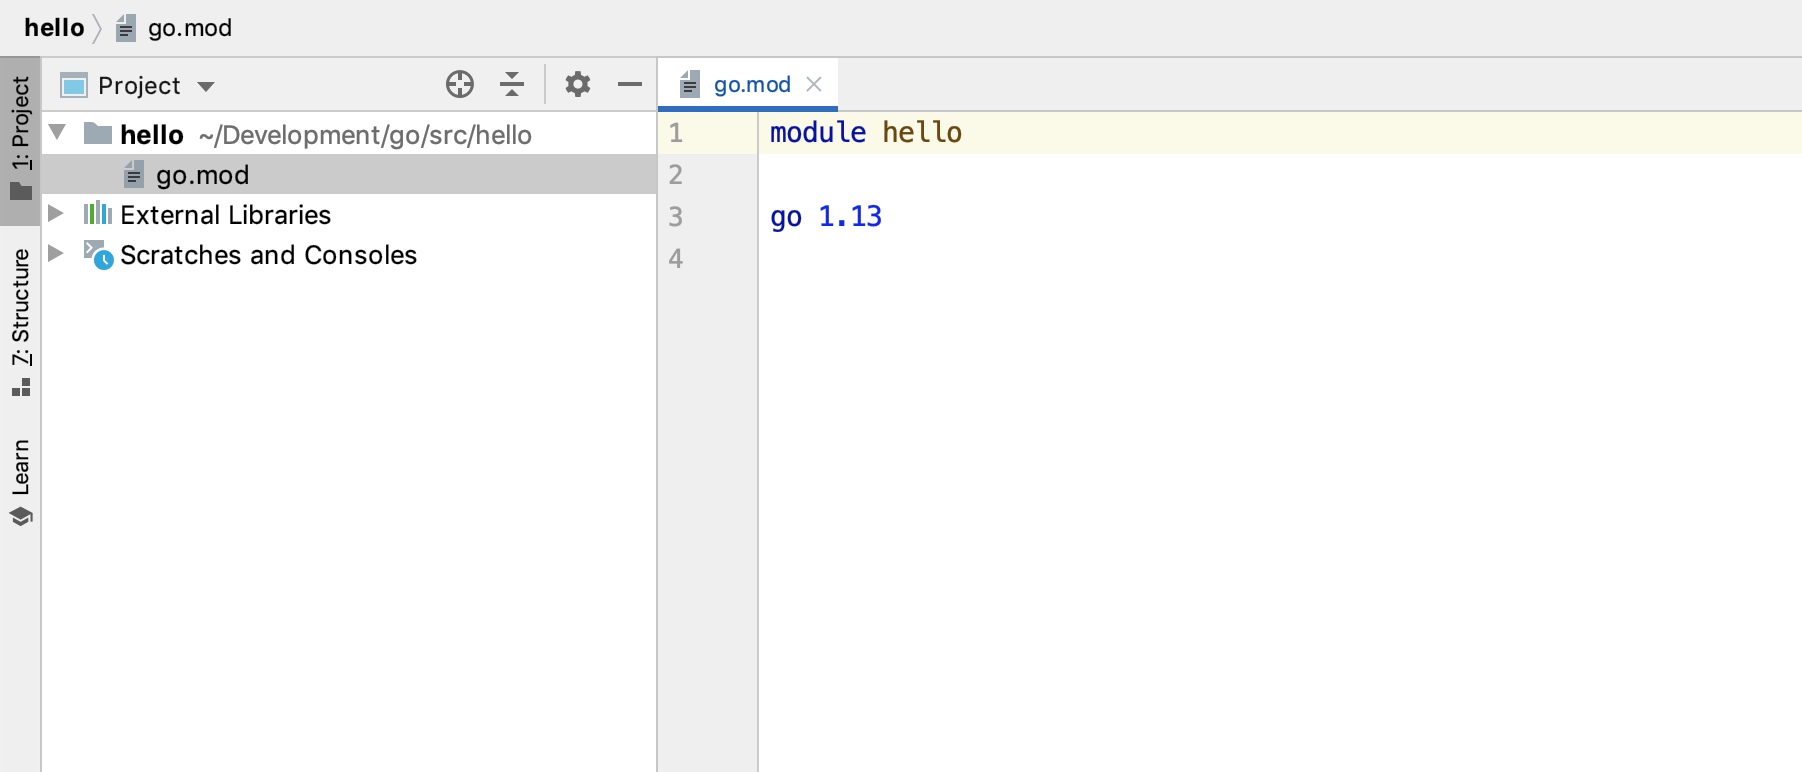
After setting as shown in the figure above, click the "Create" button to create the project, and then you can automatically generate a go.mod File, you can compare it to PHP composer.json , or in NPM package.json The Go Module manages project dependencies based on this file:
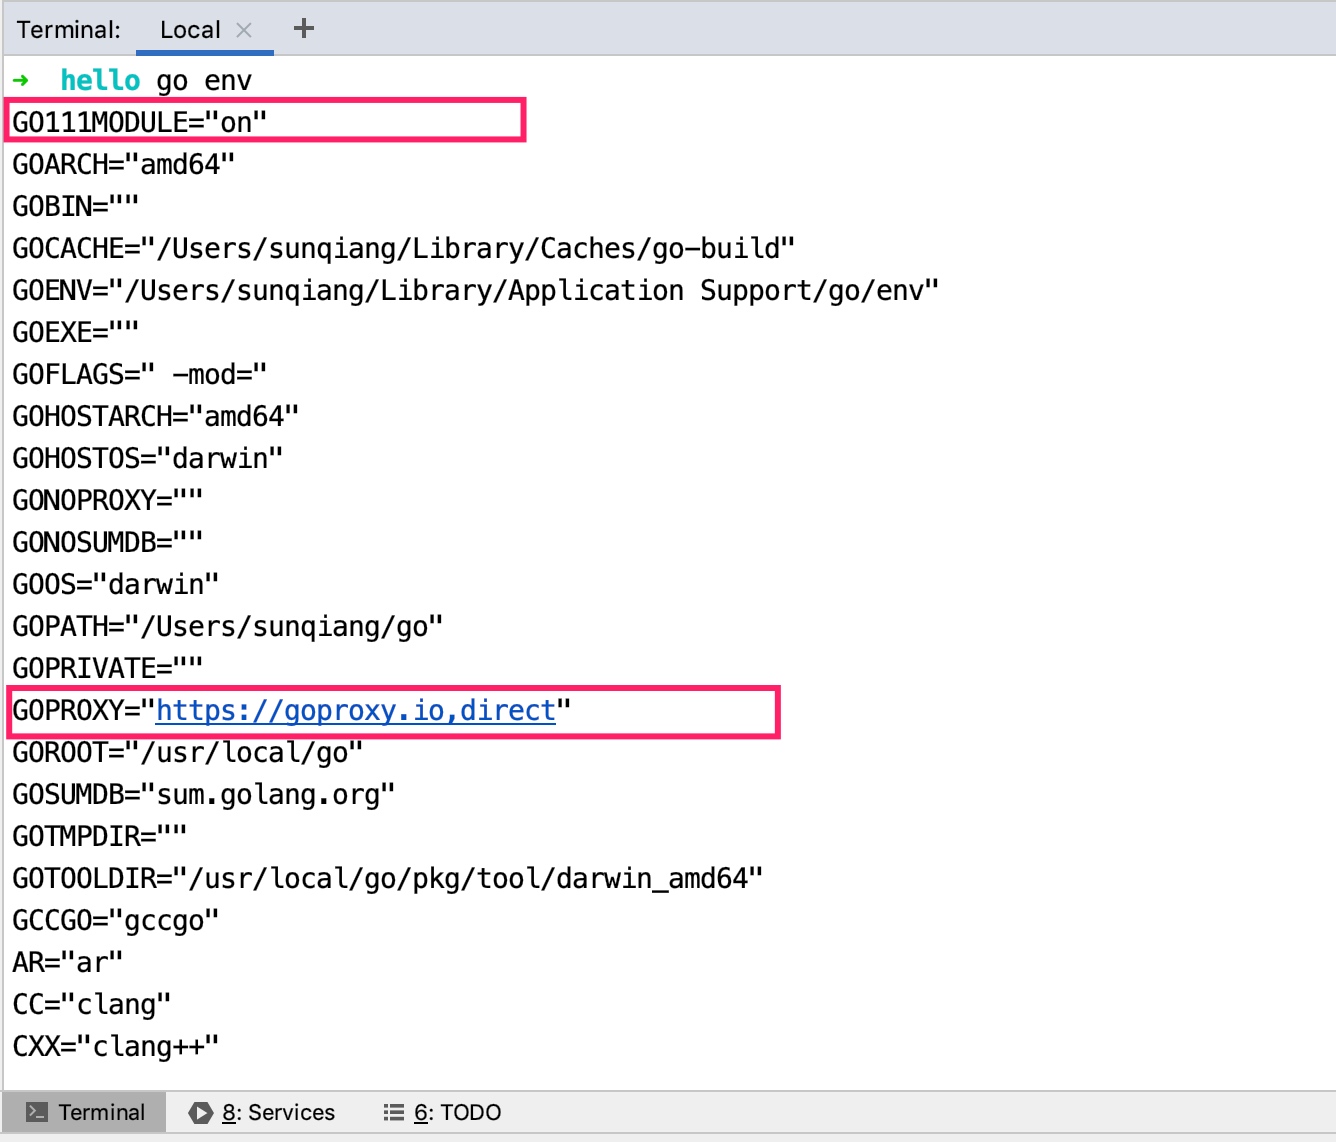
Then you can click Terminal in the toolbar at the bottom of GoLand to run go env Check whether the Go Module is enabled and whether the proxy address setting is successful:
So far, we have quickly completed the initialization of the microservice project based on the tools provided by GoLand.
Install Protobuf related tools
Next, we will install some tools needed to automatically generate microservice prototype code based on the Protobuf format service declaration file.
Install protoc gen micro
First protoc-gen-micro , which is applicable to generating service code based on Protobuf file in Micro framework. Run the following under the project root directory go get Command installation:
go get -u github.com/micro/protoc-gen-micro

After installation go.mod Of require See the dependency declaration in:
module hello go 1.13 require ( github.com/golang/protobuf v1.4.0 // indirect github.com/micro/protoc-gen-micro v1.0.0 // indirect )
By default, the system will protoc-gen-micro The executable file is installed in the GOPATH path bin In the directory, if you don't know where the default GOPATH path is, you can see it in GoLand Preferences:

Install protoc
protoc-gen-micro rely on protoc and protoc-gen-go , so use protoc-gen-micro Also install them.
You can go from here https://github.com/protocolbuffers/protobuf/releases Download the latest version of protoc :
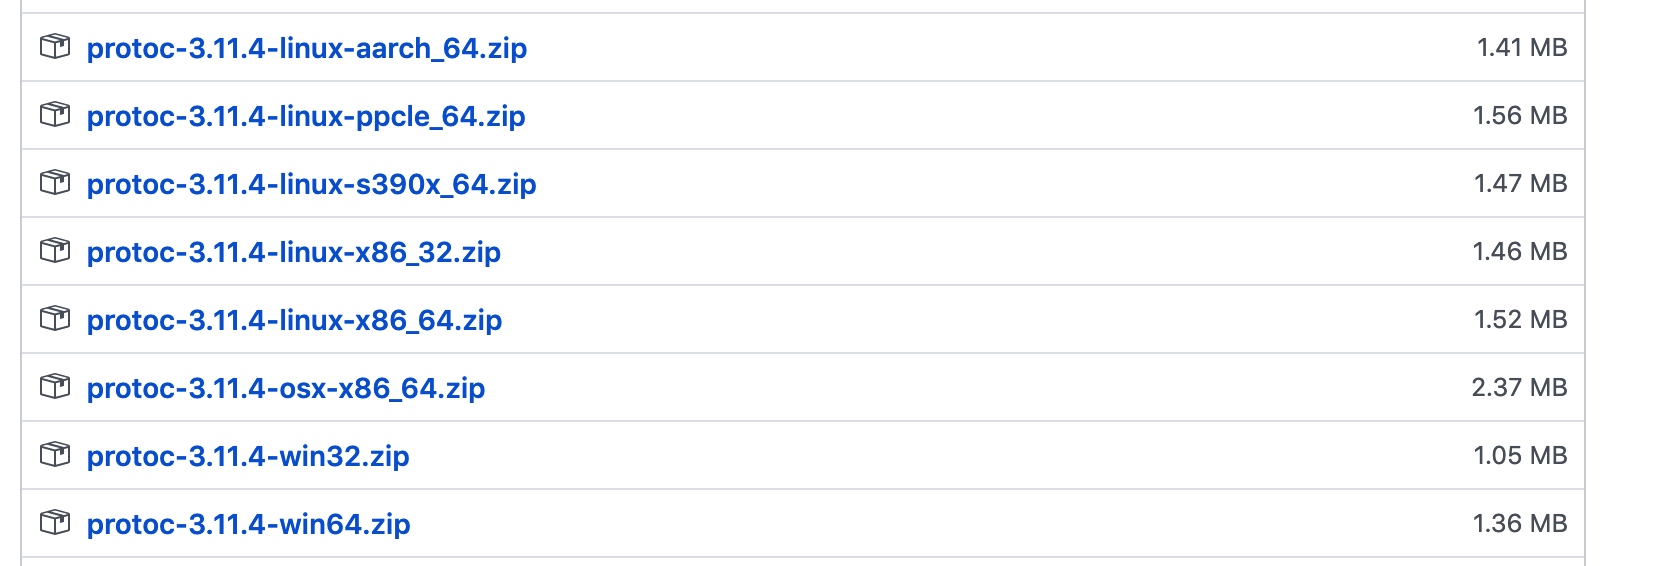
Select the compressed package that matches your own system. For example, if my system is a Mac system, select the osx 64 bit download, decompress it, move it to the specified location, and protoc The location of the binary executable file bin The directory is placed in the system path so that it can be called globally (the following are Mac system instructions, please set the system path through the graphical interface under Windows):
mv ~/Downloads/protoc-3.11.4-osx-x86_64 ~/Development/tools vi ~/.zshrc export PATH="/Users/sunqiang/go/tools/protoc-3.8.0-osx-x86_64/bin:$PATH" source ~/.zshrc
You can run protoc --version Check whether it can be called anywhere protoc Command.
Install protoc gen go
Finally, use the following command to install protoc-gen-go , this dependency package is Protobuf's Go language implementation:
go get -u github.com/golang/protobuf/protoc-gen-go
After installation, you should also be able to bin See in the table of contents protoc-gen-go 。 You need to $GOPATH/bin The directory is also placed in the system path, as shown above protoc Can be set so that it can be called globally protoc-gen-go and protoc-gen-micro Executable.
Use Etcd as the registry
Since the Go Micro framework cannot support Consul out of the box by default, we choose Etcd as the registry for service discovery. You can use this page https://github.com/etcd-io/etcd/releases Download the latest version of Etcd:
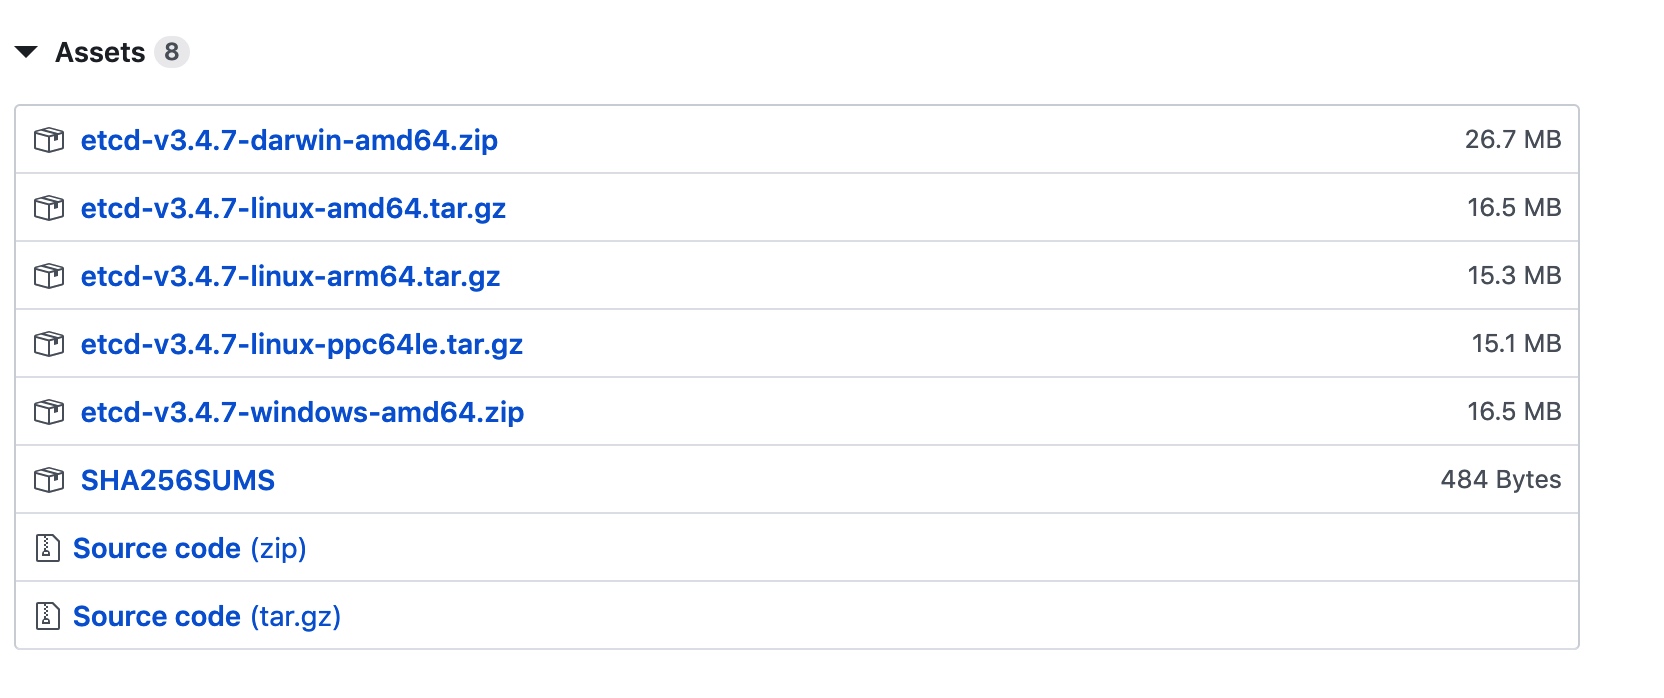
Select the zip or tar.gz package corresponding to your system to download. Take Mac as an example, select etcd-v3.4.7-darwin-amd64.zip Download and unzip to the local specified directory:
mv ~/Downloads/etcd-v3.4.7-darwin-amd64.zip ~/Development/tools cd ~/Development/tools unzip etcd-v3.4.7-darwin-amd64.zip
Enter the directory and start the Etcd server, then do not close this window, or the server will abort:
cd etcd-v3.4.7-darwin-amd64 ./etcd
Then you can open a new window, enter the directory where etcd is located, and click etcdctl Command client test:

Writing services
So far, we have made all the preparations for the periphery. Next, we can officially write the first microservice interface through the Go Micro framework.
Service Interface Statement
stay hello Create a new one in the directory proto Subdirectory, and then proto Create a service interface declaration file in Protobuf format under the directory greeter.proto :
syntax = "proto3"; service Greeter { rpc Hello(HelloRequest) returns (HelloResponse) {} } message HelloRequest { string name = 1; } message HelloResponse { string greeting = 1; }
As shown in the above code, we have defined a Greeter Service, which contains a Hello Method, which receives a HelloRequest Object, and then return a HelloResponse Object, both of which contain only one parameter.
Generate prototype code through service declaration
Next, we can use the previously installed protoc The tool generates the corresponding service prototype code through the service declaration file (in the hello Run under the project root directory):
protoc -I. --go_out=plugins=micro:. proto/greeter.proto
To avoid subsequent modifications greeter.proto This command needs to be executed frequently after the file. You can create a Makefile File, and then place the command in the build In the construction step:
build: protoc -I. --go_out=plugins=micro:. proto/greeter.proto
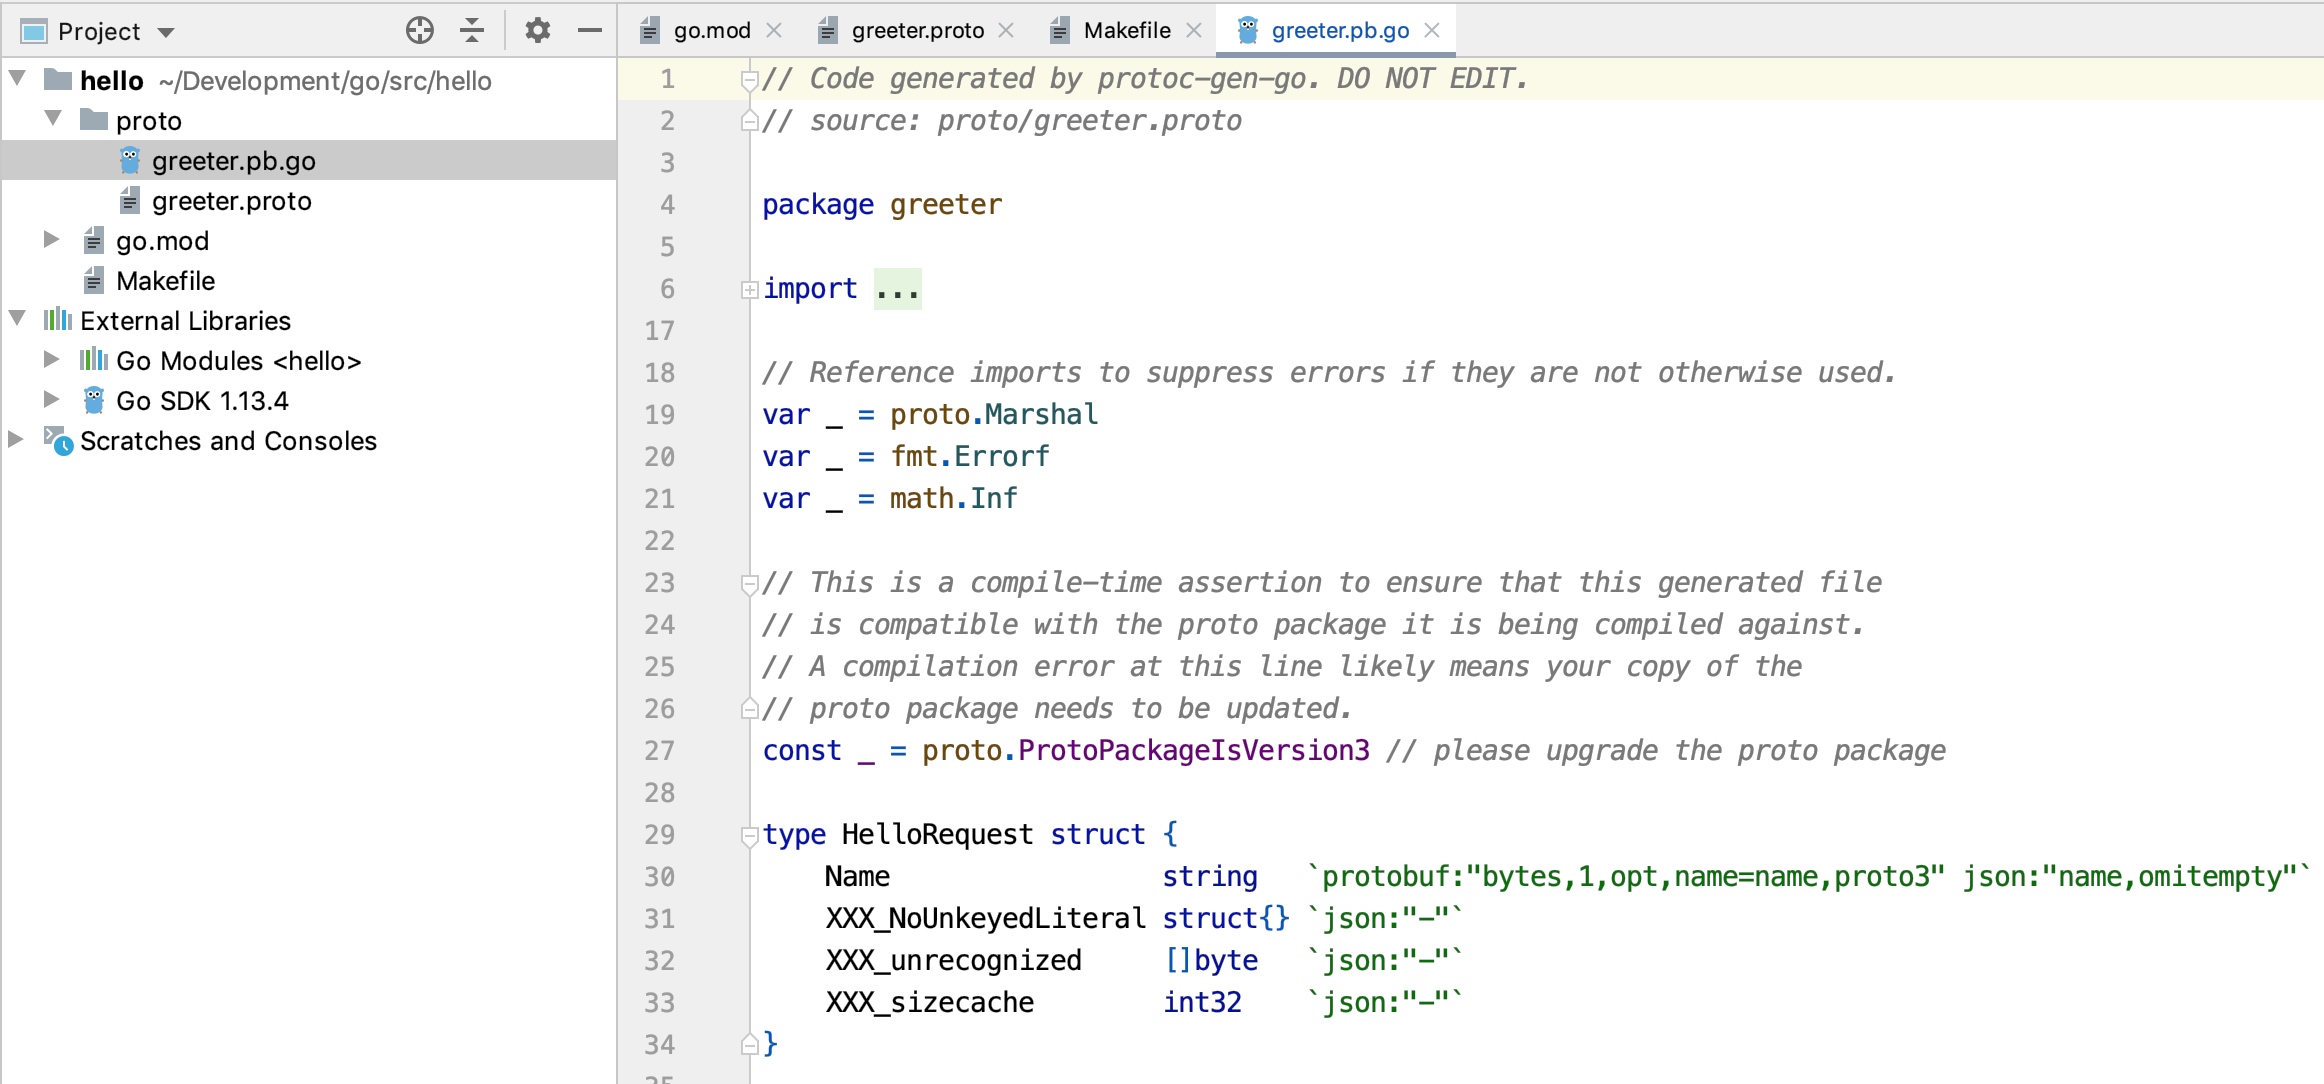
In this way, you can run the make build The command is executed. After successful execution hello/proto Generate a service prototype code in the directory greeter.pb.go File:
If you are performing the above protoc Command error, prompt micro Plug in does not exist:

You can adjust the command to the following one and execute it again (under the project root directory):
protoc --proto_path=. --micro_out=. --go_out=. proto/greeter.proto
Write service implementation code
Next, we can create a main.go , and then write the first microservice server interface based on the above service prototype code:
package main import ( "context" "fmt" "github.com/micro/go-micro" proto "hello/proto" ) type GreeterServiceHandler struct{} func (g *GreeterServiceHandler) Hello(ctx context.Context, req *proto.HelloRequest, rsp *proto.HelloResponse) error { Rsp. Greeting="Hello,"+req. Name return nil } func main() { //Create a new service service := micro.NewService( micro.Name("Greeter"), ) //Initialize and resolve command line parameters service.Init() //Register the processor and call the Greeter service interface to process the request proto.RegisterGreeterHandler(service. Server(), new(GreeterServiceHandler)) //Start Service if err := service.Run(); err != nil { fmt.Println(err) } }
The service processor class here GreeterServiceHandler Implemented the GreeterHandler Processor interface, and then we enter the function main The initialization name is Greeter And through proto.RegisterGreeterHandler The method will GreeterServiceHandler The processor implementation is bound to the microservice server (the default is the rpc server) service.Run Start the service so that you can GreeterServiceHandler The processor method processed the client request.
Run the following command in the project root directory to automatically download the dependencies in the service implementation code:
go mod tidy
Then start the service:
go run main.go --registry=etcd

Note that here we manually --registry=etcd Specify the registry as etcd , otherwise the default registry is mdns (Not available by default in Windows systems).
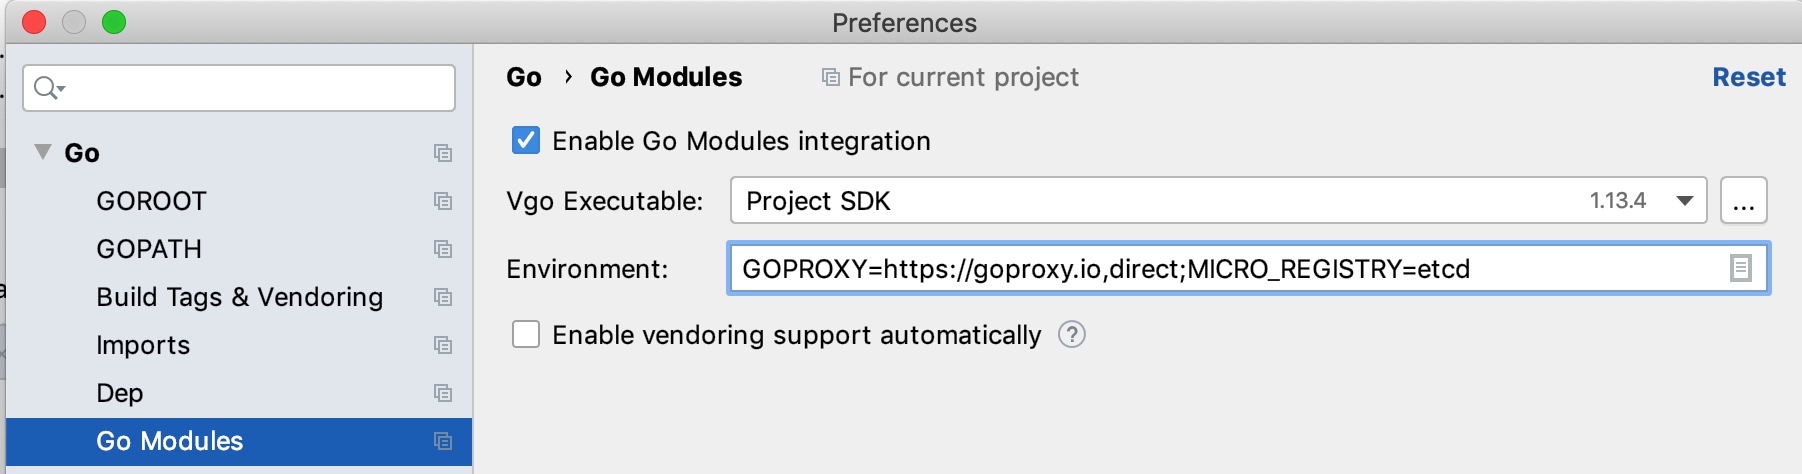
Of course, you can also set the GoModules environment variable of GoLand MICRO_REGISTRY=etcd To unify the settings, it is not necessary to import this option when starting the service (open the GoLand Preferences interface to complete the settings):
Later, we will demonstrate based on the system environment settings, and no additional incoming --registry Designated registration center, please know.
Next, you can call the remote service through the client.
Client call
Let's write a simple client test code and create it in the project root directory client.go The code is as follows:
package main import ( "context" "fmt" "github.com/micro/go-micro" proto "hello/proto" ) func main() { //Create a new service service := micro.NewService(micro. Name("Greeter.Client")) //Initialization service.Init() //Create Greeter Client greeter := proto.NewGreeterService("Greeter", service.Client()) //Call the Hello method of Greeter service remotely rsp, err := greeter.Hello(context. TODO(), &proto. HelloRequest {Name: "Scholar"}) if err != nil { fmt.Println(err) } // Print response fmt.Println(rsp. Greeting) }
We use the proto.NewGreeterClient Create a client and call it remotely through RPC Hello Method and print the response result:

The return value meets the expectation, indicating that our microservice interface can work normally. So far, we have successfully created the first microservice interface based on the Go Micro framework. Is it very simple?
Provide HTTP service interface
The above client code requests the service interface in RPC mode. Can you get the response result through HTTP request?
Of course, the Go Micro framework provides us with an API gateway implementation - Micro API. We can quickly provide a service interface in HTTP+JSON format based on this component.
Before use, you need to install micro Package:
go get github.com/micro/micro/v2
After installation $GOPATH/bin Create a micro Executable due to $GOPATH/bin It has been included in the system path, so it can be started directly through the following commands:

The API gateway passes eight thousand and eighty The port provides external services through http://localhost:8080/service/endponit The API gateway will automatically route the request to the backend's corresponding microservice processor method by resolving the URL path.
Note: The registration center here passes MICRO_REGISTRY Environment variable reading, if not set, it needs to be specified manually --registry=etcd 。
At this time, access through the curl test service interface:

An error is reported because the default service namespace of Micro API is go.micro.api , and here we do not set any namespace, so we need to specify the namespace as an empty string, and then set the processor to rpc (Special api Processor method):

In this way, if you test again, you can normally access:

For more use examples and underlying implementations of Micro, refer to the subsequent API gateway related tutorials.
Friendly tip: The subsequent framework tutorial is still based on GOPATH+Consul by default. You can import and adjust according to this tutorial.
.jpeg)