[Cotton Cloud] Fanlu Palu public service server address: pal.imotao.com: 8211 QQ group: 920652653
[Eudemon Paru] Three days120W online games with revenue exceeding 100 million,3 daysThe miracle of four million (the last one so powerful was PUBG)
To deploy your own Dedicated Server, you need to have a server first. The server is the basis for the operation of the Eudemon Paru.After the deployment, you and your friends can log in to the exclusive game clothes to experience.Using ECS to build a Eudemon Paru server allows you and your friends to play in a relatively independent and private space, ensuring a more enjoyable game experience.
Here I recommendCotton cloudThe server acts as the game server, and deploy the pet Paru according to the following tutorial
a central processor
4 cores (recommended)
Memory
16GB It is recommended to use 32GB or more for stable operation.It is OK to start the server with 8GB, but if you play longer, the server will crash due to insufficient memory.
network
UDP port 8211 (default) requires port forwarding.
Optional server
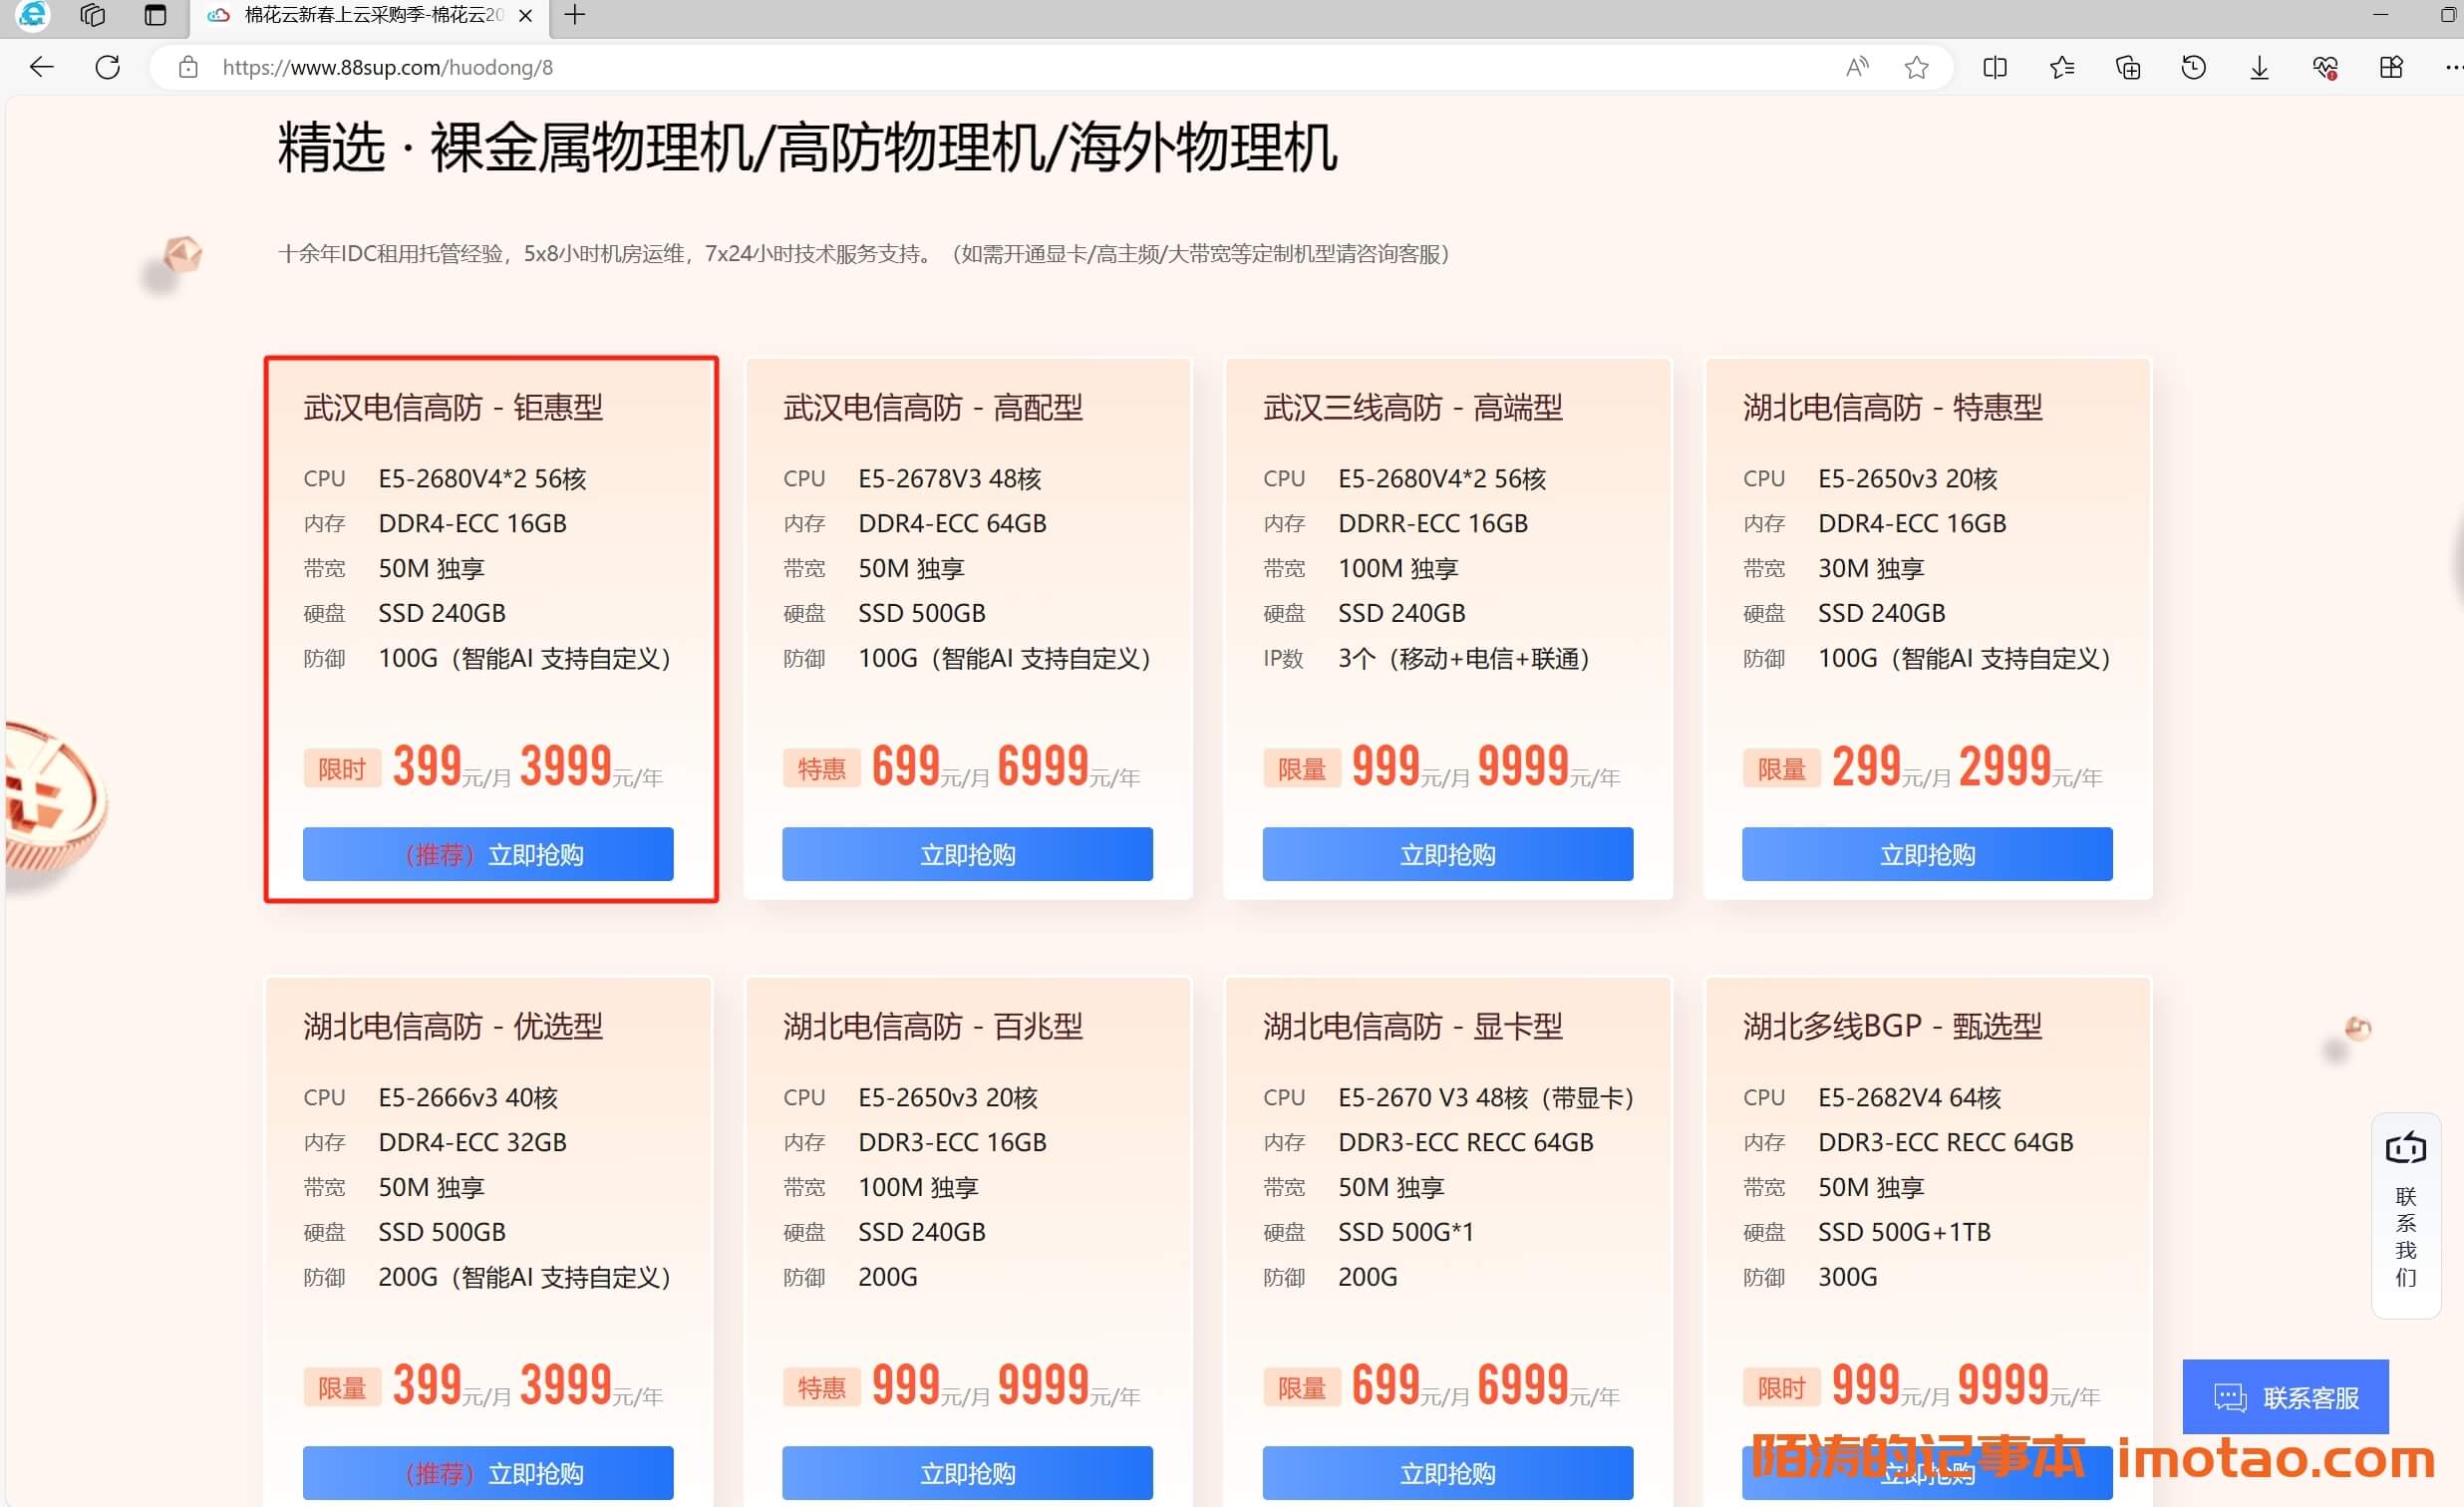
Taking the cotton cloud bare metal server as an example, this article first introduces how to purchase it:
This physical server is recommended mainly because of its geographical location.Wuhan, Hubei Province, located in the center of China's hinterland, has convenient transportation and extensive network coverage, which can ensure rapid and stable network response.In addition, the network infrastructure in this area is also quite perfect, further improving the network response performance.Therefore, choosing this physical server can ensure that your business gets efficient network support.
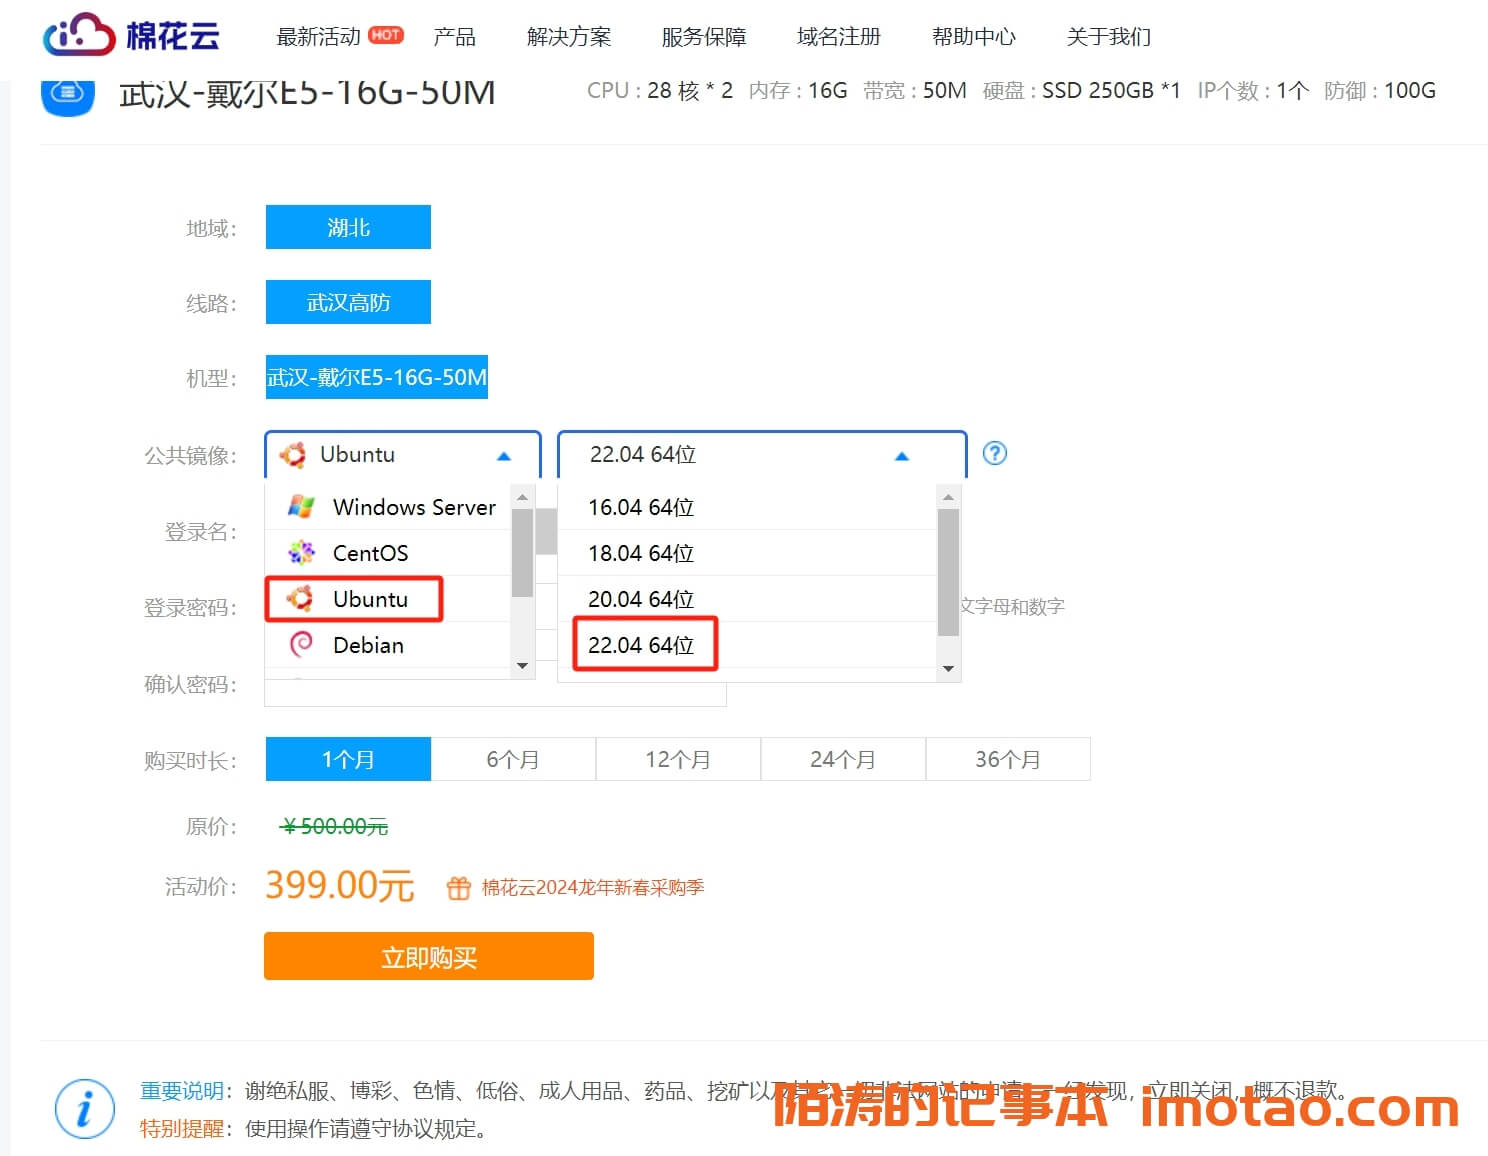
Select Ubuntu 22.0464 bit
Then set and remember the password. You need to use
Deployment environment
Region: Take Wuhan, Hubei Province as an example
Server package configuration: CPU 56 cores, memory 16GB
Operating system: Ubuntu 22.04 64 bit
Operation steps
Linux deployment operations need to be completed through the command line
Before starting deployment, you need to log in to the server first, and then enter and execute the following commands in the command box.This section selects the officially recommended Linux operating system Ubuntu as a demonstration.
The download is based on your computer environment, and the installation will not be described (don't install C disk for everything!)
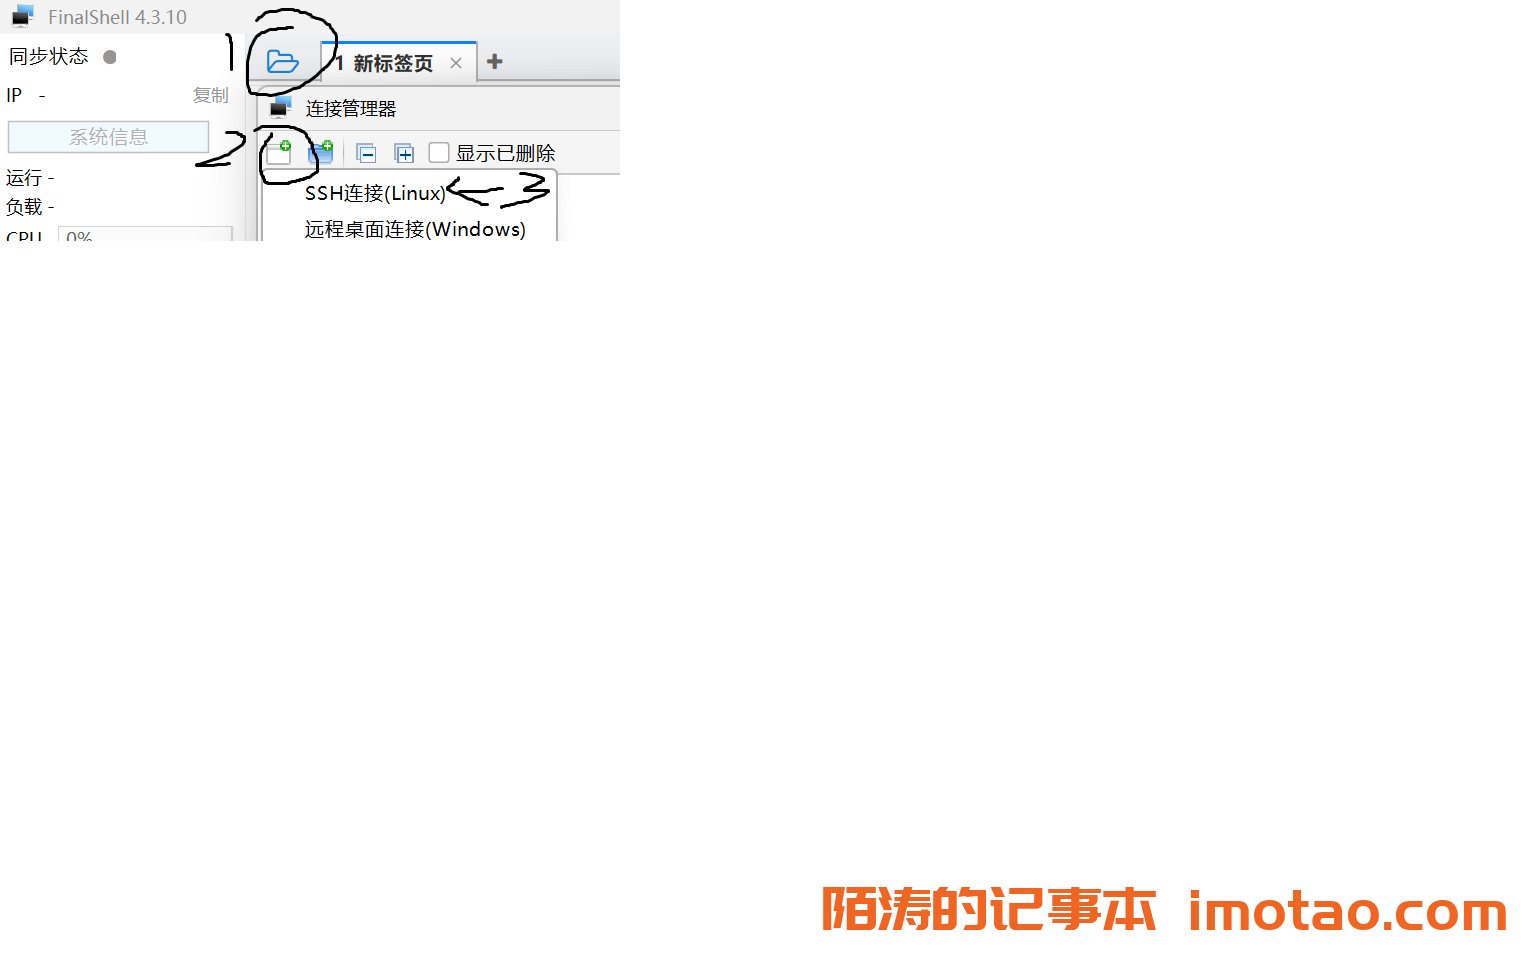
Next, start the connection and open the software - follow the figure below
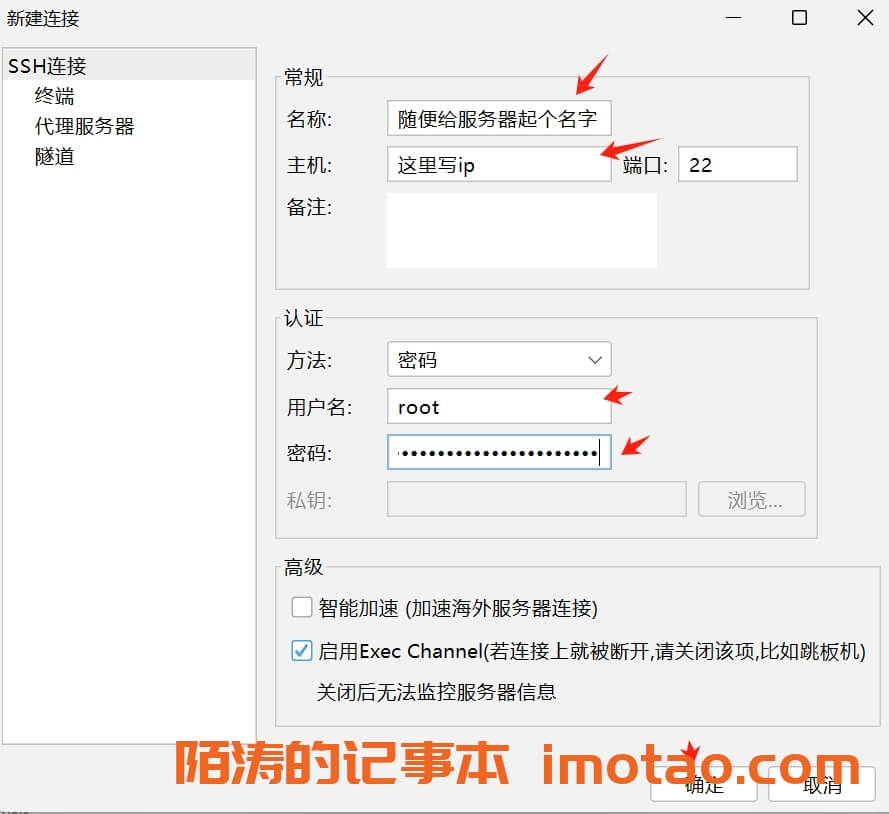
Linux default account is root
The password is automatically generated and sent to your email. Please check it (the IP address is also)
On January 24, 2024, Ubuntu One click Installation will be supplemented
wget -O - https://imotao.com/sh/pal-server/Ubuntu/install.sh | sh
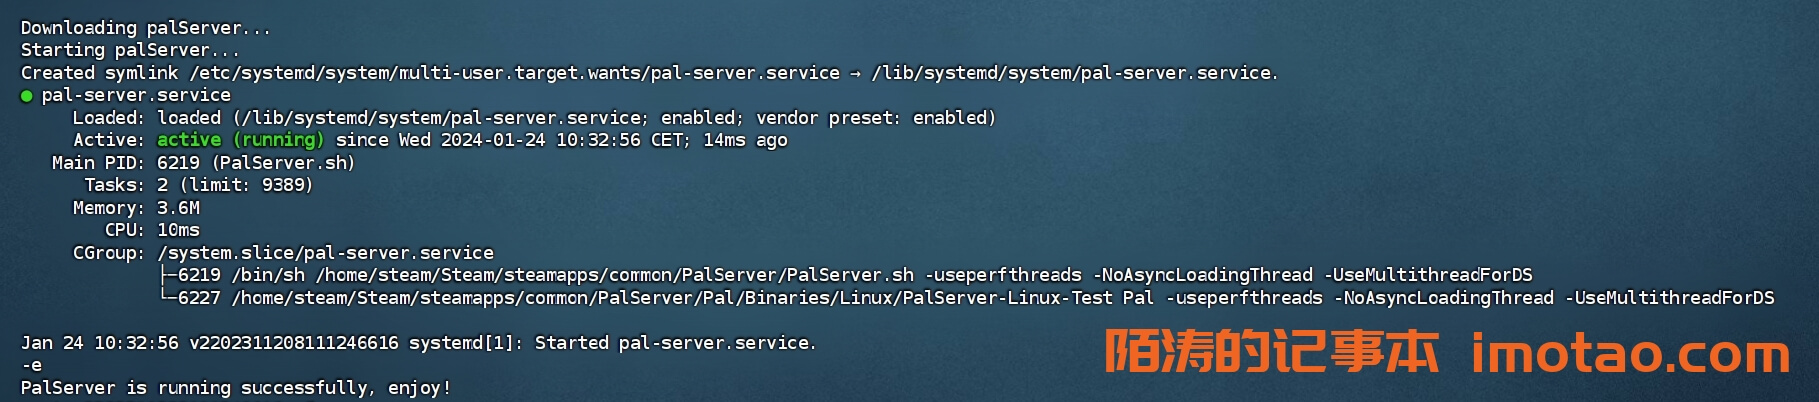
Wait 6-15 minutes, and the content shown in the figure below will be displayed. You can log in to play the game, ip: 8211
If you want to manage the service later, you can use the following command:
#Start the service of pet Parusudo systemctl start pal-server#Restart the service of pet Parusudo systemctl restart pal-server#Turn off Eudemon Paru's servicesudo systemctl stop pal-server#Query the status of pet Paru servicesudo systemctl status pal-server
SteamCMD Download
Change account
Execute the following command on the terminal to generate asteamECS account of
sudo useradd -m steamsudo passwd steam
Passwd will let you enter the password, which is invisible at this time. You can enter it in the following box and press Enter
Enter the following command in the terminal, so that the sudo command can be used in the steam account.
There is no RPM package, and there are bugs in the manual installation. The author has not tried successfully, so I will not write it here. Readers who have tried successfully can share it.
For the steamcmd installed on the ubuntu system or debian system, the path is/usr/games/steamcmd, you can link the binary to the system path through the following instructions.
sudo ln -s /usr/games/steamcmd /usr/bin/steamcmd
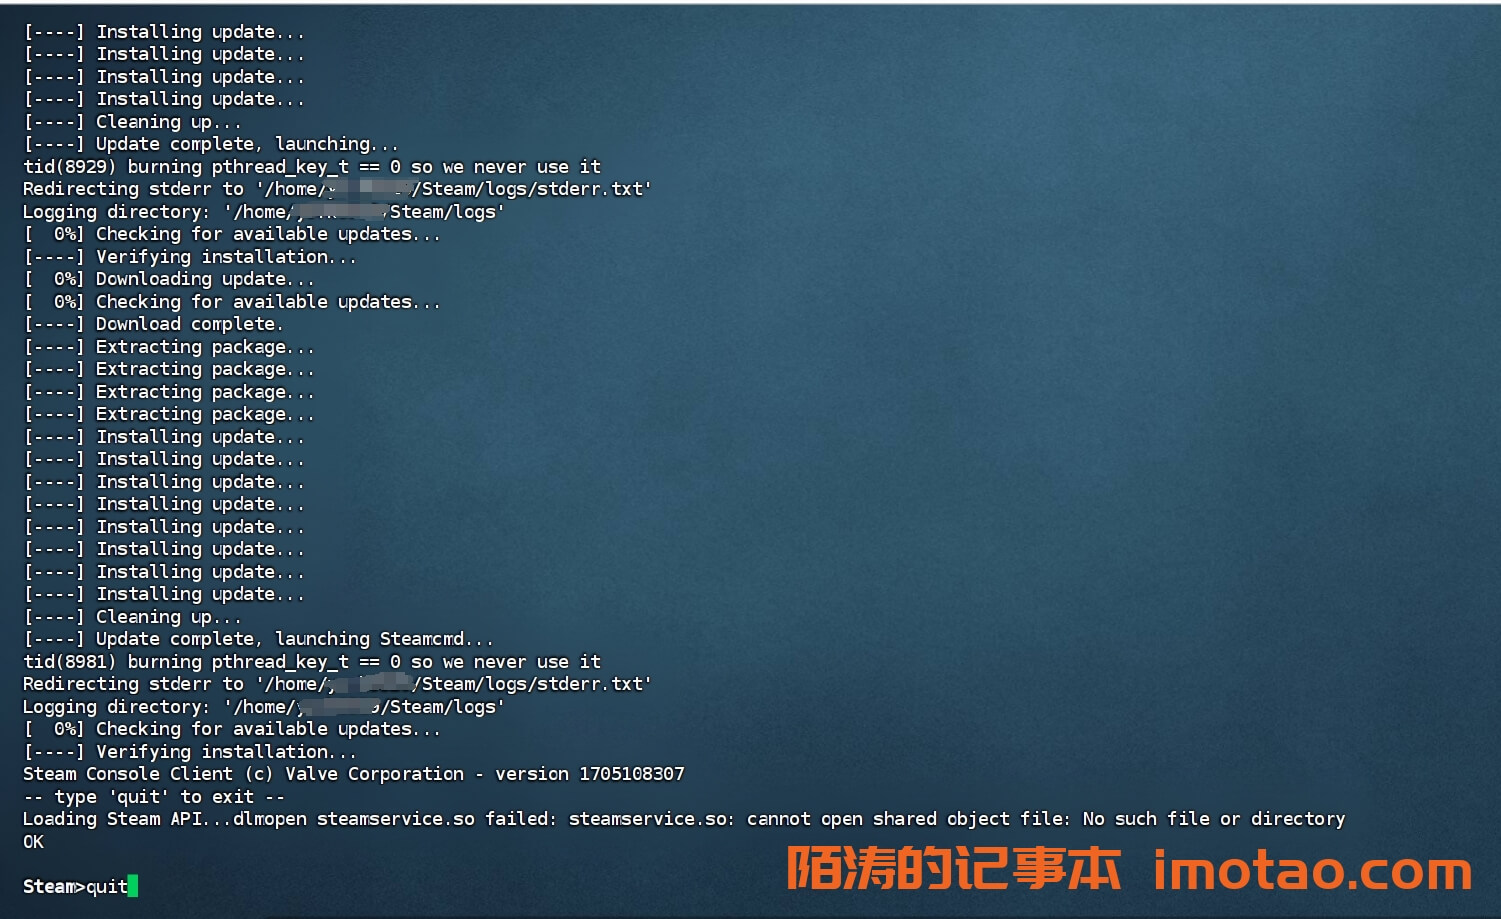
Then enter steamcmd directly into the terminal to start the service.
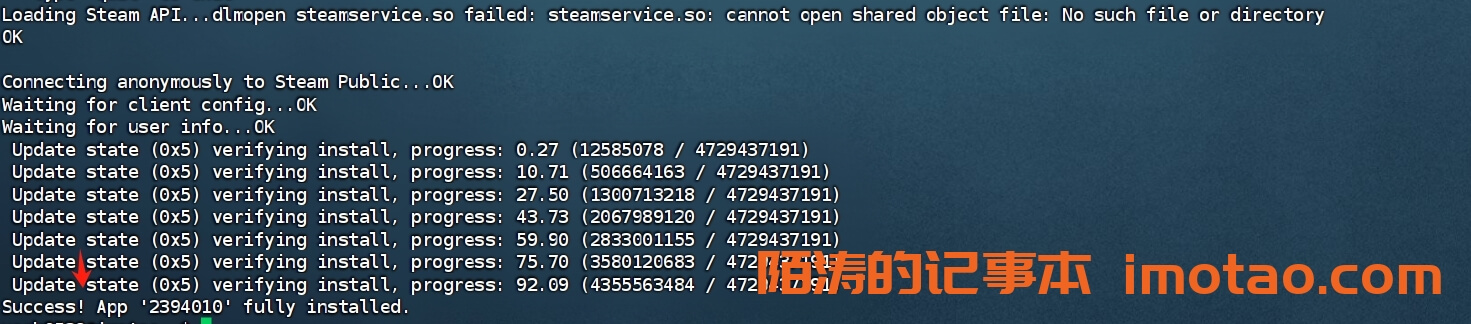
When starting steamcmd for the first time, the program will download the package. After downloading, an error message will pop up, indicating that steamservice.so is missing. This error message can be ignored first.
After downloading, enter quit to exit steamcmd
Now you can start to install the special server program of Paru.
3、 Palserver download
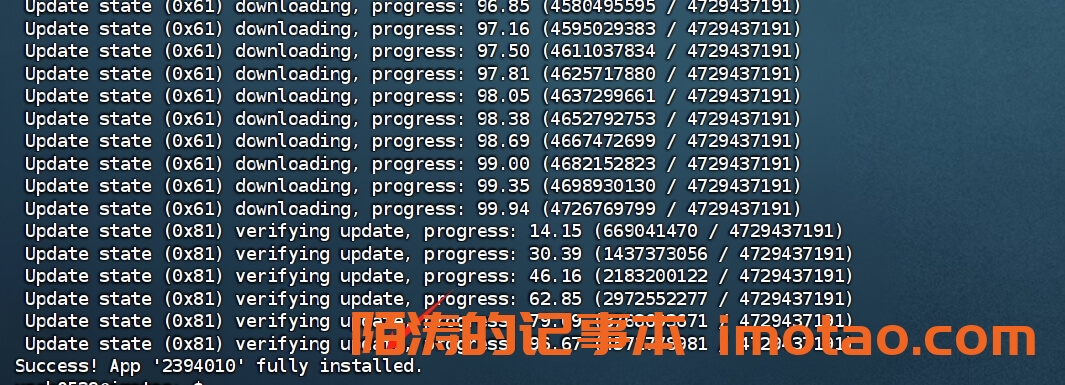
Execute the following command to start downloading the server program
There is a small probability that the connection will fail. You can always retry. You can try to enter the command several times.
The success prompt appears, indicating that the installation is complete.
Modify the service ini configuration [Not required]
After the installation of steamcmd, the running path may be~/. team or~/Team. You can execute ls - a in the/home/team directory to determine whether there is a. team or Steam folder.If the installation directory is the Steam folder, replace the following. team with Steam.
Before starting PalServer, you can modify the configuration file. You can copy the default configuration file DefaultPalWorldSettings.ini and rename it to
PalWorldSettings.ini,Then manually modify the contents, and use vim to modify the contents.
cd ~/.steam/SteamApps/common/PalServer(My name is cd Steam/semapps/common/PalServer/) But I use this stepcp ./DefaultPalWorldSettings.ini Pal/Saved/Config/LinuxServer/PalWorldSettings.inivim Pal/Saved/Config/LinuxServer/PalWorldSettings.ini
The usage of vim can be found online
Start PalServer
The next step is to enter the directory of the palserver and execute the following command
cd /Steammkdir sdk64cd steamapps/common/PalServercp linux64/* ~/Steam/sdk64
Finally, the script to start the server
cd /Steam/SteamApps/common/PalServer./PalServer.sh
As you can see, everything is working normally.
Memory optimization (optional)
We have received a lot of feedback from players that using a 4-core 8G server will run out of memory after a period of games. Here is a solution to alleviate the memory shortage for everyone: regular restart
Configuring Swap for Linux
Swap is a virtual memory technology in the computer system. It allows the operating system to temporarily store data in part of memory on the hard disk to provide space for other tasks that need more memory.
Step 1: Check the current swap status. If you configure it for the first time, running this command will not return anything.
swapon --show
Step 2: Create a swap file
The "8G" in the command refers to the creation of an 8GB file that can be used as swap space to temporarily store data that is not suitable for being stored in memory.You can adjust the size as needed.For Linux, it is recommended that you set the file size to be consistent with the system memory. Here, 8GB memory is taken as an example.
sudo fallocate -l 8G /swapfile
Step 3: Set file permissions
sudo chmod 600 /swapfile
Step 4: Format the file in swap format
sudo mkswap /swapfile
Step 5: Enable the swap file
sudo swapon /swapfile
Step 6: Set the permanent use of the swap file (the system automatically enables the swap file at startup)
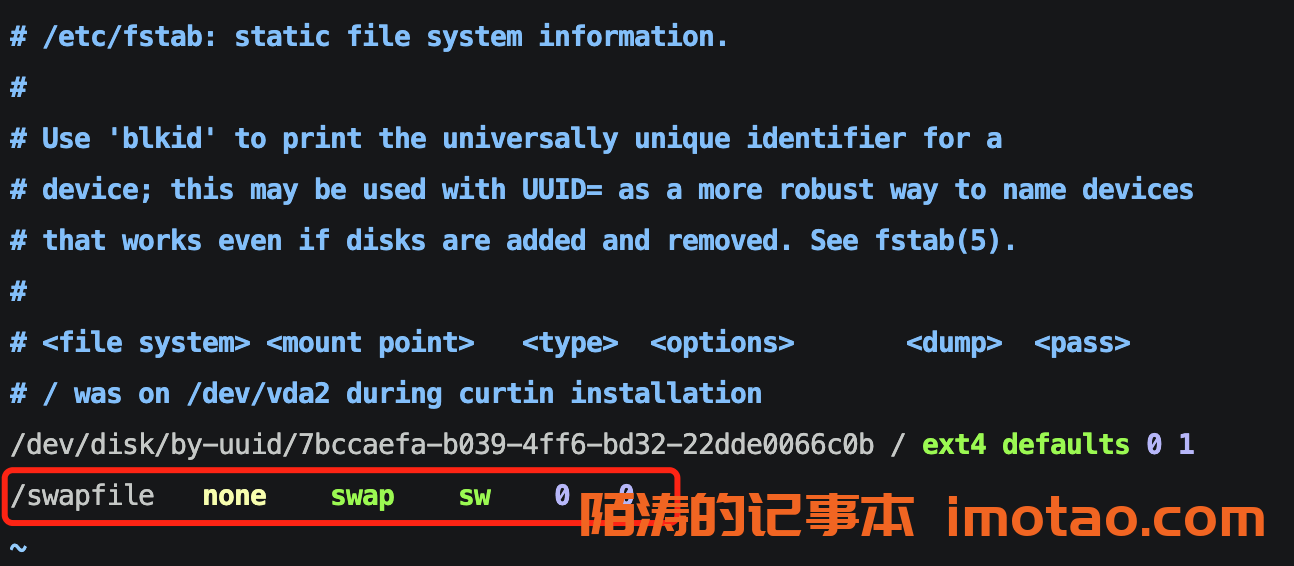
sudo vim /etc/fstab
Use the keyboard arrow keys or the j, k, h, l keys to browse to the end of the file.PressiEnter the editing mode, the cursor will move to the end of the file, and the following contents will be added to the file:
/swapfile none swap sw 0 0
PressEscKey to exit editing mode and enter:wqAnd press Enter to save the file and exit vim.
Step 7: Reload the fstab file
sudo swapon --all
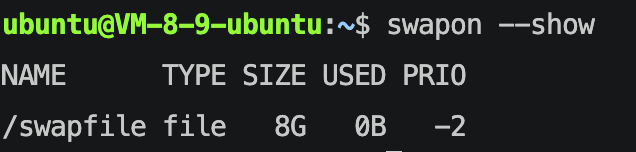
Step 8: Verify whether the swap settings are successful
swapon --show
If the following figure appears, the setting is successful.
No permission to modify the configuration folder - Solution
1. After logging in to the Linux server, copy and execute the following command to add permissions to the configuration file, so as to avoid the inability to edit the configuration file due to permission problems in subsequent steps.
2. Use the following command to copy the default configuration file to theLinuxServerIn the directory:
By default, the PalWorldSettings.ini file is empty, and the threshold for manual configuration is high. Therefore, we recommend that you modify it based on the default configuration file.
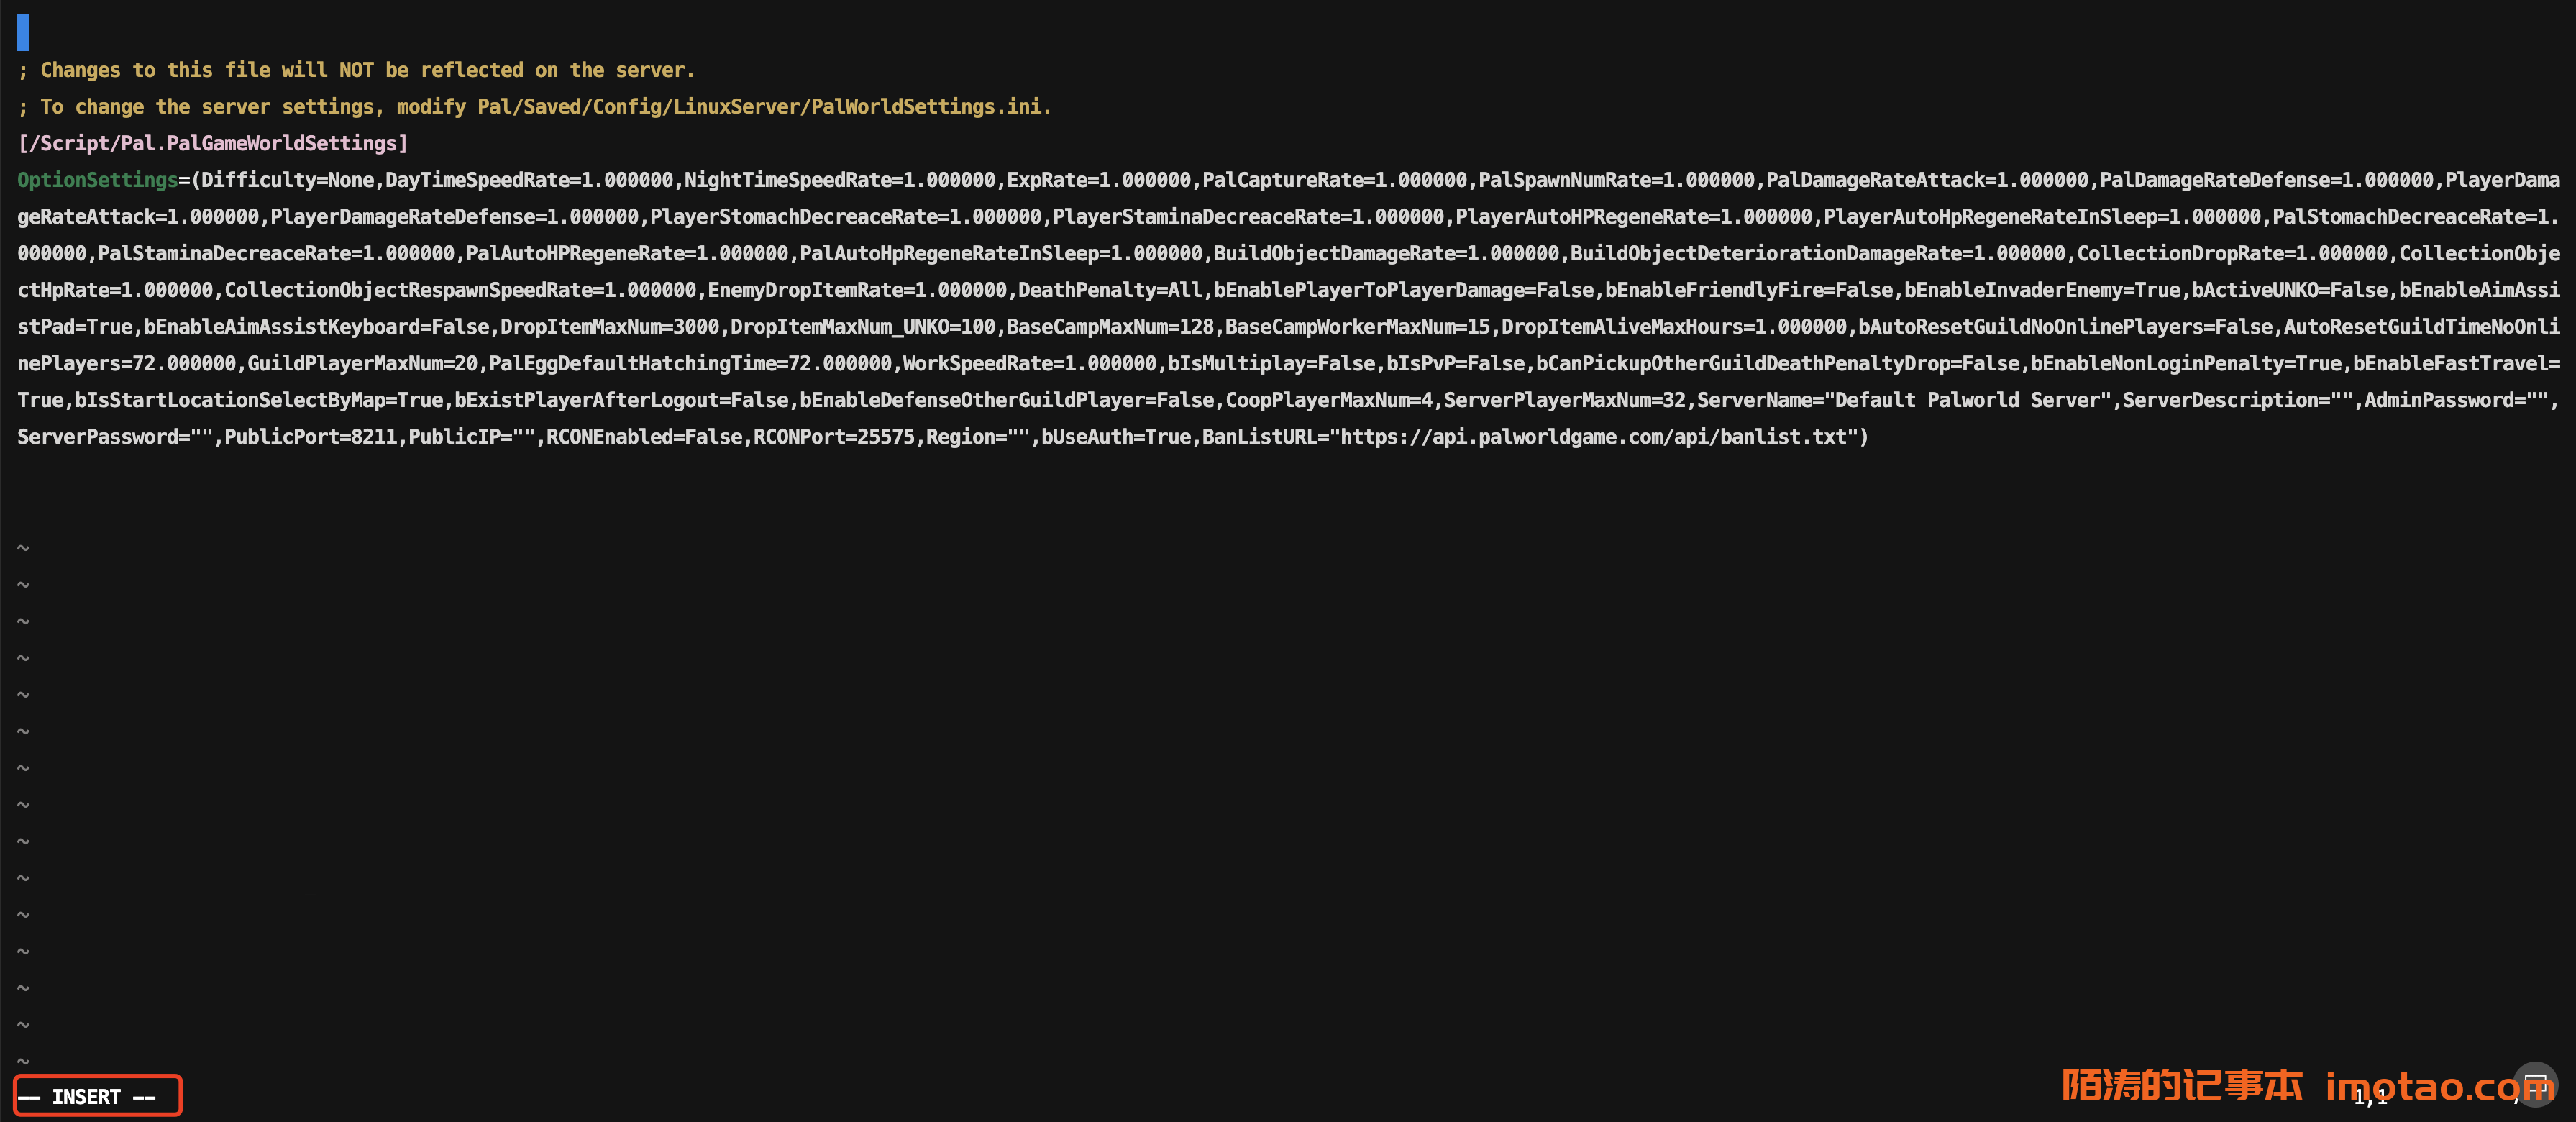
3. Use the following command to open the configuration file of game parameters:PalWorldSettings.ini。
sudo vim /home/steam/Steam/steamapps/common/PalServer/Pal/Saved/Config/LinuxServer/PalWorldSettings.ini
PressiEnter the editing mode, move the cursor to the end of the file, and then start writing the configuration.The effect of entering the editing mode is shown in the following figure:
4. When editing is complete, pressEscKey to exit editing mode and enter:wqPress Enter to save the file and exit vim, as shown in the figure.
Esc key: generally located in the upper left corner of the keyboard, but there will be no obvious prompt after pressing here. You can directly enter: wq. Remember to use an English colon. If you enter a Chinese colon, there will be no response.
common problem
problem
answer
./PalServer.sh Command prompt: Refusing to run with the root privileges
You cannot run this script as root.You can use the ubuntu user to run, and use the su ubuntu command to switch users.
Can servers in mainland China be deployed?
It can be deployed, but may encounter network problems. It is recommended that you try again when you encounter a failure caused by network problems.
What should I do if the Eudemon Palu server gets stuck irregularly?
Usually, the problem is caused by the server running out of memory. It is recommended that you run the following command regularly to restart the game process to solve the problem: sudo systemctl restart pal server
Configure automatic restart for pet Paru server
Since the game program itself has a memory leak problem, you can also clean the memory by restarting the game in the server after you play for a period of time.
This section will provide you with the script to configure the service restart according to the memory occupation ratio. After you complete the configuration,When the proportion of server memory exceeds 90%, the game will be restarted automaticallyTo free up memory usage.
⚠️Note: After you log in to the game again, the game will go back for about 10 seconds.
Ubuntu Server
1. Log in to the server. For detailed steps, refer to the previous articleLogin to Linux Server section。
2. Run the following command to monitor the memory usage and restart automatically when the percentage reaches 90%:
wget -O - https://imotao.com/sh/pal-server/Ubuntu/auto_restart_on_high_memory.sh | sh
Original article by Mo Tao, if reproduced, please indicate the source:https://imotao.com/8011.html
Epic Xijiasan will receive the Escape 2+Deserted Planet+Killing Space 2 for free. Epic Mall this week has free games: Escape 2, Deserted Planet, Killing Space 2.Users who have not played these three games can claim them.Click the corresponding game link
On April 1, the latest issue of Lehman: Legends was added, which was a casual horizontal board game launched by Ubisoft. It added more new elements to the critically acclaimed sequel of Lehman: Origin, its unique and ingenious breakthrough mode
Alibaba Cloud disks complete sharing and receive 128G of free permanent capacity. Open Alibaba Cloud disk APP, click the avatar in the upper left corner - the welfare society goes in and click [+128GB to initiate a sharing] time limited task!If you can't click Share, turn off the APP and re-enter
GOG Hi+1 free strategy game "Battle Group: Armored Edition" GOG game platform is limited to 72 hours free of charge "Battle Group: Armored Edition" is a strategy game. In the game, players need to choose appropriate equipment to fight against the enemy. The task is to destroy everything in the enemy game
QQ applet is officially open and hot terms for application. Individual enterprises can apply for WeChat applet. At present, Alipay has launched applet. For developers, applet is certainly not the simplest and most cost saving thing!QQ applet has
Do we see that when some front-end and back-end developers test the website locally, their test website URL is not our commonly used localhost address, but a very short domain name.For example, 123.com, is this domain really his?Ken
WeChat 8.0 status setting background music method sharing I think we must have updated WeChat 8.0 version these days, and we need to play several bombs every day to be comfortable with our personal status. We all know how to set this status. Today, I'm going to show you how to set the status to music!Step 1
Use CF Worker Dir to build a free navigation website on Cloudflare Worker. You can use this to replace the home page of the browser, which is still popular for your own use!First, let's learn about CloudFlare