Initialization data disk (Linux)
prerequisite
The operation of creating an empty data disk has been completed. Please refer to Create an empty data disk 。 The data disk has been attached to ECS Instance (data disk status is in use )。 See Attach data disk 。 explain The data disk created with the instance has been attached and can be ignored.
Method 1: Use the cloud assistant to automatically initialize the data disk (invited test)
The function is being tested, Only some customers Can be used. Cloud disk needs not to be opened Multi mount function 。 ECS Instance needs to be In operation Status and Installed Cloud Assistant Agent ,2017 year twelve month 01 Created using public image in the future ECS Instance, pre installed by default Cloud Assistant Agent . See Install Cloud Assistant Agent 。 The partitions created with Cloud Assistant are GPT Partition, system type is ext4。
Newly created data disk
On the instance details page Block storage On the page, turn on the cloud assistant detection function, which is turned on by default. 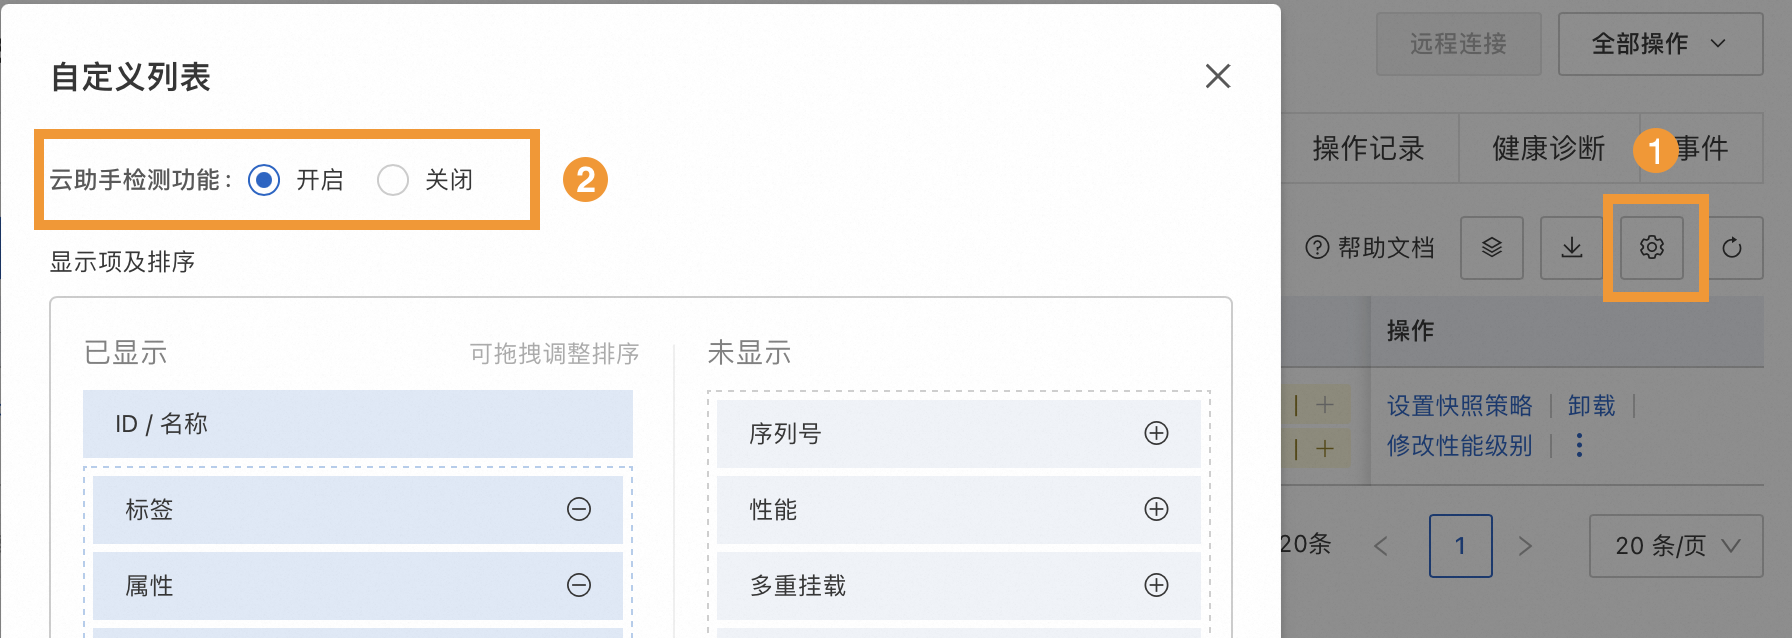
explain In the function test invitation, only some customers can use it. If you do not have the cloud assistant detection function settings, please select Method 2: Log in to the instance and initialize the data disk by yourself 。 Select the cloud disk to be initialized and move the cursor to Status detection in the system Lower 0/3 Detection passed , click Initialize Data Disk 。 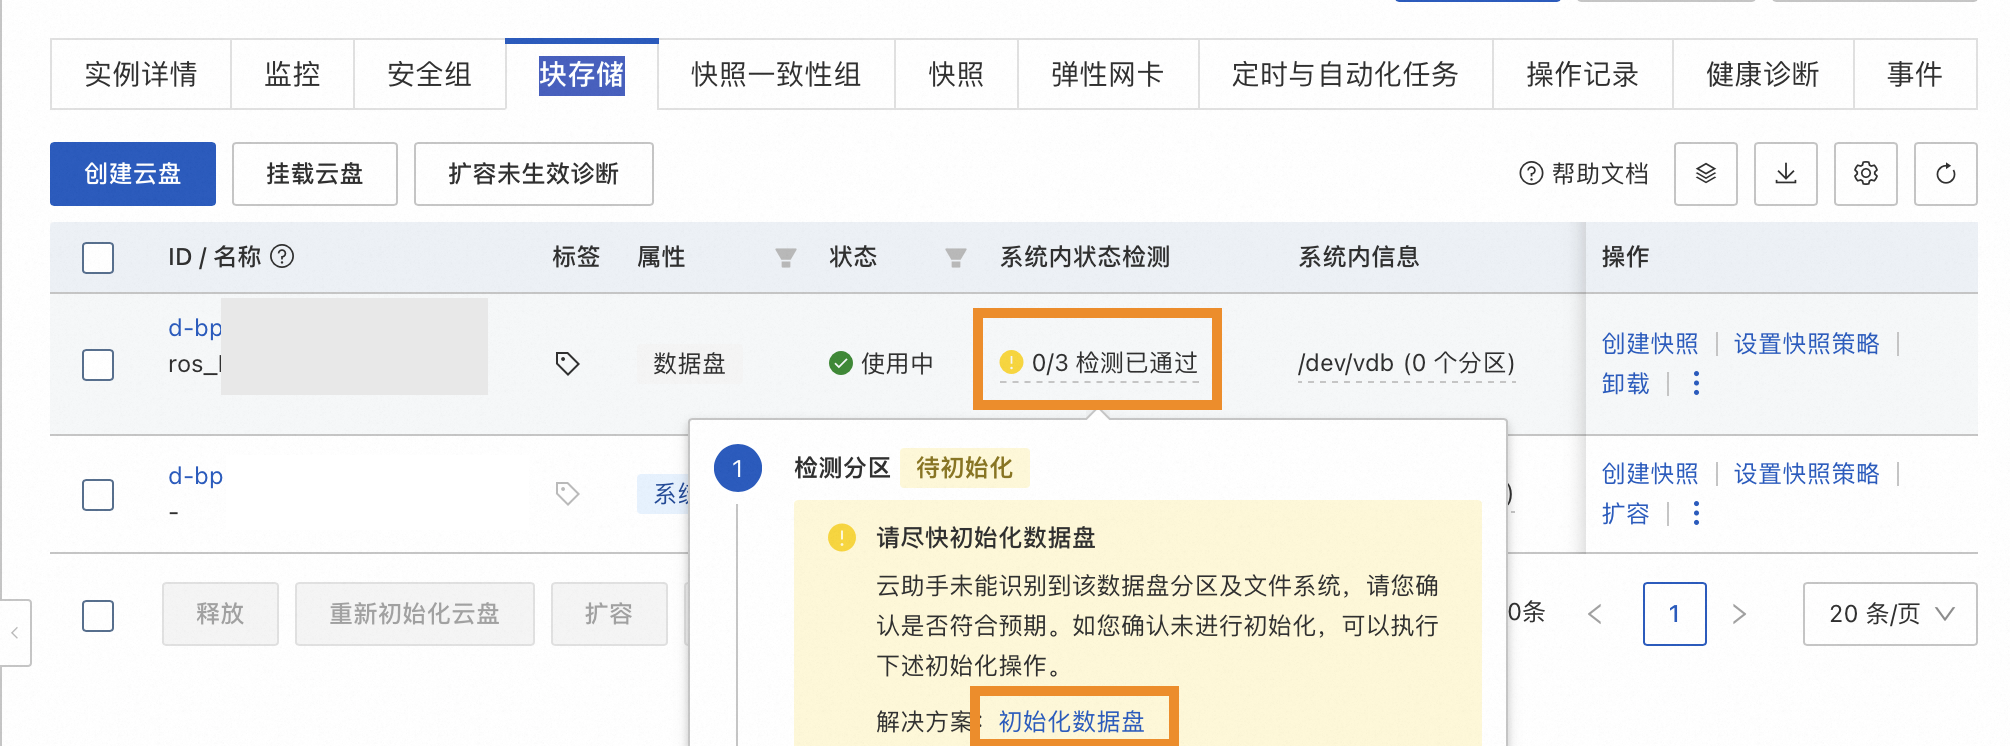
explain Only some operating systems support cloud assistant initialization. If you do not have Status detection in the system perhaps Status detection in the system Show Below Detection failed , please select Method 2: Log in to the instance and initialize the data disk by yourself 。 Set partition information. 
Set the partition size and mount point. explain You can click Add Section , add multiple partitions for the cloud disk, and each cloud disk can add at most five Partitions. Partition size: The size of a single partition and the total partition cannot exceed the total capacity of the cloud disk. explain The partition table itself needs to occupy 1~2 MiB The partition function will automatically reduce the size of the last partition to reserve the required space. Therefore, the actual size after the partition may be slightly smaller than the specified partition size, and the total available capacity may also be slightly smaller than the total cloud disk capacity. File system type: only supported ext4 Type, and partition types are all GPT Partition. Mount point: at least one path format starting with/followed by English or numbers, for example:/mnt. You can fill in the existing directory without data or fill in a new directory as the mount point. The mount point cannot be duplicate. important If data already exists in the target mount directory, the system files under the original directory will be covered after configuration, which will make the original files unreadable and affect normal business operation.
Confirm and check the risk prompt, click Start execution , when initializing the current state Change to normal Indicates that cloud disk initialization is complete.
(Optional) Set the cloud disk partition to be automatically attached when power is turned on. See (Optional) Step 4: Configure the partition to be automatically attached after startup 。
Data disk with data
On the instance details page Block storage On the page, check whether the cloud assistant query function is enabled. It is enabled by default. 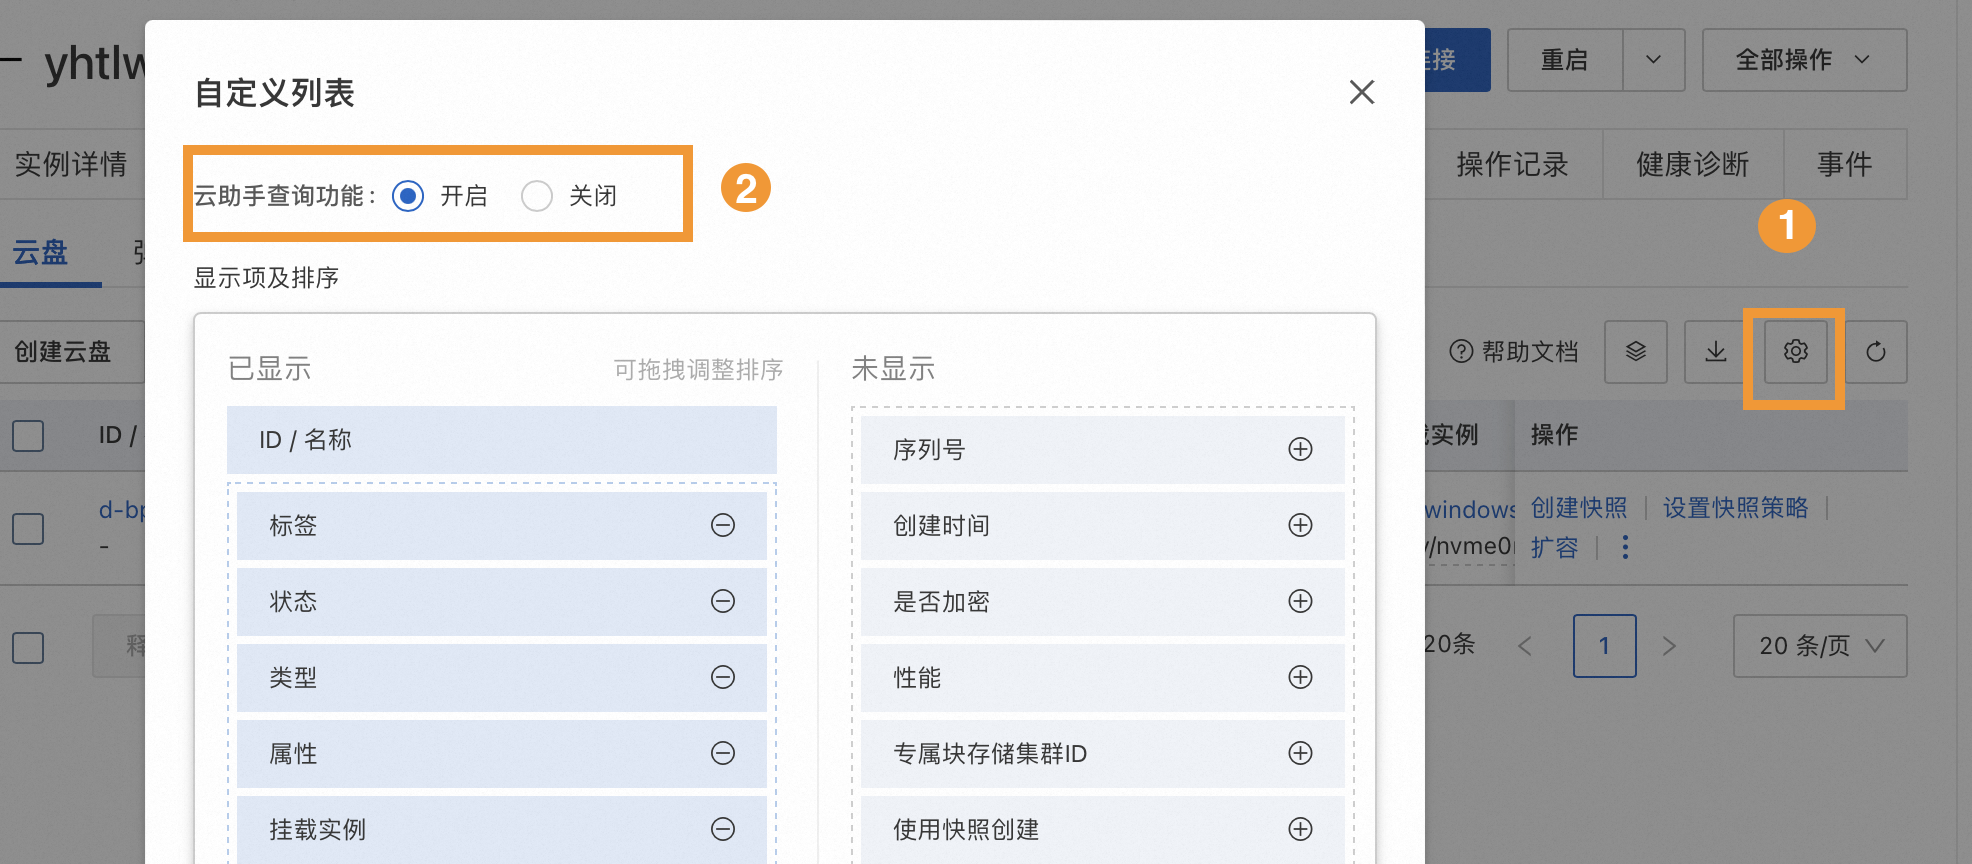
Select the cloud disk of the file system to be mounted and move the cursor to Status detection in the system Lower 1/3 Detection passed , click Mount the file system 。 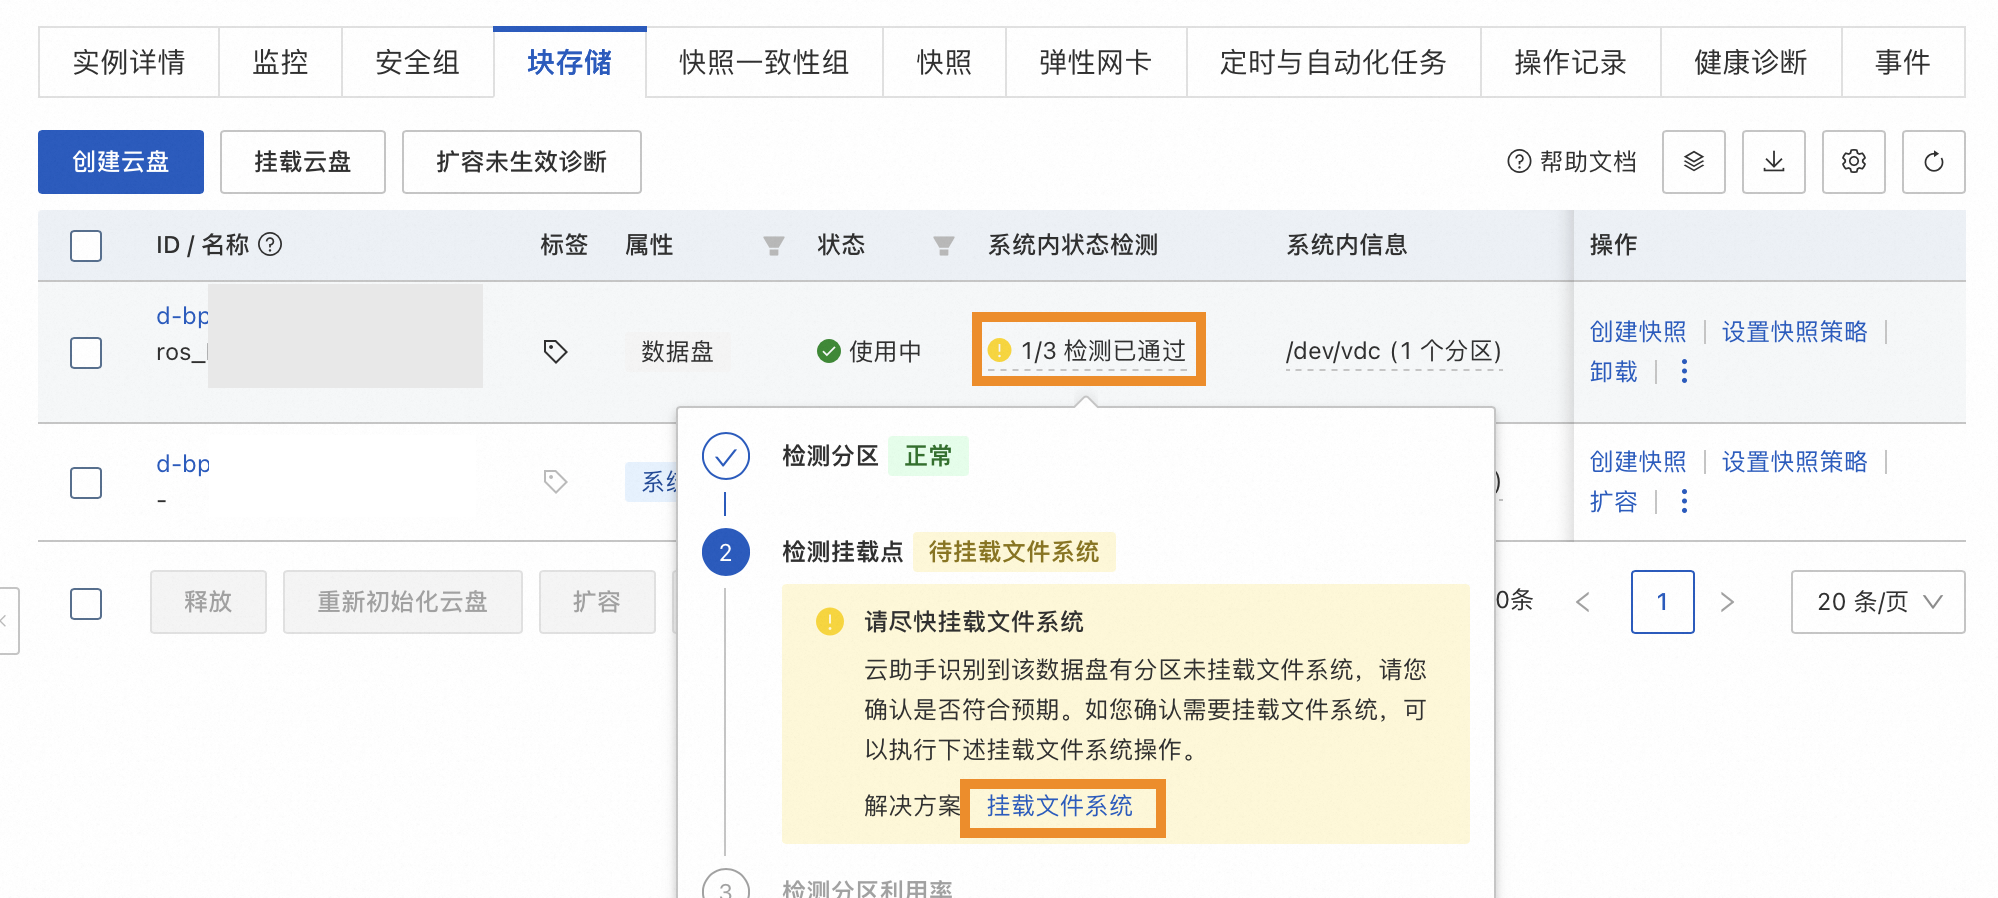
stay Partition and mount settings Fill in the dialog box Mount point And click Manual mount , mount the file system. explain You can fill in the existing directory without data or fill in a new directory as the mount point. The mount point cannot be duplicate. 
(Required condition) If you are using the newly created cloud disk from the snapshot to mount it to the original cloud disk ECS Instance (where the snapshot is located ECS Instance), the newly created cloud disk UUID It will conflict with the original cloud disk, and you need to modify the UUID。 See Modify the cloud disk's UUID 。 (Conditions must be selected) If you are using the cloud disk newly created by the snapshot, and the capacity of the cloud disk created is greater than the capacity of the cloud disk to which the snapshot belongs, you need to perform partition expansion and file system operations before you can use it normally under the system. Linux For example, please refer to Expanding partitions and file systems (Linux) 。 Windows For example, please refer to Expand partitions and file systems (Windows) 。
(Optional) Set the cloud disk partition to be automatically attached when power is turned on. See (Optional) Step 4: Configure the partition to be automatically attached after startup 。
Method 2: Log in to the instance and initialize the data disk by yourself
Step 1: Login ECS Instance and view data disk
Remote connection ECS example. Run the following commands to determine the device name of the data disk to be initialized. sudo fdisk -lu sudo blkid The running result of the example is shown below. Comparing the receipts of the two commands, we can see that the current ECS The instance has three cloud disks attached: /dev/vda It is a system disk. The system disk created with the instance has been initialized by default and does not need to be initialized again. /dev/vdb It is a data disk, and there is no partition/dev/vdbx But there is a file system ext4, No further initialization is required. /dev/vdc It is a data disk, sudo blkid If the command has no receipt of this data disk, it indicates that it is uninitialized and needs to be initialized.
Therefore, the device name of the data disk to be initialized in the example is /dev/vdc 。 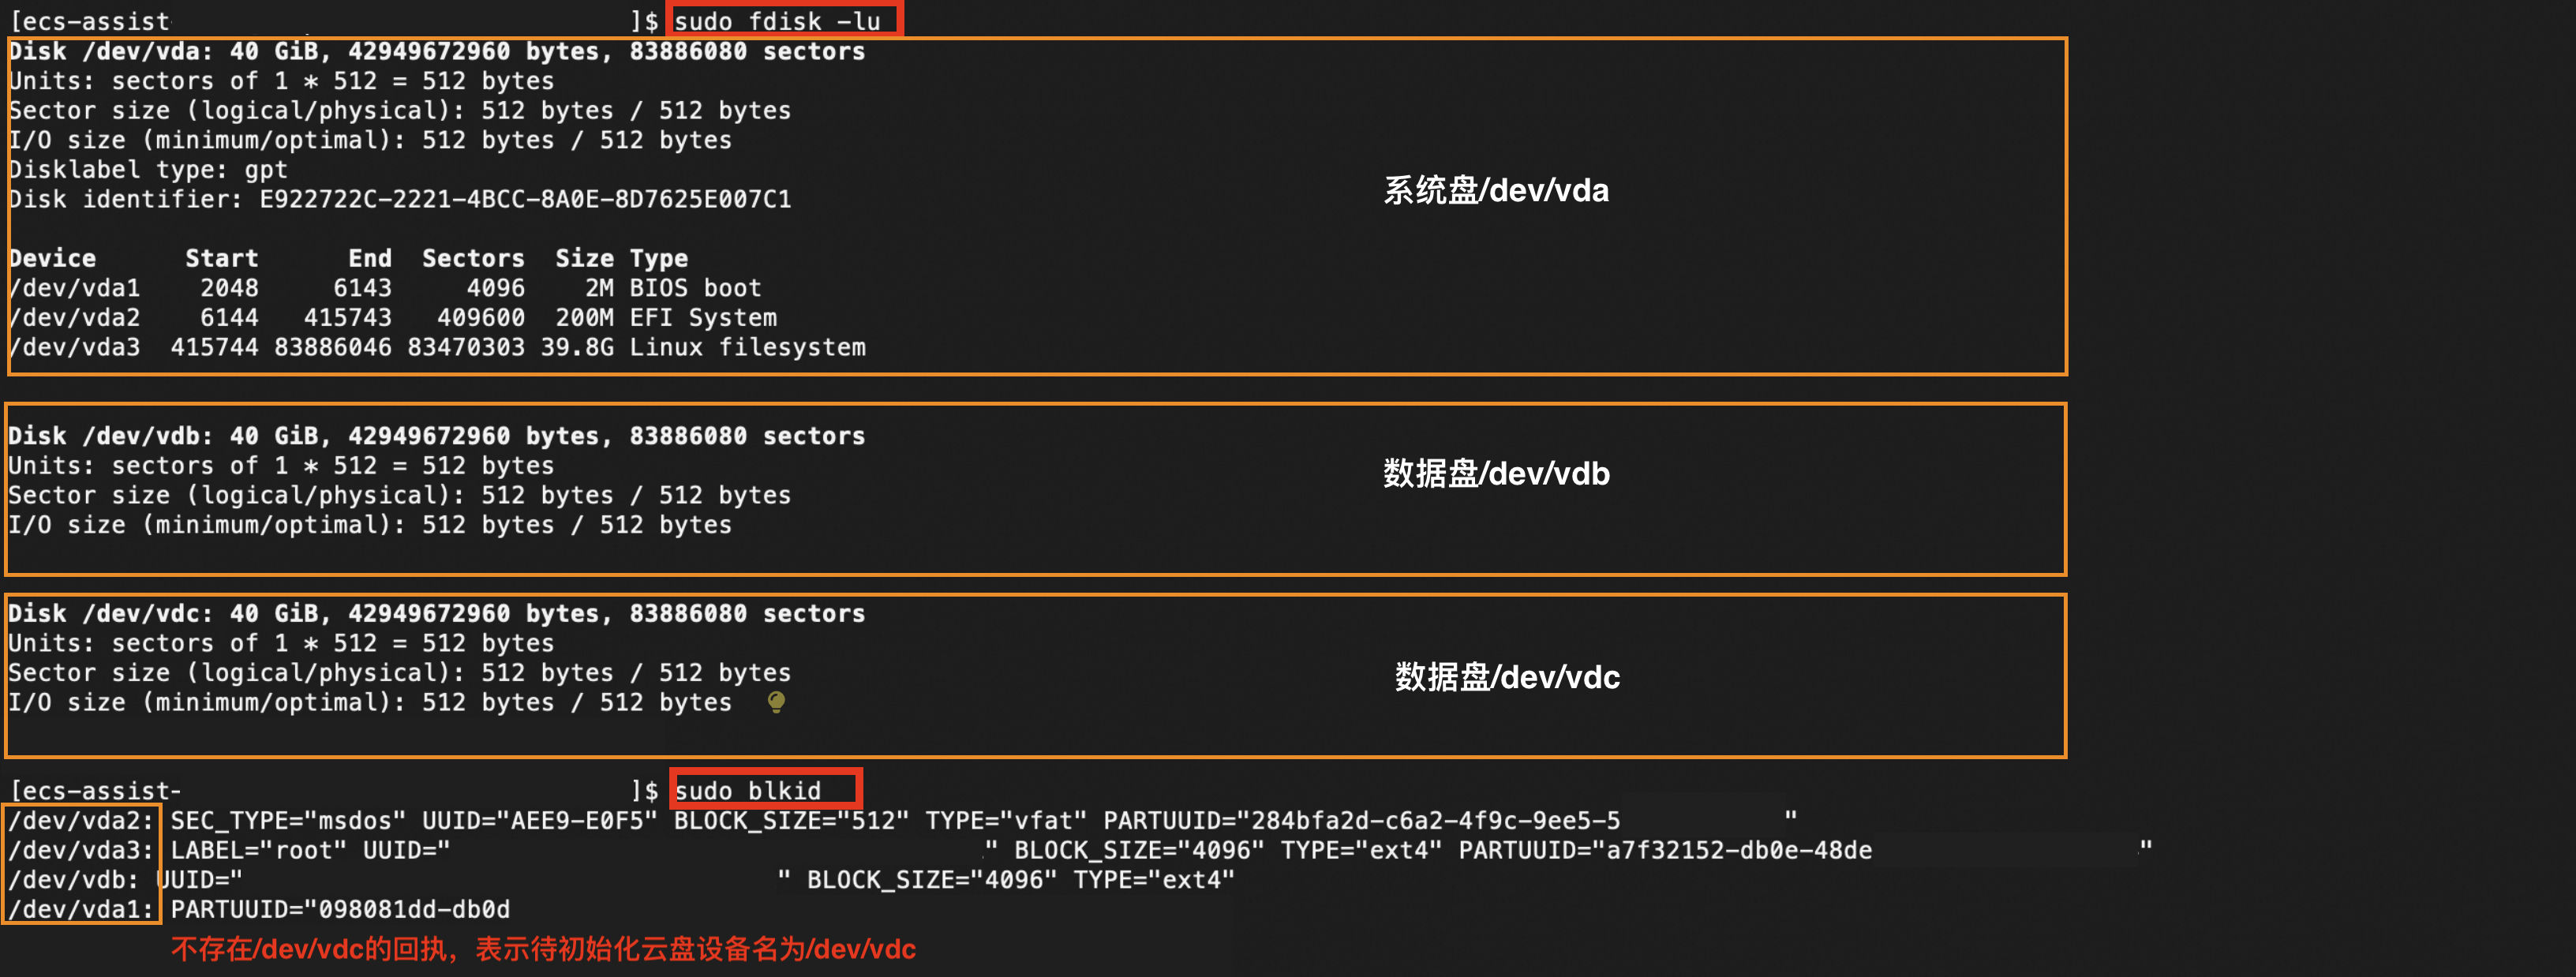
Determine the initialization steps to be executed. If you need to classify, store and manage data through partitions, and the cloud disk capacity is greater than 2TiB Or subsequently expanded to 2TiB above : Only can be created due to the limitation of partition format GPT Partition, need to execute establish GPT Partition (recommended) and Step 3: Create and mount the file system 。 If you need to classify, store and manage data through partitions, the capacity is less than or equal to 2TiB And no subsequent expansion to 2TiB demand : Can create GPT Partition (recommended) or MBR Partition, need to execute Step 2: Create partitions for the data disk and Step 3: Create and mount the file system 。 If you do not need to use partition management, you need to use cloud disk directly in the form of raw device to create a file system : Directly execute without creating partitions Step 3: Create and mount the file system OK.
(Required condition) Step 2: Create a partition for the data disk
Please follow Determine the initialization steps to be executed Confirm whether the cloud disk needs to be partitioned. Execute the create partition command. important Different partition types support different maximum partition capacities and partition numbers. For more information, see Introduction to partition format 。 If you use cloud disk capacity, it may be expanded to 2 TiB Above, please use GPT Partition. Otherwise due to MBR Due to the limitation of partition capacity, you will not be able to directly expand the capacity to the required size, which may result in the need to repartition and format the cloud disk, which may lead to data loss.
establish GPT Partition (recommended) Proceed as follows Parted Partition tool is less than or equal to 2 TiB Data disk creation for GPT Partition. Run the following command to install Parted Tools. sudo yum install -y parted explain yum Commands for CentOS etc. Linux Release version. other Linux For the release version, please modify the installation command according to the actual package management software. for example Debian or Ubuntu, Please use the following command to install Parted Tools: sudo apt-get update sudo apt-get install -y parted use Parted The tool partitions the data disk. Run the following command to start partitioning. This operation is based on the data disk /dev/vdb Take for example. sudo parted /dev/vdb Among them, /dev/vdb It is the device name of the data disk to be partitioned. Please replace it according to the actual environment. stay Parted Enter the following in the interactive command line to set GPT Partition format. mklabel gpt Enter the following contents to divide the partition, and set the start and end positions of the partition. Mkpart<partition name><initial position><end position> important Please use binary units for the start and end of the partition MiB、GiB Equal units (the partition will 4KiB Otherwise, partition alignment will be affected and cloud disk performance will be seriously affected. <Partition name>,<Initial position>,<End position>Please divide according to the actual situation. Single partition example: to divide a primary partition, the partition name is primary, Start at 1MiB, For example, 100% capacity is allocated to the first partition. mkpart primary 1MiB 100% Multi partition example: to divide two partitions, the first partition is named primary, Partition capacity is 20GiB, The remaining capacity is divided into the second partition secondary For example, you need to execute: mkpart primary 1MiB 20GiB mkpart secondary 20GiB 100%
Run the following command to check the partition alignment. Among them, one It is the corresponding partition number. It is generally recommended that you align partitions to obtain better cloud disk performance. align-check optimal 1 If the partition is aligned, the result is as follows: 1 aligned important If the return is 1 not aligned , indicating that the partition is not aligned. See Initialize cloud disk FAQ 。 Enter the following to view the partition table. print (Optional) If the above partition operation is incorrect, please enter Rm+partition number, delete the wrong partition, and then execute the steps as required III~V。 The following example is shown as finding (using Print) and delete the error partition number two Partition of. 
important Before deleting the partition, make sure there is no data in the partition or the data has been backed up. Enter the following to exit Parted Tools. quit
The partitioning process is shown below. 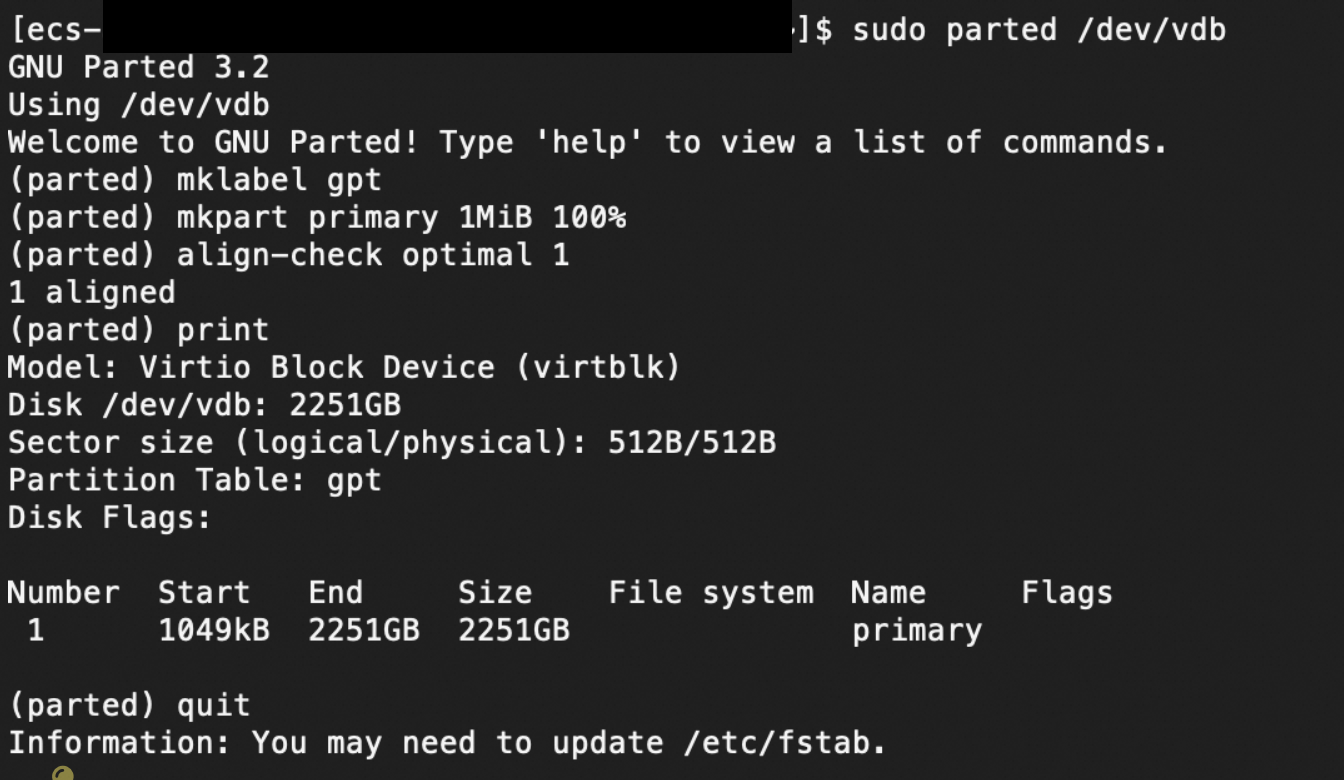
Run the following command to make the system reread the partition table. partprobe Run the following command to view the new partition information. This operation is based on the data disk /dev/vdb Take for example. sudo fdisk -lu /dev/vdb Among them, /dev/vdb It is the device name of the data disk. Please replace it according to the actual environment. The running results are as follows, if Disk label type by gpt, Indicates that the new partition has been created. 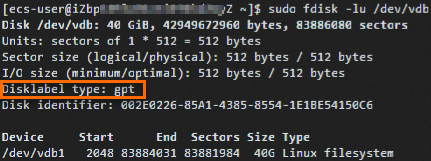
explain The display is slightly different for different operating systems. without Disk label type Field, which can be accessed via System Field judgment. System Value is Linux express MBR Partition, value is GPT express GPT Partition. Lower version fdisk May not display normally GPT Partition table. You can use the gdisk -l /dev/vdb Command to view the partition type.
establish MBR partition Proceed as follows fdisk Partition tool is less than or equal to 2 TiB Data disk creation for MBR Partition. Create a MBR Partition. Run the following command to partition the data disk. This operation is based on the data disk /dev/vdb Take for example. sudo fdisk -u /dev/vdb Among them, /dev/vdb It is the device name of the data disk to be partitioned. Please replace it according to the actual environment. Echo information is shown in the following figure. 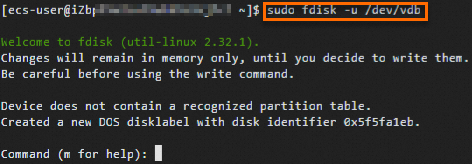
stay fdisk Interactive command line, entering p And press Enter Key to view the partition of the data disk. Echo information is shown in the following figure. 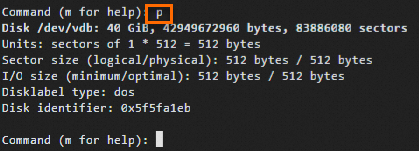
input n And press Enter Key to start creating a new partition. Echo information is shown in the following figure. 
Indicates that the cloud disk has two partition types: p Represents the primary partition. e Represents an extended partition. explain For a description of zones, see Introduction to partition format 。
Take creating a primary partition as an example. input p And press Enter Key to start creating a primary partition. Echo information is shown in the following figure. 
Partition number Indicates the number of the primary partition, which can be selected 1-4。 Enter the partition number and press Enter Key. This example takes creating a primary partition as an example Press Enter key , indicating that the partition number of the primary partition is one 。 Echo information is shown in the following figure. 
Enter the starting sector number and press Enter Key. First sector Indicates the starting sector number of the free space of the partition, which can be selected 2048-83886079, the default value is 2048。 In this example, directly Press Enter key , indicating that the default start sector number is selected two thousand and forty-eight 。 Echo information is shown in the following figure. 
explain The system will automatically prompt the starting sector number and ending sector number of the available space of the partition. You can customize or use the default value in this range. The starting sector number of the partition must be less than the ending sector number. Enter the last sector number and press Enter Key. Last sector The ending sector number of the available space of the partition, which can be selected 2048-83886079, the default value is 83886079。 In this example, directly Press Enter key , indicating that the default cut-off sector number is selected eighty-three million eight hundred and eighty-six thousand and seventy-nine 。 Echo information is shown in the following figure. 
explain The system will automatically prompt the starting sector number and ending sector number of the available space of the partition. You can customize or use the default value in this range. The starting sector number of the partition must be less than the ending sector number. input p And press Enter Key to view the partition planning of the data disk. Echo information is as shown in the figure below, indicating the new partition /dev/vdb1 Details of. 
explain If the above partition operation is incorrect, please enter q sign out fdisk The previous partition results will not be retained. You can re partition according to the above steps. input w And press Enter Key to write the partition results to the partition table. The echo information is shown in the following figure, indicating that the partition creation is completed. 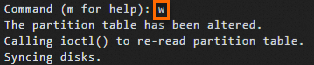
(Required condition) If you need to create multiple partitions for a cloud disk, repeat the execution step a Create another partition. Run the following command to view the new partition information. This operation is based on the data disk /dev/vdb Take for example. sudo fdisk -lu /dev/vdb Among them, /dev/vdb It is the device name of the data disk. Please replace it according to the actual environment. The running result is shown in the figure below. If /dev/vdb1 And Disk label type by dos, Indicates new MBR Partition creation completed. 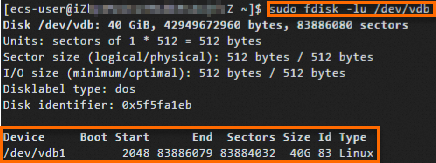
explain The display is slightly different for different operating systems. without Disk label type Field, which can be accessed via System Field judgment. System Value is Linux express MBR Partition, value is GPT express GPT Partition. Lower version fdisk May not display normally GPT Partition table. You can use the gdisk -l /dev/vdb Command to view the partition type.
Step 3: Create and mount the file system
Run the following command to install e2fsprogs Tools. sudo yum install -y e2fsprogs explain In this step yum Commands for CentOS etc. Linux Release version. other Linux For the release version, please modify the installation command according to the actual package management software. for example Debian or Ubuntu, Please use Apt get install<package name> 。 Run the following command to create a file system. The following example command describes how to create ext4 and xfs File system. establish ext4 file system Partition for /dev/vdb1 Create a ext4 Take the file system as an example, run the following command: sudo mkfs -t ext4 /dev/vdb1 Among them, /dev/vdb1 Is the partition name of the data disk. Please replace it according to the actual partition name. Raw device /dev/vdc Create a ext4 Take the file system as an example, run the following command: sudo mkfs -t ext4 /dev/vdc Among them, /dev/vdc It is the raw device name. Please replace it according to the actual raw device name.
explain When the data disk capacity is 16 TiB, Creating on ext4 When the file system reports an error, you need to check e2fsprogs Is the toolkit version higher than 1.42, and install the higher version e2fsprogs tool kit. See How to upgrade e2fsprogs tool kit? 。 ext4 File system lazy init Functions will affect the I/O Performance, you can turn off ext4 File system lazy init Function. See How to close Linux Instance lazy init Function? 。
establish xfs file system Partition for /dev/vdb1 Create a xfs Take the file system as an example, run the following command: sudo mkfs -t xfs /dev/vdb1 Among them, /dev/vdb1 It is the partition name of the data disk. Please replace it according to the actual partition name. Raw device /dev/vdc Create a xfs Take the file system as an example, run the following command: sudo mkfs -t xfs /dev/vdc Among them, /dev/vdc It is the raw device name. Please replace it according to the actual raw device name.
Run the following command to mount the file system. To partition /dev/vdb1 Mount to/mnt For example, run the following command: sudo mount /dev/vdb1 /mnt /dev/vdb1 Is the partition name of the data disk. Please replace it according to the actual environment. /mnt It is the mount point of the partition. The mount point can be an existing directory without data, or it can execute Sudo mkdir - p<new directory> Command to create a new directory as the mount point, for example sudo mkdir -p /data 。 important If data already exists in the target mount directory, the system files under the original directory will be overwritten after configuration, which may cause the loss of the original data and affect the normal operation of the business. To convert raw equipment /dev/vdc Mount to/tmp For example, run the following command: sudo mount /dev/vdc /tmp /dev/vdc It is the name of the raw device. Please replace it according to the actual environment. /tmp It is the mount point of the partition. The mount point can be an existing directory without data, or it can execute Sudo mkdir - p<new directory> Command to create a new directory as the mount point, for example sudo mkdir -p /data 。 important If data already exists in the target mount directory, the system files under the original directory will be overwritten after configuration, which may cause the loss of the original data and affect the normal operation of the business.
Run the following command to check whether the mount result meets your expectations. df -Th The results are as follows. If the information of creating a new file system appears, the file system is mounted successfully. 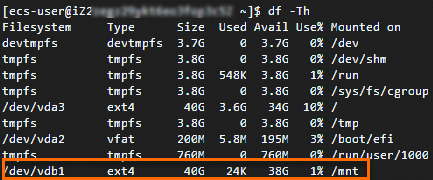
(Optional) Step 4: Configuration Auto attach partition after power on
Run the following command to backup /etc/fstab File. sudo cp /etc/fstab /etc/fstab.bak stay /etc/fstab Write the new partition information in. sudo sh -c "echo `sudo blkid /dev/vdb1 | awk '{print \$2}' | sed 's/\"//g'` /mnt ext4 defaults 0 0 >> /etc/fstab" explain Ubuntu 12.04 The system does not support barrier, You need to run sudo sh -c "echo `sudo blkid /dev/vdb1 | awk '{print $2}' | sed 's/\"//g'` /mnt ext4 barrier=0 0 0 >> /etc/fstab" Command. Including: /dev/vdb1 : The partition name of the data disk. You need to replace it according to the actual environment (via df -Th Command). /mnt : The mount point of the partition. You need to replace it according to the set mount point (via df -Th Command). ext4 : The file system type of the partition. You need to replace it according to the created file system type (via df -Th Command). defaults : The mount parameters of the file system. You can select the corresponding mount parameters according to the actual needs, see fstab explain 。 explain When the parameter is set to defaults,nofail Even if the mount configuration is incorrect, the normal startup of the instance will not be affected. However, since the system will not report errors at this time, you need to pay special attention to whether the automatic mount is successfully configured to avoid incorrect data storage locations due to configuration errors.
(Conditions must be selected) If a single disk has multiple consecutive partitions, you need to write the information of multiple partitions separately /etc/fstab Medium. For example, data disk /dev/vdb yes two Partitions /dev/vdb1 and /dev/vdb2 , you need to execute the following commands respectively: sudo sh -c "echo `sudo blkid /dev/vdb1 | awk '{print \$2}' | sed 's/\"//g'` </dev/vdb1 Mount point></dev/vdb1 File system type of>defaults 0 0>>/etc/fstab“ sudo sh -c "echo `sudo blkid /dev/vdb2 | awk '{print \$2}' | sed 's/\"//g'` </dev/vdb2 Mount point></dev/vdb2 File system type of>defaults 0 0>>/etc/fstab“ Run the following command to view /etc/fstab New partition information in. cat /etc/fstab The results are as follows. You can query the configured /dev/vdb1 Partition information for. 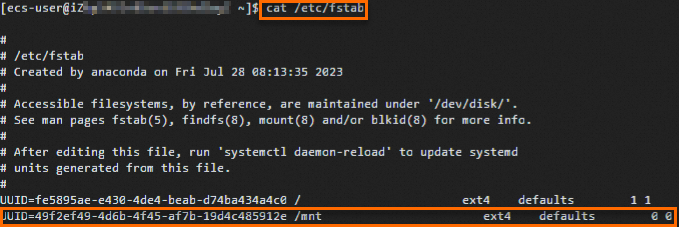
explain If the queried partition information is incorrect, you can edit it manually /etc/fstab File, delete the wrong partition information, and then add the partition information again. See stay fstab Configuration in file UUID Mode Auto attach data disk 。 Run the following command to verify whether the auto mount function is effective. sudo umount /dev/vdb1 sudo mount -a mount | grep /mnt The results are as follows. You can query the file system mount information, indicating that the automatic mount function is effective. 
Initialize cloud disk FAQ
establish GPT How to solve the problem of misaligned partitions when partitioning?
Linux How to upgrade an instance e2fsprogs tool kit?
mkfs.ext4: Size of device /dev/vdb too big to be expressed in 32 bits using a blocksize of 4096.
Run the following command to check e2fsprogs Current version. rpm -qa | grep e2fsprogs The running results are shown below. 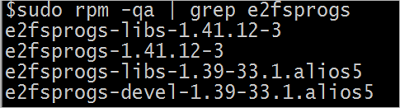
If the current version is lower than 1.42, install the software according to the following steps. Run the following command to download 1.42.8 Version of e2fsprogs。 You can also visit e2fsprogs Find the latest package. wget https://www.kernel.org/pub/linux/kernel/people/tytso/e2fsprogs/v1.42.8/e2fsprogs-1.42.8.tar.gz --no-check-certificate Compile a higher version of the tool. Run the following command to decompress the software package. tar xvzf e2fsprogs-1.42.8.tar.gz Run the following command to enter the software package directory. cd e2fsprogs-1.42.8 Run the following command to generate Makefile File. ./configure Run the following command to compile e2fsprogs。 make Run the following command to install e2fsprogs。 make install
Run the following command to check whether the version is updated successfully. rpm -qa | grep e2fsprogs
How to close Linux Instance lazy init Function?
Why does the status detection in the system display as detection failure?
Related Documents