Deploy LNMP environment (Alibaba Cloud Linux 3)
Manual configuration
Tutorial Introduction
What can I learn
Be familiar with the ECS instance of remote login Linux operating system. Learn to build a LNMP environment on ECS instances.
| |
| |
| |
| |
Prepare environment and resources
visit AliCloud free trial 。 Click the Login/Registration Button, and complete account login (existing AliCloud account), account registration (no AliCloud account), or real name authentication (personal real name authentication or enterprise real name authentication according to the requirements of the trial product) according to the page prompts. After successful login Product category Lower Selection Computing>ECS , click in the right area Try it now, Select the specifications of the trial ECS as required in the pop-up box. The instance type used in this trial tutorial is Economical 2-core 4GB , free trial 1181 hours In actual operation, it is recommended to select according to your business volume and needs. stay Configure ECS instance information Panel to complete parameter configuration. The configuration of this tutorial is as follows (please configure as required according to the business requirements): Region: East China 1 (Hangzhou), it is recommended to choose a region close to your customers Operating system: Alibaba Cloud Linux 3.2104 LTS 64 bit Other parameters: keep the default value or select as required
Once you agree to the agreement, click try now , and complete the trial application according to the page prompts. It usually takes 3-5 minutes to create an instance. Please wait patiently. When the instance status changes to In operation The instance creation is completed. 
Log in to ECS
Sign in ECS Console , on the left navigation bar, select Instance and Image>Instance 。 In the upper left corner of the top menu bar, select the same region as the trial instance. Set the login password of this instance. Click in the Action column 
>Instance Properties>Reset Instance Password , set the login password of the ECS instance according to the interface prompts. After saving the password, on the pop-up page, click Restart Now Make the password effective. Resetting the instance password is supported about 3-5 minutes after the instance creation is completed. If it cannot be reset, please wait patiently and try again. 
Click the ID of the trial instance and select Security Group Tab, click Security Group operation Column Configure Rules , add the port to be released in the incoming direction. In this tutorial, SSH default port 22, Nginx default port 80, and MySQL default port 3306 are released in the security group entry direction. 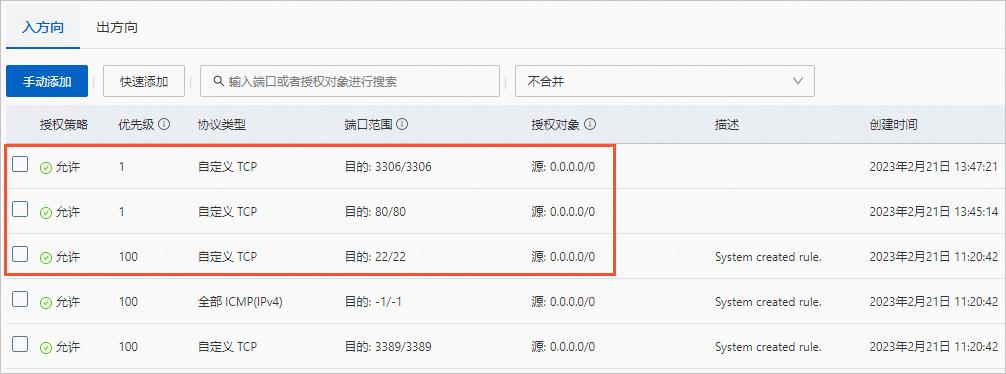
Connect ECS instances remotely. return example Page, click the Remote connection 。 In the pop-up connection and command dialog box, click Connect remotely through Workbench Corresponding Sign in now 。 In the pop-up login instance dialog box, enter the login information.
Install Nginx Service
Run the following command to install Nginx. sudo yum -y install nginx Execute the command to start nginx and set the auto start. If Apache has been installed in your experience environment before, port 80 may be occupied. You can execute the command netstat -apn|grep 80 Check the port occupancy and execute the command systemctl stop httpd.service Stop the Apache service and finally execute the command sudo systemctl start nginx Restart Nginx. sudo systemctl start nginx sudo systemctl enable nginx Execute the command to view the running status of nginx. If the echo message shows active (running), nginx is started. sudo systemctl status nginx
Install MySQL database
Execute the command to download and install the MySQL database. Echo information display Complete! , indicating that the MySQL database is successfully installed. wget http://dev.mysql.com/get/mysql57-community-release-el7-10.noarch.rpm sudo yum install -y mysql57-community-release-el7-10.noarch.rpm sudo yum install -y mysql-community-server --nogpgcheck Execute the command to start the MySQL database. sudo systemctl start mysqld.service explain If the above command fails to execute and the MySQL database cannot be started, you can try to execute sudo /etc/init.d/mysqld start Command to start the MySQL database. Execute the command to view the running status of the MySQL database. If echo information displays active(running) Indicates that the MySQL database has been started. systemctl status mysqld.service Execute the command to view the initial password of the MySQL database. sudo grep "password" /var/log/mysqld.log 
Execute the command to log in to the MySQL database. Enter the initial password of the MySQL database according to the echo information. mysql -uroot -p 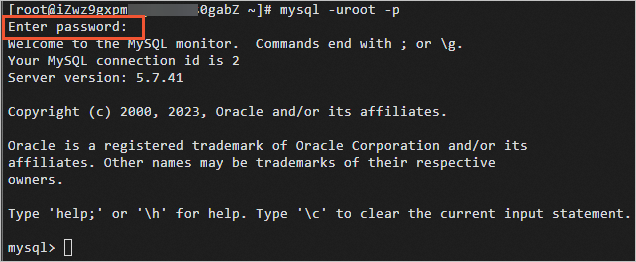
Execute the command to modify the initial password of the MySQL database. The password must contain three types of characters, including uppercase and lowercase English letters, numbers and special symbols. Note that every complete SQL command has a semicolon (;) at the end. If there is no semicolon separation between multiple lines of commands, these commands will not be executed until a semicolon is encountered.
ALTER USER 'root' @ 'localhost' IDENTIFIED BY '<new password>'; Execute the command to create a database for storing blog site content, for example: wordpress 。 create database wordpress; Execute the command to check whether the database is created successfully. If echo information displays wordpress , indicating that the database was created successfully. show databases; 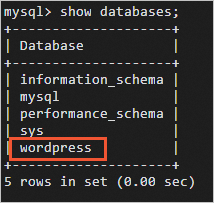
input exit , exit the database.
Installing the PHP environment
Execute the command to update the remi source. Execute the command to update the remi source. sudo rpm -ivh https://rpms.remirepo.net/enterprise/remi-release-8.rpm --nodeps Execute the command to install PHP and related libraries. sudo dnf update -y dnf libdnf sudo sed -i 's/PLATFORM_ID="platform:al8"/PLATFORM_ID="platform:el8"/g' /etc/os-release sudo yum -y module install php:remi-7.4 sudo sed -i 's/PLATFORM_ID="platform:el8"/PLATFORM_ID="platform:al8"/g' /etc/os-release Execute the command to add PHP support to the nginx. conf file. sudo vim /etc/nginx/nginx.conf After entering the Vim Editor, press i Key to enter edit mode. stay server In the braces, add the following configuration information. add to location / Configuration information. location / { index index.php index.html index.htm; } add to location ~ .php$ Configuration information. if (!- e $request_filename) { rewrite ^/(.*)$ /index.php/$1 last; } location ~ .*\.php(\/.*)*$ { fastcgi_pass 127.0.0.1:9000; include fastcgi.conf; fastcgi_index index.php; } 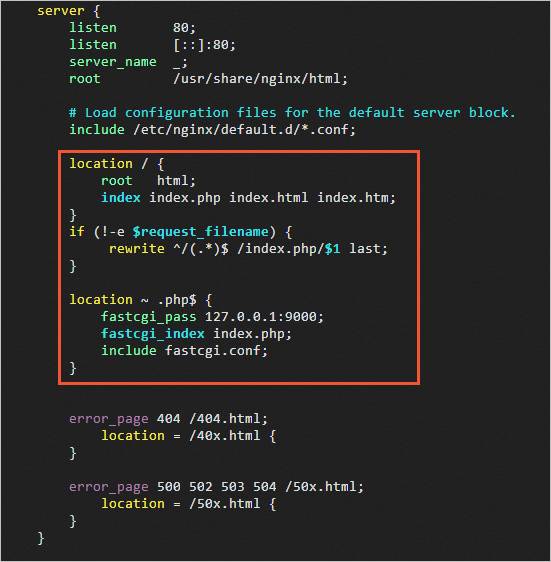
Press Ecs Key, entering :wq Press Enter Key, save and exit the Vim editor. Execute the command to restart the php fpm service. sudo systemctl start php-fpm Execute the command to restart the Nginx service. sudo systemctl start nginx Create a PHP test page phpinfo.php in the root directory of Nginx's website. sudo sh -c 'echo "<? php echo phpinfo(); ?> " > /usr/share/nginx/html/phpinfo.php' Enter in the browser address bar Http://<ECS instance public IP address>/phpinfo.php , a page similar to the following appears, indicating that the PHP environment was successfully installed. 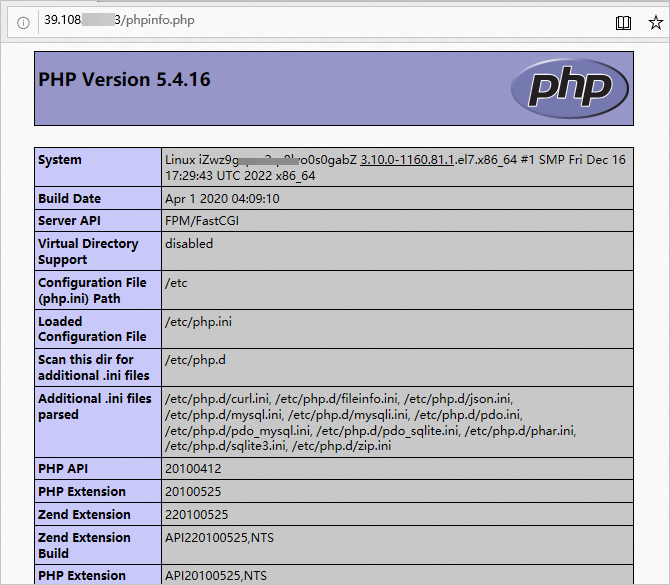
complete
Cleaning and follow-up
clear
When the subscription instance expires, it will be automatically released. When the instance is released, the data will be released at the same time. If you need to continue using the instance, please renew it before the trial expires. Instances that have not been renewed upon expiration will be automatically shut down due to arrears. The instance will be retained within 15 days of downtime, and the instance and data will be automatically released after 15 days.
follow-up
summary
Common Knowledge points
twenty-two eighty three thousand three hundred and sixty-nine
implement grep "password" /var/log/mysqld.log Command. implement grep "password"|grep /etc/nginx/nginx.conf Command. implement grep "password" /var/log/mysql.log Command.
Extended Reading
One click configuration
Tutorial Introduction
What can I learn
Be familiar with the ECS instance of remote login Linux operating system. Learn to build a LNMP environment on ECS instances.
| |
| |
| |
| |
Prepare environment and resources
visit AliCloud free trial 。 Click the Login/Registration Button, and complete account login (existing AliCloud account), account registration (no AliCloud account), or real name authentication (personal real name authentication or enterprise real name authentication according to the requirements of the trial product) according to the page prompts. After successful login Product category Lower Selection Computing>ECS , click in the right area Try it now, Select the specifications of the trial ECS as required in the pop-up box. The instance type used in this trial tutorial is Economical 2-core 4GB , free trial 1181 hours In actual operation, it is recommended to select according to your business volume and needs. stay Configure ECS instance information Panel to complete parameter configuration. The configuration of this tutorial is as follows (please configure as required according to the business requirements): Region: East China 1 (Hangzhou), it is recommended to choose a region close to your customers Operating system: Alibaba Cloud Linux 3.2104 LTS 64 bit Other parameters: keep the default value or select as required
Once you agree to the agreement, click try now , and complete the trial application according to the page prompts. It usually takes 3-5 minutes to create an instance. Please wait patiently. When the instance status changes to In operation The instance creation is completed.
One click configuration
Create security groups for ECS instances Install Nginx Service Install MySQL database and modify the default password of database root user Installing the PHP environment
Operation steps
open One click configuration template link Go to the ROS console, and the system will automatically open the panel to create a resource stack using new resources Template content The area shows the details of the YAML file. The ROS console is in the region you last accessed the console by default. Please modify the region according to the region of the resource you created. After confirming the region, keep all the options on the page unchanged and click next step get into Configure template parameters Page. stay Configure template parameters Modify the resource stack name on the page, select the ECS instance created when you applied for free trial, and modify the default password of the database root user by setting the MySQL database password. After filling in all required information and confirming, click establish Start one click configuration. Installing Nginx, MySQL and PHP requires downloading applications over the Internet. The configuration time may vary due to network stability and other reasons. During the waiting period, you can refresh Resource stack information Page to see if the configuration is complete or by clicking event Tab to view the detailed configuration progress. If you repeat the one click configuration template of this tutorial on the same ECS instance, make sure that the MySQL database password is exactly the same as the password set when you first executed the template. Otherwise, the one click configuration result is unavailable.
When Resource stack information Of the page state Show as Created successfully Indicates that one click configuration is complete. 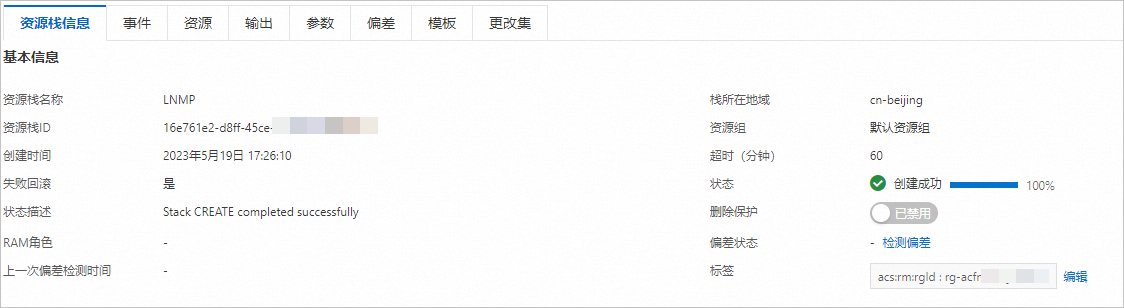
complete

Cleaning and follow-up
clear
When the subscription instance expires, it will be automatically released. When the instance is released, the data will be released at the same time. If you need to continue using the instance, please renew it before the trial expires. Instances that have not been renewed upon expiration will be automatically shut down due to arrears. The instance will be retained within 15 days of downtime, and the instance and data will be automatically released after 15 days.
follow-up
summary
Common Knowledge points
Mariadb MySQL
Click PhpUrl (http://<ECS public IP address>/phpinfo. php), and the PHP version information page appears. Click PhpUrl (http://<ECS public IP address>/phpinfo. php), and the Welcome to nginx! Page. Click NginxUrl (http://<ECS public IP address>), and the Welcome to nginx! Page.