prerequisite
-
DataFlow cluster or user-defined cluster has been created. Please refer to Create cluster 。 -
The EMR Serverless StarRocks instance has been created. Please refer to Create Instance 。 -
RDS MySQL has been created. Please refer to Create RDS MySQL instance 。 -
EMR Studio cluster has been created and ports 8443, 8000 and 8081 have been opened. Please refer to Create EMR Studio cluster and Add a security group rule 。
Restrictions on use
-
DataFlow cluster, StarRocks cluster and RDS MySQL instance need to be under the same VPC and the same zone. -
Both DataFlow cluster and StarRocks cluster must enable public network access. -
RDS MySQL is 5.7 and above.
Scenario Introduction
Scheme architecture
-
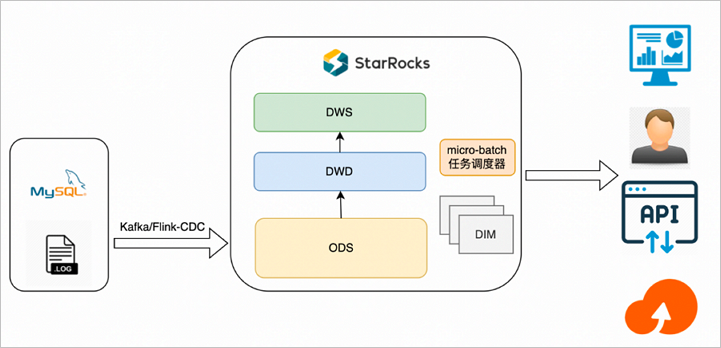
Flink cleans and imports Kafka logs or reads MySQL Binlogs and imports StarRocks through Flink CDC StarRocks. It selects detailed, aggregated, updated, and PK models as needed, and only physically lands on the ODS layer. -
Use the third-party task scheduler (such as Airflow) to arrange the tasks of the data tables of each layer according to the blood relationship, and then schedule the tasks as a micro batch granularity according to the specific minute interval, and build the data tables of each layer on the ODS in turn.
Scheme features
-
The data of the operation layer (ODS layer) is simply cleared and associated, and then stored in the detailed data. For the time being, there is no excessive secondary processing summary, and the detailed data is directly written into StarRocks. -
The DWD or DWS layer is the actual physical table, which can be scheduled to write data periodically through scheduling tools such as DataWorks or Airflow. -
StarRocks directly docks with the upper application in the form of tables to realize real-time query of applications. -
The front-end requests the actual physical table in real time. The real-time nature of data depends on the configuration of DataWorks or Airflow scheduling cycle, such as 5 minute scheduling, 10 minute scheduling, etc.
Scheme advantages
-
The query performance is strong. The upper application only queries the last summarized data. Compared with View, the query data volume is larger and the performance is stronger. -
The data is refreshed quickly. When a link or data has errors, you can re run DataWorks or Airflow scheduling tasks. Because all logic is fixed, there is no need for complex link operations. -
The business logic is adjusted quickly. When it is necessary to add or adjust businesses at all levels, the corresponding business scenarios can be developed based on SQL WYSIWYG, and the business launch cycle is shortened.
Scheme disadvantages
Applicable scenarios
Operation process
-
Step 1: Create a MySQL source data table -
Step 2: Create the StarRocks table -
Step 3: Synchronize the source data in RDS to the ODS table in StarRocks -
Step 4: Arrange the micro batch synchronization tasks of each data layer through the task scheduler -
Step 5: View database and table information -
Step 6: Verify the inserted data
Step 1: Create a MySQL source data table
-
To create a database and account for testing, see Create database and account 。 After creating the database and account, you need to authorize the read and write permissions of the test account. explain The database name created in this example is flink_cdc, and the account is emr_test. -
Use the created test account to connect to the MySQL instance. Please refer to Log in to RDS MySQL through DMS 。 -
Execute the following command to create the database and data table. CREATE DATABASE IF NOT EXISTS flink_cdc; CREATE TABLE flink_cdc.orders ( order_id INT NOT NULL AUTO_INCREMENT, order_revenue FLOAT NOT NULL, order_region VARCHAR(40) NOT NULL, customer_id INT NOT NULL, PRIMARY KEY ( order_id ) ); CREATE TABLE flink_cdc.customers ( customer_id INT NOT NULL, customer_age INT NOT NULL, customer_name VARCHAR(40) NOT NULL, PRIMARY KEY ( customer_id ) );
Step 2: Create the StarRocks table
-
Connect the EMR Serverless StarRocks instance. For details, see Connect StarRocks instance (client mode) 。 -
Execute the following command to create the database. CREATE DATABASE IF NOT EXISTS `flink_cdc`; -
Execute the following command to create an ODS table. CREATE TABLE IF NOT EXISTS `flink_cdc`.`customers` ( `timestamp` DateTime NOT NULL COMMENT "", `customer_id` INT NOT NULL COMMENT "", `customer_age` FLOAT NOT NULL COMMENT "", `customer_name` STRING NOT NULL COMMENT "" ) ENGINE=olap PRIMARY KEY(`timestamp`, `customer_id`) COMMENT "" DISTRIBUTED BY HASH(`customer_id`) BUCKETS 1 PROPERTIES ( "replication_num" = "1" ); CREATE TABLE IF NOT EXISTS `flink_cdc`.`orders` ( `timestamp` DateTime NOT NULL COMMENT "", `order_id` INT NOT NULL COMMENT "", `order_revenue` FLOAT NOT NULL COMMENT "", `order_region` STRING NOT NULL COMMENT "", `customer_id` INT NOT NULL COMMENT "" ) ENGINE=olap PRIMARY KEY(`timestamp`, `order_id`) COMMENT "" DISTRIBUTED BY HASH(`order_id`) BUCKETS 1 PROPERTIES ( "replication_num" = "1" ); -
Execute the following command to create a DWD table. CREATE TABLE IF NOT EXISTS `flink_cdc`.`dwd_order_customer_valid`( `timestamp` DateTime NOT NULL COMMENT "", `order_id` INT NOT NULL COMMENT "", `order_revenue` FLOAT NOT NULL COMMENT "", `order_region` STRING NOT NULL COMMENT "", `customer_id` INT NOT NULL COMMENT "", `customer_age` FLOAT NOT NULL COMMENT "", `customer_name` STRING NOT NULL COMMENT "" ) ENGINE=olap PRIMARY KEY(`timestamp`, `order_id`) COMMENT "" DISTRIBUTED BY HASH(`order_id`) BUCKETS 1 PROPERTIES ( "replication_num" = "1" ); -
Execute the following command to create a DWS table. CREATE TABLE IF NOT EXISTS `flink_cdc`.`dws_agg_by_region` ( `timestamp` DateTime NOT NULL COMMENT "", `order_region` STRING NOT NULL COMMENT "", `order_cnt` INT NOT NULL COMMENT "", `order_total_revenue` INT NOT NULL COMMENT "" ) ENGINE=olap PRIMARY KEY(`timestamp`, `order_region`) COMMENT "" DISTRIBUTED BY HASH(`order_region`) BUCKETS 1 PROPERTIES ( "replication_num" = "1" );
Step 3: Synchronize the source data in RDS to the ODS table in StarRocks
-
download Flink CDC connector and Flink StarRocks Connector , and upload to the /opt/apps/FLINK/flink-current/lib Directory. -
Copy the /opt/apps/FLINK/flink-current/opt/connectors/kafka JAR package in directory to /opt/apps/FLINK/flink-current/lib Directory. -
Use SSH to log in to the DataFlow cluster. Please refer to Log in to the cluster 。 -
Execute the following command to start the cluster. important The examples in this article are only for testing. For production level Flink jobs, please submit them in YARN or Kubernetes mode. For details, see Apache Hadoop YARN and Native Kubernetes 。 /opt/apps/FLINK/flink-current/bin/start-cluster.sh -
Write Flink SQL job and save it as demo.sql 。 Execute the following command to edit demo.sql File. vim demo.sql The contents of the file are shown below. CREATE DATABASE IF NOT EXISTS `default_catalog`.`flink_cdc`; -- create source tables CREATE TABLE IF NOT EXISTS `default_catalog`.`flink_cdc`.`orders_src`( `order_id` INT NOT NULL, `order_revenue` FLOAT NOT NULL, `order_region` STRING NOT NULL, `customer_id` INT NOT NULL, PRIMARY KEY(`order_id`) NOT ENFORCED ) with ( 'connector' = 'mysql-cdc', 'hostname' = 'rm-2ze5h9qnki343****.mysql.rds.aliyuncs.com', 'port' = '3306', 'username' = 'emr_test', 'password' = '@EMR! 010beijing', 'database-name' = 'flink_cdc', 'table-name' = 'orders' ); CREATE TABLE IF NOT EXISTS `default_catalog`.`flink_cdc`.`customers_src` ( `customer_id` INT NOT NULL, `customer_age` FLOAT NOT NULL, `customer_name` STRING NOT NULL, PRIMARY KEY(`customer_id`) NOT ENFORCED ) with ( 'connector' = 'mysql-cdc', 'hostname' = 'rm-2ze5h9qnki343****.mysql.rds.aliyuncs.com', 'port' = '3306', 'username' = 'emr_test', 'password' = '@EMR! 010beijing', 'database-name' = 'flink_cdc', 'table-name' = 'customers' ); CREATE TABLE IF NOT EXISTS `default_catalog`.`flink_cdc`.`orders_sink` ( `timestamp` TIMESTAMP NOT NULL, `order_id` INT NOT NULL, `order_revenue` FLOAT NOT NULL, `order_region` STRING NOT NULL, `customer_id` INT NOT NULL, PRIMARY KEY(`timestamp`,`order_id`) NOT ENFORCED ) with ( 'connector' = 'starrocks', 'database-name' = 'flink_cdc', 'table-name' = 'orders', 'username' = 'admin', 'password' = '', 'jdbc-url' = 'jdbc: mysql://fe-c-9b354c83e891 ****-internal.starrocks.aliyuncs.com:9030', 'load-url' = 'fe-c-9b354c83e891****-internal.starrocks.aliyuncs.com:8030', 'sink.properties.format' = 'json', 'sink.properties.strip_outer_array' = 'true', 'sink.buffer-flush.interval-ms' = '15000' ); CREATE TABLE IF NOT EXISTS `default_catalog`.`flink_cdc`.`customers_sink` ( `timestamp` TIMESTAMP NOT NULL, `customer_id` INT NOT NULL, `customer_age` FLOAT NOT NULL, `customer_name` STRING NOT NULL, PRIMARY KEY(`timestamp`,`customer_id`) NOT ENFORCED ) with ( 'connector' = 'starrocks', 'database-name' = 'flink_cdc', 'table-name' = 'customers', 'username' = 'admin', 'password' = '', 'jdbc-url' = 'jdbc: mysql://fe-c-9b354c83e891 ****-internal.starrocks.aliyuncs.com:9030', 'load-url' = 'fe-c-9b354c83e891****-internal.starrocks.aliyuncs.com:8030', 'sink.properties.format' = 'json', 'sink.properties.strip_outer_array' = 'true', 'sink.buffer-flush.interval-ms' = '15000' ); BEGIN STATEMENT SET; INSERT INTO `default_catalog`.`flink_cdc`.`orders_sink` SELECT LOCALTIMESTAMP, order_id, order_revenue, order_region, customer_id FROM `default_catalog`.`flink_cdc`.`orders_src`; INSERT INTO `default_catalog`.`flink_cdc`.`customers_sink` SELECT LOCALTIMESTAMP, customer_id, customer_age, customer_name FROM `default_catalog`.`flink_cdc`.`customers_src`; END; The parameters involved are as follows: -
Create data tables orders_src and customers_src. parameter describe connector The fixed value is mysql cdc. hostname The intranet address of RDS. On the RDS database connection page, click the intranet address to copy. For example, rm-2ze5h9qnki343****.mysql.rds.aliyuncs.com。 port The fixed value is 3306. username Step 1: Create a MySQL source data table The account name created in. This example is emr_test. password Step 1: Create a MySQL source data table The password of the account created in. database-name Step 1: Create a MySQL source data table The name of the database created in. This example is flink_cdc. table-name Step 1: Create a MySQL source data table Data table created in. -
Orders_src: This example is orders. -
Customers_src: This example is customers.
-
-
Create data tables orders_link and customers_link. parameter describe connector The fixed value is starrocks. database-name Step 1: Create a MySQL source data table The name of the database created in. This example is flink_cdc. table-name Step 1: Create a MySQL source data table Data table created in. -
Orders_link: This example is orders. -
Customers_sink: This example is customers.
username StarRocks connection user name. The fixed value is admin. password Not filled in. jdbc-url Used to perform query operations in StarRocks. For example, jdbc: mysql://fe-c-9b354c83e891 ****-internal.starrocks.aliyuncs.com:9030。 Among them, fe-c-9b354c83e891****-internal.starrocks.aliyuncs.com It is the intranet address of the FE node of the EMR Serverless StarRocks instance. explain For how to obtain the intranet address of the FE node of the EMR Serverless StarRocks instance, see View instance list and details 。 load-url Specify the intranet address and HTTP port of the FE node. The format is Intranet address of FE node of EMR Serverless StarRocks instance: 8030 。 For example, fe-c-9b354c83e891****-internal.starrocks.aliyuncs.com:8030。 explain For how to obtain the intranet address of the FE node of the EMR Serverless StarRocks instance, see View instance list and details 。 -
-
-
Execute the following command to start the Flink task. /opt/apps/FLINK/flink-current/bin/sql-client.sh -f demo.sql
Step 4: Arrange the micro batch synchronization tasks of each data layer through the task scheduler
-
Job 1 -- ODS to DWD INSERT INTO dwd_order_customer_valid SELECT '{start_time}', o.order_id, o.order_revenue, o.order_region, c.customer_id, c.customer_age, c.customer_name FROM customers c JOIN orders o ON c.customer_id=o.customer_id WHERE o.timestamp >= '{start_time}' AND o.timestamp < DATE_ADD('{start_time}',INTERVAL '{interval_time}' MINUTE) AND c.timestamp >= '{start_time}' AND c.timestamp < DATE_ADD('{start_time}',INTERVAL '{interval_time}' MINUTE) -
Job 2 -- DWD to DWS INSERT INTO dws_agg_by_region SELECT '{start_time}', order_region, count(*) AS order_cnt, sum(order_revenue) AS order_total_revenue FROM dwd_order_customer_valid WHERE timestamp >= '{start_time}' AND timestamp < DATE_ADD('{start_time}',INTERVAL '{interval_time}' MINUTE) GROUP BY timestamp, order_region;
-
Add users to the EMR Studio cluster. For details, see Add User 。 -
Authorize the added user. -
Enter the data development console. For details, see quick get start 。 -
Create a connection for Airflow. -
single click 
Icon.
-
-
Create Zeppelin's Note. -
stay Create New Note In the dialog box, enter the Note Name. In the Default Interpreter In the drop-down box, select airflow 。 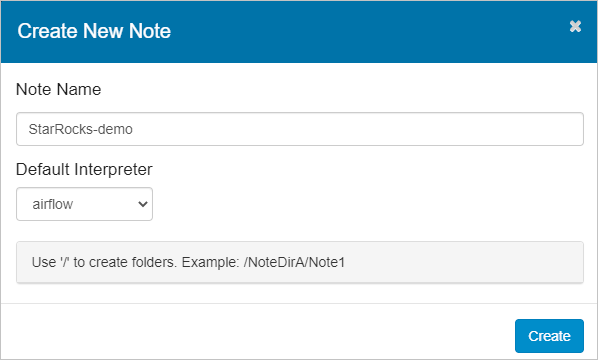
-
single click 
Icon to run the script. 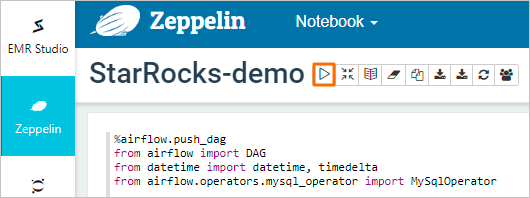
After successful execution, Paragraph outputs the following prompt information. 
-
-
View DAG status. On the Airflow page, you can see the operation of starrocks_demo_dag. 
Step 5: View database and table information
-
Connect the EMR Serverless StarRocks instance. For details, see Connect StarRocks instance (client mode) 。 -
Execute the following command to query database information. show databases; The return information is shown below. +--------------------+ | Database | +--------------------+ | _statistics_ | | information_schema | | flink_cdc | +--------------------+ 3 rows in set (0.00 sec) -
Query data table information.
Step 6: Verify the inserted data
-
use Step 1: Create a MySQL source data table Connect the test account created in to the MySQL instance. Please refer to Log in to RDS MySQL through DMS 。 -
Execute the following command in the RDS database window to insert data into the tables orders and customers. INSERT INTO flink_cdc.orders(order_id,order_revenue,order_region,customer_id) VALUES(1,10,"beijing",1); INSERT INTO flink_cdc.orders(order_id,order_revenue,order_region,customer_id) VALUES(2,10,"beijing",1); INSERT INTO flink_cdc.customers(customer_id,customer_age,customer_name) VALUES(1, 22, "emr_test"); -
Connect the EMR Serverless StarRocks instance. For details, see Connect StarRocks instance (client mode) 。 -
Execute the following command to query the ODS layer data. -
Execute the following command to query DWD layer data. -
Execute the following command to query DWS layer data.