Eric's Blog https://eblog.ink/ zh-CN Welcome Eric's Blog Tue, 23 Apr 2024 16:13:00 +0800 Tue, 23 Apr 2024 16:13:00 +0800 Linux management script, don't spray it if you don't like it https://eblog.ink/archives/158/ https://eblog.ink/archives/158/ Tue, 16 Mar 2021 11:18:00 +0800 eric Beginner to learn shell and write Linux management script
Any suggestions, please comment below and update later
BATE version

 wget -N --no-check-certificate  https://eblog.ink/sh/menu.sh  && chmod +x menu.sh && bash menu.sh

 Script Home Page

]]>
seven https://eblog.ink/archives/158/#comments https://eblog.ink/feed/archives/158/
[Windows] MDE update and failure handling method https://eblog.ink/archives/376/ https://eblog.ink/archives/376/ Tue, 23 Apr 2024 16:13:00 +0800 eric MDE update method:

 cd %ProgramFiles%\Windows Defender .\MpCmdRun.exe -removedefinitions -dynamicsignatures .\MpCmdRun.exe -SignatureUpdate

If an error is reported, you can download the offline installation package:

Link address: address

]]>
zero https://eblog.ink/archives/376/#comments https://eblog.ink/feed/archives/376/
[office365] 2604 1001 Error https://eblog.ink/archives/375/ https://eblog.ink/archives/375/ Tue, 23 Apr 2024 16:10:16 +0800 eric Please check your network settings and try again [2604]. Solution:

Scheme I:

 Open your Internet Explorer browser and select Tools>Internet Options. In the Internet Properties window, click Advanced to scroll down to the security module category column, and check ssl3.0 TLS1.0, 1.1, 1.2 and then apply and determine

Scheme II:

 Open the Edge browser, click the three points in the upper right corner, Open More Tools and select Internet Options. In the Internet Properties window, click Advanced to scroll down to the security module category column, and check ssl3.0 TLS1.0, 1.1, 1.2 and then apply and determine

Scheme III:

 Press the keyboard combination key Windows+R to pop up the operation Enter the command: inetcpl.cpl In the Internet Properties window, click Advanced to scroll down to the security module category column, and check ssl3.0 TLS1.0, 1.1, 1.2 and then apply and determine

An error occurred. [1001] :

Scheme 1:

In the first scheme, the error "An error occurred [1001]" is caused by the security software that affects the WAM plug-in (AAD). BrokerPlugin) 。

See this article for more details on how to mitigate the following actions:

Unable to sign in to Microsoft 365 desktop application

To provide temporary relief, the following steps may help:

Restarting the device usually helps alleviate the problem.

Run the following commandlet in user mode PowerShell to repair WAM. For more context, see the article Authentication Failure in Microsoft 365 Service.

 Add-AppxPackage -Register “$env:windir\SystemApps\Microsoft. AAD.BrokerPlugin_cw5n1h2txyewy\Appxmanifest.xml” -DisableDevelopmentMode -ForceApplicationShutdown Add-AppxPackage -Register   “$env:windir\SystemApps\Microsoft.Windows.CloudExperienceHost_cw5n1h2txyewy\Appxmanifest.xml” -DisableDevelopmentMode -ForceApplicationShutdown

Scheme 2:

The second case is the error "An error occurred [1001]" caused by the user profile management problem.

See this article for more details on how to mitigate the following actions:

Device identification and desktop virtualization

In this category of problems, we found that user profile data is roamed on both VDI and physical devices, which may cause the identity and authentication data components to be in an error state. Be sure to follow the guidelines in the above article to see if user profile management practices can cause this problem. This section is extracted from the article to emphasize its importance:

No data under roaming path% localappdata% is supported. If you choose to move content under% localappdata%, make sure that the contents of the following folders and registry keys never leave the device under any conditions. For example, the Profile Migration Tool must skip the following folders and keys:

 %localappdata%\Packages\Microsoft. AAD.BrokerPlugin_cw5n1h2txyewy  %localappdata%\Packages\Microsoft. Windows.CloudExperienceHost_cw5n1h2txyewy  %Localappdata%  Packages <any application package> AC  TokenBroker %localappdata%\Microsoft\TokenBroker  HKEY_CURRENT_USER\SOFTWARE\Microsoft\IdentityCRL  HKEY_CURRENT_USER\SOFTWARE\Microsoft\Windows\CurrentVersion\AAD
]]>
zero https://eblog.ink/archives/375/#comments https://eblog.ink/feed/archives/375/
[Openwrt] Enable ipv6 access https://eblog.ink/archives/374/ https://eblog.ink/archives/374/ Thu, 18 Jan 2024 10:36:00 +0800 eric (1) Determine whether the broadband has an ipv6 address, and enable ipv6 address allocation on the istore

1. Confirm whether ipv6 is enabled
The simplest way, Ping 240c::6666 If it is connected, there is an ipv6 address

2. Configure ipv6 on iStore

① Set wan port

Click: network Interface Wan interface edit advanced setting

Get IPv6 address set to automatic IPv6 allocation length is set to disabled

② LAN port setting

Click: network Interface Lan interface edit advanced setting

IPv6 allocation length: select sixty-four

Then select: DHCP Server IPv6 Settings

RA Service: Selection Server mode

DHCPv6 service: set to Server mode

NDP Proxy: Set to disabled

IPv6 RA settings are as follows
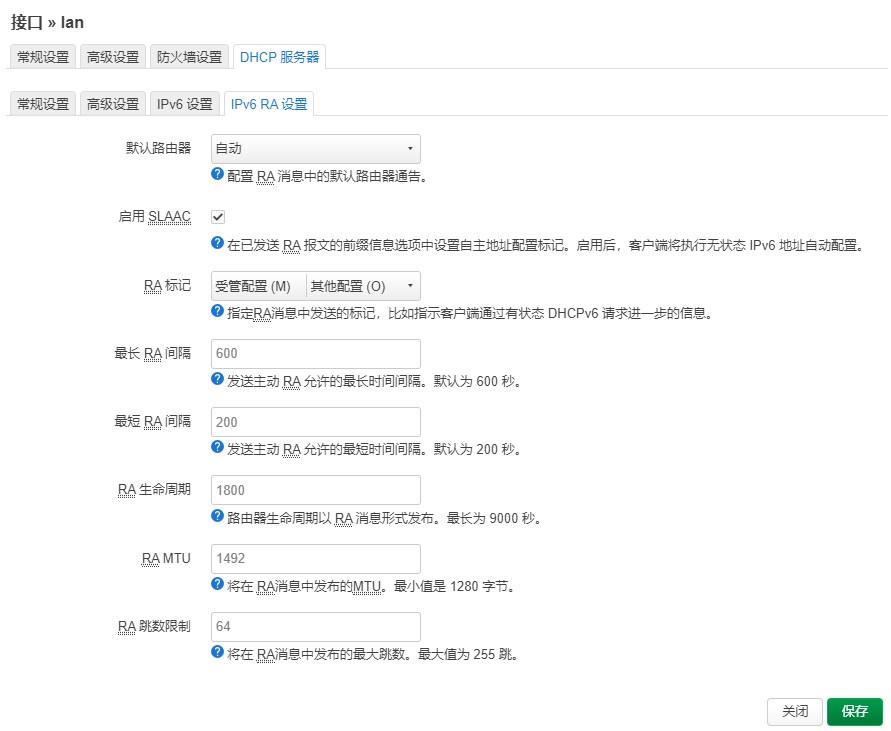
 Please enter a picture description

3. Test and unexpected solutions

So far, Istore should have successfully enabled ipv6 dhcp. Visit this website on the home network devices that support ipv6: https://ipw.cn/

If the ipv6 address appears, it is successful

If the ipv6 address does not appear, try the following two methods:

First: Manually set the IPv6 DNS server address of the device to: 2400:3200::1 2400:3200:baba::1

The phone can also be set to 223.5.5.5 , this is a dual stack address, Both v4 and v6 can be parsed

Second: istore → network Global Network Options

 Clear IPv6 ULA prefix

(2) Configure DDNS

1. Register the cloud resolution server

open https://dynv6.com/ , register an account yourself. Note that this account needs to be authenticated at your registered email address. During the authentication process, you may have to solve network problems yourself.

1. After successful registration, click My Zones , create a new address

2. Get it in instructions after completion token

3. Configure DDNS

Go back to the istore interface, find the dynamic DNS in the service, and select Add New Service

After filling, save and run it. Just remember to start DDNS

After a while (10 minutes at the latest), go to records on dynv6.com and see the ipv6 address corresponding to this domain name. That means DDNS resolution is successful

(3) Soca Set Port Forwarding

1. Download in the istore store Socat

Open Socat and check Enable

New port forwarding: newly added -- Enable --Agreement Port forwarding -- IPv6 -- TCP

Here we will first explain the listening window and the target port

Listening port , Yes Internet port

Either IPv4 or IPv6 can be selected as the target protocol. It is recommended that IPv4 be convenient

Target Port , Yes Intranet port

This is fixed. Generally, the default value for not displaying the IPv4 address is 80. What is displayed is what, such as Qunhui is 5000, Jellyfin is 8090.

(4) Lucky port forwarding

1. Add forwarding rules

two Random name --Select tcp6 udp6 -- Listening port It is the Internet port -- the target address can be filled in directly IPv4 Address-- Target Port Is the intranet port

3. Firewall Automatic release open

4. If you cannot access after adding, you need to manually add custom rules, such as the release port is eight thousand You need to add ip6tables -A INPUT -p tcp --dport 8000 j ACCEPT

Original text: link modify

]]>
zero https://eblog.ink/archives/374/#comments https://eblog.ink/feed/archives/374/
[Linux] wakeonlan wakes other devices https://eblog.ink/archives/373/ https://eblog.ink/archives/373/ Thu, 11 Jan 2024 10:25:57 +0800 eric Wake up the remote computer (usually within the same LAN) using the wakeonlan tool. Wakeonlan is a command line tool used to send special Magic Packets to the target computer to wake it up. This article takes Dell as an example:

The following are the basic steps for using wakeonlan on Linux:

1. Installation wakeonlan Tools:

In most Linux distributions, The wakeonlan tool is usually not installed by default. You can use the package manager to install. For example, based on Debian On the Ubuntu system, you can run the following commands:

 sudo apt-get install wakeonlan

Based on Red Hat On the Centos system, you can use the following commands:

 sudo yum install wakeonlan

2. BIOS settings
To use the Wake on LAN feature, you must make some settings in the system BIOS. To do this, follow these steps:

Restart the system and press F2 several times.
In the computer BIOS, go to Power Management and Wake on LAN/WLAN
Activate the option you want to use.
Reminder: Please note that, Wake on WLAN Not available on all computer models and in all system states.
Go to Deep Sleep Control (Deep sleep control) and Disable This option.
Click Apply to exit BIOS.

3. Driver settings

Back in Windows, you must set Wake on LAN in the Network Card Driver. Follow these steps to do this:

Open the Device Manager. In Windows 10, you can right-click the Windows button and select Device Manager.
Go to Network adapters and open the category.
Right click your LAN controller and select Properties.
Open the tab Power Management.
Make sure the following boxes are checked: Allow this device to wake the computer Only allow magic packs to wake the computer
At this time, open the advanced tab and select Energy Efficient Ethernet.
Reminder: This option is not available for all computer models.
Set this option to disabled.
Click OK and close the Device Manager.
Go to Control Panel, Hardware and Sound, Power Options and System Settings.
Click at the top to change settings that are not currently available.
Clear at bottom Turn on fast startup。
Click save changes.

4. Use the command to wake up the host with MAC AA: AA: AA: AA: AA: AA: AA

 wakeonlan AA:AA:AA:AA:AA:AA
]]>
zero https://eblog.ink/archives/373/#comments https://eblog.ink/feed/archives/373/
[Openwrt] Errors encountered https://eblog.ink/archives/372/ https://eblog.ink/archives/372/ Wed, 10 Jan 2024 15:35:00 +0800 eric symptom

 Collected errors: * pkg_get_installed_files: Failed to open //usr/lib/opkg/info/resize2fs.list: No such file or directory. * pkg_get_installed_files: Failed to open //usr/lib/opkg/info/tune2fs.list: No such file or directory.

solve:

 opkg install --force-overwrite resize2fs tune2fs

symptom:

Chinese language pack missing

solve:

 opkg update opkg install luci-i18n-base-zh-cn
]]>
zero https://eblog.ink/archives/372/#comments https://eblog.ink/feed/archives/372/
[Linux] Docker container runs Nginx and implements reverse proxy https://eblog.ink/archives/371/ https://eblog.ink/archives/371/ Wed, 10 Jan 2024 11:00:00 +0800 eric 1、 Preface

We know that for security reasons, we usually set a reverse proxy to mask the real IP address and port number of the application. The most commonly used reverse proxy on Linux is Nginx. In this article, we will set the reverse proxy through the Docker container.

2、 Run Nginx container

1. Get Nginx image
To run the container, you need to have a corresponding image first. Use the following command to pull the NGINX image:

 docker pull nginx

2. Run Nginx container
After obtaining the Nginx image, we can run the container according to the image

 docker run --name=nginx -d -p 80:80 nginx

The above command is explained as follows:

--Name: set the name of the container.
-d: Indicates that the container is running in the background.
-p: Specify the port mapping. 4030 is the port of the host and 80 is the port inside the Nginx container.
Nginx: indicates that the container is run according to the nginx image.

Then access in the browser: http://ip

3、 Set reverse proxy

To configure reverse proxy, we need to modify the Nginx configuration file. Set the HTTP address of the reverse proxy in the Nginx configuration file.

To modify the Nginx configuration file, first enter the Nginx container and use the following command to enter the container

 docker exec -it nginx /bin/bash

Explanation of the above command:

-It: indicates that a pseudo terminal is allocated.
Nginx: indicates the name of the container. The container ID can also be used here.
/Bin/bash: indicates that the bash operation is performed on the container.

 cd /etc/nginx/con.d/ vim default.conf

Edit as follows:

 server { listen 80; Server_name yourdomain.com; # Your domain name location / { proxy_pass yourdomain.com:port; proxy_set_header Host $host; proxy_set_header X-Real-IP $remote_addr; proxy_set_header X-Forwarded-For $proxy_add_x_forwarded_for; proxy_set_header X-Forwarded-Proto $scheme; } }

If you need to enable https and auto jump https:

 server { listen 80; Server_name yourdomain.com; # Your domain name location / { return 301 https://$host$request_uri; } } server { listen 443 ssl; Server_name yourdomain.com; # Your domain name resolver 8.8.8.8; ssl_certificate /path/to/your/fullchain.pem; ssl_certificate_key /path/to/your/privkey.pem; ssl_protocols TLSv1.2 TLSv1.3; ssl_ciphers 'TLS_AES_128_GCM_SHA256:TLS_AES_256_GCM_SHA384'; location / { proxy_pass yourdomain.com:port; proxy_set_header Host $host; proxy_set_header X-Real-IP $remote_addr; proxy_set_header X-Forwarded-For $proxy_add_x_forwarded_for; proxy_set_header X-Forwarded-Proto $scheme; } }

or DDNS

server {

 listen 80; server_name yourdomain.com; location / { return 301 https://$host$request_uri; }

}
server {

 listen 443 ssl; server_name yourdomain.com; resolver 8.8.8.8; ssl_certificate /path/to/your/fullchain.pem; ssl_certificate_key /path/to/your/privkey.pem; ssl_protocols TLSv1.2 TLSv1.3; ssl_ciphers "TLS13-AES-256-GCM-SHA384:TLS13-CHACHA20-POLY1305-SHA256:TLS13-AES-128-GCM-SHA256:TLS13-AES-128-CCM-8-SHA256:TLS13-AES-128-CCM-SHA256:EECDH+CHACHA20:EECDH+CHACHA20-draft:EECDH+AES128:RSA+AES128:EECDH+AES256:RSA+AES256:EECDH+3DES:RSA+3DES:! MD5"; location / { set $backend_server " https://yourdomain_back.com:port "; resolver_timeout 5s;  proxy_pass $backend_server; proxy_set_header Host $host; proxy_set_header X-Real-IP $remote_addr; proxy_set_header X-Forwarded-For $proxy_add_x_forwarded_for; proxy_set_header X-Forwarded-Proto $scheme; }

}

Restart the container after modification

 docker restart nginx

Original text: link

]]>
zero https://eblog.ink/archives/371/#comments https://eblog.ink/feed/archives/371/
[Windows] Windows11 right-click menu is changed to classic right-click menu https://eblog.ink/archives/370/ https://eblog.ink/archives/370/ Thu, 21 Dec 2023 16:07:00 +0800 eric Change to windows10 menu:

 reg add "HKCU\Software\Classes\CLSID\{86ca1aa0-34aa-4e8b-a509-50c905bae2a2}\InprocServer32" /f /ve

Change back to the windows11 menu

 reg delete "HKCU\Software\Classes\CLSID\{86ca1aa0-34aa-4e8b-a509-50c905bae2a2}" /f

Original text: Original link

]]>
zero https://eblog.ink/archives/370/#comments https://eblog.ink/feed/archives/370/
[Box] TV box brush bag, Armbian system https://eblog.ink/archives/369/ https://eblog.ink/archives/369/ Mon, 30 Oct 2023 10:23:00 +0800 eric Android TV system:

Link: https://pan.baidu.com/s/1qFBIIz7jjI8fTGEA18Fw2Q

Extraction code: bjns

Alternate link: https://wwt.lanzoux.com/b021zvjkj

Extraction code: 6l1n

Armbian system:

Link: https://github.com/ophub/amlogic-s9xxx-armbian/releases

View type: https://github.com/ophub/amlogic-s9xxx-armbian

Original link: link

]]>
zero https://eblog.ink/archives/369/#comments https://eblog.ink/feed/archives/369/
[Windows] Silent installation method https://eblog.ink/archives/368/ https://eblog.ink/archives/368/ Fri, 27 Oct 2023 16:44:00 +0800 eric 1、 How to get the silent installation parameters of software

1. If the software has been installed, query its installation/uninstallation parameters in the registry:

 View the parameter content information of InstallSource (if any) and UninstallString

2. Query the silent installation parameters of third-party software:

3. Manual test:

 Anyway, I got an installation program and used/? Query. If/? Is not supported? Parameters. You can also try each silent installation parameter to find out ([/S] [/silent [/noreboot]] [/verysilent [/sp -] [/norestart]] [/q] [/qn] [/qb] [REBOOT=SUPPRESS] [/s/v/qn] [/q: a/r: n] [/u/n/z] [/quiet] [/SilentInstallNoSponsor] [/SilentInstall] [/s/qn] [/s/qd] [- s] [- q], etc.) This step is boring, but usually effective.

4. After trying the above parameters, it seems that the software does not support silent installation. At this time, you can consider decompressing the installation package:

 Priority should be given to testing the software's own method of decompression and supporting silent installation: for example: Office 2003 uses the/a parameter to decompress; Unpack the Office 2007 Service Pack with/extract; ACDSee10/a Decompress Unzip the installation package with WinRAR or 7-ZIP, extract the installation file directly, and perform a silent installation if the built-in parameter decompression is not supported

5. You can also change the software configuration file to perform a silent installation

 For example: Total Commander: decompress it with winrar, and modify auto=1 in install.inf to automatically install

6. If not, find a way to obtain the version of the software that supports silent installation, or repackage the version, or use the keyboard and mouse of Au3 to automatically click to install

2、 Common software silence parameters

Personally, I feel that the silent installation of the InstallShield package is not stable. Sometimes the installation fails inexplicably and takes up resources. Other formats are OK. For example, Google SketchUp 6 is packaged with InstallShield. The failure rate of silent deployment is a headache for me.

1. msi format

 msiexec.exe /i ActiveSync.msi /quiet /norestart

2. msp format

 msiexec.exe /p hotfix.msp /quiet /norestart

3. System runtime

 ○ Visual C++2008 (VC8) decompresses the msi file (the official download is the exe file, and the query through the. exe/? Is also/Q, but the deployment/Q and/q both report errors, so the decompression deployment method is used) ○ Visual C++ 2009(VC9).exe /q ○ Visual C++ 2010 (VC10).exe /q ○ Microsoft . NET Framework 1.1 is decompressed to get the msi file (the official download is the exe file, and the query through the. exe/? Is also/Q, but the deployment/Q and/q both report errors, so the method of decompressing the deployment is used) ○ Microsoft . NET Framework 2.0.exe /q ○ Microsoft . NET Framework 3.0.exe /q ○ Microsoft . NET Framework 3.5.exe /q ○ Microsoft . NET Framework 4.0.exe /q

4. Common use of system

 ○ Windows patches, usually/quiet/norestart. For example, WindowsXP-KB915865-v11-x86-CHS.exe  ○ WinRAR.exe /S ○ 7-ZIP.exe /S ○ Google Pinyin. exe/S ○ Sogou Pinyin. exe/S ○ Driver wizard 2012.exe/S ○ CPU-Z v1.60 official Chinese installation version. exe/S ○ Google Picasa v3.9.135.93 official simplified Chinese version. exe/S ○ Xunlei View Player v4.8.8.966.exe/S ○ Netease Youdao Desktop Dictionary 5.0 official version. exe/S ○ Microsoft Yahei font for XP.exe/Q ○ VMware-workstation-full-8.0.2-591240.exe /silent /noSilentReboot

5. Instant messaging

 ○ Alibaba Wangwang Taobao Buyer Edition 2011 Official SP1.exe/S ○ Feixin 2012 New Year Version v4.7.0.exe/S ○ Tencent QQ 2011 official version. exe/S ○ Tencent TM 2009 Beta v3.3.exe/S ○ Tencent RTX 2011 official version. exe/S

6. Written Office

 ○ Office 2003 Professional Method 1: Re package the original installation CD of office 2003 (also called administrator installation mode) to support network installation. Run Setup.exe/a on the original installation CD, enter the serial number, and select a folder as the office installation point. (such as d:  office on the hard disk) Run msiexec.exe/i Pro11.msi/quiet/norestart Method 2: Step 3: Create the MST file for customized installation: Run the Custom Installation Wizard of the office 2003 resource kit tool to create a corresponding MST file and store it in the Office 2003 directory. (In the same directory of setup and pro11.msi files) msiexec.exe /a pro11.msi /p setup.msp ○ Office 2003 Compatibility Pack FileFormatConverters.exe /quiet /norestart ○ Office System 2007/Office System 2010 (including Project/Visio) Run setup.exe/admin, and use the Office 2007 customization tool to generate the. msp file (including consent license agreement, serial number, registration information, display level, etc.), The name of the msp file is optional. (The figure below is Auto_Office_2007.msp. The other msps are the installation files extracted after running/extract with Office 2007 Service Pack 3.) After the customized msp is placed in the Updates directory of Office 2007/2010, run setup.exe under the root directory to achieve a fully automatic installation (the service pack patch package of office 2007/2010 is also applicable, and can be placed in the Updates directory) In addition, to integrate the service packs of Office 2007 or 2010, you only need to run the exe installer of the service pack and add the/extract parameter to the Updates directory of Office. ○ Adobe PDF Reader v9.1.exe /sAll ○ Adobe Acrobat X Pro v10.1.0 Extract it to get the msi file, msiexec.exe /i AcroPro.msi /quiet /norestart ○ Foxit PDF Reader v5.1.0.1117.exe /S Previous version was - i ○ Foxmail.exe 6.0.exe /sp- /verysilent /norestart ○ Google Kingsoft PowerWord. exe/S

7. Network and security

 ○ Microsoft TMG firewall client msiexec.exe /i TMGClient.msi  ENABLE_AUTO_DETECT=1 REFRESH_WEB_PROXY=1 /quiet /norestart ○ Adobe Flash Player ActiveX for IE v11.3 The version before 10 seems to be/S, and the later version knows by querying the registry that the silent installation is/install, and the uninstallation is - maintainactivex  IE 8 IE8-WindowsXP-x86-CHS.exe /quiet /update-no /promptrestart ○ Microsoft Security Essential (MSE) mseinstall_xp_v2.1.1116.exe /s /q /o /runwgacheck ○ 360 Security Guard. exe/S ○ Super rabbit. exe/S ○ PPLive.exe /S ○ Xunlei. exe/S

8. Mobile phone related

 ○ 91 Mobile assistant Microsoft is required NET Framework 2.0,msiexec.exe /i netfs.msi  /quiet /norestart 91mobilesetup_v3.1.8.583.exe /sp- /verysilent /norestart  iTunes The extracted files are all in msi format. Just refer to the following installation sequence (1) AppleApplicationSupport.msi (2) AppleMobileDeviceSupport.msi" (3) AppleSoftwareUpdate.msi" (4) Bonjour.msi" (5) iTunes.msi" ○ Nokia Suite Similarly, the extracted files are all msi files, in the following order: (1) Packages\CCD\Setup\Nokia_Connectivity_Cable_Driver.msi (2) Packages\PCCS\Setup\PCCS.msi (3) Packages  VC80_x86  Setup  VC80_x86_v2.msi or Packages  VC80_x64  Setup  VC80_x64_v2.msi (4) Packages\Nokia_Suite\Setup\Nokia_Suite.msi

9. Design

 ○ AutoCAD 2004/AuctoCAD 2007 Find the AutoCAD  ACAD.msi file with the parameter Msiexec.exe/i acad.msi ACADSERIALPREFIX=<Serial number prefix: 111>ACADSERIALNUMBER=<Serial number: 20111111> ACADFIRSTNAME=<registrant's last name>ACADLASTNAME=<registrant's first name>ACADORGANIZATION=<registration unit> ACADDEALER=<Dealer> ACADDEALERPHONE=& lt; Dealer telephone 12345>/quiet ○ Google SketchUp v8.0.11752 Chinese free version Decompress to get msi ○ CorelDraw older version: Setup32.exe/silent (silent installation of few interfaces); The new version is MSI

Original link: link

]]>
zero https://eblog.ink/archives/368/#comments https://eblog.ink/feed/archives/368/
[Windows] Windows11 Skip boot and log in to Microsoft account https://eblog.ink/archives/367/ https://eblog.ink/archives/367/ Mon, 16 Oct 2023 13:46:39 +0800 eric 1. Start up to enter the following interface

 Interface 1

2. In the current state, press the Shift+F10 or Fn+Shift+F10 shortcut key to call up the command prompt window

3. Enter: oobebypassnro in the command prompt window, and the computer will restart

 Interface 2

4. After entering the command, the computer will restart, and the option of skipping networking will be available in the second entry into the system

5. The interface is as follows

 Interface 3

]]>
zero https://eblog.ink/archives/367/#comments https://eblog.ink/feed/archives/367/