Cluster refers to the collection of cloud resource management, including resources such as virtual machines running applications.Clusters in TSF are divided into virtual machine clusters and container clusters.When using virtual machines or container computing resources, users need to import the virtual machine into the cluster in advance before deploying applications.
This article describes how to create a virtual machine cluster on the TSF console and manage the cluster.
twoClick in the left navigation barcolony, select a region and clickNew cluster。
threeSet the basic information of the cluster.
Cluster type: selectVirtual machine cluster。
Cluster Name: fill in the cluster name, which can be up to 60 characters long. It can only contain lowercase letters, numbers and the separator ("-"), and cannot start or end with the separator.
Zone: select the zone where the cluster is located
Cluster network: Select the same VPC network as the existing ECS to ensure that the ECS imported into the cluster later belongs to the same VPC.
Label: used to manage resources by category; optional.See for detailslabel。
Note: The description of the cluster shall not exceed 200 characters.
Dataset: add the new cluster to the existing dataset.Not a required field.For dataset usage, seeDataset Management。
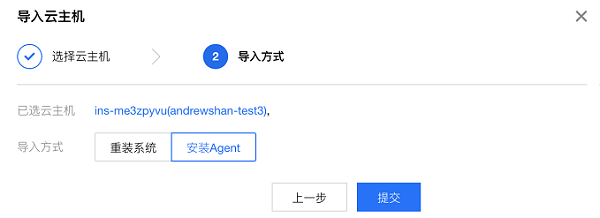
foursingle clickSubmit, select in the pop-up windowImport virtual machine, enter the import virtual machine page.If you selectcancelIn the cluster list, you can clickImport virtual machineRe import the virtual machine.
fiveFrom the virtual machine list of the VPC where the cluster is located, select the virtual machine to be added to the cluster.
sixsingle clicknext step, to configure the virtual machine.
Reinstall the system: This method will enable the root user to install the agent.After reinstallation, all data in the virtual machine system disk will be cleared and restored to the initial state. Please be careful!
Install Agent (only applicable to virtual machine clusters): This method supports the use of root and non root users to install agents.The machine will not be reinstalled when deploying using the installation agent.You can click the following tab to view the operation steps of the corresponding import method.
Reinstall the system
Installing the Agent
explain
CVM bidding instances do not support reinstalling the system.
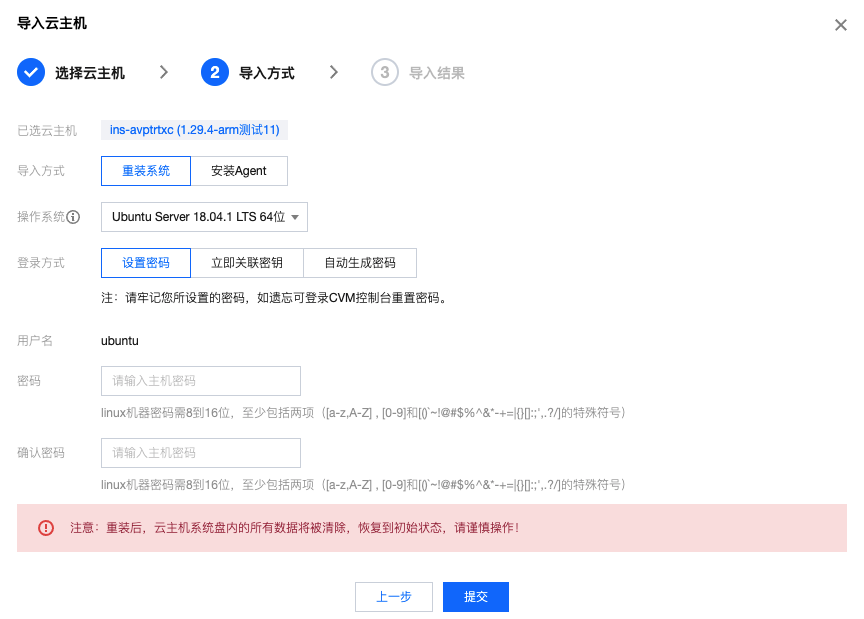
oneVM configuration
Import method: selectReinstall the system。
Operating system: supports two different operating system options: Ubuntu 18.04 and CentOS 7.5.
Login Method: three corresponding login methods are provided.
Set password: Please set the corresponding password according to the prompt.
Associate key immediately: key pair is a pair of parameters generated by an algorithm, which is a more secure way to log in to virtual machine than conventional password.See for detailsSSH Key。
Automatic password generation: The automatically generated password will be sent to you through the in station message, or you can log in to the CVM console to reset the password.
twosingle clickSubmit, the imported virtual machine will appear in the virtual machine name list.Wait a few minutes to refresh the list. Normally, the virtual machine status will change to running and the available status will change to "available".
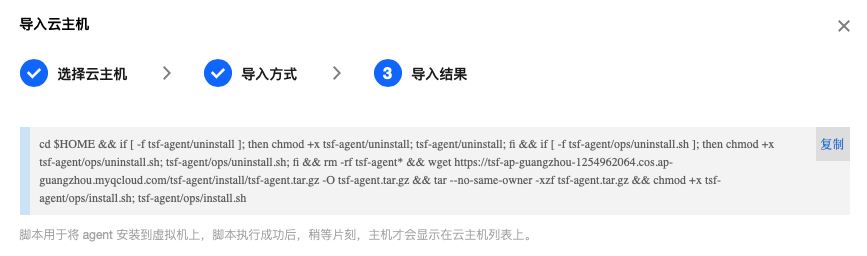
oneImport method selectionInstalling the Agent, clickSubmit, copy the agent installation script on the import result page.Later, you can also obtain the agent installation script by clicking * * Install Agent * * in the operation column of the virtual machine list.
twosingle clickclose, return to the virtual machine list, and the available status of the imported virtual machine displays "Unavailable". SelectSign inLog in to the virtual machine.
Root user installs agent: paste the script directly and execute it.
Non root user installs agent: it needs to be created by root user/data/tsf_apm/and/var/log/tsf/These two directories, and grant read-write permissions to the installation user of tsf agent.The installation user of the tsf agent is the startup user of the deployment application.Paste the script and execute it.
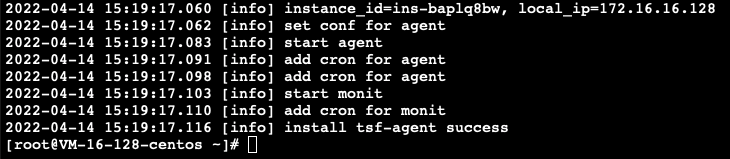
threeThe following figure shows the screenshots of the last few print logs of the terminal after the script is successfully executed.
fourAfter the script is successfully executed, return to the virtual machine list, wait a moment, and the virtual machine will become available.
After importing the virtual machine, you can create and deploy applications in the virtual machine cluster service. SeeCreate and deploy applications。
Only when no application is running on the node can the node be removed from the cluster.To stop the application, you need to go to the instance list page of the deployment group. Please refer toApplication management。
oneOn the cluster list page, click theID/cluster name, enter the virtual machine list page of the cluster.
twoOn the virtual machine node list page, select the virtual machine to be removed, and clickdelete。
threeIn the pop-up prompt box, clickdetermineMove the virtual machine out of the node.
Delete cluster
be careful
When there is a virtual machine in the cluster, the cluster cannot be deleted. You need to remove the virtual machine first.
The cluster cannot provide external services during deletion. Please prepare in advance to avoid impact.
oneOn the cluster list page, clickdelete。
twoIn the pop-up prompt box, clickdetermineDelete the cluster.