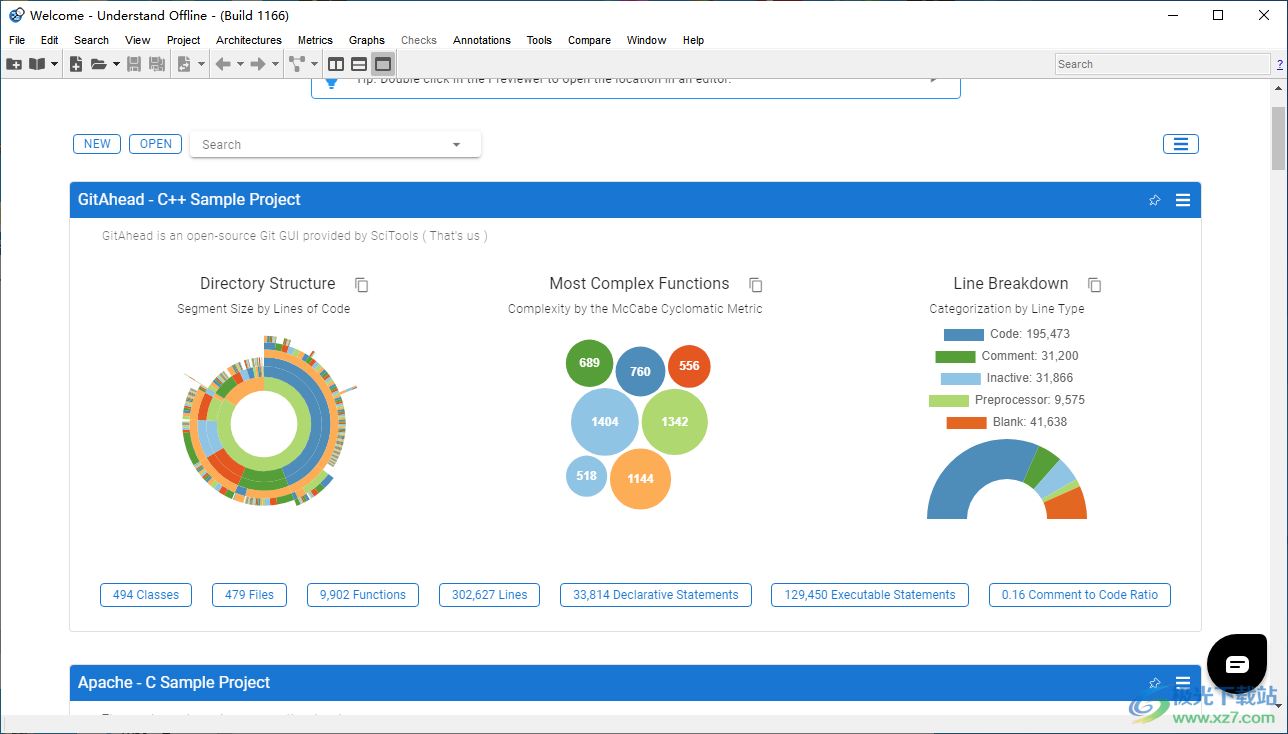
Understand provides the code analysis function. You can add one of your development projects to the software for analysis. You can directly import the directory where the source code is located into the software to start analysis. You can also perform analysis on remote Git library data to view the content of the source code on the software. You can also use the Code Editor To modify the code, you can also compare the source code in the software, and also support the construction of a new code base. There are many functions. Most programming languages can be compatible with this software to meet the needs of different developers to analyze the code and project. The software has provided a lot of case contents. You can view the GitAhead C++example project and the Linux kernel - C Download the sample project if necessary.
software function
1. Support multiple languages: Ada, C, C++, C #, Java, FORTRAN, delphi , Jovial, and PL/M , mixed language project Also supported
2. Multi platform: Windows/Linux/Solaris/HP-UX/IRIX/MAC OS X
3. Basic reading functions such as code syntax highlighting, code folding, cross jump, bookmarks, etc.
4. It can analyze the architecture and metrics of the whole project and output reports.
5. Multiple graphs can be generated for code (butterfly graph, call graph, called by graph, control flow Graph, UML class graph, etc.), click the node on the diagram to jump to the corresponding source code location.
6. Perl API is provided for easy extension. The drawing is all implemented with Perl plug-in, and the results are read and analyzed directly data base Drawing.
7. Built in directory and file comparator.
8. It supports project snapshots and can integrate with its own TrackBack to monitor project changes.
Software features
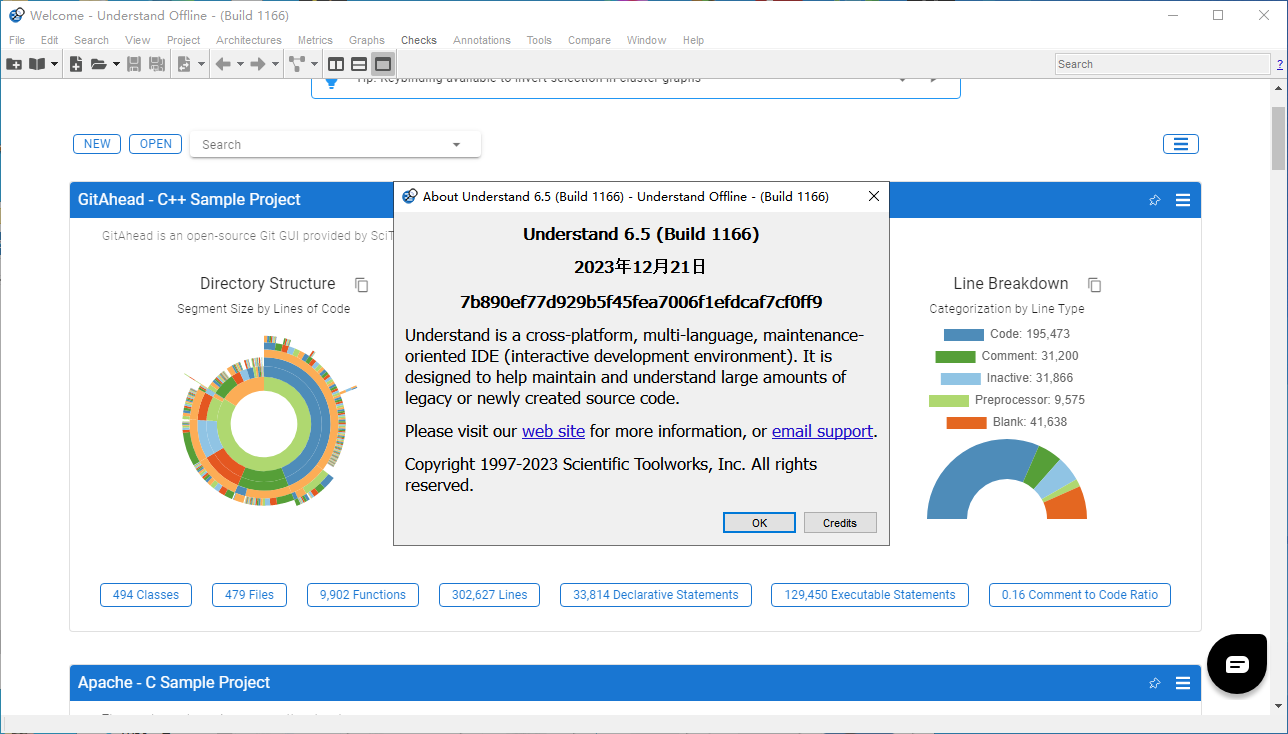
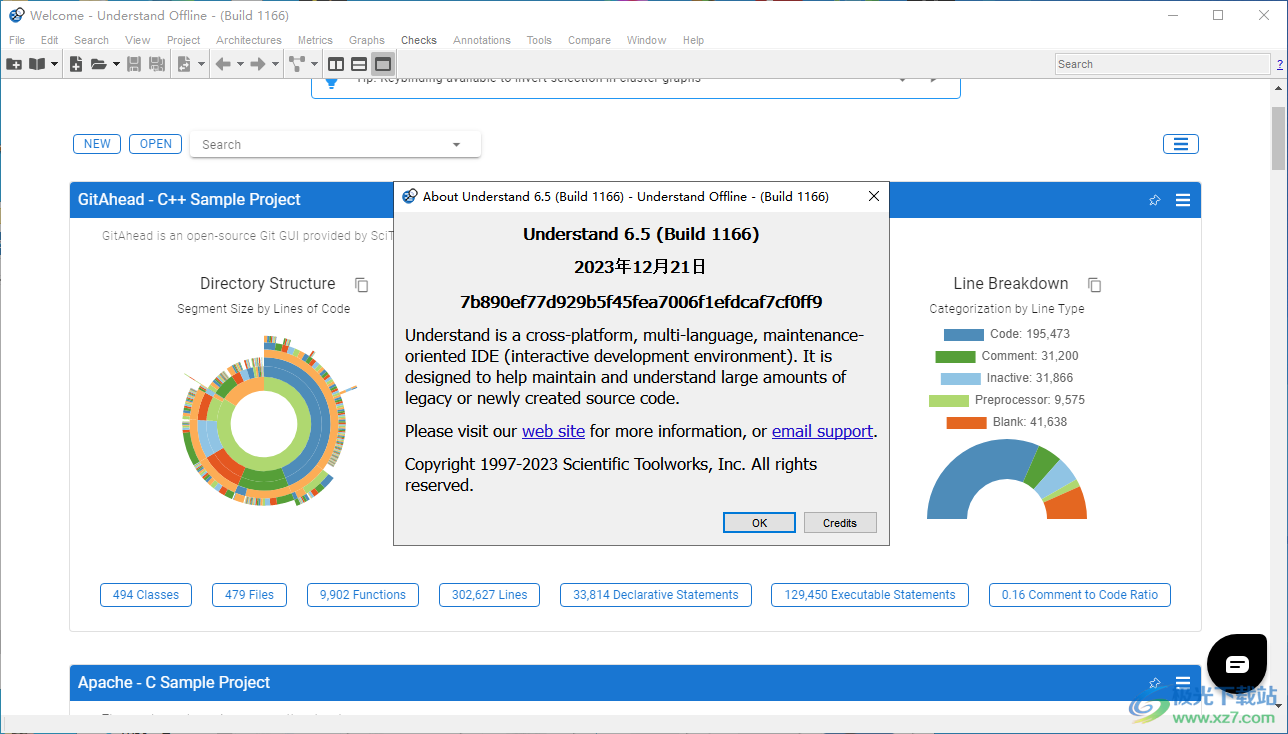
Understand is a static analysis tool, focusing on source code understanding, measurement and standard testing. It is designed to help maintain and understand a large amount of legacy or newly created source code. It provides a cross platform, multi language, maintenance oriented IDE (interactive development environment).
The analyzed source code may include C, C++, C #, Objective C/Objective C++, Ada, Assembly, Visual Basic、Fortran、Java、JOVIAL、Pascal/DDelphi、 python 、 VHDL and Web (PHP, HTML, CSS, JavaScript, Typescript, and XML).
It provides code navigation with a "smart" editor that uses detailed cross references, syntax coloring, and various graphic reverse engineering views.
Understand creates a repository of relationships and structures contained in software projects. Then use the repository to understand the source code.
Understand has an analysis function that can help you quickly answer the following questions:
*What is this entity?
*Where was it changed?
*Where is it quoted?
*Who depends on it?
*What does it depend on?
Understand has an architecture function that can help you create hierarchical aggregations of source code units. You can name these units and manipulate them in various ways to create interesting hierarchies for analysis.
usage method
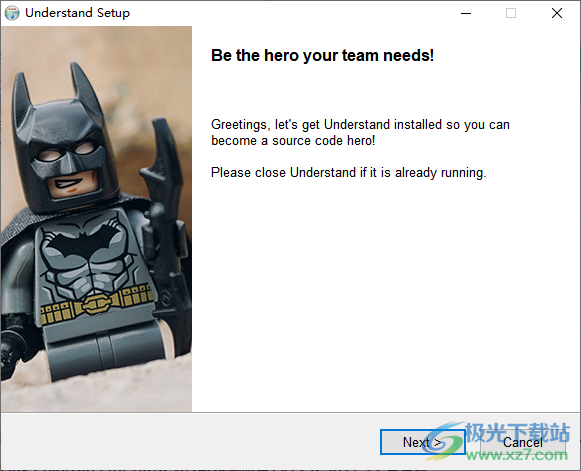
1. Install Understand to the computer and click Next
2. As shown in the figure, set the software installation address, and click install to start the installation

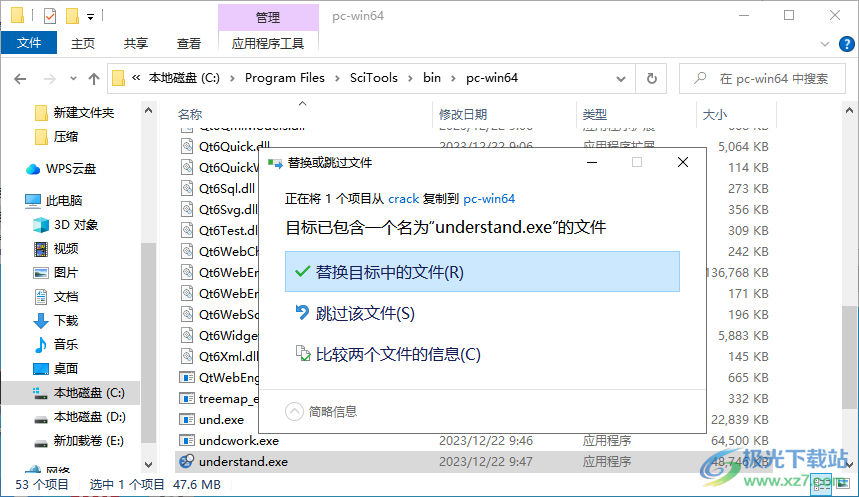
3. Copy the patch understand.exe to the installation address and replace the main program to complete activation
4. Open Understand to display the function interface and start creating a new code analysis project
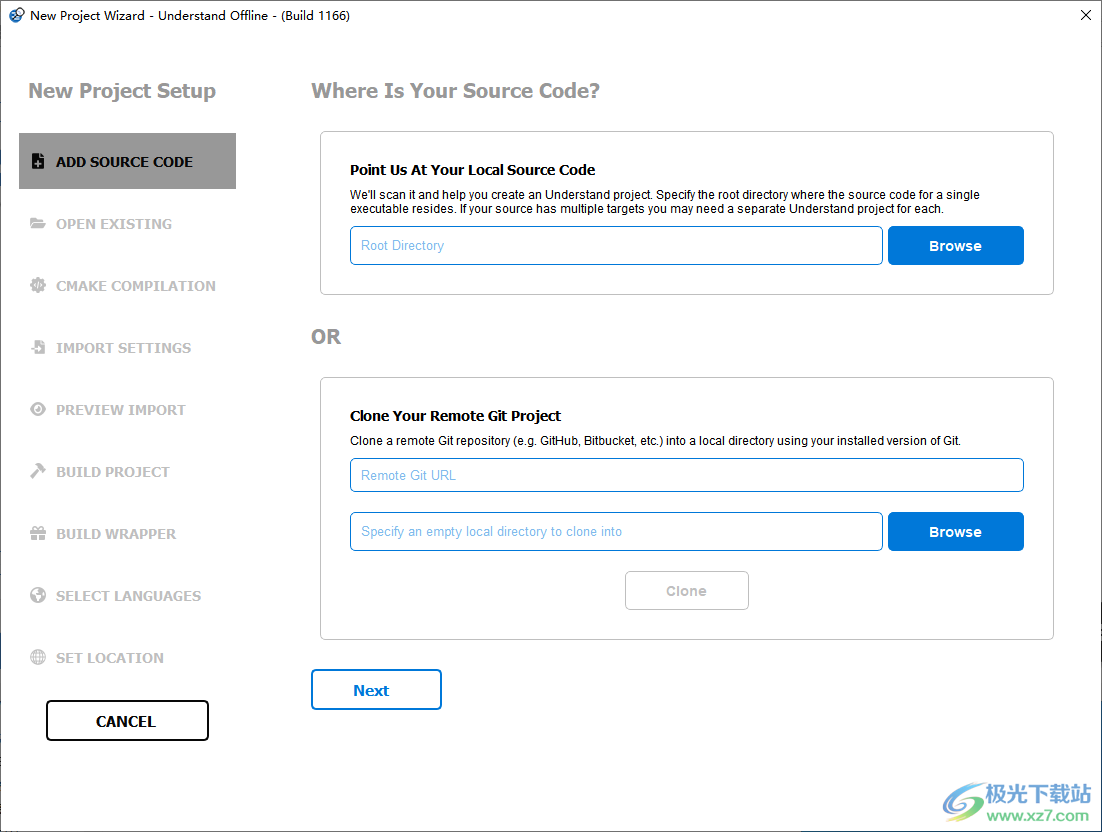
5. Point to us your local source code
We will scan it and help you create an Understand project. Specifies the root directory where the source code of a single executable is located. If your source has multiple goals, you may need to have a separate Understand project for each goal.
Clone your remote Git project
Use the Git version you installed to clone remote Git repositories (such as GitHub, Bitbucket, etc.) to the local directory.
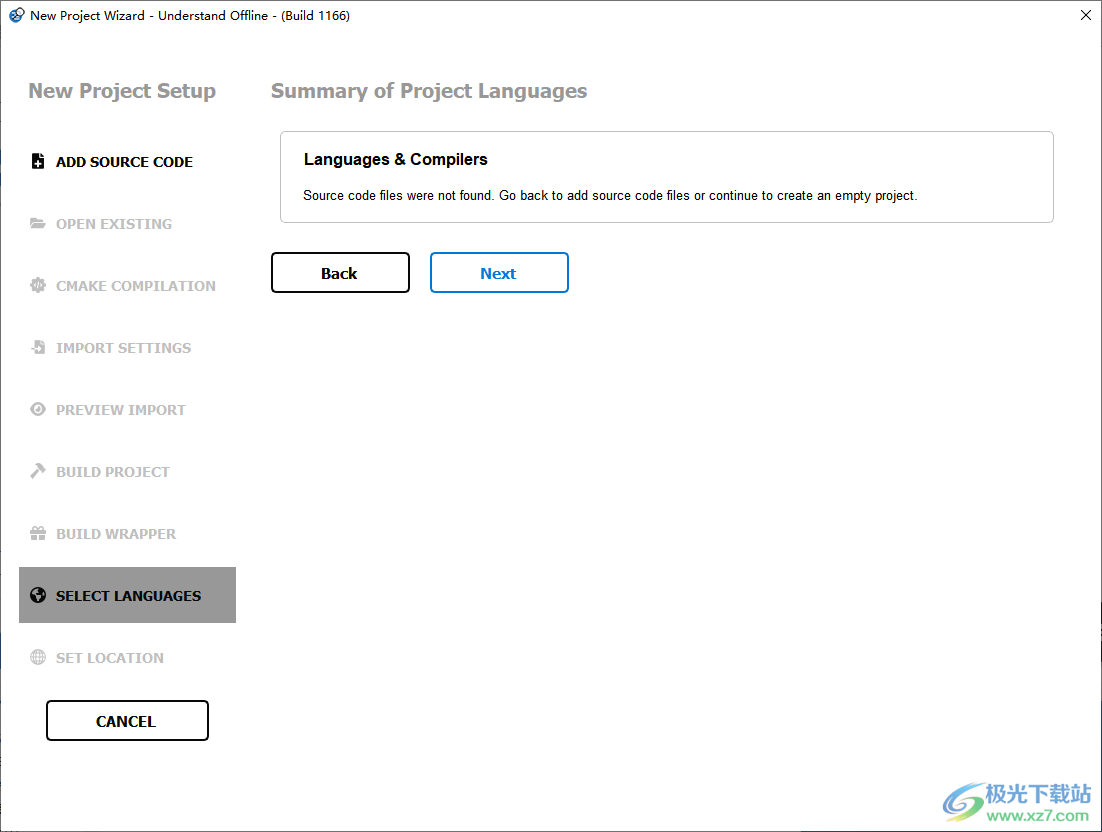
6. Language and compiler
Source code file not found. Return to add the source code file, or continue to create an empty project.
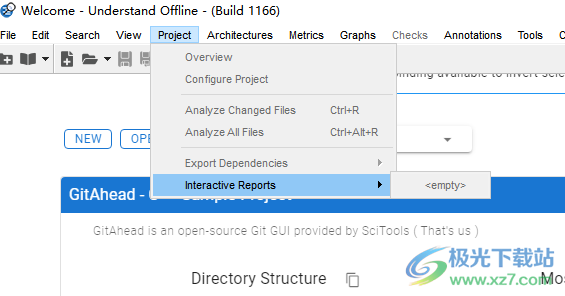
7. Overview, configuration items, analyzing changed files, analyzing all files, exporting dependencies, interactive reports
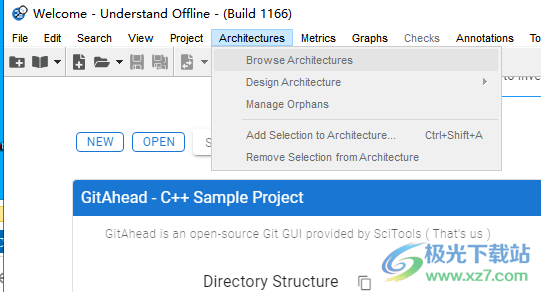
8. Browse architecture, design architecture Manage Orphans、 Add selection to architecture, remove selection from architecture
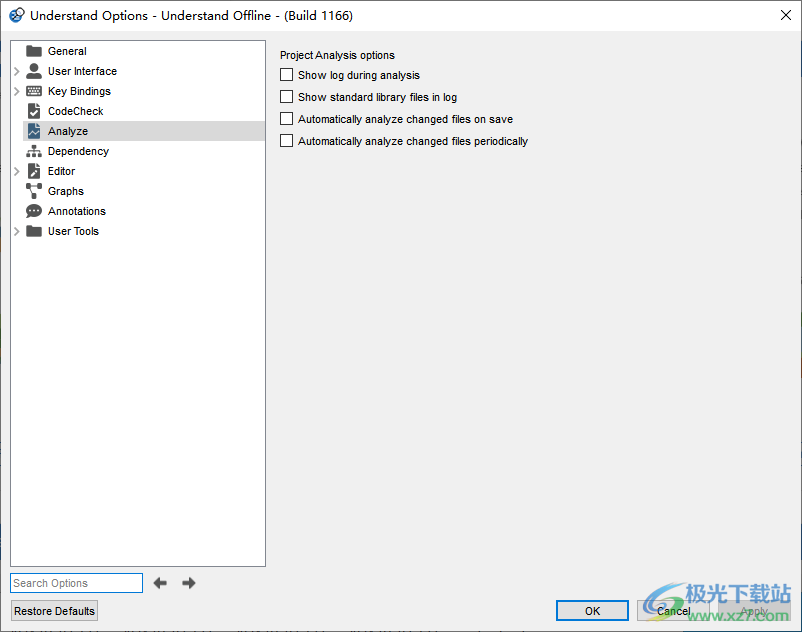
9. Project analysis options: Display logs during analysis, display standard library files in logs, automatically analyze changed files when saving, and automatically analyze changed files periodically
Official Tutorial
source editor
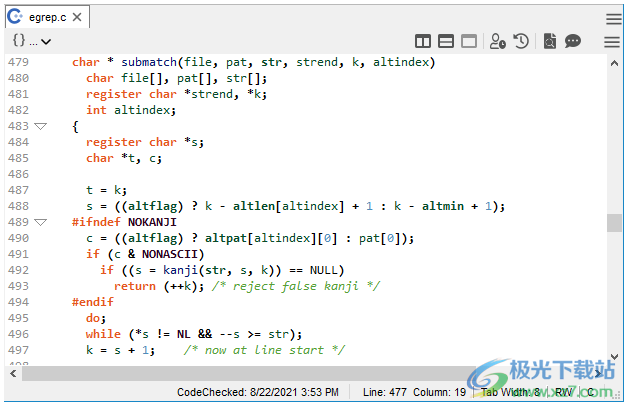
The source code editor provides a full-featured source code editor with the functions of syntax coloring and right clicking to access the information of most entities in the code.
Line numbers and Collapse markers used to expand/collapse code blocks can be turned on and off in the Editor category of the Learn Options dialog box, which you can use the Tools>Options command to open (see Editor categories). The display font and many other items can also be changed in the editor category. You can also enable bookmarks, indent guide markers, and right margin markers (page guides) in this category of the dialog box.
The Editor>Advanced category of the Learn Options dialog box (see Editor>Advanced category) is used to control the format when printing from the source editor, highlighting in the scroll bar (radar) when searching, copy and paste behavior, automatic completion, automatic indentation, and so on.
The Editor>Styles category of the Learn Options dialog box (see Editor>Style Categories) allows you to change the colors and styles used for different types of source code. The Key Binding category (see Key Binding Categories) displays a list of keystrokes that can be used in the editor (and allows you to modify the list).
Editor Category
The Editor category has general options and options in the following subcategories:
*Editor>Advanced Category
*Editor>Macro Category
*Editor>Style Category
*Editor>Navigation Category
*Editors>External Editor Categories
The following options control the general behavior of the Source Editor window. They can be set in the Editor category of the Tools>Options dialog box:

*Default style: Use the Font drop-down list to select a font for the Source Code Editor window. The displayed font is the fixed width font available in the system. Select Size for the Source Editor text. If the Anti aliasing box is checked, the font will be smooth. The fields in this area set the default size. You can change each file on a per file basis by selecting one of the View>Zoom menu options.
*File Mode: select the encoding type and line feed character to use when saving the source file. Multiple encoding formats are supported. The "System" encoding option is used for your operating system The same encoding format defined. These settings should only be changed if other applications have problems opening or displaying files created by Understand.
By default, these settings apply only to new files you create, including text and CSV files. The existing file will retain its previous format. However, if the Convert existing line ends box is checked, the saved file will be converted to the format selected here.
*The end of a window's line ends with a combination of carriage return (r) and line feed (n), also known as CR/LF. When the file is opened, the CR, CR, LF sequences are interpreted as the end of a single line.
*Unix ends a line with a newline character (n), also known as a newline character (LF).
*The classic Macintosh line ends with a carriage return (CR).
If the Convert Tab to Space box is checked, the tab will change to the number of spaces specified in the Width field when the file is saved. In addition, if the box "Add line breaks at the end of the file if it does not exist" is checked, line breaks will be added to files without line breaks when the file is saved (checked by default). If the Delete trailing blanks box is checked, any spaces or tabs at the end of the line will be automatically deleted when the file is saved.
*Page Guides: Check the Show Page Guides box to display lines similar to indent guides at the defined line weight (that is, the right edge of the code). Set Column to the width of the characters you want to display.
*Caret Line: If you want to highlight the entire line where the cursor is, check the Highlight Caret Line box.
*Indent: If you want to use dotted lines to display columns that should be indented, check the Show Indent Guide box.

By default, the Insert Space Instead of Tab box is enabled, and pressing Tab adds spaces to the source file.
For Indent Width, specify the number of columns in the indentation level. For Tab Stop Width, specify the number of columns per tab stop. For example, if you set Tab Width to 4, each<Tab>will move 4 columns to the right. If you set Indent Width to 6 and Tab Width to 4, each auto indent level consists of one Tab and two spaces. You can set tab widths for specific files to override project wide tab widths (see Indentation). Also, for advanced indentation options, see Editor>Advanced Categories.
*Blank: Select whether you want to view indicators about blank characters. Dots represent spaces, and arrows represent tabs. You can select Invisible (the default), Always Visible, or Visible after Indentation. Check the Show End of Line box to see which characters are forced to wrap.
*Margins: Show or hide the following left margin columns in the source code editor window:
*Line Number: (Enabled by default) Enables line numbers in source view.
*Criticism: (default is off) Git's criticism information is displayed. For more information, see Explore Git History.
*Collapse: (On by default) Turns on the ability to "collapse" source code solid blocks.
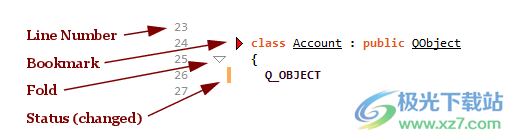
*Status: If the row has been modified but not saved, the change bar is displayed (enabled by default).
*Bookmark: (Enabled by default) Displays a bookmark (red arrow) next to the line number.
Editor>Advanced Category
The following options control more advanced behavior of the Source Editor window. They can be set in the Editor>Advanced category of the Tools>Options dialog box.
Print: The following options control how the source code looks when printed from the editor window:
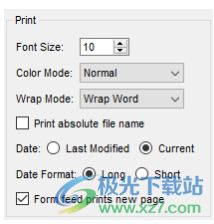
*Font Size: Select the size of the source code used for printing. To zoom in and out of a single source window, see Changing the Source Font Size.
*Color mode: select the color mode for printing. Select below. Please note that only when you use a color printer and Printer drive When the program is set to color printing, colors other than black and white will be printed.
*Normal matches the current display appearance.
*Reverse Light prints black as white and white as black. This is useful if you set the displayed background to a dark color and the text to a light color.
*"White on black" prints a black code on a white background, independent of the current display appearance.
*Color on White prints a color code on a white background, regardless of the current display appearance.
*Wrap Mode: Select the wrap mode you want to use for printing. By default, the word wraps to the next line, but you can choose to truncate the line or wrap at the character level, which will wrap the word. The line breaks displayed are for printing only; No actual line breaks were added to the source file. See Wrap to change the wrapping mode of the screen display.
*Print absolute file name: Check this box if you want to print the complete file path at the top of the print source file, not just the file name.
*Date: select whether to display the date when the file was last modified or the current date when printing. The default is the current date.
*Date Format: select whether to print the date in long format or short format. Use the system's preferred long date and short date formats.
*Form feed printing new page: if this box is checked, the form feed characters in the source code file will cause page interruption. If you uncheck this box, the form feed characters will be printed as "FF" and page breaks will not occur.
The Radar Scroll Bar area is used to show or hide markers indicating the location of various content in the scroll bar of the Source Editor window. You can change the color of these highlights using Editor>Style Categories. You can disable all radar highlighting by deselecting the radar scroll bar box.
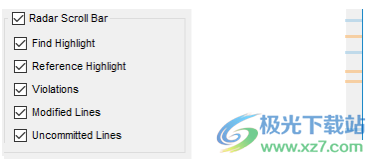
*The Find Highlight box controls the highlighting of strings found using Ctrl+F (blue by default). The scroll bar can highlight up to 1024 results in a file.
*The Reference Highlight box controls the highlighting of elements found by reference (for example, using the Information Browser (blue by default)).
*The Violation box controls the highlighting of code check violations. See Viewing Results in the Violations Browser.
*The Modified Lines box controls highlighting of modified but unsaved lines (orange by default).
*The uncommitted row control highlights rows that have been saved but not submitted in Git (see Exploring Git History for more information).
The Copy Paste area controls the format of the text when you copy and paste code into a word processor.
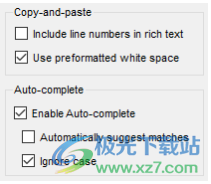
*Include line numbers in rich textPaste line numbers (bold). HTML is used to format pasted text. This option is off by default.
*Use pre formatted blank paste code to use HTML<pre>tags to keep blank. If this option is disabled, use; (uninterrupted space) and
Tag. If the application you are using does not respect the<pre>tag, disable this option to force format matching.
The AutoComplete option is used to automatically complete keywords and entities typed in the editor. As you type, the text appears below the text. You can select a suggestion by using the down arrow in the list and pressing Enter.

*Enable AutoComplete: This box is not selected by default. Check this box if you want to enable AutoComplete.
*Automatic suggestion matching: If this box is checked, suggestions will be automatically displayed below what you type. If you uncheck this box, you can still press Esc while typing to view and select from a list of auto complete options.
*Ignore case: If this box is checked, it is recommended to include the upper and lower case versions of the text you type.
The Auto Indent option allows you to control how tabs are automatically added to your code. If the Enable automatic indenting box is checked, it will automatically indent as you type in the source editor.

*Indent after line break: If this box is checked, an indent will be added when you start a new line, so that you can start typing directly below the first character of the previous line. If not selected, the cursor is always in the first column of the new row.
*Tab auto indent: If this field is set to "Never" (the default value), the tab or space character is always inserted into the<Tab>key. If set to Always, the key will always adjust the indent to the Correct level. If it is set as leading space, the<Tab>key will indent the leading space appropriately and insert tabs or spaces elsewhere.
*Trigger Character: If you type one of the specified characters, the indentation level of the current line will be modified to the correct level according to the code resolution. For example, "{" will increase the indentation level, and "}" will decrease the indentation level. You can press Ctrl+Z to undo the automatic indentation that just happened. The default trigger character is #: {}
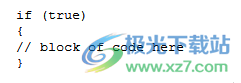
*Indent Brackets: If this box is selected, automatic indentation will use braces to format code, as shown in the following example:
The Vertical Insertion Policy field controls how the source editor scrolls up and down when moving the text cursor or the current position highlight. Use these fields to optimize the amount of context the Source Editor sees when it jumps to a new location. Most users do not need to modify these settings.
*Even number: check this box to make the source code scroll up and down the same content.
*Jump: Selecting this box will cause the code to scroll multiple lines as needed to display some contexts of the current code line.
*Strict: Check this box to specify that you do not want the text cursor to enter the area defined by Slope Value. If Slope is not selected, the code scrolls to keep the current line in the middle of the window.
*Slope: Select this box to define the number of lines at the top and bottom of the source editor that you do not want the text cursor to enter.
*Slope value: This field allows you to set the number of lines the text cursor should avoid at the top and bottom of the source editor.
The Unused Entities field allows you to highlight unused entities with a colored background. This feature is disabled by default. If this feature is enabled, the default background for codes that define unused entities is gray. For example, if a function has never been called, all code in that function will display a gray background if this feature is enabled.
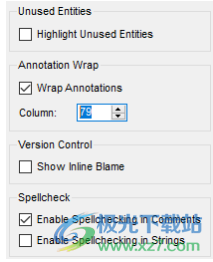
Use the Annotation Wrap field to wrap annotation text to a specified column. This feature is disabled by default.
The "Display inline accusations" field in the "Version control" area displays the accusations information from each line of Git.
By default, comments and text strings in the code are checked for spelling errors. To disable spell checking for notes or text strings, uncheck the Enable spell checking in notes and/or Enable spell checking in strings boxes.
Editor>Style Category
You can customize the colors used in the Source Editor in the Options dialog box. To open this dialog box, select Tools>Options. Expand the Editor category, and select the Styles category.
Also learn to switch between dark and light modes depending on your system settings. These color themes vary depending on your mode.
To select a color scheme with a set of defined colors, select a scheme from the Predefined list. The default scheme is Understanding.
To change the color, click the color box next to an item in the list. Use the Select Color dialog box to select a new color for the item.
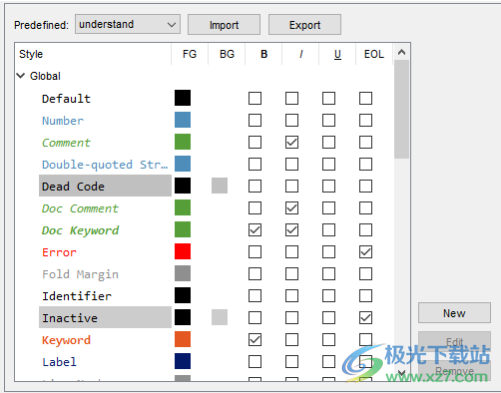
You can change the text foreground (FG) and background (BG) colors of any item. You can also set the text of any item to bold (B), italic (I), or underline (U). To highlight the entire line of an item, check the EOL box.
You can use the Import and Export buttons to save editor style settings to the Understanding Themes (*. lua) file. This allows you to share styles between computers.
By default, the source code uses the following color codes:
*Dark orange text: for language and preprocessor keywords
*Blue text: for characters and strings
*Slanted green text: for notes
*Black text: for all other source text
*White background: for most source text
*Gray background: for inactive lines of code
*Blue background: used to highlight the text in the search
Depending on your source code language, you can also customize other projects. For example, with C++, you can customize the names of classes, enumerators, namespaces, and many other categories. With Pascal, you can customize the color of module, routine, and type names. With Fortran, you can customize the color of block, module, subroutine, and type names. With Ada, you can customize the colors of global, local, package, subprogram, and type names.
To create another category, click New. In the User Styles dialog box, type the name of the style, select the language in which the style is applied, and then type the keywords you want to highlight in this style. Separate keywords with spaces, newlines, or tabs. Then click Save. You can then format the new style.