Cloud Knight Installation Master Official Edition
-
Software size: 24.00 MB -
Software language: Simplified Chinese -
Updated: 2021-06-04 -
Software type: Domestic software/operating system -
Operating environment: WinAll, WinXP, Win7, Win10 -
Software license: freeware -
Official homepage: https://www.yunqishi.net -
Software level:

Armourycrate computer version v3.0.11.0 official version 
The latest version of maxdos toolkit v9.3 
Ubuntu version 12.10 v12.10 official version 
Vista One Button Restore (Vista Ghost) v1.3.6 Simplified Chinese Version 
Cabbage PE installation tool win10 v6.0 green version 
Windows 8.1 professional version image file 32&64 bit official version
-
Introduction -
Download address -
Boutique recommendation -
Related software -
Netizen comments
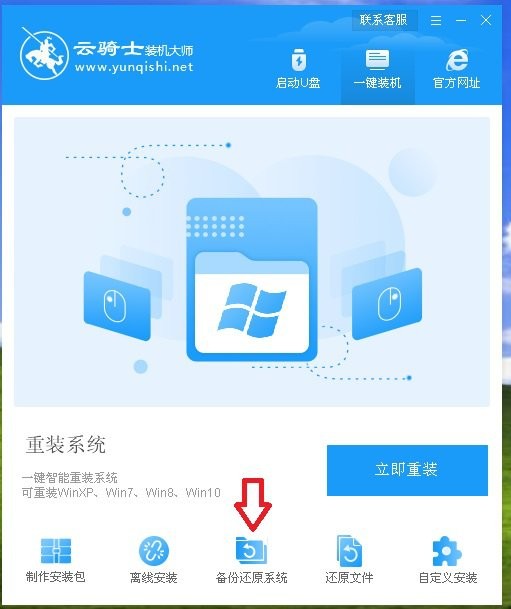
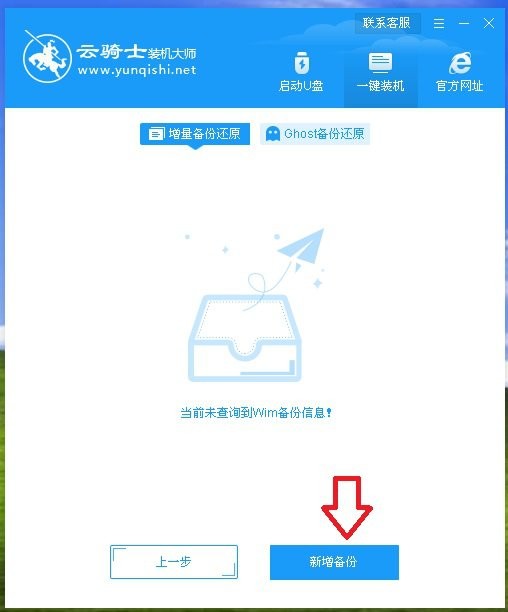
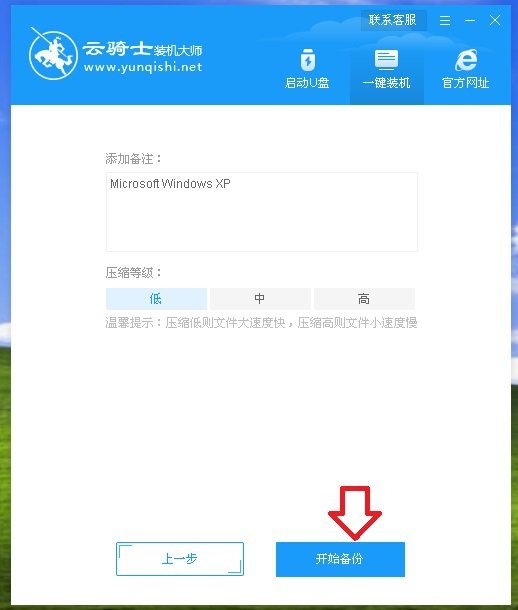
Official introduction of Cloud Knight installation master:

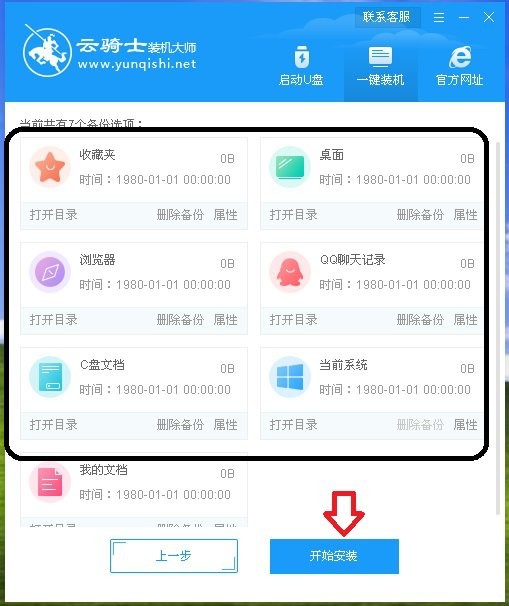
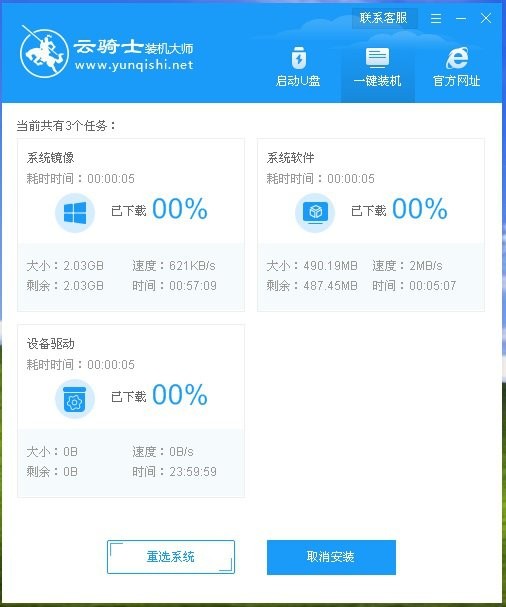
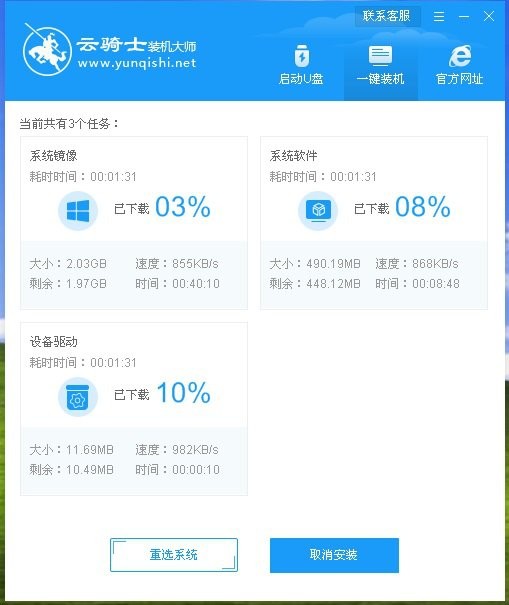
How does Cloud Knight install the system?


How to restore the lost local connection?
What if there is no sound from the win7 microphone?

Download address
-
Pc version
Cloud Knight Installation Master Official Version v12.7.48.1870 Latest Version
Boutique recommendation
-
Reinstall system software -
Installation software

Reinstall system software More+

The latest version of Black Cloud one button installation system v5.1.0.0 30.70 MB / Simplified Chinese V5.1.0.0 Latest download 
Jinshan Reinstall Expert Win7 System v3.1.2.901 Official Version 11.21 MB / Simplified Chinese V3.1.2.901 Official Version download 
Onekey ghost One click restore v18.0.18 latest version 11.19 MB / Simplified Chinese V18.0.18 Latest download 
Xiaohu USB flash disk creation tool v1.0.0 latest version 329.00 MB / Simplified Chinese V1.0.0 latest version download 
UMaster uDisk Startup Disk Making Tool v4.7.47.83 Computer Version 429.77 MB / Simplified Chinese V4.7.47.83 Computer Edition download 
Xiaobai one button reinstallation system official original v12.6.49.2290 green installation free version 36.51 MB / Simplified Chinese V12.6.49.2290 green installation free version download 
360 system reinstallation master u disk version v6.0.0.1160 official version 22.49 MB / Simplified Chinese V6.0.0.1160 Official Edition download 
Official version of u disk installation assistant v3.6.6.5 latest version 231.36 MB / Simplified Chinese V3.6.6.5 Latest version download

Installation software More+
Vista One Button Restore (Vista Ghost) v1.3.6 Simplified Chinese Version 4.71 MB / Simplified Chinese V1.3.6 Simplified Chinese download Cabbage PE installation tool win10 v6.0 green version 3.29 MB / Simplified Chinese V6.0 green version download Cabbage PE installation tool win10 v6.0 green version 3.29 MB / Simplified Chinese V6.0 green version download 
Professional toolbox for installers Computer version v3.0 latest version 26.16 MB / Simplified Chinese V3.0 latest version download UMaster uDisk Startup Disk Making Tool v4.7.47.83 Computer Version 429.77 MB / Simplified Chinese V4.7.47.83 Computer Edition download 
Computer store U disk startup disk production software v7.5 Tianpeng Marshal version 3.20 MB / Simplified Chinese V7.5 Tianpeng Marshal Version download Cloud Knight Installation Master Official Version v12.7.48.1870 Latest Version 24.00 MB / Simplified Chinese V12.7.48.1870 latest version download 
Dr. Han's installation master software v12.8.49.2320 official version 25.90 MB / Simplified Chinese V12.8.49.2320 Official download
Related software
Netizen comments
Ranking in this category
-
one Windows 3.1 Chinese system image -
two Official original version of win2000 ghost image -
three Vmware vsphere client v6.0 official version -
four Windows 2000 server (server version) -
five Windows Vista sp2 latest Chinese version 32&64 bit official image -
six Windows nt4.0 operating system official version -
seven Windows me chinese iso image -
eight The latest version of win10 mobile version Official version -
nine Super Terminal Win10 Special Edition -
ten Iso image file of windows xp 32-bit operating system
This category of recommendation
-
one Micro pe toolbox v2.3 computer version -
two Phoenix System x64 latest version (phoenix os) v3.6.1 official version -
three Veket operating system v20 latest version -
four Vmware student version v15.5.6 official latest version -
five ASUS Windows 7 Ultimate Computer Edition -
six Vmware workstation 15.0.2 official version of virtual machine -
seven Vmware workstation 15.1.0 pro for windows official edition -
eight Magic pig system reinstallation master v12.6.48.1830 latest version -
nine Win8 Chinese customer preview green version -
ten Vmware workstation v16.0.0 official version
Necessary for installation

Tencent computer butler win10 special edition v13.5.20525.234 official latest edition 
WinRAR official 64 bit v5.80 official version 
ITunes 32-bit for Windows 12.10.8.5 Multilingual Official Edition 
Google Chrome 100.0.4896.75 64 bit official latest version 
360 Security Guard computer version v13.0.0.2005m official version 
Baidu Online Disk PC Version v7.30.5.2 Official Latest Version 
Tencent app pc v5.8.2 latest version 
Sogou Pinyin Input Method Computer Version v13.6.0.7891 Official Version 
Kugou music player computer version v10.1.93 official latest version 
IQIYI pps AV client v10.6.0.7043 official latest version 
WeChat 2024 latest computer version v3.9.11.0 
Wps office 2016 professional version V11.1.0.7875 pro version _ attached serial number


-
chat -
WeChat computer version -
Yy voice -
skype -
Qq computer version -
video -
Youku Video -
Tencent Video -
Mango tv -
IQIYI -
clip -
Ulead VideoStudio -
adobe premiere -
Love editing -
Cut and reflect -
music -
Kuwo Music -
Cool dog music -
NetEase cloud music -
Qq music -
browser -
360 Browser -
Ie browser -
Firefox -
Google Browser -
to work in an office -
wps -
Enterprise WeChat -
Nail -
office -
typewriting -
Five stroke input method -
Sogou input method -
Qq input method -
iFlytek Input -
compress -
winzip -
7z decompression software -
winrar -
360 Compression -
translate -
Google Translate -
Jinshan Translation -
English to Chinese software -
Baidu Translate -
Anti-Virus -
360 Antivirus -
360 Security Guard -
Tinder software -
Tencent Computer Housekeeper -
P diagram -
Beautiful pictures -
photoshop -
nEO iMAGING -
lightroom -
programming -
vc6.0 -
Java development tools -
python -
C language software -
Online disk -
115 network disk -
Celestial wing cloud disk -
Baidu online disk -
AliCloud disk -
download -
Thunder -
utorrent -
Emule -
Qq cyclone -
negotiable securities -
Huatai Securities -
Founder Securities -
gf securities -
Southwest Securities -
mailbox -
Alibaba Email -
Qq mailbox -
outlook -
icloud -
drive -
Drive sprite -
Printer drive -
Drive life -
Network card driver