

-
Production is down. -
We need a test site. -
Why is this costing so much? -
Are my environments safe? -
Is my website backed up? -
How quickly can I recover my website after a disaster? -
Can I easily scale my website for more traffic? -
What is my uptime?
-
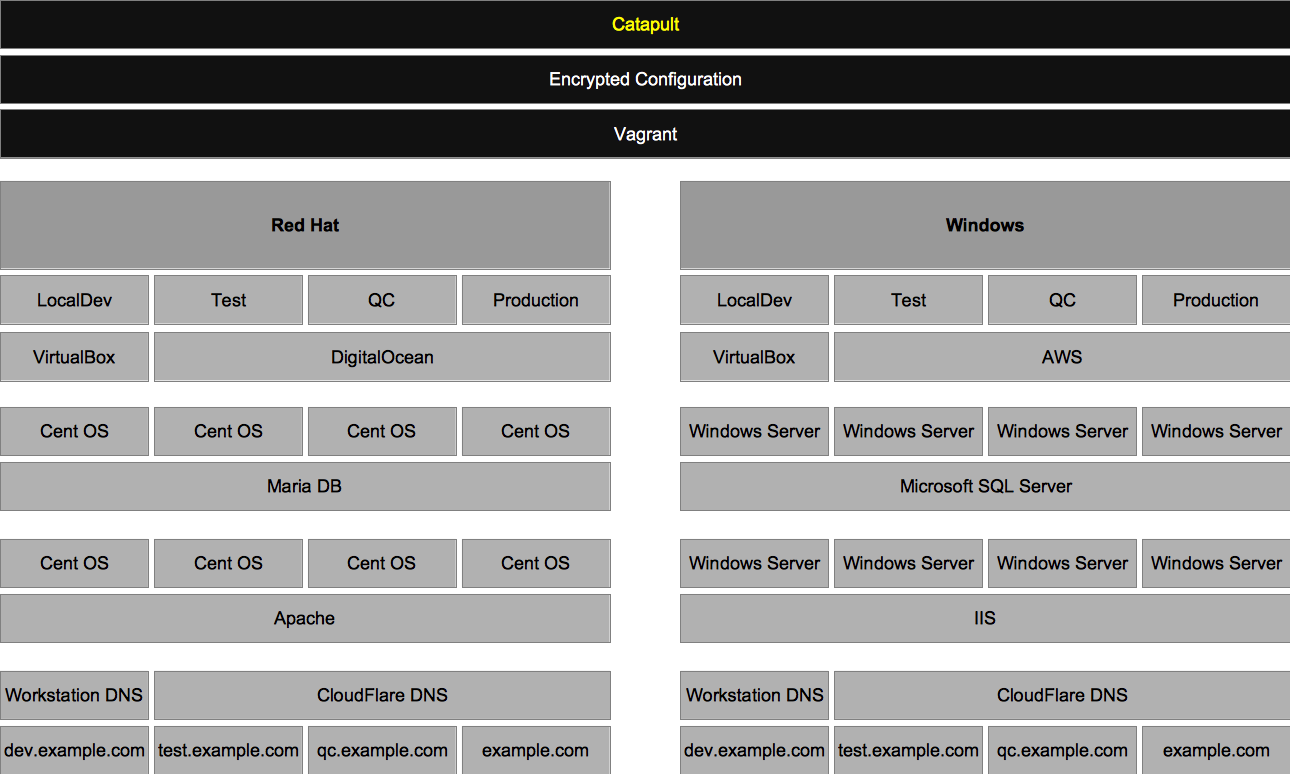
Catapult is an open-source, complete, and distributed architecture -
Catapult only orchestrates - it is not required to run your infrastructure -
Catapult uses platform native shell scripting rather than configuration management tools such as Chef, Puppet, or Salt -
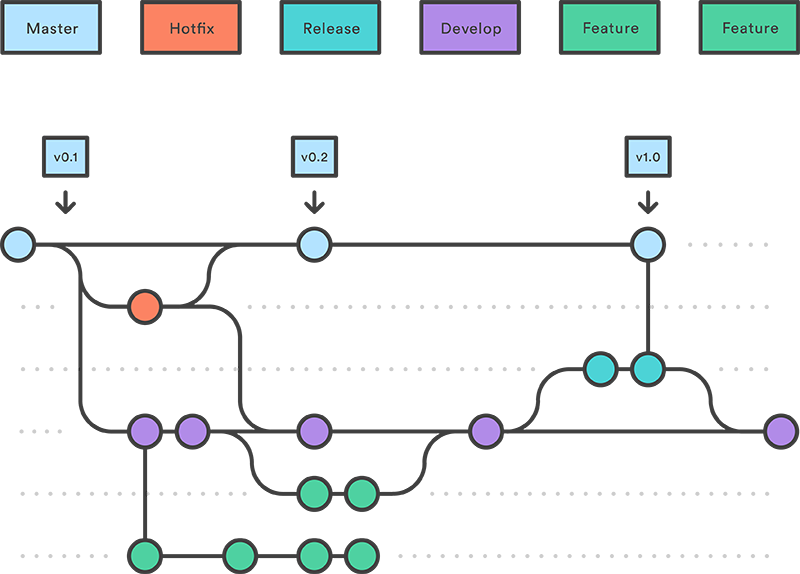
Catapult features Gitflow workflow while enforcing exactly matching, branch-driven environments -
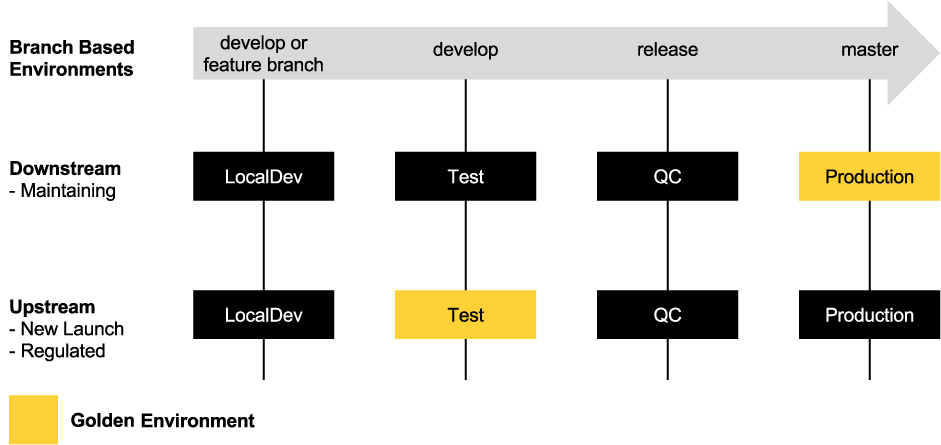
Catapult features a unique software workflow model - upstream or downstream -
Catapult overlays seamlessly with Scrum methodology -
Catapult is very cost-effective
-
Security Management -
Configuration Secrets - GnuPG Encryption
-
-
Source Code Management -
Catapult - Git (via GitHub) -
Websites - Git (via GitHub or Bitbucket)
-
-
Environment Management -
Vagrant
-
-
Environment Virtualization -
Local -
VirtualBox and VMware Fusion - Red Hat and Windows
-
-
Cloud -
DigitalOcean - Red Hat -
Amazon Web Services (AWS) - Windows
-
-
-
DNS Management -
Local -
vagrant-hostmanager
-
-
Cloud -
CloudFlare
-
-
-
Release Management -
Automated Deployments - Atlassian Bamboo Server -
Continuous Integration - Branch-based environments with Git triggers
-
-
Monitoring and Performance -
Server Resources - New Relic Servers -
Application Performance - New Relic APM -
Browser Performance - New Relic Browsers -
Website Availability - New Relic Synthetics
-
-
Catapult -
Setup Catapult -
Setup Environments -
Release Management -
Security -
Compliance -
Performance -
Capacity -
Performance and Capacity Testing -
How-to -
Troubleshooting -
Contributing -
Community
| |
|
|
|
|
|
|---|---|---|---|---|---|
| |
|
|
|
|
|
| |
|
|
|
|
|
| |
|
|
|
|
|
| |
|
|
|
|
|
| |
|
|
|
|
|
| |
|
|
|
|
|
| |
|
|
|
|
|
| |
|
|
|
|
|
| |
|
|
|
|
|
| |
|
|
|
|
|
| |
|
|
|
|
|
| |
|
|
|
|
|
| |
|
|
|
|
|
| |
|
|
|
|
|
| |
|
|
|
|
|
| |
|
|
|
|
|
| |
|
|
|
|
|
| |
|
|
|
|
|
| |
|
|
|
|
|
| |
|
|
|
|
|
| |
|
|
|
|
-
When an above software type is not defined, the default PHP version that is used is PHP 5.4. This is not configurable. -
PHP-less static site generators, such as, Jekyll , are supported.
| |
|
|
|
|---|---|---|---|
| |
|
|
|
| |
|
|
|
| |
|
|
|
| |
|
|
|
| |
|
|
|
|---|---|---|---|
| |
|
|
|
| |
|
|
|
| |
|
|
|
| |
|
|
|
| |
|
|
|
| |
|
|
|
| |
|
|
|
| |
|
|
|
| |
|
|
|
| |
|
|
|
| |
|
|
|
| |
|
|
|
| |
|
|
|
| |
|
|
|
| |
|
|
|
| |
|
|
|
| |
|
|
|
| |
|
|
|
| |
|
|
|
| |
|
|
|
| |
|
|
|
| |
|
|
|
| |
|
|
|
| |
|
|
|
| |
|
|
|
| |
|
|
|
| |
|
|
|
| |
|
|
|
| |
|
|
|
| |
|
|
|
-
Catapult Users are developers who use Catapult for developing within the websites that the Catapult Admin has added and configured -
Catapult Admins are administrators who setup their organization's Catapult instance and required services
-
It is advised to turn off any antivirus software that you may have installed during setup and usage of Catapult - tasks such as forwarding ports and writing hosts files may be blocked. -
Virtualizaion must be enabled in the BIOS of the developer's workstation - follow this how-to to get started. -
It is recommended to disable Internet Service Provider (ISP) Domain Name System (DNS) helpers, such as opting out of the Verizon DNS Assitance . -
Using a VPN client during usage of LocalDev may result in lost communication between your workstation and the guests, requiring a vagrant reload to regain communication.
-
macOS workstations: Compatible and supported -
Linux workstations: Compatible and supported -
Windows workstations: Limited testing and support
-
Terminal -
Using macOS? -
The terminal in the base distributions are 100% compatible.
-
-
Using Windows? -
Run all Vagrant commands from Command Prompt as Administrator by right-clicking and selecting "Open as Administrator"
-
-
Using Linux? -
The terminal in the base distributions are 100% compatible.
-
-
-
GPG2 -
Using macOS? -
Download and install GPG Suite from https://gpgtools.org
-
-
Using Windows? -
Download and install Gpg4win from http://gpg4win.org/download.html
-
-
Using Linux? -
GPG is included in the base distribution in most cases. -
If being prompted by the Passphrase GUI Agent, comment out 'use-agent' in ~/.gnupg/gpg.conf
-
-
-
Git -
Using macOS? -
Git command line is included in the base distribution in most cases. -
For a streamlined Git GUI, download and install SourceTree from https://www.sourcetreeapp.com/
-
-
Using Windows? -
Download and install Git from https://git-scm.com/download/win -
Download and install SourceTree from https://www.sourcetreeapp.com/
-
-
Using Linux? -
Git command line is included in the base distribution in most cases. -
For a streamlined Git GUI, download and install SmartGit from http://www.syntevo.com/smartgit/
-
-
-
Hypervisor -
Using macOS with Apple silicon ? -
Download and install the latest version of VMware Fusion Player from https://customerconnect.vmware.com/en/evalcenter?p=fusion -player-personal-13
-
-
Using macOS? -
Download and install the latest version of VirtualBox from https://www.virtualbox.org/wiki/Downloads
-
-
Using Windows? -
Download and install the latest version of VirtualBox from https://www.virtualbox.org/wiki/Downloads
-
-
Using Linux (Debian, Ubuntu)? -
Download and install the latest version of VirtualBox using Advanced Packaging Tool (APT) sudo apt-get install virtualbox
-
-
Using Linux (Fedora, Red Hat, Suse)? -
Download and install the latest version of VirtualBox using Yellowdog Updater, Modified (yum) sudo yum install virtualbox
-
-
-
Vagrant -
Using macOS? -
Ensure Xcode Command Line Tools are installed by running xcode-select --install from the Terminal -
Download and install the latest version of Vagrant v2.x from https://releases.hashicorp.com/vagrant/
-
-
Using macOS with Apple silicon ? -
Download and install the latest version of Vagrant VMware Utility from https://developer.hashicorp.com/vagrant/downloads/vmware
-
-
Using Windows? -
Download and install the latest version of Vagrant v2.x from https://releases.hashicorp.com/vagrant/
-
-
Using Linux (Debian, Ubuntu)? -
Download the latest version of Vagrant v2.x respective to your architecture from https://releases.hashicorp.com/vagrant/ by running e.g. wget https://releases.hashicorp.com/vagrant/2.2.9/vagrant_2.2.9_x86_64.deb -
Install Vagrant using dpkg e.g. sudo dpkg --install vagrant_2.2.9_x86_64.deb -
Install Network File System (NFS) sudo apt-get install nfs-kernel-server
-
-
Using Linux (Fedora, Red Hat, Suse)? -
Download the latest version of Vagrant v2.x respective to your architecture from https://releases.hashicorp.com/vagrant/ by running e.g. wget https://releases.hashicorp.com/vagrant/2.2.9/vagrant_2.2.9_x86_64.rpm -
Install Vagrant using yum e.g. sudo yum install vagrant_2.2.9_x86_64.rpm
-
-
-
Java SE Development Kit -
Download the respective Java SE Development Kit for your system http://www.oracle.com/technetwork/java/javase/downloads/jdk8-downloads-2133151.html
-
-
Instance Configuration -
If you are a Catapult admin : -
If you are setting up a new Catapult instance, continue on to the Instance Setup step. If you are configuring a new workstation with an existing Catapult instance, ensure the following is completed: -
Run vagrant status to verify the correct workstation software is installed and to generate your Catapult user files -
Set ~/secrets/configuration-user.yml["settings"]["admin"] to true -
Enable Git credential caching by following the instructions outlined for your system to store your Git credentials . This will allow you to push changes to your Catapult instance without a prompt for credentials.
-
-
-
If you are a Catapult user : -
Using Git, clone your team's Catapult instance repository -
Once cloned, from your workstation's terminal, change the directory into the root of the newly cloned Catapult repository -
Run vagrant status to verify the correct workstation software is installed and to generate your Catapult user files -
Contact your Catapult admin for your Catapult instance's GPG passphrase and place at ~/secrets/configuration-user.yml["settings"]["gpg_key"] -
You may stop at this point and contact your Catapult admin for the next steps. The following Instance Setup and Services Setup will be or have been, completed by your Catapult admin
-
-
Any role: personal accounts : -
Users can choose to specify a personal Bamboo user (rather than the company user) for certain Bamboo calls that originate locally -
Set ~/secrets/configuration-user.yml["settings"]["bamboo_username"] to the username for this Bamboo user -
Set ~/secrets/configuration-user.yml["settings"]["bamboo_password"] to the password for this Bamboo user
-
-
-
-
If you are a Catapult User, contact your Catapult Admin for next steps. If you are a Catapult Admin, continue to the Instance Setup and Services Setup .
-
Fork Catapult -
GitHub (public) -
Fork https://github.com/devopsgroup-io/catapult and clone via SourceTree or the Git utility of your choice.
-
-
BitBucket (private) -
From BitBucket, create a new repository and import https://github.com/devopsgroup-io/catapult . Then clone via SourceTree or the Git utility of your choice.
-
-
-
Admin Mode -
Once cloned, from your workstation's terminal, change the directory into the root of the newly cloned Catapult repository -
Run vagrant status to verify the correct workstation software is installed and to generate your Catapult user files -
Set ~/secrets/configuration-user.yml["settings"]["admin"] to true -
Enable Git credential caching by following the instructions outlined for your system to store your Git credentials
-
-
GPG Edit Mode -
GPG Edit Mode is set at ~/secrets/configuration-user.yml["settings"]["gpg_edit"] ( false by default) and is used to encrypt your Catapult configuration secrets using your GPG Passphrase : ~/secrets/id_rsa as ~/secrets/id_rsa.gpg ~/secrets/id_rsa.pub as ~/secrets/id_rsa.pub.gpg ~/secrets/configuration.yml as ~/secrets/configuration.yml.gpg
-
GPG Edit Mode requires that you are on your Catapult fork's develop branch. -
Running any Vagrant command (e.g. vagrant status ) will encrypt your configuration, of which, will allow you to commit and push safely to your public Catapult fork.
-
-
SSH Key Pair -
Create a passwordless SSH key pair - this will drive authentication for Catapult. -
For instructions please see https://help.github.com/articles/generating-a-new-ssh-key-and-adding-it-to-the-ssh-agent/ -
Place the newly created passwordless SSH key pair id_rsa and id_rsa.pub in the ~/secrets/ folder.
-
-
-
GPG Passphrase -
Generate a GPG passphrase -
This passphrase is used to encrypt and decrypt your Catapult instance's configuration file. -
NEVER SHARE THE PASSPHRASE WITH ANYONE OTHER THAN YOUR TEAM. -
Spaces are not permitted and must be at least 20 characters. -
To create a strong passphrase, please visit https://xkpasswd.net/ -
Place your newly generated passphrase at ~/secrets/configuration-user.yml["settings"]["gpg_key"] -
It is recommended to print a QR code of the passphrase to distribute to your team, please visit http://educastellano.github.io/qr-code/demo/ -
Remember! Effective security is equal parts process and technology.
-
-
| |
|
|
|
|---|---|---|---|
| |
|
|
|
| |
|
|
|
| |
|
|
|
| |
|
|
|
| |
|
|
|
| |
|
|
|
| |
|
|
|
| |
|
-
DigitalOcean sign-up and configuration -
Create an account at http://digitalocean.com -
[Free Stuff] Get a $10 credit and give us $25 once you spend $25 https://www.digitalocean.com/?refcode=6127912f3462
-
-
Go to your DigitalOcean Applications & API Dashboard https://cloud.digitalocean.com/settings/api -
Create a Personal Access Token named "Vagrant" and place the token value at ~/secrets/configuration.yml["company"]["digitalocean_personal_access_token"]
-
-
Go to your DigitalOcean Security Dashboard https://cloud.digitalocean.com/settings/security -
Add a new SSH Key named "Vagrant" with your newly created id_rsa.pub from ~/secrets/id_rsa.pub key
-
-
-
Amazon Web Services (AWS) sign-up and configuration -
Create an account https://portal.aws.amazon.com/gp/aws/developer/registration -
[Free Stuff] Receive Free Tier benefits for the first 12 months after signing up https://aws.amazon.com/ec2/pricing/
-
-
Sign in to your new AWS console https://console.aws.amazon.com -
Go to your AWS Identity and Access Management (IAM) Users Dashboard https://console.aws.amazon.com/iam/home#users -
Create a "Catapult" user. -
Place the Access Key ID at ~/secrets/configuration.yml["company"]["aws_access_key"] -
Place the Secret Access Key at ~/secrets/configuration.yml["company"]["aws_secret_key"]
-
-
Go to your AWS Identity and Access Management (IAM) Groups Dashboard https://console.aws.amazon.com/iam/home#groups -
Create a "Catapult" group. -
Attach the "AmazonEC2FullAccess" policy to the "Catapult" group.
-
-
Go back to your AWS Identity and Access Management (IAM) Groups Dashboard https://console.aws.amazon.com/iam/home#groups -
Select your newly created "Catapult" group. -
Select Add Users to Group and add your newly created "Catapult" user.
-
-
Go to your AWS EC2 Key Pairs Dashboard https://console.aws.amazon.com/ec2/home#KeyPairs -
Select "N. Virginia" from the top navigation -
Click Import Key Pair -
Add your newly created id_rsa.pub from ~/secrets/id_rsa.pub key -
Set the Key pair name to "Catapult"
-
-
Go to your AWS EC2 Security Groups Dashboard https://console.aws.amazon.com/ec2/home#SecurityGroups -
Select the "default" Group Name -
Select the Inbound tab and click Edit -
Change Source to "Anywhere" -
Click Save
-
-
-
Bitbucket sign-up and configuration -
Create an account at https://bitbucket.org -
Place the username (not the email address) that you used to sign up for Bitbucket at ~/secrets/configuration.yml["company"]["bitbucket_username"]
-
-
Create an App password at https://bitbucket.org/account/settings/app-passwords/ -
Create an App password with the label of "Catapult" and check off all Read permissions, with the exception of "Repositories", check up to Admin permissions. -
Place the App password at ~/secrets/configuration.yml["company"]["bitbucket_password"]
-
-
Add your newly created id_rsa.pub from ~/secrets/id_rsa.pub key in https://bitbucket.org/account/user/ `your-user-here`/ssh-keys/ named "Catapult"
-
-
GitHub sign-up and configuration -
Create an account at https://github.com -
Place the username (not the email address) that you used to sign up for GitHub at ~/secrets/configuration.yml["company"]["github_username"] -
Place the password of the account for GitHub at ~/secrets/configuration.yml["company"]["github_password"]
-
-
Go to your account then Settings, Developer settings, and Personal access tokens. -
Create a personal access token and name it Catapult. Enable repo, admin:public_key, and user permissions. -
Place the personal access token at ~/secrets/configuration.yml["company"]["github_personal_access_token"]
-
-
Add your newly created id_rsa.pub from ~/secrets/id_rsa.pub key in https://github.com/settings/ssh named "Catapult"
-
-
Sign up for an Atlassian account at https://my.atlassian.com/ -
Purchase the $10 Bamboo Server license from https://www.atlassian.com/purchase/product/bamboo -
It's now time to bring up your build server, please run vagrant up ~/secrets/configuration.yml["company"]["name"]-build -
The initial up will take some time, please be patient
-
-
Login to DigitalOcean to obtain the IP address of the virtual machine to access via URL -
Place your Bamboo base URL at ~/secrets/configuration.yml["company"]["bamboo_base_url"] , the format should be http://[digitalocean-ip-here]/
-
-
Once your Bamboo Server instance is accessible via URL, you will be prompted with a license prompt, enter your license. Select Express installation. -
You will next be prompted to enter the following information: -
Username (required) - root -
Password (required) - specify a complex password -
Confirm password (required) -
Full name (required) - use ~/secrets/configuration.yml["company"]["name"] -
Email - use ~/secrets/configuration.yml["company"]["email"]
-
-
Place your Bamboo username at ~/secrets/configuration.yml["company"]["bamboo_username"] -
Normally root for Bamboo Server
-
-
Place your Bamboo password at ~/secrets/configuration.yml["company"]["bamboo_password"] -
Allow anonymous users to trigger remote repository change detection by clicking the gear at the top right and going to Overview -
Next, under Security, go to Security settings and click the Edit button at the bottom -
Check the "Allow anonymous users to trigger remote repository change detection and Bamboo Specs detection" setting and click Save
-
-
Disable anonymous user access by clicking the gear at the top right and going to Overview -
Next, under Security, go to Global permissions and remove Access from Anonymous Users
-
-
Click Create > Create a new plan from the top navigation: -
Create Catapult Project and create BUILD Plan -
Project and build plan name -
Project > New Project -
Project name: Catapult -
Project key: CAT -
Plan name: BUILD -
Plan key: BUILD -
Plan description:
-
-
Link repository to new build plan -
Repository host: Other > None
-
-
-
Create Catapult Project and create TEST Plan -
Project and build plan name -
Project > New Project -
Project name: Catapult -
Project key: CAT -
Plan name: TEST -
Plan key: TEST -
Plan description:
-
-
Link repository to new build plan -
Repository host: Other > None
-
-
-
Create QC Plan -
Project and build plan name -
Project: Catapult -
Plan name: QC -
Plan key: QC -
Plan description:
-
-
Link repository to new build plan -
Repository host: Other > None
-
-
-
Create PROD Plan -
Project and build plan name -
Project: Catapult -
Plan name: PROD -
Plan key: PROD -
Plan description:
-
-
Link repository to new build plan -
Repository host: Other > None
-
-
-
Create WINTEST Plan -
Project and build plan name -
Project: Catapult -
Plan name: WINTEST -
Plan key: WINTEST -
Plan description:
-
-
Link repository to new build plan -
Repository host: Other > None
-
-
-
Create WINQC Plan -
Project and build plan name -
Project: Catapult -
Plan name: WINQC -
Plan key: WINQC -
Plan description:
-
-
Link repository to new build plan -
Repository host: Other > None
-
-
-
Create WINPROD Plan -
Project and build plan name -
Project: Catapult -
Plan name: WINPROD -
Plan key: WINPROD -
Plan description:
-
-
Link repository to new build plan -
Repository host: Other > None
-
-
-
-
CloudFlare sign-up and configuration -
Create a CloudFlare account at https://www.cloudflare.com -
Sign in to your new CloudFlare account -
Visit your My Account section at https://www.cloudflare.com/a/account/my-account and scroll down to your Global API Key and place the token value at ~/secrets/configuration.yml["company"]["cloudflare_api_key"] -
Place the email address of the email address that you used to sign up for Cloudflare at ~/secrets/configuration.yml["company"]["cloudflare_email"]
-
-
New Relic sign-up and configuration -
Create a New Relic account at http://newrelic.com/ -
[Free Stuff] Sign-up up for New Relic and get a Data Nerd shirt! http://newrelic.com/lp/datanerd -
[Free Stuff] Refer Catapult and get a New Relic hoodie! http://newrelic.com/referral
-
-
Sign in to your New Relic account -
Go to your Account Settings > Integrations > API keys. -
Generate and place your REST API key at ~/secrets/configuration.yml["company"]["newrelic_api_key"] -
Generate and place your Admin API key at ~/secrets/configuration.yml["company"]["newrelic_admin_api_key"] -
Go to your Account Settings > Account > Summary. -
Place your License key at ~/secrets/configuration.yml["company"]["newrelic_license_key"]
-
-
SendGrid sign-up and configuration -
Create a SendGrid account at https://sendgrid.com/ -
Sign in to your SendGrid account -
Go to Settings > API Keys. -
Generate an API key named "Catapult" and place at ~/secrets/configuration.yml["company"]["sendgrid_api_key"] -
Place the username "apikey" at ~/secrets/configuration.yml["company"]["sendgrid_username"] -
Place the API key at ~/secrets/configuration.yml["company"]["sendgrid_password"]
-
-
-
To verify all of the configurations that you just set, open your command line and change the directory into your fork of Catapult, then run vagrant status . Catapult will confirm the connection to all of the Services and inform you of any problems.
| |
|
|
|
|
|---|---|---|---|---|
| |
|
|
|
|
| |
|
|
|
|
-
Web Servers vagrant up ~/secrets/configuration.yml["company"]["name"]-dev-redhat vagrant up ~/secrets/configuration.yml["company"]["name"]-test-redhat vagrant up ~/secrets/configuration.yml["company"]["name"]-qc-redhat vagrant up ~/secrets/configuration.yml["company"]["name"]-production-redhat
-
Database Servers vagrant up ~/secrets/configuration.yml["company"]["name"]-dev-redhat-mysql vagrant up ~/secrets/configuration.yml["company"]["name"]-test-redhat-mysql vagrant up ~/secrets/configuration.yml["company"]["name"]-qc-redhat-mysql vagrant up ~/secrets/configuration.yml["company"]["name"]-production-redhat-mysql
-
Sign in to your new custom Bamboo instance ~/secrets/configuration.yml["company"]["bamboo_base_url"] -
Click Build > All build plans from the header: -
From the Build Dashboard and under the Catapult project: -
Configure Catapult Project BUILD Plan -
Click the edit icon for the BUILD plan -
From the Stages tab, select Default Job -
Remove all tasks that may have been added by default during initial setup -
Click Add task -
Search for Script Task and select it -
Interpreter: shell -
Script Location: Inline -
Script body: bash /catapult/provisioners/redhat/provision.sh "build" " https://github.com/ [your-name-here]/catapult" "~/secrets/configuration-user.yml["settings"]["gpg_key"]" "bamboo" -
Click Save
-
-
-
Configure Catapult Project TEST Plan -
Click the edit icon for the TEST plan -
From the Stages tab, select Default Job -
Remove all tasks that may have been added by default during initial setup -
Click Add task -
Search for SSH Task and select it -
Host: ~/secrets/configuration.yml["environments"]["test"]["servers"]["redhat"]["ip"] -
Username: root -
Authentication Type: Key without passphrase -
SSH Key: ~/secrets/id_rsa -
SSH command: bash /catapult/provisioners/redhat/provision.sh "test" " https://github.com/ [your-name-here]/catapult" "~/secrets/configuration-user.yml["settings"]["gpg_key"]" "apache" -
Click Save
-
-
Click Add task -
Search for SSH Task and select it -
Host: ~/secrets/configuration.yml["environments"]["test"]["servers"]["redhat_mysql"]["ip"] -
Username: root -
Authentication Type: Key without passphrase -
SSH Key: ~/secrets/id_rsa -
SSH command: bash /catapult/provisioners/redhat/provision.sh "test" " https://github.com/ [your-name-here]/catapult" "~/secrets/configuration-user.yml["settings"]["gpg_key"]" "mysql" -
Click Save
-
-
-
Configure Catapult Project QC Plan -
Click the edit icon for the QC plan -
From the Stages tab, select Default Job -
Remove all tasks that may have been added by default during initial setup -
Click Add task -
Search for SSH Task and select it -
Host: ~/secrets/configuration.yml["environments"]["qc"]["servers"]["redhat"]["ip"] -
Username: root -
Authentication Type: Key without passphrase -
SSH Key: ~/secrets/id_rsa -
SSH command: bash /catapult/provisioners/redhat/provision.sh "qc" " https://github.com/ [your-name-here]/catapult" "~/secrets/configuration-user.yml["settings"]["gpg_key"]" "apache" -
Click Save
-
-
Click Add task -
Search for SSH Task and select it -
Host: ~/secrets/configuration.yml["environments"]["qc"]["servers"]["redhat_mysql"]["ip"] -
Username: root -
Authentication Type: Key without passphrase -
SSH Key: ~/secrets/id_rsa -
SSH command: bash /catapult/provisioners/redhat/provision.sh "qc" " https://github.com/ [your-name-here]/catapult" "~/secrets/configuration-user.yml["settings"]["gpg_key"]" "mysql" -
Click Save
-
-
-
Configure Catapult Project PRODUCTION Plan -
Click the edit icon for the PRODUCTION plan -
From the Stages tab, select Default Job -
Remove all tasks that may have been added by default during initial setup -
Click Add task -
Search for SSH Task and select it -
Host: ~/secrets/configuration.yml["environments"]["production"]["servers"]["redhat"]["ip"] -
Username: root -
Authentication Type: Key without passphrase -
SSH Key: ~/secrets/id_rsa -
SSH command: bash /catapult/provisioners/redhat/provision.sh "production" " https://github.com/ [your-name-here]/catapult" "~/secrets/configuration-user.yml["settings"]["gpg_key"]" "apache" -
Click Save
-
-
Click Add task -
Search for SSH Task and select it -
Host: ~/secrets/configuration.yml["environments"]["production"]["servers"]["redhat_mysql"]["ip"] -
Username: root -
Authentication Type: Key without passphrase -
SSH Key: ~/secrets/id_rsa -
SSH command: bash /catapult/provisioners/redhat/provision.sh "production" " https://github.com/your-name-here/catapult " "~/secrets/configuration-user.yml["settings"]["gpg_key"]" "mysql" -
Click Save
-
-
-
Configure Catapult Project WINTEST Plan -
Click the edit icon for the WINTEST plan -
From the Stages tab, select Default Job -
Remove all tasks that may have been added by default during initial setup -
Click Add task -
Search for Script Task and select it -
Interpreter: shell -
Script Location: Inline -
Script body: python /catapult/provisioners/windows/provision.py "~/secrets/configuration.yml["environments"]["test"]["servers"]["windows"]["ip"]" "Administrator" "~/secrets/configuration.yml["environments"]["test"]["servers"]["windows"]["admin_password"]" "test" " https://github.com/ [your-name-here]/catapult" "~/secrets/configuration-user.yml["settings"]["gpg_key"]" "iis" -
Click Save
-
-
Click Add task -
Search for Script Task and select it -
Interpreter: shell -
Script Location: Inline -
Script body: python /catapult/provisioners/windows/provision.py "~/secrets/configuration.yml["environments"]["test"]["servers"]["windows_mssql"]["ip"]" "Administrator" "~/secrets/configuration.yml["environments"]["test"]["servers"]["windows_mssql"]["admin_password"]" "test" " https://github.com/ [your-name-here]/catapult" "~/secrets/configuration-user.yml["settings"]["gpg_key"]" "mssql" -
Click Save
-
-
-
Configure Catapult Project WINQC Plan -
Click the edit icon for the WINQC plan -
From the Stages tab, select Default Job -
Remove all tasks that may have been added by default during initial setup -
Click Add task -
Search for Script Task and select it -
Interpreter: shell -
Script Location: Inline -
Script body: python /catapult/provisioners/windows/provision.py "~/secrets/configuration.yml["environments"]["qc"]["servers"]["windows"]["ip"]" "Administrator" "~/secrets/configuration.yml["environments"]["qc"]["servers"]["windows"]["admin_password"]" "qc" " https://github.com/ [your-name-here]/catapult" "~/secrets/configuration-user.yml["settings"]["gpg_key"]" "iis" -
Click Save
-
-
Click Add task -
Search for Script Task and select it -
Interpreter: shell -
Script Location: Inline -
Script body: python /catapult/provisioners/windows/provision.py "~/secrets/configuration.yml["environments"]["qc"]["servers"]["windows_mssql"]["ip"]" "Administrator" "~/secrets/configuration.yml["environments"]["qc"]["servers"]["windows_mssql"]["admin_password"]" "qc" " https://github.com/ [your-name-here]/catapult" "~/secrets/configuration-user.yml["settings"]["gpg_key"]" "mssql" -
Click Save
-
-
-
Configure Catapult Project WINPROD Plan -
Click the edit icon for the WINPROD plan -
From the Stages tab, select Default Job -
Remove all tasks that may have been added by default during initial setup -
Click Add task -
Search for Script Task and select it -
Interpreter: shell -
Script Location: Inline -
Script body: python /catapult/provisioners/windows/provision.py "~/secrets/configuration.yml["environments"]["production"]["servers"]["windows"]["ip"]" "Administrator" "~/secrets/configuration.yml["environments"]["production"]["servers"]["windows"]["admin_password"]" "production" " https://github.com/ [your-name-here]/catapult" "~/secrets/configuration-user.yml["settings"]["gpg_key"]" "iis" -
Click Save
-
-
Click Add task -
Search for Script Task and select it -
Interpreter: shell -
Script Location: Inline -
Script body: python /catapult/provisioners/windows/provision.py "~/secrets/configuration.yml["environments"]["production"]["servers"]["windows_mssql"]["ip"]" "Administrator" "~/secrets/configuration.yml["environments"]["production"]["servers"]["windows_mssql"]["admin_password"]" "production" " https://github.com/ [your-name-here]/catapult" "~/secrets/configuration-user.yml["settings"]["gpg_key"]" "mssql" -
Click Save
-
-
-
| |
|
|
|
|
|---|---|---|---|---|
| |
|
|
|
|
| |
|
|
|
|
| |
|
|
|
|
| |
|
|
|
|
| |
|
|
|
|
| |
|
|
|
|
|---|---|---|---|---|
| |
|
|
|
|
| |
|
|
|
|
| |
|
|
|
|
| |
|
|
|
|
|---|---|---|---|---|
| |
|
|
|
|
| |
|
|
|
|
| |
|
|
|
|
name: -
required: yes -
Your company's name or your name
-
-
email: -
required: yes -
The primary contact email
-
-
timezone_redhat: -
required: yes -
Your company's timezone in tz database format -
See this list for a list of valid tz database format timezones
-
-
timezone_windows: -
required: yes -
Your company's timezone in Windows Standard Format -
See this list for a list of valid Windows Standard Format timezones
-
-
digitalocean_personal_access_token bitbucket_username bitbucket_password github_username github_password github_personal_access_token bamboo_base_url bamboo_username bamboo_password aws_access_key aws_secret_key bamboo_password cloudflare_api_key cloudflare_email newrelic_admin_api_key newrelic_api_key newrelic_license_key sendgrid_api_key sendgrid_username sendgrid_password
websites: apache: - domain: devopsgroup.io repo: git@github.com :devopsgroup-io/devopsgroup-io.git - domain: example.com repo: git@github.com :example-company/example.com.git
domain: -
required: yes -
example: domain: example.com -
example: domain: subdomain.example.com -
this root domain entry is the Production canonical domain name without www. -
a www. subdomain is created for you -
the key for all management orchestration of this website
-
-
one subdomain level is supported for this root domain entry ( subdomain.example.com ) -
manages DNS of LocalDev (via hosts file) and Test, QC, Production (via CloudFlare) dev.example.com , test.example.com , qc.example.com , example.com www.dev.example.com , www.test.example.com , www.qc.example.com , www.example.com
-
-
domain_tld_override: -
default: not set -
required: no -
example: domain_tld_override: mycompany.com -
a domain name under your name server authority to append to the top-level-domain (e.g. .com ) -
useful when you cannot or do not wish to host the Test/QC website at the domain
-
-
appends the domain_tld_override for Environments dev.example.com.mycompany.com , test.example.com.mycompany.com , qc.example.com.mycompany.com , example.com.mycompany.com www.dev.example.com.mycompany.com , www.test.example.com.mycompany.com , www.qc.example.com.mycompany.com , www.example.com.mycompany.com
-
PLEASE NOTE: When removing this option from a website with software: , you need to manually replace URLs in the database respective to the software_workflow: option. -
ie vagrant ssh mycompany.com-test-redhat-mysql wp-cli --allow-root --path="/var/www/repositories/apache/example.com/(webroot if applicable)" search-replace ":\/\/(www\.)? (dev\.|test\.)? (example\.com\.mycompany\.com)" "://example.com" --regex
-
-
-
configure_email: -
default: true -
required: no -
option: configure_email: false -
should be used for when there is an already configured email provider at this website's domain -
disables creating dns spf records for the website's dns zone -
disables configuring website software smtp settings
-
-
force_auth: -
default: not set -
required: no -
example: force_auth: letmein -
forces HTTP basic authentication in LocalDev, Test, QC, and Production (see force_auth_exclude ) letmein is both the username and password
-
-
force_auth_exclude: -
default: not set -
required: no -
dependency: force_auth: -
example: force_auth_exclude: ["production"] -
array of select environments ["dev","test","qc","production"] to exclude from the force_auth option
-
-
force_https: -
default: false -
required: no -
option: force_https: true -
rewrites all http traffic to https -
all dev. domains in LocalDev will have an unsigned certificate warning -
free certificates are created and managed for you compliments of CloudFlare (single-subdomain) and Let's Encrypt (multi-subdomain)
-
-
force_ip: -
default: not set -
example: force_ip: ["208.80.154.224"] -
an array of valid IPv4 or IPv6 addresses that denies all traffic except for traffic coming from the defined addresses -
option applies to LocalDev, Test, QC, and Production unless force_ip_exclude is defined -
can be used as an alternative to force_auth for when HTTP basic authentication cannot be used. e.g. Drupal 8 Basic Auth Module -
can be used in addition to force_auth for added security
-
-
force_ip_exclude: -
default: not set -
required: no -
dependency: force_ip: -
example: force_ip_exclude: ["production"] -
array of select environments ["dev","test","qc","production"] to exclude from the force_ip option
-
-
idle: -
default: false -
required: no -
option: idle: true -
used for websites that are not under active software development -
turns off all website operations in the dev and test environment, including git pulls and database refreshing -
turns off nightly database backups in the test (upstream software workflow) and production (downstream software workflow) environments, hosting provider snapshots should be used for backups
-
-
repo: -
required: yes -
example: repo: git@github.com :devopsgroup-io/devopsgroup-io.git -
the existing source code repository of your website (repo automatically created if none exists) -
GitHub and Bitbucket over SSH are supported, HTTPS is not supported
-
-
software: -
default: not set -
required: no -
description: manages many aspects of software respective to each environment for websites with supported software types -
php version -
git ignore file entries -
directory and file permissions -
database configuration file -
software file stores -
operations such as cron, garbage collection, and cache rebuilds -
performance configuration -
database migrations -
database backups and restores -
url references in database -
administrator account integrity
-
-
option: software: codeigniter2 -
option: software: codeigniter3 -
option: software: concrete58 -
option: software: drupal6 -
option: software: drupal7 -
option: software: drupal8 -
option: software: elgg1 -
option: software: expressionengine3 -
option: software: joomla3 -
option: software: laravel5 -
option: software: mediawiki1 -
option: software: moodle3 -
option: software: silverstripe3 -
option: software: suitecrm7 -
option: software: wordpress4 -
option: software: wordpress5 -
option: software: wordpress6 -
option: software: xenforo1 -
option: software: xenforo2 -
option: software: zendframework2
-
software_auto_update: -
default: false -
required: no -
dependency: software: -
option: software_auto_update: true -
manages software core and pluggable component (plugins, modules, etc.) updates to the latest compatible versions using the software's CLI tool or similar method -
updates only occur in the software_workflow environment -
not all software is supported, see Software Auto Updates
-
-
software_dbprefix: -
default: not set -
required: no -
dependency: software: -
example: software_dbprefix: wp_ -
the value that prefixes table names within the database -
PLEASE NOTE: table prefixes included in software distributions, such as WordPress' wp_ , must be specified if desired
-
-
-
software_dbtable_retain: -
default: not set -
required: no -
dependency: software: -
dependency: software_workflow: upstream -
example: software_dbtable_retain: ["comments","commentmeta"] -
array of tables, excluding the software_dbprefix: , to retain from the Production environment when software_workflow: is set to upstream -
this will backup and commit a YYYYMMDD_software_dbtable_retain.sql file to ~/_sql -
this is useful in a content-regulated situation when moving a database upstream is necessary, however, needing to retain a table that includes, for example, a table of contact form submissions
-
-
software_workflow: -
required: yes -
dependency: software: -
option: software_workflow: downstream -
this option is useful for maintaining a website -
specifies the Production environment and the master branch as the source and automated save point for software files and database -
the master branch is automatically merged into the develop branch for convenience
-
-
option: software_workflow: upstream -
this option is useful for launching a new website or maintaining a regulated website -
specifies the Test environment and the develop branch as the source and automated save point for software files and database -
REMINDER: websites with this option will have their Production instance overwritten with software files and database from the master branch - see Release Management
-
-
webroot: -
default: / -
required: no -
example: webroot: www/ -
if the webroot differs from the repo root, specify it here -
must include the trailing slash
-
-
| |
|
|
|---|---|---|
|
|
|
|
|
|
|
|
|
|
|
|
|
|
|
|
|
|
|
|
|
|
|
|
|
|
|
|
|
|
|
|
|
|
|
|
|
|
|
|
|
|
|
|
|
|
|
|
|
|
|
|
|
|
|
|
|
|
|
|
|
|
|
| |
|
|---|---|
|
|
|
|
|
|
|
|
|
|
|
|
|
|
|
|
|
|
|
|
|
|
|
|
|
|
|
|
|
|
|
|
|
|
|
|
|
|
|
|
|
|
-
The files in ~/_append/ will be appended to files in ~/{webroot}/ -
The append filenames must match the filenames that you would like to append. -
The append files must only contain the lines of content that you would like to append. -
Please note that only files that allow for hash style comments (i.e. # THIS IS A COMMENT ) are supported. -
Please note that only files that are in the root of the website's webroot are supported.
-
Chrome 1 -
Internet Explorer 7 / Windows Vista -
Internet Explorer 8 / Windows 7 -
Firefox 1 -
Safari 1
| |
|
|
|
|---|---|---|---|
| |
|
|
|
| |
|
|
|
| |
|
|
|
| |
|
|
|
| |
|
|
|
| |
|
|
|
| |
|
|
|
| |
|
|
|
| |
|
|
|
| |
|
|
|
| |
|
|
|
| |
|
|
|
-
A bundled file that contains the Root Certificate Authority (CA) certificate and any Intermediate Certificate Authority certificates -
CA root and intermediate certificate files can be combined like this cat COMODORSADomainValidationSecureServerCA.crt COMODORSAAddTrustCA.crt AddTrustExternalCARoot.crt >> example_com.ca-bundle
-
-
The certificate file -
The Certificate Signing Request (CSR) including the CSR file and private key file -
Generated with openssl req -new -newkey rsa:2048 -nodes -keyout server.key -out server.csr -
Your Certificate Signing Request file -
Your private key file
-
reporoot/_cert/example_com/example_com.ca-bundle reporoot/_cert/example_com/example_com.crt reporoot/_cert/example_com/server.csr reporoot/_cert/example_com/server.key
reporoot/_cert/dev_example_com/dev_example_com.ca-bundle reporoot/_cert/dev_example_com/dev_example_com.crt reporoot/_cert/dev_example_com/server.csr reporoot/_cert/dev_example_com/server.key
| |
|
|
|---|---|---|
|
|
|
|
|
|
|
|
|
|
|
|
|
|
|
|
|
|
|
||
|
||
|
||
|
||
|
||
|
||
|
|
|
|
||
|
|
|
|
|
|
|
|
|
|
||
|
||
|
| |
|
|
|
|---|---|---|---|
| |
|
|
|
-
SMTP host: smtp.sendgrid.net -
SMTP port: five hundred and eighty-seven -
Encryption: TLS -
Authentication: yes -
Username: ~/secrets/configuration.yml["company"]["sendgrid_username"] -
Password: ~/secrets/configuration.yml["company"]["sendgrid_password"]
-
SPF DNS record: If your website's domain is configured to use Cloudflare, Catapult will automatically configure an SPF record for each environment. -
TLS message encryption: If the receiving mail server supports it, the message will be TLS encrypted.
-
With SendGrid: Catapult automatically configures SendGrid to forward bounces to your ~/secrets/configuration.yml["company"]["email"] to clear hard bounces every 5 days and soft bounces every 3 days. -
Without SendGrid: Postfix will retry sending every hour for five days. Catapult cron looks for bounces and emails them to your ~/secrets/configuration.yml["company"]["email"] daily.
-
Maximum request body size excluding the size of any files being transported in the request ( SecRequestBodyNoFilesLimit ): 1 MB -
Limits the application/x-www-form-urlencoded Content-Type
-
-
Maximum request body size ( SecRequestBodyLimit ): 64 MB -
Limits the multi-part Content-Type
-
-
Maximum size of an uploaded file ( upload_max_filesize ): 16 MB -
Maximum size of post data allowed ( post_max_size ): 64 MB
-
Databases are dumped once per day to the ~/_sql folder and restored, dependent on the environment and software_workflow setting per website - see Release Management for details. -
Leverage Catapult's workflow model (configured by software_workflow ) to trigger a database refresh. From the develop branch, commit a deletion of today's database backup lock file from the ~/_sql folder.
-
Download and install Oracle SQL Developer , some platforms require the Java SE Development Kit -
Install third-party JDBC drivers : Oracle SQL Developer uses JDBC, via a .jar file, to connect to different database types. To install a new JDBC connector, download the respective .jar file then from Oracle SQL Developer > Preferences > Database > Third Party JDBC Drivers, click Add Entry. four -
MySQL http://dev.mysql.com/downloads/connector/j/5.0.html -
For convenience, you may also use ~/catapult/installers/mysql-connector-java-5.0.8-bin.jar
-
-
MSSQL https://sourceforge.net/projects/jtds/files/jtds/ -
For convenience, you may also use ~/catapult/installers/jtds-1.3.1.jar
-
-
-
Connecting to: LocalDev -
The firewall allows direct connection to the database server. -
From Oracle SQL Developer > View > Connections, add a New Connection with the respective environment's mysql user values in ~/secrets/configuration.yml .
-
-
-
Connecting to: Test, QC, Production -
The firewall does not allow a direct mysql connection to the database servers. -
From Oracle SQL Developer > View > SSH, add a New SSH Host in Oracle SQL Developer with the respective environment's mysql server host public IP address, root username with key file at ~/secrets/id_rsa . -
Create a New Local Port Forward with 127.0.0.1 as the IP address and port 3306.
-
-
From Oracle SQL Developer > View > Connections, add a New Connection with the respective environment's mysql user values in ~/secrets/configuration.yml . -
The hostname will be localhost since we are forwarding the port through our local SSH tunnel.
-
-
-
-
What is the organizational risk? -
High = 1 or Low = 0
-
-
How many users does this affect? -
Many = 1 or Few = 0
-
-
Is there a workaround? -
No = 1 or Yes = 0
-
-
What is the user impact? -
High = 1 or Low = 0
-
-
0=Tolerate -
1=Trivial -
2=Minor -
3=Major -
4=Critical
software_workflow: downstream -
Code -
In ~/configuration.yml , temporarily set the environments -> dev -> branch key to branch: master , and do not commit the change -
Provision any related LocalDev servers -
Develop, test, then commit any changes directly to the master branch -
Run the Production Bamboo build and verify the release -
Create a pull request and merge the master branch into the develop branch -
Set the environments -> dev -> branch key back to branch: develop -
Provision any related LocalDev servers
-
-
Database -
Login to the Production website and make the change -
(any database change that is beyond the direct capability of the software should not be taken out as a production hotfix)
-
-
-
software_workflow: upstream -
Code -
In ~/configuration.yml , temporarily set the environments -> dev -> branch key to branch: master , and do not commit the change -
Provision any related LocalDev servers -
Develop, test, then commit any changes directly to the master branch -
Run the Production build and verify the release -
Create a pull request and merge the master branch into the develop branch -
Set the environments -> dev -> branch key back to branch: develop -
Provision any related LocalDev servers
-
-
Database -
Login to the Production and Test website and make the change -
(any database change that is beyond the direct capability of logging into the software and safely making the change, should not be taken out as a production hotfix)
-
-
From LocalDev and the develop branch of the website's repository, commit a deletion of today's (if exists) SQL dump file from within the ~/sql folder -
(this ensures there is a known committed SQL dump of your change to the develop branch for when this branch is merged upstream)
-
-
From LocalDev, temporarily checkout the master branch of the website's repository, make your change in the most recent SQL dump file from within the ~/sql folder -
(this ensures that during the next Production build your change is not overwritten)
-
-
-
| |
|
|---|---|
| |
|
| |
|
| |
|
| |
|
-
Operating System and server software updates -
Website software updates -
Website repository changesets -
Website software database restores -
Website software database migrations -
Website software database backups
-
Red Hat - 3:05 AM -
Windows - 2:00 AM
-
Updating Operating System and server software -
Rotating logs -
Discovering mail that has failed to send
-
Red Hat - Sunday 3:25 AM -
Windows - Sunday 3:00 AM
-
Security Preventive Controls -
Security Detective Controls -
Security Corrective Controls -
Auto-rewew HTTPS certificate -
Git garbage collection for website repositories -
Performing database maintenance
-
Red Hat - a kernel update is staged -
Windows - Microsoft Update indicates a restart is required
-
LocalDev is rebuildable by running vagrant destroy and then vagrant up for the respective virtual machine. -
Test, QC, and Production are rebuildable by running vagrant rebuild for the respective virtual machine - this is necessary (rather than a destroy and up) to retain the IP addresses of the machine.
software_workflow: upstream -
Files -
Reverse the offending merge commit from the master branch and run the Production deployment.
-
-
Database -
Reverse the offending merge commit from the master branch and run the Production deployment. -
Note: The Production database is overwritten and restored from the latest sql dump file from Test in the ~/_sql folder.
-
-
software_workflow: downstream -
Files -
Reverse the offending merge commit from the master branch and run the Production deployment.
-
-
Database -
Reverse the offending database dump auto-commit from the develop branch and manually restore the Production database from the desired sql dump file in the ~/_sql folder. -
Note: The Production database is dumped once per day when the production build is run.
-
-
-
*DDoS protection -
*Bad browser -
*Bad IP from Project Honeypot and Cloudflare's Threat Score list
-
Hardened kernel and network interface configuration -
Hardened SSH configuration including key-only authentication -
Strict firewall ruleset -
Automatic weekly kernel updates
-
OWASP ModSecurity Core Rule Set (CRS) Apache rules -
Mozilla OpSec strict HTTPS protocol and cipher suite -
OWASP Secure Headers Project recommended HTTP response headers -
Automatic hourly application updates
-
Strict directory and file permissions -
Automatic software updates during a build
-
ARPwatch (Address Resolution Protocol) notifies of changed MAC/IP pairings -
Fail2Ban filters for sshd, sshd-ddos, and apache-botsearch -
SysStat collects and stores system performance and usage activity -
Weekly report of 404s and error keywords targeted at the server and virtual hosts
-
Weekly ClamAV antivirus scan of website files
-
Privacy by design -
Right to access -
Right to be forgotten -
Data portability -
Breach notification
| |
|
|
|
|
|---|---|---|---|---|
| |
|
|
|
|
| |
|
|
||
| |
|
|
|
|
| |
|
|||
| |
|
|
| |
|
|
|
|---|---|---|---|
| |
|
|
|
| |
|
|
|
| |
|
|
|
| |
|
|
|
| |
|
|
-
HTTP Content-Encoding headers are set for a defined list of files, this will compress the file sent from the server to the client using gzip. This saves network bandwidth and total time for the client to download the file. -
Aggregating CSS and JavaScript files is enabled for the website's software type if available.
-
Zend OPcache is enabled for faster PHP execution through opcode caching and optimization. -
Page caching is enabled for the website's software type if available. -
HTTP Cache-Control headers are set to expire browser-cached files after a default of 7 days; longer for specific file types. -
HTTP ETag headers are set for all files, the ETag is a unique value based on the file modified time and size in bytes. If the ETag value is unchanged then a cached version is served if available. This saves network bandwidth.
-
If your website's name servers are set to Cloudflare, you will take advantage of files being cached across their global network, bringing it closer to visitors from every region.
-
Use a development task automation tool, like Gulp to perform the following: -
Execute <script> tags asynchronously -
Note that asynchronous scripts are not guaranteed to execute in specified order
-
-
Execute <script> tags after the document has been parsed with defer -
Note this is the same as placing script tags just before the </body> tag
-
-
Use CSS sprites to reduce the number of HTTP requests -
Take advantage of resource prioritization using rel="prefetch" -
Take advantage of cross-origin performance gains for external target="_blank" links, use rel="noopener" -
Write PHP the right way -
Practice self-documenting code
-
-
Write efficient PHP
* `vagrant up ~/secrets/configuration.yml["company"]["name"]-dev-redhat1` * `vagrant up ~/secrets/configuration.yml["company"]["name"]-test-redhat1` * `vagrant up ~/secrets/configuration.yml["company"]["name"]-qc-redhat1` * `vagrant up ~/secrets/configuration.yml["company"]["name"]-production-redhat1`
-
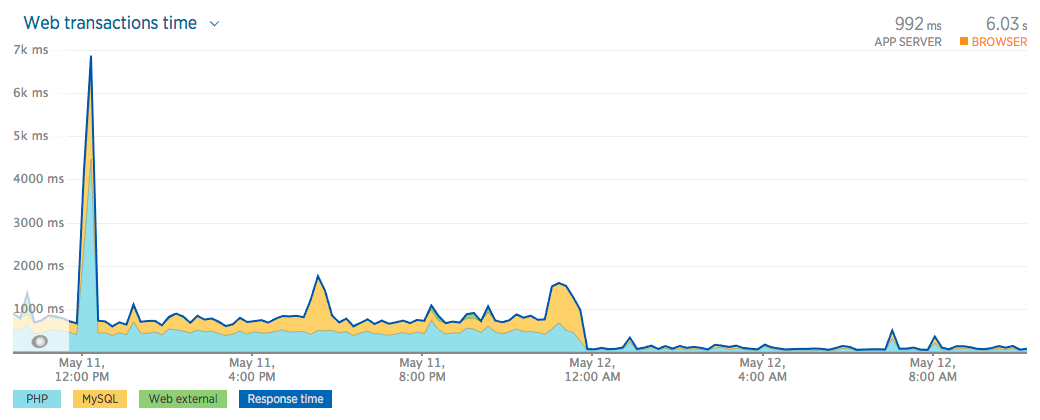
Performance testing -
Definition : Testing for the time it takes for a client to request a web page from the server. -
Why : Enables us to see real-world request times for our website. -
How to improve : Please reference the Performance section and its many optimization recommendations.
-
-
Capacity testing -
Definition : Testing many concurrent requests at a time to uncover when performance begins to degrade. -
Why : Enables us to see real-world capacity limits for our website's unique resource fingerprint. -
How to improve : Please reference the Capacity section and its many optimization recommendations.
-
| |
|
|
|
|---|---|---|---|
| |
|
|
|
| |
|
|
|
| |
|
|
|
| |
|
|
|
ab -l -r -n 1000 -c 100 -H "Accept-Encoding: gzip, deflate" http://test.drupal7.devopsgroup.io/
| |
|
|
|
|---|---|---|---|
| |
|
|
|
| |
|
|
|
| |
|
|
|
| |
|
|
|
ab -l -r -n 100 -c 10 -H "Accept-Encoding: gzip, deflate" http://test.drupal7.devopsgroup.io/
Percentage of the requests served within a certain time (ms) 50% 19 66% 21 75% 24 80% 27 90% 34 95% 3968 98% 6127 99% 7227 100% 7325 (longest request)
-
GPG Passphrase -
Disable all Bamboo build plans -
Generate a new GPG passphrase, as described in the Instance Setup , and place it at ~/secrets/configuration-user.yml["settings"]["gpg_key"] -
Encrypt the file ~secrets/configuration.yml with the new GPG passphrase: gpg --verbose --batch --yes --passphrase "[insert newly generated passphrase here]" --output secrets/configuration.yml.gpg --armor --cipher-algo AES256 --symmetric secrets/configuration.yml -
Encrypt the file ~secrets/id_rsa with the new GPG passphrase: gpg --verbose --batch --yes --passphrase "[insert newly generated passphrase here]" --output secrets/id_rsa.gpg --armor --cipher-algo AES256 --symmetric secrets/id_rsa -
Encrypt the file ~secrets/secrets/id_rsa.pub with the new GPG passphrase: gpg --verbose --batch --yes --passphrase "[insert newly generated passphrase here]" --output secrets/id_rsa.pub.gpg --armor --cipher-algo AES256 --symmetric secrets/id_rsa.pub -
Commit the updated files to the develop branch, then ensure the TEST Bamboo build plan's jobs have the updated GPG passphrase, and run the build for confirmation. -
Create and merge a pull request from develop into the release branch, then ensure the QC Bamboo build plan's jobs have the updated GPG passphrase, and run the build for confirmation. -
Create and merge a pull request from release into the master branch, then ensure the PROD Bamboo build plan's jobs have the updated GPG passphrase, and run the build for confirmation.
-
-
Bamboo Server -
Login to the Bamboo Server and change the password -
With GPG Edit Mode enabled, update ~/secrets/configuration.yml with the new credential and commit
-
-
DigitalOcean -
Login to DigitalOcean and generate a new personal access token and delete the old -
With GPG Edit Mode enabled, update ~/secrets/configuration.yml with the new credential and commit
-
-
Bitbucket -
Login to Bitbucket and change the password -
With GPG Edit Mode enabled, update ~/secrets/configuration.yml with the new credential and commit
-
-
GitHub -
Login to GitHub and change the password, generate a new personal access token and delete the old -
With GPG Edit Mode enabled, update ~/secrets/configuration.yml with the new credential and commit
-
-
Apple Silicon (M1 and M2 chips) -
When using Catapult with a Mac computer with Apple silicon , you will need to set ~/secrets/configuration-user.yml["settings"]["provider_dev"] to vmware_fusion
-
-
Vagrant -
When upgrading Vagrant you may run into errors - the most common issue is mismatched plugins, running this command has a good chance of success sudo rm -Rf ~/.vagrant.d/gems/ && sudo rm ~/.vagrant.d/plugins.json
-
-
Submit a pull request -
Report an issue -
Provide feedback on open issues -
Improve documentation in the README -
Share your experiences with Catapult
-
MAJOR version when you make incompatible API changes, -
MINOR version when you add functionality in a backwards-compatible manner, and -
PATCH version when you make backward-compatible bug fixes.
-
[06-03-2016] New Relic creates a request on Catapult's behalf for a free entry point for the New Relic Synthetics API -
[01-28-2016] Pantheon provides feedback -
[01-22-2016] New Relic provides private beta access to their Synthetics API alongside Breather, Carfax, Ring Central, Rackspace, and IBM.
-
Spring 2016 [04-08-2016] Drupaldelphia : DevOps Discipline: Detailed and Complete
-
Technical.ly Philly 12k+ technologists -
Tech in Motion Philly 7k+ technologists -
Philadelphia WordPress Meetup Group 2.5k+ technologists -
Philly DevOps 3k+ technologists -
Greater Philadelphia Drupal Meetup Group .75k+ technologists
-
Atlassian. Comparing Workflows. https://www.atlassian.com/git/tutorials/comparing-workflows/gitflow-workflow . Accessed February 15, 2016. -
Pantheon. Load and Performance Testing: Before You Begin. https://pantheon.io/docs/articles/load-and-performance-testing/ . Accessed February 20, 2016. -
Acquia. Acquia Dev Desktop. https://www.acquia.com/products-services/dev-desktop . Accessed February 20, 2016. -
Oracle Technology Network. Oracle SQL Developer Migrations: Getting Started. http://www.oracle.com/technetwork/database/migration/omwb-getstarted-093461.html#conf . Accessed March 14, 2016.